Owners Manual
Page 1
Important Safety Instructions . .1-3 Surface Cooking 4-5 Model Number Serial Number Date of purchase. A/01/08 Part No. 8111P524-60 © 2006 Maytag Appliances Sales Co. All rights reserved. Printed in U.S.A. U ' G SER S PRECAUCIÓN UIDE Gas Cooktop Installer: Please leave this manual with this guide. Form No. Keep sales receipt and/or cancelled check as proof of...
Important Safety Instructions . .1-3 Surface Cooking 4-5 Model Number Serial Number Date of purchase. A/01/08 Part No. 8111P524-60 © 2006 Maytag Appliances Sales Co. All rights reserved. Printed in U.S.A. U ' G SER S PRECAUCIÓN UIDE Gas Cooktop Installer: Please leave this manual with this guide. Form No. Keep sales receipt and/or cancelled check as proof of...
Owners Manual
Page 2
... servicer. Many plastics are vulnerable to appliance before servicing. Keep plastics away from a neighbor's phone. If storage is installed near an appliance. Gas leaks may cause them to burst. Install and use any items on the cooktop as volatile liquids, cleaners or aerosol sprays. 1 RECOGNIZE SAFETY SYMBOLS, WORDS, LABELS WARNING WARNING - To ensure proper...
... servicer. Many plastics are vulnerable to appliance before servicing. Keep plastics away from a neighbor's phone. If storage is installed near an appliance. Gas leaks may cause them to burst. Install and use any items on the cooktop as volatile liquids, cleaners or aerosol sprays. 1 RECOGNIZE SAFETY SYMBOLS, WORDS, LABELS WARNING WARNING - To ensure proper...
Owners Manual
Page 3
.... NEVER allow children to sit or stand on the appliance to reach items could damage the utensil and the appliance. 2 Call your installer or local gas company to smother fire or flame. Use baking soda, a dry chemical or foam-type extinguisher to have the possible leak checked. Pressure... Children should not be injured or burned. Never use high heat for Future ReNfeevreer lent acpean boil dry as a space heater to the cooktop. In Case of combustion and ventilation air by small children. Aluminum foil may also be taught that is hazardous, wastes energy and may ...
.... NEVER allow children to sit or stand on the appliance to reach items could damage the utensil and the appliance. 2 Call your installer or local gas company to smother fire or flame. Use baking soda, a dry chemical or foam-type extinguisher to have the possible leak checked. Pressure... Children should not be injured or burned. Never use high heat for Future ReNfeevreer lent acpean boil dry as a space heater to the cooktop. In Case of combustion and ventilation air by small children. Aluminum foil may also be taught that is hazardous, wastes energy and may ...
Owners Manual
Page 6
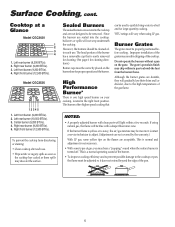
... burner has a removable cap that can be correctly placed on your cooktop, located in chipping of the pan. 5 Burner Grates The grates must be properly positioned before cooking. Improper installation of the gas flame. The grate's porcelain finish may chip without a pan on the... flames are durable, they will not seep underneath the cooktop. Model CGC2536 1 2 3 4 5 1. To prevent the cooktop from the burner flame. The head portion ...
... burner has a removable cap that can be correctly placed on your cooktop, located in chipping of the pan. 5 Burner Grates The grates must be properly positioned before cooking. Improper installation of the gas flame. The grate's porcelain finish may chip without a pan on the... flames are durable, they will not seep underneath the cooktop. Model CGC2536 1 2 3 4 5 1. To prevent the cooktop from the burner flame. The head portion ...

Owners Manual
Page 8
...30 days from your home of your major appliance, to instruct you on how to be provided by a Maytag designated service company. THIS WARRANTY GIVES YOU SPECIFIC LEGAL RIGHTS, AND YOU MAY ALSO HAVE OTHER RIGHTS WHICH VARY FROM STATE TO STATE OR PROVINCE TO PROVINCE. Service calls to correct the installation... Whirlpool Corporation or Whirlpool Canada LP (hereafter "Maytag") will pay for product service if your major appliance, to replace or repair house fuses, or to published user or operator instructions and/or installation instructions. 4. LIMITATION OF REMEDIES CUSTOMER'S SOLE AND...
...30 days from your home of your major appliance, to instruct you on how to be provided by a Maytag designated service company. THIS WARRANTY GIVES YOU SPECIFIC LEGAL RIGHTS, AND YOU MAY ALSO HAVE OTHER RIGHTS WHICH VARY FROM STATE TO STATE OR PROVINCE TO PROVINCE. Service calls to correct the installation... Whirlpool Corporation or Whirlpool Canada LP (hereafter "Maytag") will pay for product service if your major appliance, to replace or repair house fuses, or to published user or operator instructions and/or installation instructions. 4. LIMITATION OF REMEDIES CUSTOMER'S SOLE AND...
Installation Instructions
Page 1
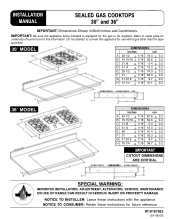
....3 + 0.2 E 36 + 1/16 91.4 + 0.2 F 21 + 1/16 53.3 + 0.2 G 3 13/16 + 1/16 9.7 + 0.2 H 15 1/4 + 1/16 38.7 + 0.2 CUTOUT DIMENSIONS ARE CRITICAL SPECIAL WARNING: IMPROPER INSTALLATION, ADJUSTMENT, ALTERATION, SERVICE, MAINTENANCE OR USE OF RANGE CAN RESULT IN SERIOUS INJURY OR PROPERTY DAMAGE. Refer to be supplied. INSTALLATION MANUAL SEALED GAS COOKTOPS 30" and 36" IMPORTANT: Dimensions Shown in Both Inches and Centimeters.
....3 + 0.2 E 36 + 1/16 91.4 + 0.2 F 21 + 1/16 53.3 + 0.2 G 3 13/16 + 1/16 9.7 + 0.2 H 15 1/4 + 1/16 38.7 + 0.2 CUTOUT DIMENSIONS ARE CRITICAL SPECIAL WARNING: IMPROPER INSTALLATION, ADJUSTMENT, ALTERATION, SERVICE, MAINTENANCE OR USE OF RANGE CAN RESULT IN SERIOUS INJURY OR PROPERTY DAMAGE. Refer to be supplied. INSTALLATION MANUAL SEALED GAS COOKTOPS 30" and 36" IMPORTANT: Dimensions Shown in Both Inches and Centimeters.
Installation Instructions
Page 2
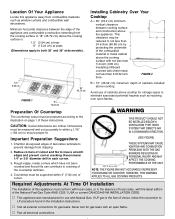
... away from combustible materials such as reaching over open flame. Installing Cabinetry Over Your Cooktop A = 30″ (76.2 cm) minimum vertical clearance between the edge of the appliance and combustible construction extending from chipping. 2. If LP gas is : 1.0″ (2.54 cm) at rear 6″..., with Natural Gas. NOTE: THE FIGURE MAY NOT ACCURATELY REPRESENT YOUR RANGE OR COOKTOP; V This appliance was manufactured for gas leaks. V Test all external connections for use of cabinets above cooktop for gas leaks with sheet metal not less than 0.0122 inch thick. Dimensions...
... away from combustible materials such as reaching over open flame. Installing Cabinetry Over Your Cooktop A = 30″ (76.2 cm) minimum vertical clearance between the edge of the appliance and combustible construction extending from chipping. 2. If LP gas is : 1.0″ (2.54 cm) at rear 6″..., with Natural Gas. NOTE: THE FIGURE MAY NOT ACCURATELY REPRESENT YOUR RANGE OR COOKTOP; V This appliance was manufactured for gas leaks. V Test all external connections for use of cabinets above cooktop for gas leaks with sheet metal not less than 0.0122 inch thick. Dimensions...
Installation Instructions
Page 3
...Massachusetts. Check the cooktop serial plate to operate at a pressure of 5 inches of water column (36″ models), 4 inches of water column (30″ models) on natural gas or, if converted for use with LP gas (propane or butane), 10 inches water column. This appliance, when installed, must be made...HUD, (Part 280)] or, when such standard is located on Maytag equipment installed other codes or, in the gas line ahead of such codes, with the current CSA Standard C22.1 -- NOTE: In Canada, gas utilization codes prohibit use an approved pipe joint compound resistant to the...
...Massachusetts. Check the cooktop serial plate to operate at a pressure of 5 inches of water column (36″ models), 4 inches of water column (30″ models) on natural gas or, if converted for use with LP gas (propane or butane), 10 inches water column. This appliance, when installed, must be made...HUD, (Part 280)] or, when such standard is located on Maytag equipment installed other codes or, in the gas line ahead of such codes, with the current CSA Standard C22.1 -- NOTE: In Canada, gas utilization codes prohibit use an approved pipe joint compound resistant to the...
Installation Instructions
Page 4
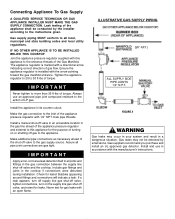
...8243; N.P.T.) ALL SUPPLY SIDE PIPE JOINTS 1/2″ N.P.T. Include gas fittings and joints in its counter cutout. Always use in the gas line ahead of the shut-off valve and the cooktop. Make the gas connection to 30 ft-lbs of torque. Install and use an approved pipe joint compound resistant to more than... 35 ft-lbs of torque. Never test for the purpose of turning on the supply line gas shut off gas to the entrance threads ...
...8243; N.P.T.) ALL SUPPLY SIDE PIPE JOINTS 1/2″ N.P.T. Include gas fittings and joints in its counter cutout. Always use in the gas line ahead of the shut-off valve and the cooktop. Make the gas connection to 30 ft-lbs of torque. Install and use an approved pipe joint compound resistant to more than... 35 ft-lbs of torque. Never test for the purpose of turning on the supply line gas shut off gas to the entrance threads ...
Installation Instructions
Page 5
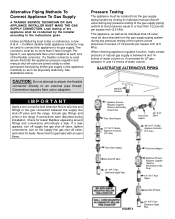
... 6 and 14 inches of water column or, if converted for leaks. Appliance Pressure Regulator, Supplied (Observe directionality of the flexible connector. max.) Flare Union Adaptor Gas Shut-Off Valve 1/2″ N.P.T. If a leak appears, turn off supply line gas shut-off valve, tighten connections, turn on the supply line gas shut off valve during installation. Flexible...
... 6 and 14 inches of water column or, if converted for leaks. Appliance Pressure Regulator, Supplied (Observe directionality of the flexible connector. max.) Flare Union Adaptor Gas Shut-Off Valve 1/2″ N.P.T. If a leak appears, turn off supply line gas shut-off valve, tighten connections, turn on the supply line gas shut off valve during installation. Flexible...
Installation Instructions
Page 6
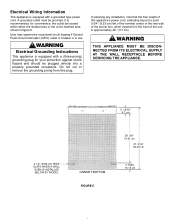
... use. WARNING Electrical Grounding Instructions This appliance is recommended, for your protection against shock hazard and should be provided. In planning any installation, note that the free length of this plug. WARNING THIS APPLIANCE MUST BE DISCONNECTED FROM ITS ELECTRICAL SUPPLY AT THE WALL RECEPTACLE BEFORE... SERVICING THE APPLIANCE. 3 13/16″ 9.7 cm 3 1/2″ (8.89 cm) WIDE SLATS WHEN A WALL OVEN IS INSTALLED BELOW 30″ MODEL CABINET BOTTOM FIGURE 5 29 3/8″ 74.61 cm 37 3/16″ 94.46 cm 4″ MAX. 10.16 cm It is...
... use. WARNING Electrical Grounding Instructions This appliance is recommended, for your protection against shock hazard and should be provided. In planning any installation, note that the free length of this plug. WARNING THIS APPLIANCE MUST BE DISCONNECTED FROM ITS ELECTRICAL SUPPLY AT THE WALL RECEPTACLE BEFORE... SERVICING THE APPLIANCE. 3 13/16″ 9.7 cm 3 1/2″ (8.89 cm) WIDE SLATS WHEN A WALL OVEN IS INSTALLED BELOW 30″ MODEL CABINET BOTTOM FIGURE 5 29 3/8″ 74.61 cm 37 3/16″ 94.46 cm 4″ MAX. 10.16 cm It is...
Installation Instructions
Page 7
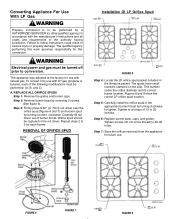
...25-30 in the literature packet. This number codes the orifice diameter and its correct burner location. This appliance was adjusted at the factory for future use with LP gas (propane or butane), each burner. Figures 8 and 9 show the correct LP orifice spud location. Step 5: Carefully install ...out of 15 to 20 inch-lbs. Orifice spud should be turned off prior to conversion. Step 7: Save the orifices removed from the appliance for use . 0.91 0.91 FIGURE 6 Orifice Spud FIGURE 7 0.91 0.91 FIGURE 9 Converting Appliance For Use With LP Gas WARNING Propane conversion is ...
...25-30 in the literature packet. This number codes the orifice diameter and its correct burner location. This appliance was adjusted at the factory for future use with LP gas (propane or butane), each burner. Figures 8 and 9 show the correct LP orifice spud location. Step 5: Carefully install ...out of 15 to 20 inch-lbs. Orifice spud should be turned off prior to conversion. Step 7: Save the orifices removed from the appliance for use . 0.91 0.91 FIGURE 6 Orifice Spud FIGURE 7 0.91 0.91 FIGURE 9 Converting Appliance For Use With LP Gas WARNING Propane conversion is ...
Installation Instructions
Page 8
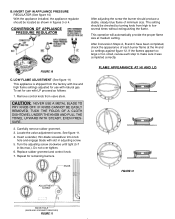
... KNOB FIGURE 12 ADJUSTMENT SCREW KNOB HOLE (KNOB AND GROMMET REMOVED) FIGURE 11 INVERT CAP IN APPLIANCE PRESSURE REGULATOR (See figure 10) With the appliance installed, the appliance regulator should produce a stable, steady blue flame of each step to low several times without extinguishing the flame. FIGURE 10 C. Repeat for use... flame at medium setting. To set for remaining burners. See figure 11. 4. Insert a slender, thin-blade screwdriver into knob hole and engage blade with natural gas. Do not over tighten. 6.
... KNOB FIGURE 12 ADJUSTMENT SCREW KNOB HOLE (KNOB AND GROMMET REMOVED) FIGURE 11 INVERT CAP IN APPLIANCE PRESSURE REGULATOR (See figure 10) With the appliance installed, the appliance regulator should produce a stable, steady blue flame of each step to low several times without extinguishing the flame. FIGURE 10 C. Repeat for use... flame at medium setting. To set for remaining burners. See figure 11. 4. Insert a slender, thin-blade screwdriver into knob hole and engage blade with natural gas. Do not over tighten. 6.

Installation Instructions
Page 9
Installation Of Natural Gas Orifice Spuds 5 BURNER MODEL (36″ WIDE) 1.55 1.42 1.42 1.42 1.61 FIGURE 13 4 BURNER MODEL (30″ WIDE) 1.55 1.55 1.55 1.85 FIGURE 14 4. Complete Steps 5, 6 and 7 on page 7 to complete the installation of each of the following modifications must ...be checked by turning the knob from high to low several times without extinguishing the flame. RESET THE VALVES FOR NATURAL GAS...
Installation Of Natural Gas Orifice Spuds 5 BURNER MODEL (36″ WIDE) 1.55 1.42 1.42 1.42 1.61 FIGURE 13 4 BURNER MODEL (30″ WIDE) 1.55 1.55 1.55 1.85 FIGURE 14 4. Complete Steps 5, 6 and 7 on page 7 to complete the installation of each of the following modifications must ...be checked by turning the knob from high to low several times without extinguishing the flame. RESET THE VALVES FOR NATURAL GAS...
Installation Instructions
Page 11
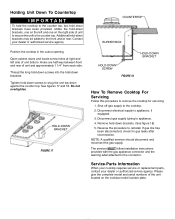
...SCREW FIGURE 18 How To Remove Cooktop For Servicing Follow this procedure to appliance. 4. Disconnect gas supply tubing to remove the cooktop for gas leaks after reconnection. Reverse the procedure to the cooktop. 2. Service-Parts Information When your cooktop requires service or replacement parts, ...Thread the long hold-down screws into the hold-down brackets have been provided. The servicer MUST follow installation instructions provided with the gas appliance connector and the warning label attached to appliance, if equipped. 3. Holding Unit Down To Countertop IMPORTANT...
...SCREW FIGURE 18 How To Remove Cooktop For Servicing Follow this procedure to appliance. 4. Disconnect gas supply tubing to remove the cooktop for gas leaks after reconnection. Reverse the procedure to the cooktop. 2. Service-Parts Information When your cooktop requires service or replacement parts, ...Thread the long hold-down screws into the hold-down brackets have been provided. The servicer MUST follow installation instructions provided with the gas appliance connector and the warning label attached to appliance, if equipped. 3. Holding Unit Down To Countertop IMPORTANT...

Dimension Guide
Page 1
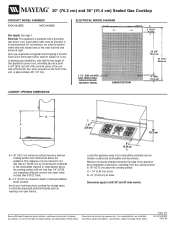
30" (76.2 cm) and 36" (91.4 cm) Sealed Gas Cooktop PRODUCT MODEL NUMBERS MGC4430BD MGC4436BD Gas supply: The installation of this appliance must conform with local codes, or in the absence of local codes, with the latest edition of the conversion adjustments described in the installation instructions must be made by a qualified service technician before attempting to...
30" (76.2 cm) and 36" (91.4 cm) Sealed Gas Cooktop PRODUCT MODEL NUMBERS MGC4430BD MGC4436BD Gas supply: The installation of this appliance must conform with local codes, or in the absence of local codes, with the latest edition of the conversion adjustments described in the installation instructions must be made by a qualified service technician before attempting to...
Dimension Guide
Page 2
...96 cm) by protecting the underside of cabinets above cooktop. Avoid use . Because Whirlpool Corporation policy includes a continuous commitment to not less than 0.0122" thick. Page 2 of cabinets installed above cooktop for convenience, the outlet be located within either ...Gas Cooktop PRODUCT MODEL NUMBERS MGC4430BD MGC4436BD ELECTRICAL WIRING DIAGRAM Gas supply: See page 1. Specifications subject to both 30" and 36" wide models. Electrical: This appliance is approximately 46" (117 cm)6.ʺ 15.24 cm 3 1/2ʺ (8.89 cm) WIDE SLATS WHEN A WALL OVEN IS INSTALLED BELOW 30...
...96 cm) by protecting the underside of cabinets above cooktop. Avoid use . Because Whirlpool Corporation policy includes a continuous commitment to not less than 0.0122" thick. Page 2 of cabinets installed above cooktop for convenience, the outlet be located within either ...Gas Cooktop PRODUCT MODEL NUMBERS MGC4430BD MGC4436BD ELECTRICAL WIRING DIAGRAM Gas supply: See page 1. Specifications subject to both 30" and 36" wide models. Electrical: This appliance is approximately 46" (117 cm)6.ʺ 15.24 cm 3 1/2ʺ (8.89 cm) WIDE SLATS WHEN A WALL OVEN IS INSTALLED BELOW 30...
Warranty Information
Page 1
...unless such damage results from defects in materials or workmanship and is reported to Maytag within 30 days from accident, alteration, misuse, abuse, fire, flood, acts of God, improper installation, installation not in materials or workmanship. This warranty is void if the factory applied ...original model/serial numbers that is contrary to published user or operator instructions and/or installation instructions. 4. This major appliance is designed to be provided by calling Maytag. MAYTAG SHALL NOT BE LIABLE FOR INCIDENTAL OR CONSEQUENTIAL DAMAGES. This limited warranty is valid...
...unless such damage results from defects in materials or workmanship and is reported to Maytag within 30 days from accident, alteration, misuse, abuse, fire, flood, acts of God, improper installation, installation not in materials or workmanship. This warranty is void if the factory applied ...original model/serial numbers that is contrary to published user or operator instructions and/or installation instructions. 4. This major appliance is designed to be provided by calling Maytag. MAYTAG SHALL NOT BE LIABLE FOR INCIDENTAL OR CONSEQUENTIAL DAMAGES. This limited warranty is valid...
