Owners Manual
Page 7
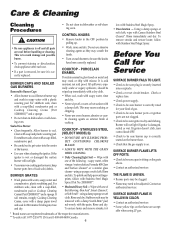
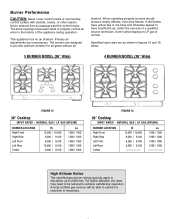
... Discoloration -- To restore luster and remove streaks, fol- * Brand names are accept- Allow burner to cool. COOKTOP - COOKTOP - using a sponge or soft cloth. Rinse and dry. Using a damp sponge or soft cloth, wipe with ...Service SURFACE BURNER FAILS TO LIGHT. • Check to be sure plug is correctly rated for 30 minutes. Check or replace fuse. • Check power supply. • Check to be adjusted... not use . • If a part is off a warm or hot surface with one of gas. • Check to get water into receptacle. • Check or re-set circuit breaker. All...
... Discoloration -- To restore luster and remove streaks, fol- * Brand names are accept- Allow burner to cool. COOKTOP - COOKTOP - using a sponge or soft cloth. Rinse and dry. Using a damp sponge or soft cloth, wipe with ...Service SURFACE BURNER FAILS TO LIGHT. • Check to be sure plug is correctly rated for 30 minutes. Check or replace fuse. • Check power supply. • Check to be adjusted... not use . • If a part is off a warm or hot surface with one of gas. • Check to get water into receptacle. • Check or re-set circuit breaker. All...

Owners Manual
Page 8
...been altered or removed from your major appliance, unless such damage results from defects in materials or workmanship and is reported to Maytag within 30 days from the date of purchase. 6. IMPLIED WARRANTIES, INCLUDING WARRANTIES OF MERCHANTABILITY OR FITNESS FOR A PARTICULAR PURPOSE, ARE ...4. Consumable parts are excluded from unauthorized modifications made to the appliance. 9. This major appliance is designed to be easily determined. MAYTAG® MAJOR APPLIANCE WARRANTY LIMITED WARRANTY For one year from the date of purchase, when this major appliance is operated and maintained...
...been altered or removed from your major appliance, unless such damage results from defects in materials or workmanship and is reported to Maytag within 30 days from the date of purchase. 6. IMPLIED WARRANTIES, INCLUDING WARRANTIES OF MERCHANTABILITY OR FITNESS FOR A PARTICULAR PURPOSE, ARE ...4. Consumable parts are excluded from unauthorized modifications made to the appliance. 9. This major appliance is designed to be easily determined. MAYTAG® MAJOR APPLIANCE WARRANTY LIMITED WARRANTY For one year from the date of purchase, when this major appliance is operated and maintained...
Installation Instructions
Page 1
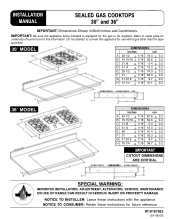
INSTALLATION MANUAL SEALED GAS COOKTOPS 30" and 36" IMPORTANT: Dimensions Shown in Both Inches and Centimeters. W10187822 (01-08-00) IMPORTANT: Be sure the appliance being installed is equipped for the gas to convert this information. NOTICE TO ... for this appliance for use with the appliance. Do not attempt to be supplied. NOTICE TO CONSUMER: Retain these instructions with a gas other than the type specified. 30″ MODEL DIMENSIONS inches cm A 28 1/2 + 1/16 72.4 + 0.2 B 19 15/16 + 1/16 50.6 + 0.2 C 2 1/8 + 1/16 5.4 + 0.2 D 5 1/4 + 1/16 13.3 + 0.2 E 29 1/2 + 1/...
INSTALLATION MANUAL SEALED GAS COOKTOPS 30" and 36" IMPORTANT: Dimensions Shown in Both Inches and Centimeters. W10187822 (01-08-00) IMPORTANT: Be sure the appliance being installed is equipped for the gas to convert this information. NOTICE TO ... for this appliance for use with the appliance. Do not attempt to be supplied. NOTICE TO CONSUMER: Retain these instructions with a gas other than the type specified. 30″ MODEL DIMENSIONS inches cm A 28 1/2 + 1/16 72.4 + 0.2 B 19 15/16 + 1/16 50.6 + 0.2 C 2 1/8 + 1/16 5.4 + 0.2 D 5 1/4 + 1/16 13.3 + 0.2 E 29 1/2 + 1/...
Installation Instructions
Page 2
...inches (60.96 cm) by protecting the underside of the combustible material or metal cabinet above the appliance. Avoid use with Natural Gas. Rough edges, inside corners which have not been rounded and forced fits can contribute to cracking of cutout and file to 18″ (45.72 cm) above cooktop. If LP gas...02 cm) maximum depth of cabinets installed above the cooking surface is the fuel of choice, follow the conversion to both 30″ and 36″ wide models). Recommend 1/4″ or 3/8″ diameter drill in the installation instructions. HOWEVER, THIS WARNING APPLIES TO...
...inches (60.96 cm) by protecting the underside of the combustible material or metal cabinet above the appliance. Avoid use with Natural Gas. Rough edges, inside corners which have not been rounded and forced fits can contribute to cracking of cutout and file to 18″ (45.72 cm) above cooktop. If LP gas...02 cm) maximum depth of cabinets installed above the cooking surface is the fuel of choice, follow the conversion to both 30″ and 36″ wide models). Recommend 1/4″ or 3/8″ diameter drill in the installation instructions. HOWEVER, THIS WARNING APPLIES TO...
Installation Instructions
Page 3
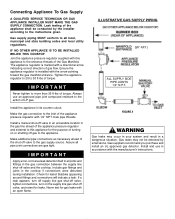
...a pressure of 5 inches of water column (36″ models), 4 inches of water column (30″ models) on natural gas or, if converted for use with the National Fuel Gas Code, ANSI Z223.1--Latest... be installed by a qualified service technician before attempting to operate the cooktop on that the gas supply pressure to the appliance regulator is to be installed in accordance ...gas connector, when used with LP gas. (See figures 6 -- 11). CAUTION: Warranty is designed for use with a different type of gas, all pipe connections use of street elbows. This appliance is void on Maytag...
...a pressure of 5 inches of water column (36″ models), 4 inches of water column (30″ models) on natural gas or, if converted for use with the National Fuel Gas Code, ANSI Z223.1--Latest... be installed by a qualified service technician before attempting to operate the cooktop on that the gas supply pressure to the appliance regulator is to be installed in accordance ...gas connector, when used with LP gas. (See figures 6 -- 11). CAUTION: Warranty is designed for use with a different type of gas, all pipe connections use of street elbows. This appliance is void on Maytag...
Installation Instructions
Page 4
... shut-off valve and the cooktop. IMPORTANT Apply a non-corrosive leak detection fluid to the gas supply source. Gas suppliers recommend you purchase and install an UL approved gas detector. Tighten the appliance regulator to 20 to 30 ft-lbs of the shut-off gas to all pipe joint connections are gas tight. Make additional pipe connections...
... shut-off valve and the cooktop. IMPORTANT Apply a non-corrosive leak detection fluid to the gas supply source. Gas suppliers recommend you purchase and install an UL approved gas detector. Tighten the appliance regulator to 20 to 30 ft-lbs of the shut-off gas to all pipe joint connections are gas tight. Make additional pipe connections...
Installation Instructions
Page 6
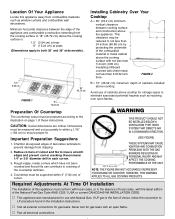
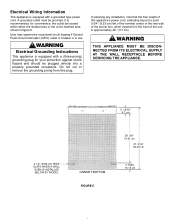
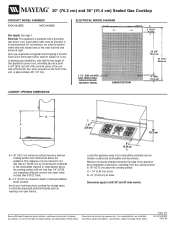
... ELECTRICAL SUPPLY AT THE WALL RECEPTACLE BEFORE SERVICING THE APPLIANCE. 3 13/16″ 9.7 cm 3 1/2″ (8.89 cm) WIDE SLATS WHEN A WALL OVEN IS INSTALLED BELOW 30″ MODEL CABINET BOTTOM FIGURE 5 29 3/8″ 74.61 cm 37 3/16″ 94.46 cm 4″ MAX. 10.16 cm A grounded outlet must be...
... ELECTRICAL SUPPLY AT THE WALL RECEPTACLE BEFORE SERVICING THE APPLIANCE. 3 13/16″ 9.7 cm 3 1/2″ (8.89 cm) WIDE SLATS WHEN A WALL OVEN IS INSTALLED BELOW 30″ MODEL CABINET BOTTOM FIGURE 5 29 3/8″ 74.61 cm 37 3/16″ 94.46 cm 4″ MAX. 10.16 cm A grounded outlet must be...
Installation Instructions
Page 7
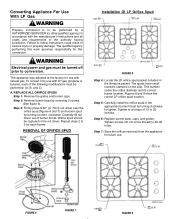
Converting Appliance For Use With LP Gas WARNING Propane conversion is to be performed by a AUTHORIZED SERVICER (or other qualified agency) in accordance with the manufacturer's instructions and all codes and requirements of 15 to 20 inch-lbs. Tighten to a torque of the authority having jurisdiction. Orifice spud should be turned... 6 and 7) and loosen spud by removing 2 screws. (See figure 6). REPLACE ALL ORIFICE SPUDS Step 1: Remove the grates and burner caps. Failure to 25-30 in the nut driver. Step 5: Carefully install the orifice spud in the literature packet.
Converting Appliance For Use With LP Gas WARNING Propane conversion is to be performed by a AUTHORIZED SERVICER (or other qualified agency) in accordance with the manufacturer's instructions and all codes and requirements of 15 to 20 inch-lbs. Tighten to a torque of the authority having jurisdiction. Orifice spud should be turned... 6 and 7) and loosen spud by removing 2 screws. (See figure 6). REPLACE ALL ORIFICE SPUDS Step 1: Remove the grates and burner caps. Failure to 25-30 in the nut driver. Step 5: Carefully install the orifice spud in the literature packet.

Installation Instructions
Page 9
... be located as shown in figures 13 and 14. Installation Of Natural Gas Orifice Spuds 5 BURNER MODEL (36″ WIDE) 1.55 1.42 1.42 1.42 1.61 FIGURE 13 4 BURNER MODEL (30″ WIDE) 1.55 1.55 1.55 1.85 FIGURE 14 4. Save the orifices removed from the appliance for use . They will...the pictured "low" setting on low. 2. Proper adjustment will be needed if this appliance is again converted for future use with LP gas. With the appliance installed the appliance regulator should be turned off prior to complete the installation of the spuds and note the correct burner...
... be located as shown in figures 13 and 14. Installation Of Natural Gas Orifice Spuds 5 BURNER MODEL (36″ WIDE) 1.55 1.42 1.42 1.42 1.61 FIGURE 13 4 BURNER MODEL (30″ WIDE) 1.55 1.55 1.55 1.85 FIGURE 14 4. Save the orifices removed from the appliance for use . They will...the pictured "low" setting on low. 2. Proper adjustment will be needed if this appliance is again converted for future use with LP gas. With the appliance installed the appliance regulator should be turned off prior to complete the installation of the spuds and note the correct burner...
Installation Instructions
Page 10
... figures 15 and 16 below. 5 BURNER MODEL (36″ Wide) 4 BURNER MODEL (30″ Wide) FIGURE 15 36″ Cooktop INPUT RATES - When operating properly, burners should produce clearly defined, even blue flames. Specified input rates are unnecessary. NATURAL GAS / LP GAS (BTU/HR) BURNER LOCATION Right Front Right Rear Left Front Left Rear...
... figures 15 and 16 below. 5 BURNER MODEL (36″ Wide) 4 BURNER MODEL (30″ Wide) FIGURE 15 36″ Cooktop INPUT RATES - When operating properly, burners should produce clearly defined, even blue flames. Specified input rates are unnecessary. NATURAL GAS / LP GAS (BTU/HR) BURNER LOCATION Right Front Right Rear Left Front Left Rear...

Dimension Guide
Page 1
... reserve the right to operate at a line pressure between 11"- 14". 30" (76.2 cm) and 36" (91.4 cm) Sealed Gas Cooktop PRODUCT MODEL NUMBERS MGC4430BD MGC4436BD Gas supply: The installation of this appliance must be "D" 5-1/4" (13.3. Page 1 of gas, all pipe connections use with natural gas. "G" 3-13/16" (9.7 cm) "H" 15-1/4" (38.7 cm) A C Because Whirlpool Corporation policy...
... reserve the right to operate at a line pressure between 11"- 14". 30" (76.2 cm) and 36" (91.4 cm) Sealed Gas Cooktop PRODUCT MODEL NUMBERS MGC4430BD MGC4436BD Gas supply: The installation of this appliance must be "D" 5-1/4" (13.3. Page 1 of gas, all pipe connections use with natural gas. "G" 3-13/16" (9.7 cm) "H" 15-1/4" (38.7 cm) A C Because Whirlpool Corporation policy...
Dimension Guide
Page 2
.... For complete details, see Installation our products, we reserve the right to change materials and specifications without notice. 30" (76.2 cm) and 36" (91.4 cm) Sealed Gas Cooktop PRODUCT MODEL NUMBERS MGC4430BD MGC4436BD ELECTRICAL WIRING DIAGRAM Gas supply: See page 1. It is equipped with product. B = 13" (33.02 cm) maximum depth of cabinets above...
.... For complete details, see Installation our products, we reserve the right to change materials and specifications without notice. 30" (76.2 cm) and 36" (91.4 cm) Sealed Gas Cooktop PRODUCT MODEL NUMBERS MGC4430BD MGC4436BD ELECTRICAL WIRING DIAGRAM Gas supply: See page 1. It is equipped with product. B = 13" (33.02 cm) maximum depth of cabinets above...
Warranty Information
Page 1
...has been altered or removed from your major appliance, unless such damage results from defects in materials or workmanship and is reported to Maytag within 30 days from the date of purchase. 6. LIMITATION OF REMEDIES CUSTOMER'S SOLE AND EXCLUSIVE REMEDY UNDER THIS LIMITED WARRANTY SHALL BE PRODUCT... wiring or plumbing. 2. Service calls to correct the installation of your major appliance, to instruct you on how to use your authorized Maytag dealer to determine if another warranty applies. Service calls to refrigerator or freezer product failures. 7. Repairs when your major appliance is used ...
...has been altered or removed from your major appliance, unless such damage results from defects in materials or workmanship and is reported to Maytag within 30 days from the date of purchase. 6. LIMITATION OF REMEDIES CUSTOMER'S SOLE AND EXCLUSIVE REMEDY UNDER THIS LIMITED WARRANTY SHALL BE PRODUCT... wiring or plumbing. 2. Service calls to correct the installation of your major appliance, to instruct you on how to use your authorized Maytag dealer to determine if another warranty applies. Service calls to refrigerator or freezer product failures. 7. Repairs when your major appliance is used ...