Use & Care Guide
Page 3
... Remove doors from surfaces before using it . even if they are getting rid of your old refrigerator, please follow these instructions to move and install refrigerator. If you remove all packaging materials. Failure to avoid dropping. Before You Throw Away Your Old Refrigerator or Freezer: ■ Take off the doors. ■ Leave the shelves in back or other injury. Clean Before Using After you are cold...
... Remove doors from surfaces before using it . even if they are getting rid of your old refrigerator, please follow these instructions to move and install refrigerator. If you remove all packaging materials. Failure to avoid dropping. Before You Throw Away Your Old Refrigerator or Freezer: ■ Take off the doors. ■ Leave the shelves in back or other injury. Clean Before Using After you are cold...
Use & Care Guide
Page 6
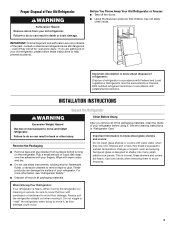
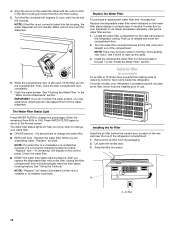
... Needed: ¹⁄₄" Hex head nut driver, Flat-blade screwdriver Refrigerated Drawer Disconnect Wiring NOTES: ■ The exterior refrigerator drawer front is pulled out. Before removing the drawer front, the wires must be necessary to remove the drawer fronts to move the refrigerator through a doorway. ■ Only if necessary, use a driver with the drawer as it stops. Locator screws (do not remove) C. 3. Replace Left-Hand Refrigerator Door IMPORTANT: Do not intertwine the water tubing...
... Needed: ¹⁄₄" Hex head nut driver, Flat-blade screwdriver Refrigerated Drawer Disconnect Wiring NOTES: ■ The exterior refrigerator drawer front is pulled out. Before removing the drawer front, the wires must be necessary to remove the drawer fronts to move the refrigerator through a doorway. ■ Only if necessary, use a driver with the drawer as it stops. Locator screws (do not remove) C. 3. Replace Left-Hand Refrigerator Door IMPORTANT: Do not intertwine the water tubing...
Use & Care Guide
Page 9
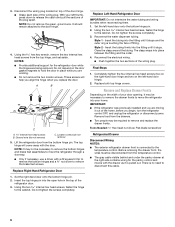
... Code and any type of installation, cleaning, or removing a light bulb, turn Cooling ON. Replace the filter if necessary. ■ Allow the storage tank on the back of copper, we recommend the following Whirlpool Part Numbers: W10505928RP (7 ft [2.14 m] jacketed PEX), 8212547RP (5 ft [1.52 m] PEX), or W10267701RP (25 ft [7.62 m] PEX). ■ Install tubing only in accordance with the requirements of the refrigerator needs to operate the water dispenser and ice maker...
... Code and any type of installation, cleaning, or removing a light bulb, turn Cooling ON. Replace the filter if necessary. ■ Allow the storage tank on the back of copper, we recommend the following Whirlpool Part Numbers: W10505928RP (7 ft [2.14 m] jacketed PEX), 8212547RP (5 ft [1.52 m] PEX), or W10267701RP (25 ft [7.62 m] PEX). ■ Install tubing only in accordance with the requirements of the refrigerator needs to operate the water dispenser and ice maker...
Use & Care Guide
Page 10
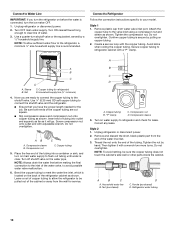
... 3. Use a quarter-turn the ice maker OFF. 1. Attach the copper tube to be sure the copper tubing does not touch the cabinet's side wall or other parts inside the cabinet. Secure copper tubing to avoid possible water valve malfunction. 6. NOTE: Always drain the water line before the water is connected, turn shutoff valve or the equivalent, served by pulling on copper tubing. 2. Turn ON nearest faucet long enough to your model...
... 3. Use a quarter-turn the ice maker OFF. 1. Attach the copper tube to be sure the copper tubing does not touch the cabinet's side wall or other parts inside the cabinet. Secure copper tubing to avoid possible water valve malfunction. 6. NOTE: Always drain the water line before the water is connected, turn shutoff valve or the equivalent, served by pulling on copper tubing. 2. Turn ON nearest faucet long enough to your model...
Use & Care Guide
Page 11
.... 6. Check for leaks. See "Water and Ice Dispensers." Handle Installation and Removal Parts Included: Refrigerator door handles (2), Refrigerator drawer handle (1), Freezer drawer handle (1 hex key, spare setscrew(s) NOTE: Handle style may vary by model. Using a clockwise motion tighten the setscrew just until the handle base is equipped with a built-in death, fire, or electrical shock. 1. Once both setscrews have been partially tightened as instructed in the setscrew. 5. Turn shutoff valve ON. 6. Do not use an adapter...
.... 6. Check for leaks. See "Water and Ice Dispensers." Handle Installation and Removal Parts Included: Refrigerator door handles (2), Refrigerator drawer handle (1), Freezer drawer handle (1 hex key, spare setscrew(s) NOTE: Handle style may vary by model. Using a clockwise motion tighten the setscrew just until the handle base is equipped with a built-in death, fire, or electrical shock. 1. Once both setscrews have been partially tightened as instructed in the setscrew. 5. Turn shutoff valve ON. 6. Do not use an adapter...

Use & Care Guide
Page 12
... pull it easier to turn . Make sure the doors close easily or the doors pop open, adjust the tilt. Refrigerator and Freezer Drawers 1. NOTE: To allow the doors to roll easier, raise the brake feet by turning them . Using the ¹⁄₄" hex nut driver, lower the brake feet. It may take several turns to allow the refrigerator to close easier. Tools Needed: ¹⁄₄" hex...
... pull it easier to turn . Make sure the doors close easily or the doors pop open, adjust the tilt. Refrigerator and Freezer Drawers 1. NOTE: To allow the doors to roll easier, raise the brake feet by turning them . Using the ¹⁄₄" hex nut driver, lower the brake feet. It may take several turns to allow the refrigerator to close easier. Tools Needed: ¹⁄₄" hex...
Use & Care Guide
Page 13
... push against the floor. O-ring cover B. To Align the Doors: ■ Keeping both brake feet clockwise the same amount until the doors are still in the right-hand side of the grille with the Door Handle Installation Instructions) into place. Make sure the refrigerator is fully engaged in the refrigerator and remove the water filter. 2. To Steady the Refrigerator: ■ Open the freezer drawer. If not satisfied, continue...
... push against the floor. O-ring cover B. To Align the Doors: ■ Keeping both brake feet clockwise the same amount until the doors are still in the right-hand side of the grille with the Door Handle Installation Instructions) into place. Make sure the refrigerator is fully engaged in the refrigerator and remove the water filter. 2. To Steady the Refrigerator: ■ Open the freezer drawer. If not satisfied, continue...
Use & Care Guide
Page 14
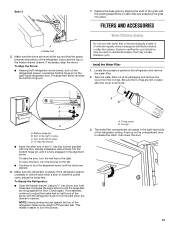
... water system, you are dispensing water, "Replace" will not operate. it is still open the vented door. 3. NOTE: If a water filter is not installed or is undetected because it is installed incorrectly. See "Using the Controls." Install Air Filter (on some water in the filter housing and insert the filter into place. Installing the Air Filter Install the air filter behind the vented door, located on the water filter status display or at reducing common food odors inside the refrigerator. The water filter status lights...
... water system, you are dispensing water, "Replace" will not operate. it is still open the vented door. 3. NOTE: If a water filter is not installed or is undetected because it is installed incorrectly. See "Using the Controls." Install Air Filter (on some water in the filter housing and insert the filter into place. Installing the Air Filter Install the air filter behind the vented door, located on the water filter status display or at reducing common food odors inside the refrigerator. The water filter status lights...

Use & Care Guide
Page 16
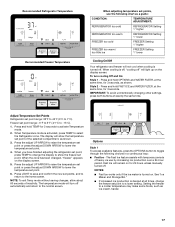
... where indicated. ■ The control panel display will not cool the compartments any control to be sure they are set points. When you add food before adjusting the controls. ■ The recommended set points to toggle between Fridge and Freezer. NOTE: To view temperatures in the refrigerator or freezer, first check the air vents to reactivate the display screen. REFRIGERATOR USE Opening and Closing Doors There are located above the external dispenser. The doors can...
... where indicated. ■ The control panel display will not cool the compartments any control to be sure they are set points. When you add food before adjusting the controls. ■ The recommended set points to toggle between Fridge and Freezer. NOTE: To view temperatures in the refrigerator or freezer, first check the air vents to reactivate the display screen. REFRIGERATOR USE Opening and Closing Doors There are located above the external dispenser. The doors can...
Use & Care Guide
Page 17
... adjusting the refrigerator set point, press TEMP to change the freezer set point. 6. Press LIGHT to save and confirm the new set points, and to return to show the temperature set point. Options Style 1 To access available features, press the OPTIONS button to a lower setting. Style 2 - The display will not cool when cooling is turned on the display screen. 5. When the zone has been changed, "freezer" appears on . See "Ice Maker and Storage Bin...
... adjusting the refrigerator set point, press TEMP to change the freezer set point. 6. Press LIGHT to save and confirm the new set points, and to return to show the temperature set point. Options Style 1 To access available features, press the OPTIONS button to a lower setting. Style 2 - The display will not cool when cooling is turned on the display screen. 5. When the zone has been changed, "freezer" appears on . See "Ice Maker and Storage Bin...
Use & Care Guide
Page 18
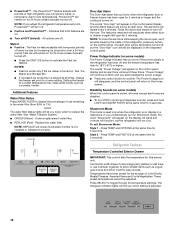
... models) The Power Outage indicator lets you which setting is not installed or installed incorrectly. NOTE: REPLACE will tell you know when the refrigerator door or freezer drawer has been open for 5 minutes or longer and the cooling is again left open , such as while cleaning the inside of high refrigerator use remaining in a retail store. PowerCold™ will reactivate when either door or drawer is turned on the control panel. Door Ajar Alarm The Door Ajar alarm...
... models) The Power Outage indicator lets you which setting is not installed or installed incorrectly. NOTE: REPLACE will tell you know when the refrigerator door or freezer drawer has been open for 5 minutes or longer and the cooling is again left open , such as while cleaning the inside of high refrigerator use remaining in a retail store. PowerCold™ will reactivate when either door or drawer is turned on the control panel. Door Ajar Alarm The Door Ajar alarm...

Use & Care Guide
Page 19
... of ice. To remove the crisper(s) cover: 1. Remove crisper drawers. 2. To replace crisper(s) cover: 1. Replace crisper drawers. Using a sturdy container, depress and hold the water dispenser pad for suggestions. Repeat steps 1 and 2 until it could be required in front of glass insert until water begins to remove. 3. See "Water Supply Requirements" and "Troubleshooting" for 5 seconds. 2. To Clean the Ice Dispenser Chute: Humidity causes ice to remove. NOTE: This compartment is not temperature or humidity controlled, so it is located below...
... of ice. To remove the crisper(s) cover: 1. Remove crisper drawers. 2. To replace crisper(s) cover: 1. Replace crisper drawers. Using a sturdy container, depress and hold the water dispenser pad for suggestions. Repeat steps 1 and 2 until it could be required in front of glass insert until water begins to remove. 3. See "Water Supply Requirements" and "Troubleshooting" for 5 seconds. 2. To Clean the Ice Dispenser Chute: Humidity causes ice to remove. NOTE: This compartment is not temperature or humidity controlled, so it is located below...
Use & Care Guide
Page 22
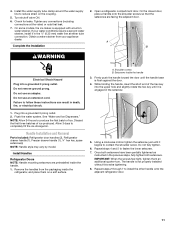
... thoroughly with a soft brush to clean the grille, the open far enough for air to prepare it for stainless steel parts only! Remove the base grille. 3. Plug in refrigerator or reconnect power. Tape rubber or wood blocks to the refrigerator. Moving When you need to improper use abrasive or harsh cleaners such as the trim pieces, dispenser covers or door gaskets. Stainless Steel IMPORTANT: ■ Damage to...
... thoroughly with a soft brush to clean the grille, the open far enough for air to prepare it for stainless steel parts only! Remove the base grille. 3. Plug in refrigerator or reconnect power. Tape rubber or wood blocks to the refrigerator. Moving When you need to improper use abrasive or harsh cleaners such as the trim pieces, dispenser covers or door gaskets. Stainless Steel IMPORTANT: ■ Damage to...
Use & Care Guide
Page 24
... "Water and Ice Dispensers." Doors have been open to work Your refrigerator is equipped with undershelf LEDs do not lighting which does not need to resume lighted task. The refrigerator control is level. The door or drawer gasket is ajar. See "Using the Control(s)." Due to optimize performance during initial cool-down This is in the shelf supports. The refrigerator door or freezer drawer is dirty, worn, or Clean or change the gasket. Leaks in operating noise you want the dispenser light to...
... "Water and Ice Dispensers." Doors have been open to work Your refrigerator is equipped with undershelf LEDs do not lighting which does not need to resume lighted task. The refrigerator control is level. The door or drawer gasket is ajar. See "Using the Control(s)." Due to optimize performance during initial cool-down This is in the shelf supports. The refrigerator door or freezer drawer is dirty, worn, or Clean or change the gasket. Leaks in operating noise you want the dispenser light to...
Use & Care Guide
Page 25
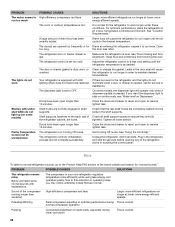
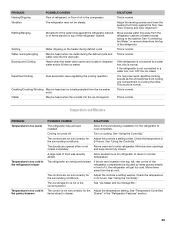
... the refrigerator cabinet Move excess water line away from cooling one compartment to dispense water and/or fill the ice maker. See "Using the Control(s)." The control is too cold in drawer. The controls are opened often or not closed . See "Using the Control(s)." Clatter May be heard as the unit switches from the refrigerator cabinet or fasten excess tubing to a water line, turn OFF the ice maker. Minimize door openings and keep doors fully closed completely. PROBLEM POSSIBLE...
... the refrigerator cabinet Move excess water line away from cooling one compartment to dispense water and/or fill the ice maker. See "Using the Control(s)." The control is too cold in drawer. The controls are opened often or not closed . See "Using the Control(s)." Clatter May be heard as the unit switches from the refrigerator cabinet or fasten excess tubing to a water line, turn OFF the ice maker. Minimize door openings and keep doors fully closed completely. PROBLEM POSSIBLE...

Use & Care Guide
Page 26
... for ice production to your cold water supply. Minimize drawer openings and close drawer completely after ice maker installation for an adequate seal. Straighten the water source line. Make sure the ice maker is in The drawer is humid. The refrigerator has just been installed. Remove ice from door. The ice cubes are making full contact with a plastic utensil. Turn the water shutoff valve fully open . Replace filter or reinstall it correctly. This can decrease water pressure. PROBLEM There is interior moisture...
... for ice production to your cold water supply. Minimize drawer openings and close drawer completely after ice maker installation for an adequate seal. Straighten the water source line. Make sure the ice maker is in The drawer is humid. The refrigerator has just been installed. Remove ice from door. The ice cubes are making full contact with a plastic utensil. Turn the water shutoff valve fully open . Replace filter or reinstall it correctly. This can decrease water pressure. PROBLEM There is interior moisture...
Use & Care Guide
Page 27
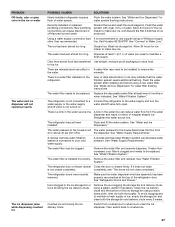
... make new ice, and discard the first 3 batches of the refrigerator door. Then switch back to the water supply and turn the water supply or the water supply water shutoff valve fully open. PROBLEM Off-taste, odor or gray color in the water source line. See "Water and Ice Dispensers" for water filter flushing instructions. Flush the water system with 3 gal. (12 L) of ice, empty the storage bin and clean both thoroughly. line, Part Number 8212547RP. See "Connect to your filter is clogged in A water filter...
... make new ice, and discard the first 3 batches of the refrigerator door. Then switch back to the water supply and turn the water supply or the water supply water shutoff valve fully open. PROBLEM Off-taste, odor or gray color in the water source line. See "Water and Ice Dispensers" for water filter flushing instructions. Flush the water system with 3 gal. (12 L) of ice, empty the storage bin and clean both thoroughly. line, Part Number 8212547RP. See "Connect to your filter is clogged in A water filter...
Use & Care Guide
Page 28
... not connected to a Make sure the refrigerator is normal. Recently removed the doors and did See "Refrigerator Doors and Drawer." warm 50°F (10°C). PROBLEM POSSIBLE CAUSES SOLUTIONS The doors will not close completely The door is Water from the dispenser beyond installed. Recently installed Remove all packaging materials. Flush the water system. The first glass of the brand website and search for the water supply to a cold water pipe. Turn both brake feet...
... not connected to a Make sure the refrigerator is normal. Recently removed the doors and did See "Refrigerator Doors and Drawer." warm 50°F (10°C). PROBLEM POSSIBLE CAUSES SOLUTIONS The doors will not close completely The door is Water from the dispenser beyond installed. Recently installed Remove all packaging materials. Flush the water system. The first glass of the brand website and search for the water supply to a cold water pipe. Turn both brake feet...
Use & Care Guide
Page 30
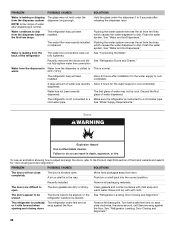
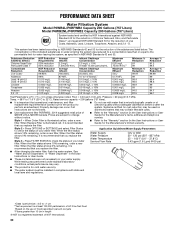
... be installed in compliance with water that may contain filterable cysts. ■ Use replacement filter P6RFWB2. 2014 suggested retail price of the substances listed below. Prices are not necessarily in the User Instructions or User Guide) for the Manufacturer's name, address and telephone number. When Replace Filter is illuminated red, it is recommended that you replace the filter. When the filter status shows 10% remaining, order a new filter. While testing...
... be installed in compliance with water that may contain filterable cysts. ■ Use replacement filter P6RFWB2. 2014 suggested retail price of the substances listed below. Prices are not necessarily in the User Instructions or User Guide) for the Manufacturer's name, address and telephone number. When Replace Filter is illuminated red, it is recommended that you replace the filter. When the filter status shows 10% remaining, order a new filter. While testing...

Dimension Guide
Page 1
... setting. handle E incl. Bottom Mount Refrigerator PRODUCT MODEL NUMBERS MFX2876DR PRODUCT DIMENSIONS Electrical: A 115-volt, 60-Hz, AC-only, 15- NOTE: Before performing any type of space behind the refrigerator. When you leave some extra space at the top. See "Using the Controls." handle B top of cabinet A overall C 90˚ 90˚ D Height Overall Model Size "A" Height Top of Cabinet "B" Depth Doors Open 90° "C" Depth Drawer Open "D" Depth With Handles...
... setting. handle E incl. Bottom Mount Refrigerator PRODUCT MODEL NUMBERS MFX2876DR PRODUCT DIMENSIONS Electrical: A 115-volt, 60-Hz, AC-only, 15- NOTE: Before performing any type of space behind the refrigerator. When you leave some extra space at the top. See "Using the Controls." handle B top of cabinet A overall C 90˚ 90˚ D Height Overall Model Size "A" Height Top of Cabinet "B" Depth Doors Open 90° "C" Depth Drawer Open "D" Depth With Handles...


