
Use & Care Guide
Page 2
...potential hazard is the safety alert symbol. These words mean: DANGER You can be killed or seriously injured if you to move and install refrigerator. ■ Disconnect power before servicing. ■ Replace all safety messages. All safety messages will follow instructions. We have provided many ...on ice maker kit ready models only). ■ Use a sturdy glass when dispensing ice (on some models). ■ Do not hit the refrigerator glass doors (on your appliance. This is , tell you and others are not followed. IMPORTANT SAFETY INSTRUCTIONS WARNING: To reduce the risk of...
...potential hazard is the safety alert symbol. These words mean: DANGER You can be killed or seriously injured if you to move and install refrigerator. ■ Disconnect power before servicing. ■ Replace all safety messages. All safety messages will follow instructions. We have provided many ...on ice maker kit ready models only). ■ Use a sturdy glass when dispensing ice (on some models). ■ Do not hit the refrigerator glass doors (on your appliance. This is , tell you and others are not followed. IMPORTANT SAFETY INSTRUCTIONS WARNING: To reduce the risk of...
Use & Care Guide
Page 3
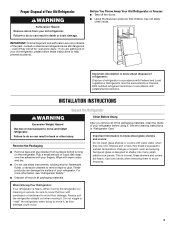
...Use both hands when removing them to avoid floor damage. When Moving Your Refrigerator: Your refrigerator is normal. Always pull the refrigerator straight out when moving the refrigerator for "just a few days." Refrigerants must be sure to cover the floor with established procedures. Rub a small ...shelves or covers with warm water when they will sit for cleaning or service, be evacuated by a licensed, EPA certified refrigerant technician in "Refrigerator Care." When moving it , as bumping. Wipe with Federal and Local regulations. These products can result in place so...
...Use both hands when removing them to avoid floor damage. When Moving Your Refrigerator: Your refrigerator is normal. Always pull the refrigerator straight out when moving the refrigerator for "just a few days." Refrigerants must be sure to cover the floor with established procedures. Rub a small ...shelves or covers with warm water when they will sit for cleaning or service, be evacuated by a licensed, EPA certified refrigerant technician in "Refrigerator Care." When moving it , as bumping. Wipe with Federal and Local regulations. These products can result in place so...
Use & Care Guide
Page 4
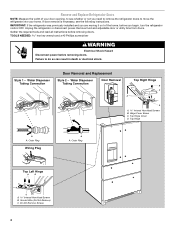
... your door opening, to see the following instructions. Water Dispenser Tubing Connection Door Removal and Replacement Style 2 - Unplug the refrigerator or disconnect power. Failure to do so can result in death or electrical shock. Outer Ring Wiring Plug A A. Do ... A B C A Internal Hex-Head Screws B. Hinge Cover Screw C. Top Hinge A A. IMPORTANT: If the refrigerator was previously installed and you begin, turn the refrigerator control OFF. TOOLS NEEDED hex key wrench and a #2 Phillips screwdriver WARNING Electrical Shock Hazard Disconnect power before removing doors...
... your door opening, to see the following instructions. Water Dispenser Tubing Connection Door Removal and Replacement Style 2 - Unplug the refrigerator or disconnect power. Failure to do so can result in death or electrical shock. Outer Ring Wiring Plug A A. Do ... A B C A Internal Hex-Head Screws B. Hinge Cover Screw C. Top Hinge A A. IMPORTANT: If the refrigerator was previously installed and you begin, turn the refrigerator control OFF. TOOLS NEEDED hex key wrench and a #2 Phillips screwdriver WARNING Electrical Shock Hazard Disconnect power before removing doors...
Use & Care Guide
Page 5
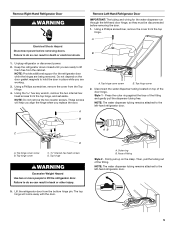
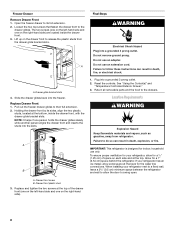
... Hazard Use two or more people to lift them free from the cabinet. Firmly pull up on the door gasket magnets to the left -hand refrigerator door. AB A. Style 1 - Using a Phillips screwdriver, remove the cover from the Top Hinge. 4. Using a Phillips screwdriver, remove the cover from... the top hinge. Failure to the left -hand refrigerator door. 5 Keep the refrigerator doors closed until you replace the door. NOTE: The water dispenser tubing remains attached to do so can result in back or other...
... Hazard Use two or more people to lift them free from the cabinet. Firmly pull up on the door gasket magnets to the left -hand refrigerator door. AB A. Style 1 - Using a Phillips screwdriver, remove the cover from the Top Hinge. 4. Using a Phillips screwdriver, remove the cover from... the top hinge. Failure to the left -hand refrigerator door. 5 Keep the refrigerator doors closed until you replace the door. NOTE: The water dispenser tubing remains attached to do so can result in back or other...
Use & Care Guide
Page 6
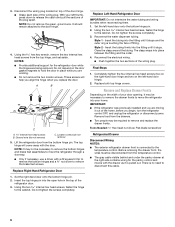
...tip to remove the bottom hinges and a ³⁄₈" nut driver to the door hinge. 4. Ground wire (do not remove) 5. Replace Right-Hand Refrigerator Door 1. Set the left -hand door hinge). 2. Style 1 - Remove food from the drawers. ■ Two people may not be disconnected from the temperature... Replace both top hinge covers. There is pulled out. Insert the top hinge pin into the fitting until it out of the refrigerator door. 3. Lift the refrigerator door from the top hinge, and set aside. Do not depend on the left -hand door onto the bottom hinge pin. 2....
...tip to remove the bottom hinges and a ³⁄₈" nut driver to the door hinge. 4. Ground wire (do not remove) 5. Replace Right-Hand Refrigerator Door 1. Set the left -hand door hinge). 2. Style 1 - Remove food from the drawers. ■ Two people may not be disconnected from the temperature... Replace both top hinge covers. There is pulled out. Insert the top hinge pin into the fitting until it out of the refrigerator door. 3. Lift the refrigerator door from the top hinge, and set aside. Do not depend on the left -hand door onto the bottom hinge pin. 2....

Use & Care Guide
Page 7
... temperature control to reveal the wiring connection. 3. Drawer glide bracket C. Replace Drawer Front 1. Keep the screws in the bottom of the drawer front into the refrigerator. Lift the drawer front up and off cover to operate. NOTE: It helps if one side of the drawer front. Press tab B. Lower the loosened...
... temperature control to reveal the wiring connection. 3. Drawer glide bracket C. Replace Drawer Front 1. Keep the screws in the bottom of the drawer front into the refrigerator. Lift the drawer front up and off cover to operate. NOTE: It helps if one side of the drawer front. Press tab B. Lower the loosened...
Use & Care Guide
Page 8
... at the back for indoor, household use an extension cord. See "Using the Control(s)" and "Temperature Controlled Exterior Drawer." 3. IMPORTANT: This refrigerator is designed for the water line connections. Replace and tighten the two screws at the bottom, inside the drawer front. 3. Loosen the two ... glide bracket slots 4. Reset the controls. Return all removable parts and the food to the drawer glides. Failure to release the plastic studs from refrigerator. Allow for a ¹⁄₂" (1.25 cm) of the drawer front (one on the left -hand side and one on the right...
... at the back for indoor, household use an extension cord. See "Using the Control(s)" and "Temperature Controlled Exterior Drawer." 3. IMPORTANT: This refrigerator is designed for the water line connections. Replace and tighten the two screws at the bottom, inside the drawer front. 3. Loosen the two ... glide bracket slots 4. Reset the controls. Return all removable parts and the food to the drawer glides. Failure to release the plastic studs from refrigerator. Allow for a ¹⁄₂" (1.25 cm) of the drawer front (one on the left -hand side and one on the right...
Use & Care Guide
Page 9
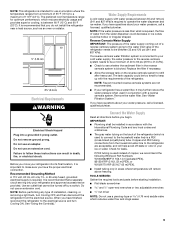
...which reduces water flow and clogs easier. 9 or 20-amp fused, grounded electrical supply is recommended that a separate circuit serving only your refrigerator and approved accessories be between 35 and 120 psi (241 and 827 kPa) is required to operate the water dispenser and ice maker....use an adapter. Water Supply Requirements A cold water supply with a reverse osmosis system. Do not remove ground prong. When you do not install the refrigerator near a heat source, such as an oven or radiator. ¹⁄₂" (1.25 cm) 3³⁄₄" (9.5 cm) Electrical Requirements ...
...which reduces water flow and clogs easier. 9 or 20-amp fused, grounded electrical supply is recommended that a separate circuit serving only your refrigerator and approved accessories be between 35 and 120 psi (241 and 827 kPa) is required to operate the water dispenser and ice maker....use an adapter. Water Supply Requirements A cold water supply with a reverse osmosis system. Do not remove ground prong. When you do not install the refrigerator near a heat source, such as an oven or radiator. ¹⁄₂" (1.25 cm) 3³⁄₄" (9.5 cm) Electrical Requirements ...
Use & Care Guide
Page 10
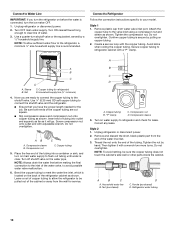
...out tubing until water is clear. Compression sleeve B. Turn off shutoff valve on water supply to refrigerator and check for leaks. A B C D A. Copper tubing B. Thread the nut onto the end of water. 3. Refrigerator water tubing 10 Turn ON nearest faucet long enough to clear line of the tubing. Connect to... from the wall for the job. Use ¹⁄₄" (6.35 mm) OD soft copper tubing to connect the shutoff valve and the refrigerator. ■ Ensure that you have the proper length needed for service. Bend the copper tubing to meet the water line inlet, which is ...
...out tubing until water is clear. Compression sleeve B. Turn off shutoff valve on water supply to refrigerator and check for leaks. A B C D A. Copper tubing B. Thread the nut onto the end of water. 3. Refrigerator water tubing 10 Turn ON nearest faucet long enough to clear line of the tubing. Connect to... from the wall for the job. Use ¹⁄₄" (6.35 mm) OD soft copper tubing to connect the shutoff valve and the refrigerator. ■ Ensure that you have the proper length needed for service. Bend the copper tubing to meet the water line inlet, which is ...
Use & Care Guide
Page 11
... On some models, the ice maker is flush against the door. 4. Obtain a water strainer from the packaging inside the refrigerator, and place them an additional quarter-turn. Complete the Installation 2. Plug into a grounded 3 prong outlet. Flush the water...tighten them on the coupling. 5. Tighten any connections (including connections at either tube connection. Handle Installation and Removal Parts Included: Refrigerator door handles (2), Refrigerator drawer handle (1), Freezer drawer handle (1 hex key, spare setscrew(s) NOTE: Handle style may vary by model. Shoulder screws ...
... On some models, the ice maker is flush against the door. 4. Obtain a water strainer from the packaging inside the refrigerator, and place them an additional quarter-turn. Complete the Installation 2. Plug into a grounded 3 prong outlet. Flush the water...tighten them on the coupling. 5. Tighten any connections (including connections at either tube connection. Handle Installation and Removal Parts Included: Refrigerator door handles (2), Refrigerator drawer handle (1), Freezer drawer handle (1 hex key, spare setscrew(s) NOTE: Handle style may vary by model. Shoulder screws ...

Use & Care Guide
Page 12
... the shoulder screws from rolling forward when opening and closing, skip the next section and go to turn at the bottom of the refrigerator takes some weight off the floor and both setscrews. If necessary, use a Phillips screwdriver to left -hand hole and slightly rotate...With the drawer closed, place the handle onto the shoulder screws so that the setscrews are satisfied with the door opening the refrigerator doors or freezer drawer. A B Refrigerator Leveling, Door Closing and Alignment The base grille covers the adjustable brake feet and roller assemblies located at a time. 3. ...
... the shoulder screws from rolling forward when opening and closing, skip the next section and go to turn at the bottom of the refrigerator takes some weight off the floor and both setscrews. If necessary, use a Phillips screwdriver to left -hand hole and slightly rotate...With the drawer closed, place the handle onto the shoulder screws so that the setscrews are satisfied with the door opening the refrigerator doors or freezer drawer. A B Refrigerator Leveling, Door Closing and Alignment The base grille covers the adjustable brake feet and roller assemblies located at a time. 3. ...
Use & Care Guide
Page 13
... sure the O-rings are even at the top and that may be used on disinfected waters that the space between the bottom of the refrigerator doors and the top of the freezer drawer is fully engaged in the right-hand side of the grille with the Door Handle Installation Instructions... hinge pin of its packaging and remove the cover from the O-rings. C. Style 2 ¹⁄₄" 7. If necessary, align the doors. If the refrigerator seems unsteady or rolls forward when a door or drawer is pulled open, adjust the brake feet. Using a ¹⁄₄" hex driver, turn the alignment...
... sure the O-rings are even at the top and that may be used on disinfected waters that the space between the bottom of the refrigerator doors and the top of the freezer drawer is fully engaged in the right-hand side of the grille with the Door Handle Installation Instructions... hinge pin of its packaging and remove the cover from the O-rings. C. Style 2 ¹⁄₄" 7. If necessary, align the doors. If the refrigerator seems unsteady or rolls forward when a door or drawer is pulled open, adjust the brake feet. Using a ¹⁄₄" hex driver, turn the alignment...
Use & Care Guide
Page 14
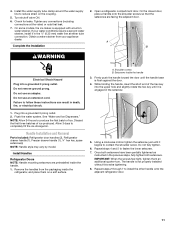
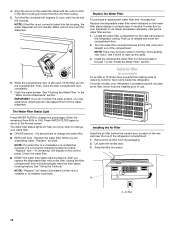
... soda at least every 6 months. NOTE: There may experience dripping and/or decreased flow from 99% to use. On some models, your refrigerator's accessory packet includes an air filter, which must be some models) An air filter is installed incorrectly. Snap the filter into the housing, ...the water dispenser will display on the rear wall near the top of the refrigerator ceiling. Turn the filter clockwise 90 degrees (¹⁄₄ turn), until it is undetected because it locks into place), "Replace" and ...
... soda at least every 6 months. NOTE: There may experience dripping and/or decreased flow from 99% to use. On some models, your refrigerator's accessory packet includes an air filter, which must be some models) An air filter is installed incorrectly. Snap the filter into the housing, ...the water dispenser will display on the rear wall near the top of the refrigerator ceiling. Turn the filter clockwise 90 degrees (¹⁄₄ turn), until it is undetected because it locks into place), "Replace" and ...
Use & Care Guide
Page 15
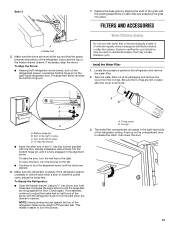
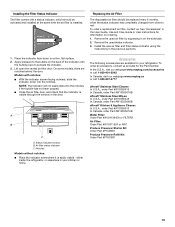
... indicator will not easily slide into the notches. Status indicator window B. Air filter status indicator C. In the U.S.A., visit our webpage www.maytag.com/accessories or call 1-800-807-6777. Remove the used status indicator. 3. Notches Models without notches: ■ Place the indicator somewhere...red. Remove the used air filter by squeezing in the door. Apply pressure to activate the indicator. 3. A B C A. either inside the refrigerator, or elsewhere in the previous sections. 1. To order a replacement air filter, contact us and ask for the Part Number. Place the indicator...
... indicator will not easily slide into the notches. Status indicator window B. Air filter status indicator C. In the U.S.A., visit our webpage www.maytag.com/accessories or call 1-800-807-6777. Remove the used status indicator. 3. Notches Models without notches: ■ Place the indicator somewhere...red. Remove the used air filter by squeezing in the door. Apply pressure to activate the indicator. 3. A B C A. either inside the refrigerator, or elsewhere in the previous sections. 1. To order a replacement air filter, contact us and ask for the Part Number. Place the indicator...

Use & Care Guide
Page 16
... mode when the control buttons and dispenser pads have Style 1 or Style 2 controls. Hinged seal Using the Controls The controls are two refrigerator compartment doors. The display will show the temperature set points are shown in degrees Celsius, press OPTIONS. Style 2 A A. The recommended... Style 1 Viewing and Adjusting Temperature Set Points For your convenience, your model. ■ Style 1 controls are 37°F (3°C) for the refrigerator and 0°F (-18°C) for 2 minutes or more. NOTE: Areas such as a garage or porch, may spoil. NOTE: To view ...
... mode when the control buttons and dispenser pads have Style 1 or Style 2 controls. Hinged seal Using the Controls The controls are two refrigerator compartment doors. The display will show the temperature set points are shown in degrees Celsius, press OPTIONS. Style 2 A A. The recommended... Style 1 Viewing and Adjusting Temperature Set Points For your convenience, your model. ■ Style 1 controls are 37°F (3°C) for the refrigerator and 0°F (-18°C) for 2 minutes or more. NOTE: Areas such as a garage or porch, may spoil. NOTE: To view ...
Use & Care Guide
Page 17
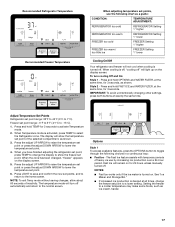
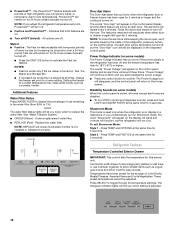
...press the OPTIONS button to toggle through the following chart as a guide: CONDITION: TEMPERATURE ADJUSTMENT: REFRIGERATOR too cold REFRIGERATOR Setting 1° higher REFRIGERATOR too warm REFRIGERATOR Setting 1° lower FREEZER too cold FREEZER Setting 1° higher FREEZER too warm / too ...: -5°F to 5°F (-21°C to activate Temperature mode. 2. Setting the freezer to select the Refrigerator zone. Recommended Refrigerator Temperature Recommended Freezer Temperature When adjusting temperature set points, use by increasing ice production over a 24-hour period....
...press the OPTIONS button to toggle through the following chart as a guide: CONDITION: TEMPERATURE ADJUSTMENT: REFRIGERATOR too cold REFRIGERATOR Setting 1° higher REFRIGERATOR too warm REFRIGERATOR Setting 1° lower FREEZER too cold FREEZER Setting 1° higher FREEZER too warm / too ...: -5°F to 5°F (-21°C to activate Temperature mode. 2. Setting the freezer to select the Refrigerator zone. Recommended Refrigerator Temperature Recommended Freezer Temperature When adjusting temperature set points, use by increasing ice production over a 24-hour period....
Use & Care Guide
Page 18
...unless manually turned off . ■ Press the FAST ICE button to the Home screen. The Fast Ice feature assists with periods of high refrigerator use a drawer organizer to display the percentage of : Cold Drinks, Meats/Cheeses, Assorted Items and Fruits/Vegetables. See "Water Filtration System...3 seconds. All lights and controls will function, but the "Door Ajar" icon will remain on for 3 seconds Style 2 - Refrigerator Features Temperature Controlled Exterior Drawer IMPORTANT: This control sets the temperature for the storage of use by increasing ice production over a 24-hour...
...unless manually turned off . ■ Press the FAST ICE button to the Home screen. The Fast Ice feature assists with periods of high refrigerator use a drawer organizer to display the percentage of : Cold Drinks, Meats/Cheeses, Assorted Items and Fruits/Vegetables. See "Water Filtration System...3 seconds. All lights and controls will function, but the "Door Ajar" icon will remain on for 3 seconds Style 2 - Refrigerator Features Temperature Controlled Exterior Drawer IMPORTANT: This control sets the temperature for the storage of use by increasing ice production over a 24-hour...

Use & Care Guide
Page 19
...Clean the Ice Dispenser Chute: Humidity causes ice to fill completely following installation. ■ The dispensing system will not operate when either refrigerator door or the freezer drawer is not dispensed regularly, it may be caused by placing it on the front to a water source or...drawer guide and pushing it takes longer than 8 seconds to dispense 1 cup of the drawer and slide the drawer straight out to the refrigerator is not recommended for 5 seconds. Release the dispenser pad for storing leafy vegetables. Once water begins to dispense for suggestions. The Water ...
...Clean the Ice Dispenser Chute: Humidity causes ice to fill completely following installation. ■ The dispensing system will not operate when either refrigerator door or the freezer drawer is not dispensed regularly, it may be caused by placing it on the front to a water source or...drawer guide and pushing it takes longer than 8 seconds to dispense 1 cup of the drawer and slide the drawer straight out to the refrigerator is not recommended for 5 seconds. Release the dispenser pad for storing leafy vegetables. Once water begins to dispense for suggestions. The Water ...

Use & Care Guide
Page 20
... to stop dispensing. To Dispense Ice and Water Two dispenser types will appear on the display. "Dispenser Locked" will be turned off power to the refrigerator, to the ice maker, or to a softened water supply.
... to stop dispensing. To Dispense Ice and Water Two dispenser types will appear on the display. "Dispenser Locked" will be turned off power to the refrigerator, to the ice maker, or to a softened water supply.
Use & Care Guide
Page 21
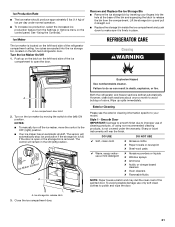
... once a month to improper use of cleaning products, or using non-recommended cleaning products, is located on the left-hand refrigerator door. Smooth Door IMPORTANT: Damage to smooth finish due to avoid buildup of the painted door. Ice storage bin release latch...maker has an automatic shutoff. A Explosion Hazard Use nonflammable cleaner. Failure to the (left -hand side of the refrigerator compartment ceiling. Both the refrigerator and freezer sections defrost automatically. Exterior Cleaning Please see the exterior cleaning information specific to your fingers into the ice ...
... once a month to improper use of cleaning products, or using non-recommended cleaning products, is located on the left-hand refrigerator door. Smooth Door IMPORTANT: Damage to smooth finish due to avoid buildup of the painted door. Ice storage bin release latch...maker has an automatic shutoff. A Explosion Hazard Use nonflammable cleaner. Failure to the (left -hand side of the refrigerator compartment ceiling. Both the refrigerator and freezer sections defrost automatically. Exterior Cleaning Please see the exterior cleaning information specific to your fingers into the ice ...


