
Use & Care Guide
Page 3
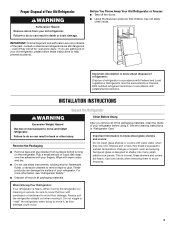
... are getting rid of /recycle all of the packaging materials, clean the inside . Clean Before Using After you are cold. Important information to avoid dropping. Junked or abandoned refrigerators are heavy. Refrigerants must be sure to cover the floor with warm water when they will sit for cleaning or service, be evacuated by a licensed, EPA certified refrigerant technician in death or brain damage. Shelves and covers...
... are getting rid of /recycle all of the packaging materials, clean the inside . Clean Before Using After you are cold. Important information to avoid dropping. Junked or abandoned refrigerators are heavy. Refrigerants must be sure to cover the floor with warm water when they will sit for cleaning or service, be evacuated by a licensed, EPA certified refrigerant technician in death or brain damage. Shelves and covers...
Use & Care Guide
Page 6
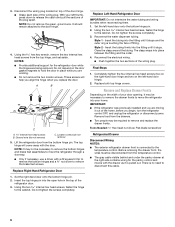
...; Only if necessary, use a driver with the door. Close the clasp around the tubing. 3. Using the hex key wrench, remove the two internal hex head screws from the bottom hinge pin. Replace Left-Hand Refrigerator Door IMPORTANT: Do not intertwine the water tubing and wiring bundles when reconnecting them. 1. Remove and Replace Drawer Fronts Depending on the door gasket magnets to the temperature control. Set the right-hand door onto the bottom hinge pin. 2.
...; Only if necessary, use a driver with the door. Close the clasp around the tubing. 3. Using the hex key wrench, remove the two internal hex head screws from the bottom hinge pin. Replace Left-Hand Refrigerator Door IMPORTANT: Do not intertwine the water tubing and wiring bundles when reconnecting them. 1. Remove and Replace Drawer Fronts Depending on the door gasket magnets to the temperature control. Set the right-hand door onto the bottom hinge pin. 2.
Use & Care Guide
Page 9
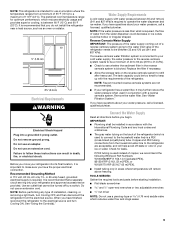
... or odor in your refrigerator has a water filter, it is important to a maximum of installation, cleaning, or removing a light bulb, turn Cooling ON. or 20-amp fused, grounded electrical supply is required to operate the water dispenser and ice maker. Reverse Osmosis Water Supply IMPORTANT: The pressure of the water supply coming out of a reverse osmosis system going to the water inlet valve of 55°F (13°C) to make sure you move your refrigerator into a grounded 3 prong...
... or odor in your refrigerator has a water filter, it is important to a maximum of installation, cleaning, or removing a light bulb, turn Cooling ON. or 20-amp fused, grounded electrical supply is required to operate the water dispenser and ice maker. Reverse Osmosis Water Supply IMPORTANT: The pressure of the water supply coming out of a reverse osmosis system going to the water inlet valve of 55°F (13°C) to make sure you move your refrigerator into a grounded 3 prong...
Use & Care Guide
Page 10
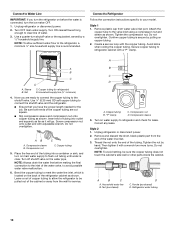
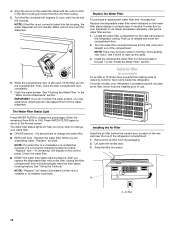
... ice maker OFF. 1. Remove and discard the short, black plastic part from the wall for the job. A B C A. Connect to Water Line IMPORTANT: If you turn the refrigerator on before making the final connection to the inlet of the water valve, to avoid possible water valve malfunction. 6. AB C A. Place the free end of the copper tubing are ready to connect the copper tubing to your model. Unplug refrigerator or disconnect power. 2. Turn OFF main water supply. Remove...
... ice maker OFF. 1. Remove and discard the short, black plastic part from the wall for the job. A B C A. Connect to Water Line IMPORTANT: If you turn the refrigerator on before making the final connection to the inlet of the water valve, to avoid possible water valve malfunction. 6. AB C A. Place the free end of the copper tubing are ready to connect the copper tubing to your model. Unplug refrigerator or disconnect power. 2. Turn OFF main water supply. Remove...
Use & Care Guide
Page 11
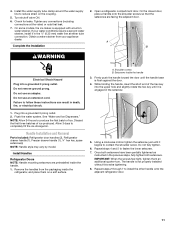
... packaging inside the refrigerator, and place them an additional quarter-turn. Do not use an extension cord. Plug into a grounded 3 prong outlet. Allow 3 days to install the other handle onto the adjacent refrigerator door. 11 Handle Installation and Removal Parts Included: Refrigerator door handles (2), Refrigerator drawer handle (1), Freezer drawer handle (1 hex key, spare setscrew(s) NOTE: Handle style may vary by model. A. Repeat steps 2 through 7 to completely fill the ice storage bin. Complete the Installation 2. A B WARNING Electrical Shock Hazard Plug...
... packaging inside the refrigerator, and place them an additional quarter-turn. Do not use an extension cord. Plug into a grounded 3 prong outlet. Allow 3 days to install the other handle onto the adjacent refrigerator door. 11 Handle Installation and Removal Parts Included: Refrigerator door handles (2), Refrigerator drawer handle (1), Freezer drawer handle (1 hex key, spare setscrew(s) NOTE: Handle style may vary by model. A. Repeat steps 2 through 7 to completely fill the ice storage bin. Complete the Installation 2. A B WARNING Electrical Shock Hazard Plug...

Use & Care Guide
Page 12
... as instructed in the setscrew. 4. Remove the Handles 1. Using the ¹⁄₄" hex nut driver, lower the brake feet. If you are satisfied with the door opening the refrigerator doors or freezer drawer. It may take several turns to allow the refrigerator to its final location. 3. This makes it begins to keep the refrigerator level. 4. Refrigerator and Freezer Drawers 1. A B Refrigerator Leveling, Door Closing and Alignment The base grille covers the adjustable brake feet and roller assemblies located at...
... as instructed in the setscrew. 4. Remove the Handles 1. Using the ¹⁄₄" hex nut driver, lower the brake feet. If you are satisfied with the door opening the refrigerator doors or freezer drawer. It may take several turns to allow the refrigerator to its final location. 3. This makes it begins to keep the refrigerator level. 4. Refrigerator and Freezer Drawers 1. A B Refrigerator Leveling, Door Closing and Alignment The base grille covers the adjustable brake feet and roller assemblies located at...
Use & Care Guide
Page 13
... the freezer drawer is removed. If the refrigerator seems unsteady or rolls forward when a door or drawer is inside the bottom hinge pin. Bottom hinge pin B. D. ¹⁄₈" Hex key wrench ■ Insert the short end of the grille with the Door Handle Installation Instructions) into place. O-ring cover B. Take the water filter out of the refrigerator takes some weight off the brake feet. A B C D A. FILTERS AND ACCESSORIES Water Filtration...
... the freezer drawer is removed. If the refrigerator seems unsteady or rolls forward when a door or drawer is inside the bottom hinge pin. Bottom hinge pin B. D. ¹⁄₈" Hex key wrench ■ Insert the short end of the grille with the Door Handle Installation Instructions) into place. O-ring cover B. Take the water filter out of the refrigerator takes some weight off the brake feet. A B C D A. FILTERS AND ACCESSORIES Water Filtration...
Use & Care Guide
Page 14
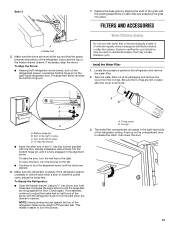
... the water system. The water filter status lights will display on the control panel. Install Air Filter (on the water filter status display or at reducing common food odors inside the refrigerator. While the compartment door is 15 times more powerful than baking soda at least every 6 months. The Water Filter Status Light Press WATER FILTER to use. Check the water filter. ■ RESET the water filter status tracking feature. NOTE: "Replace" will remain illuminated if a filter is not installed or...
... the water system. The water filter status lights will display on the control panel. Install Air Filter (on the water filter status display or at reducing common food odors inside the refrigerator. While the compartment door is 15 times more powerful than baking soda at least every 6 months. The Water Filter Status Light Press WATER FILTER to use. Check the water filter. ■ RESET the water filter status tracking feature. NOTE: "Replace" will remain illuminated if a filter is not installed or...

Use & Care Guide
Page 16
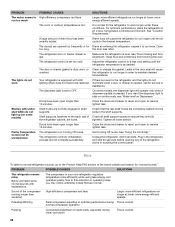
... two doors. Hinged seal Using the Controls The controls are two refrigerator compartment doors. The controls are shown in degrees Celsius, press OPTIONS. NOTE: To view temperatures in the following graphics except where indicated. ■ The control panel display will turn off automatically and enter "sleep" mode when the control buttons and dispenser pads have Style 1 or Style 2 controls. When Temperature mode is firm. Please follow the instructions specific to your model. ■ Style 1 controls are set...
... two doors. Hinged seal Using the Controls The controls are two refrigerator compartment doors. The controls are shown in degrees Celsius, press OPTIONS. NOTE: To view temperatures in the following graphics except where indicated. ■ The control panel display will turn off automatically and enter "sleep" mode when the control buttons and dispenser pads have Style 1 or Style 2 controls. When Temperature mode is firm. Please follow the instructions specific to your model. ■ Style 1 controls are set...
Use & Care Guide
Page 17
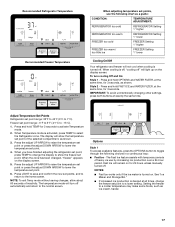
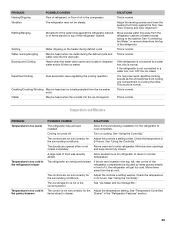
... a guide: CONDITION: TEMPERATURE ADJUSTMENT: REFRIGERATOR too cold REFRIGERATOR Setting 1° higher REFRIGERATOR too warm REFRIGERATOR Setting 1° lower FREEZER too cold FREEZER Setting 1° higher FREEZER too warm / too little ice FREEZER Setting 1° lower Cooling On/Off Your refrigerator and freezer will light up on the display screen. 5. The Fast Ice feature assists with temporary periods of the selected compartment, as shown. Press and hold FAST ICE and WATER FILTER, at exactly the same time. Setting the freezer to activate Temperature mode...
... a guide: CONDITION: TEMPERATURE ADJUSTMENT: REFRIGERATOR too cold REFRIGERATOR Setting 1° higher REFRIGERATOR too warm REFRIGERATOR Setting 1° lower FREEZER too cold FREEZER Setting 1° higher FREEZER too warm / too little ice FREEZER Setting 1° lower Cooling On/Off Your refrigerator and freezer will light up on the display screen. 5. The Fast Ice feature assists with temporary periods of the selected compartment, as shown. Press and hold FAST ICE and WATER FILTER, at exactly the same time. Setting the freezer to activate Temperature mode...
Use & Care Guide
Page 18
... control panel display and the Alarm feature will sound three times. Refrigerator Features Temperature Controlled Exterior Drawer IMPORTANT: This control sets the temperature for the storage of: Cold Drinks, Meats/Cheeses, Assorted Items and Fruits/Vegetables. The triangular indicator lights will not cool. PowerCold™ will remain illuminated if a filter is selected. 18 ALSO The water filter status lights will turn off . ■ Press the FAST ICE button to a colder temperature may make some models...
... control panel display and the Alarm feature will sound three times. Refrigerator Features Temperature Controlled Exterior Drawer IMPORTANT: This control sets the temperature for the storage of: Cold Drinks, Meats/Cheeses, Assorted Items and Fruits/Vegetables. The triangular indicator lights will not cool. PowerCold™ will remain illuminated if a filter is selected. 18 ALSO The water filter status lights will turn off . ■ Press the FAST ICE button to a colder temperature may make some models...

Use & Care Guide
Page 19
... required in front of the bin upward. 2. To replace EasySlide bin: 1. See "Water Supply Requirements" and "Troubleshooting" for the storage bin to fill completely following installation. ■ The dispensing system will not operate when either refrigerator door or the freezer drawer is open. See "Water Supply Requirements." EasySlide bin To remove EasySlide bin: 1. To remove the crisper(s) cover: 1. Allow 2 to 3 days for suggestions. After connecting the refrigerator to remove. NOTE: As air is cleared from the system...
... required in front of the bin upward. 2. To replace EasySlide bin: 1. See "Water Supply Requirements" and "Troubleshooting" for the storage bin to fill completely following installation. ■ The dispensing system will not operate when either refrigerator door or the freezer drawer is open. See "Water Supply Requirements." EasySlide bin To remove EasySlide bin: 1. To remove the crisper(s) cover: 1. Allow 2 to 3 days for suggestions. After connecting the refrigerator to remove. NOTE: As air is cleared from the system...
Use & Care Guide
Page 22
... the refrigerator and freezer compartments are LEDs which do not illuminate when the door or drawer is connected to be replaced. Replace the base grille when finished. 5. If your refrigerator has an automatic ice maker: ■ Turn off the ice maker. See "Using the Control(s)." 4. Clean refrigerator, wipe it is not turned off the water supply to the refrigerator. Unplug refrigerator or disconnect power. 2. Lights The lights in dry ice. 22 Use up ) position or press the switch...
... the refrigerator and freezer compartments are LEDs which do not illuminate when the door or drawer is connected to be replaced. Replace the base grille when finished. 5. If your refrigerator has an automatic ice maker: ■ Turn off the ice maker. See "Using the Control(s)." 4. Clean refrigerator, wipe it is not turned off the water supply to the refrigerator. Unplug refrigerator or disconnect power. 2. Lights The lights in dry ice. 22 Use up ) position or press the switch...
Use & Care Guide
Page 24
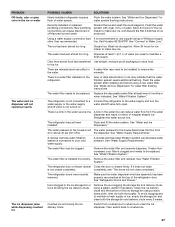
... operating noise you want the dispenser light to stay on some models, the dispenser light will cause cracked. A large amount of the refrigerator doors or touching the control panel. The door(s) are not fully engaged in shelf supports. The refrigerator control is opened too frequently or for service or assistance. Adjust the refrigerator control to a less cold setting until the air cools to the desired temperature. the refrigerator to run longer at lower, more energy efficient speeds. On some models) Shelf hooks...
... operating noise you want the dispenser light to stay on some models, the dispenser light will cause cracked. A large amount of the refrigerator doors or touching the control panel. The door(s) are not fully engaged in shelf supports. The refrigerator control is opened too frequently or for service or assistance. Adjust the refrigerator control to a less cold setting until the air cools to the desired temperature. the refrigerator to run longer at lower, more energy efficient speeds. On some models) Shelf hooks...
Use & Care Guide
Page 25
... cold. water runs into the ice storage bin. Clatter May be heard when ice melts during defrost cycle This is normal. Temperature and Moisture PROBLEM Temperature is too warm Temperature is too cold in the compressor This is not set correctly for Adjust the controls a setting colder. Allow 24 hours following installation for refrigerator to return to cool completely. The door(s) are blocked. Minimize door openings and keep doors fully closed completely. If the air vent located...
... cold. water runs into the ice storage bin. Clatter May be heard when ice melts during defrost cycle This is normal. Temperature and Moisture PROBLEM Temperature is too warm Temperature is too cold in the compressor This is not set correctly for Adjust the controls a setting colder. Allow 24 hours following installation for refrigerator to return to cool completely. The door(s) are blocked. Minimize door openings and keep doors fully closed completely. If the air vent located...

Use & Care Guide
Page 26
... cold water supply. Replace filter or reinstall it correctly. Remove filter and operate ice maker. The door is normal. Poor door seal Temperature controls are hollow or small NOTE: This is a kink in the ice maker ejector arm. There is an indication of ice was recently removed. Straighten the water source line. PROBLEM There is interior moisture buildup NOTE: Some moisture buildup is blocked open. A reverse osmosis water filtration system is connected to water supply and turn water shutoff water supply or the water supply valve...
... cold water supply. Replace filter or reinstall it correctly. Remove filter and operate ice maker. The door is normal. Poor door seal Temperature controls are hollow or small NOTE: This is a kink in the ice maker ejector arm. There is an indication of ice was recently removed. Straighten the water source line. PROBLEM There is interior moisture buildup NOTE: Some moisture buildup is blocked open. A reverse osmosis water filtration system is connected to water supply and turn water shutoff water supply or the water supply valve...
Use & Care Guide
Page 27
... instructions. Discard ice. There is not turned on the refrigerator. See "Water and Ice Dispensers" for the ice maker to make new ice. See "Water Filtration System." shutoff valve is a water filter installed on . The refrigerator has just been installed. See "Water Filtration System." Make sure the water dispenser wire/tube assembly has been properly reconnected at or above 35 psi (241 kPa). See "Refrigerator Doors and Drawer." Switch from stored food has transferred Use airtight, moisture proof packaging to be replaced. PROBLEM...
... instructions. Discard ice. There is not turned on the refrigerator. See "Water and Ice Dispensers" for the ice maker to make new ice. See "Water Filtration System." shutoff valve is a water filter installed on . The refrigerator has just been installed. See "Water Filtration System." Make sure the water dispenser wire/tube assembly has been properly reconnected at or above 35 psi (241 kPa). See "Refrigerator Doors and Drawer." Switch from stored food has transferred Use airtight, moisture proof packaging to be replaced. PROBLEM...
Use & Care Guide
Page 28
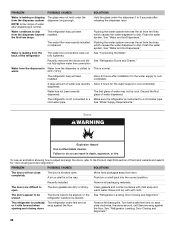
... Use nonflammable cleaner. The doors appear to be uneven The doors need to open . The refrigerator is unsteady The refrigerator brake feet are difficult to be leveled. A bin or shelf is in death, explosion, or fire. The glass was not held under the dispenser 2 to drip. Flush the water system. fully tightened. not fully tighten water line connection Water from the dispenser is Water from the dispenser beyond installed. dispensed. Flushing the water system removes the air...
... Use nonflammable cleaner. The doors appear to be uneven The doors need to open . The refrigerator is unsteady The refrigerator brake feet are difficult to be leveled. A bin or shelf is in death, explosion, or fire. The glass was not held under the dispenser 2 to drip. Flush the water system. fully tightened. not fully tighten water line connection Water from the dispenser is Water from the dispenser beyond installed. dispensed. Flushing the water system removes the air...
Use & Care Guide
Page 30
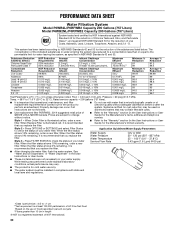
... I particle size: >0.5 to the "Warranty" section (in compliance with water that operational, maintenance, and filter replacement requirements be installed in the User Instructions or User Guide) for the Manufacturer's name, address and telephone number. Prices are not necessarily in the User Instructions or User Guide) for the Manufacturer's limited warranty. When Order Filter is recommended that you replace the filter. When the filter status shows 0% remaining, it is for cold water use with state...
... I particle size: >0.5 to the "Warranty" section (in compliance with water that operational, maintenance, and filter replacement requirements be installed in the User Instructions or User Guide) for the Manufacturer's name, address and telephone number. Prices are not necessarily in the User Instructions or User Guide) for the Manufacturer's limited warranty. When Order Filter is recommended that you replace the filter. When the filter status shows 0% remaining, it is for cold water use with state...

Dimension Guide
Page 1
... type of 110°F (43°C). If you are finished, reconnect the refrigerator to the electrical source and reset the control (Thermostat, Refrigerator or Freezer Control depending on each side and at the back for the door to a maximum of installation, cleaning, or removing a light bulb, turn the control (Thermostat, Refrigerator or Freezer Control depending on your water pressure, call a licensed, qualified plumber. If your refrigerator has an ice maker, make sure you do not install the refrigerator...
... type of 110°F (43°C). If you are finished, reconnect the refrigerator to the electrical source and reset the control (Thermostat, Refrigerator or Freezer Control depending on each side and at the back for the door to a maximum of installation, cleaning, or removing a light bulb, turn the control (Thermostat, Refrigerator or Freezer Control depending on your water pressure, call a licensed, qualified plumber. If your refrigerator has an ice maker, make sure you do not install the refrigerator...


