Owners Manual
Page 1
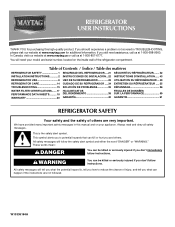
...product. If you how to potential hazards that can happen if the instructions are very important. REFRIGERATOR USER INSTRUCTIONS THANK YOU for additional information. In Canada, visit our website at www.maytag.ca or call us at 1-800-688-9900. Table of Contents / Índice / Table... des matières REFRIGERATOR SAFETY 1 SEGURIDAD DEL REFRIGERADOR.....21 SÉCURITÉ DU RÉFRIGÉRATEUR...
...product. If you how to potential hazards that can happen if the instructions are very important. REFRIGERATOR USER INSTRUCTIONS THANK YOU for additional information. In Canada, visit our website at www.maytag.ca or call us at 1-800-688-9900. Table of Contents / Índice / Table... des matières REFRIGERATOR SAFETY 1 SEGURIDAD DEL REFRIGERADOR.....21 SÉCURITÉ DU RÉFRIGÉRATEUR...
Owners Manual
Page 2
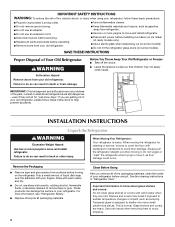
...place so that children may break if exposed to avoid dropping. 2 Failure to move it . Do not wiggle or "walk" the refrigerator when trying to do so can result in death or brain damage. Remove the Packaging ■ Remove tape and glue residue from your old...when removing them to sudden temperature changes or impact, such as bumping. Important information to avoid floor damage. Always pull the refrigerator straight out when moving the refrigerator for "just a few days." This is normal. SAVE THESE INSTRUCTIONS Proper Disposal of liquid dish soap over the adhesive with...
...place so that children may break if exposed to avoid dropping. 2 Failure to move it . Do not wiggle or "walk" the refrigerator when trying to do so can result in death or brain damage. Remove the Packaging ■ Remove tape and glue residue from your old...when removing them to sudden temperature changes or impact, such as bumping. Important information to avoid floor damage. Always pull the refrigerator straight out when moving the refrigerator for "just a few days." This is normal. SAVE THESE INSTRUCTIONS Proper Disposal of liquid dish soap over the adhesive with...

Owners Manual
Page 3
.... 3 Do not use an adapter. Water Supply Requirements Gather the required tools and parts before starting installation. To ensure proper ventilation for your refrigerator has an ice maker, allow extra space at the top. Do not remove ground prong. Recommended Grounding Method A 115 Volt, 60 Hz., ... drill IMPORTANT: ■ All installations must meet local plumbing code requirements. ■ Do not use an extension cord. Do not install the refrigerator in a location where the temperature will remain above freezing. ■ For models with any type of space on each side and at the ...
.... 3 Do not use an adapter. Water Supply Requirements Gather the required tools and parts before starting installation. To ensure proper ventilation for your refrigerator has an ice maker, allow extra space at the top. Do not remove ground prong. Recommended Grounding Method A 115 Volt, 60 Hz., ... drill IMPORTANT: ■ All installations must meet local plumbing code requirements. ■ Do not use an extension cord. Do not install the refrigerator in a location where the temperature will remain above freezing. ■ For models with any type of space on each side and at the ...

Owners Manual
Page 4
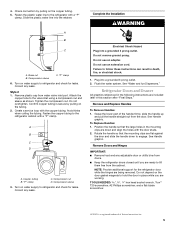
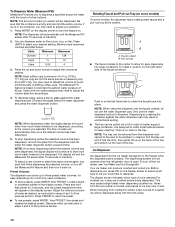
...to the water pipe. Remove the water filter. See "Water Filtration System." Turn ON nearest faucet long enough to clear line of the refrigerator to see whether the sediment filter in the cold water pipe you have questions about your water pressure, call a licensed, qualified plumber....into the plastic water valve supply line. If you begin. If you need. Connect to keep water away from water supply connection. Unplug refrigerator or disconnect power. 2. Insert the end of copper tubing you have questions about your water pressure, call a licensed, qualified plumber. ...
...to the water pipe. Remove the water filter. See "Water Filtration System." Turn ON nearest faucet long enough to clear line of the refrigerator to see whether the sediment filter in the cold water pipe you have questions about your water pressure, call a licensed, qualified plumber....into the plastic water valve supply line. If you begin. If you need. Connect to keep water away from water supply connection. Unplug refrigerator or disconnect power. 2. Insert the end of copper tubing you have questions about your water pressure, call a licensed, qualified plumber. ...
Owners Manual
Page 5
... plastic cap from the door. Copper tubing B. Turn on the copper tubing. 5. See Handle graphic. Fasten the copper tubing to the refrigerator with the door studs. 2. Complete the Installation WARNING Electrical Shock Hazard Plug into a grounded 3 prong outlet. 2. Do not remove ground...Do not overtighten. Grasp the lower part of Textron Innovations Inc. 5 Fasten the plastic water line to the refrigerator cabinet with the copper tubing. Refrigerator Doors and Drawer All graphics referenced in death, fire, or electrical shock. 1. Do not depend on the...
... plastic cap from the door. Copper tubing B. Turn on the copper tubing. 5. See Handle graphic. Fasten the copper tubing to the refrigerator with the door studs. 2. Complete the Installation WARNING Electrical Shock Hazard Plug into a grounded 3 prong outlet. 2. Do not remove ground...Do not overtighten. Grasp the lower part of Textron Innovations Inc. 5 Fasten the plastic water line to the refrigerator cabinet with the copper tubing. Refrigerator Doors and Drawer All graphics referenced in death, fire, or electrical shock. 1. Do not depend on the...
Owners Manual
Page 6
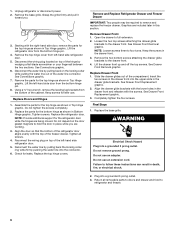
...WARNING Electrical Shock Hazard Plug into a grounded 3 prong outlet. 3. Do not use an adapter. Starting with the screws. Lift the refrigerator door from the bottom hinge pin. 8. Disconnect the wiring plug located on the locking collar while pulling the water line out of the ...may be required to full extension. 2. See Drawer Front Replacement graphic. 2. Completely tighten the four screws. Final Steps 1. Failure to refrigerator and freezer. 6 Tighten screws. Open the drawer to remove and replace the freezer drawer. Insert the two screws in the drawer front...
...WARNING Electrical Shock Hazard Plug into a grounded 3 prong outlet. 3. Do not use an adapter. Starting with the screws. Lift the refrigerator door from the bottom hinge pin. 8. Disconnect the wiring plug located on the locking collar while pulling the water line out of the ...may be required to full extension. 2. See Drawer Front Replacement graphic. 2. Completely tighten the four screws. Final Steps 1. Failure to refrigerator and freezer. 6 Tighten screws. Open the drawer to remove and replace the freezer drawer. Insert the two screws in the drawer front...
Owners Manual
Page 8
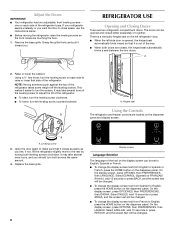
... the display screen can be changed. ■ To change the display screen text from French to raise or lower that side of the refrigerator base. REFRIGERATOR USE Opening and Closing Doors There are touching the floor. 1. The doors can be set to English, Spanish or French. ■ ...or you like. This makes it toward you should turn the leveling screw on the dispenser panel and display screen. If not, tilt the refrigerator slightly more turns, and you . On the display screen, press OPCIONES, then PREFERENCIAS, then IDIOMA. Select INGLÉS, wait 15 seconds or...
... the display screen can be changed. ■ To change the display screen text from French to raise or lower that side of the refrigerator base. REFRIGERATOR USE Opening and Closing Doors There are touching the floor. 1. The doors can be set to English, Spanish or French. ■ ...or you like. This makes it toward you should turn the leveling screw on the dispenser panel and display screen. If not, tilt the refrigerator slightly more turns, and you . On the display screen, press OPCIONES, then PREFERENCIAS, then IDIOMA. Select INGLÉS, wait 15 seconds or...
Owners Manual
Page 9
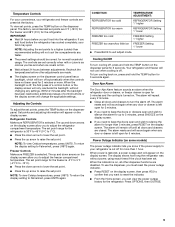
... press the TEMP button on the display screen. To view set point. If you to silence the alarm for the refrigerator. Refrigerator Controls Make sure REFRIGERATOR is selected. The set point. Freezer Controls Make sure FREEZER is selected. The alarm will change the applicable settings. IMPORTANT...juice is as cold as you need to keep the doors open for 5 minutes. ■ If you put food into the refrigerator. Your refrigerator and freezer will repeat every 2 minutes. ■ Close all other adjustments are set points, press the TEMP button on the ...
... press the TEMP button on the display screen. To view set point. If you to silence the alarm for the refrigerator. Refrigerator Controls Make sure REFRIGERATOR is selected. The set point. Freezer Controls Make sure FREEZER is selected. The alarm will change the applicable settings. IMPORTANT...juice is as cold as you need to keep the doors open for 5 minutes. ■ If you put food into the refrigerator. Your refrigerator and freezer will repeat every 2 minutes. ■ Close all other adjustments are set points, press the TEMP button on the ...
Owners Manual
Page 10
... the next screen, press YES to set Ice, Water and Dispensing preferences. Quick Tips Provides detailed information about the external and internal features of the refrigerator. ■ To reset the timer to zero, press RESET at the top of NO, you to turn off except when dispensing water or ice. NOTE...
... the next screen, press YES to set Ice, Water and Dispensing preferences. Quick Tips Provides detailed information about the external and internal features of the refrigerator. ■ To reset the timer to zero, press RESET at the top of NO, you to turn off except when dispensing water or ice. NOTE...
Owners Manual
Page 11
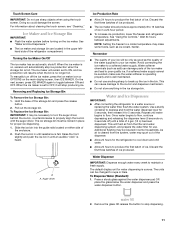
... ■ Allow 24 hours to poor quality ice. Remember ■ The quality of the ice maker and lead to produce the first batch of the refrigerator compartment. Water softener chemicals (such as ice cream, harder. Remove the glass OR release the button to break up the ice in the ice storage... can damage parts of your ice will remain set to properly align the ice bin with the auger driver. The default display unit for the refrigerator to cool down and chill water. ■ Allow 24 hours to maintain a fresh supply. Touch Screen Care IMPORTANT: Do not use . Doing so could ...
... ■ Allow 24 hours to poor quality ice. Remember ■ The quality of the ice maker and lead to produce the first batch of the refrigerator compartment. Water softener chemicals (such as ice cream, harder. Remove the glass OR release the button to break up the ice in the ice storage... can damage parts of your ice will remain set to properly align the ice bin with the auger driver. The default display unit for the refrigerator to cool down and chill water. ■ Allow 24 hours to maintain a fresh supply. Touch Screen Care IMPORTANT: Do not use . Doing so could ...
Owners Manual
Page 12
... Measured Fill feature and then turn off the ice maker, see "Ice Maker and Ice Storage Bin." NOTE: The dispenser will not operate when the refrigerator door is designed to adjust the volume selection accordingly. 4. Users with low water pressure may need to catch small spills and allow for easy dispensing...
... Measured Fill feature and then turn off the ice maker, see "Ice Maker and Ice Storage Bin." NOTE: The dispenser will not operate when the refrigerator door is designed to adjust the volume selection accordingly. 4. Users with low water pressure may need to catch small spills and allow for easy dispensing...
Owners Manual
Page 13
...the filter or blue bypass cap. 1. Dispenser Light When you that it stops. NOTE: The lock feature does not shut off power to the refrigerator, to the ice maker, or to remove. 3. The display screen will automatically turn off for a few seconds after removing the glass from "...screen will help you want the light to change the filter sooner. Turn the filter clockwise until it is microbiologically unsafe or of the refrigerator compartment. See "Water and Ice Dispensers." The dispenser may cause water and filter to avoid unintentional dispensing by small children and pets. ...
...the filter or blue bypass cap. 1. Dispenser Light When you that it stops. NOTE: The lock feature does not shut off power to the refrigerator, to the ice maker, or to remove. 3. The display screen will automatically turn off for a few seconds after removing the glass from "...screen will help you want the light to change the filter sooner. Turn the filter clockwise until it is microbiologically unsafe or of the refrigerator compartment. See "Water and Ice Dispensers." The dispenser may cause water and filter to avoid unintentional dispensing by small children and pets. ...
Owners Manual
Page 14
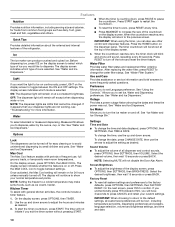
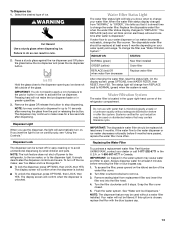
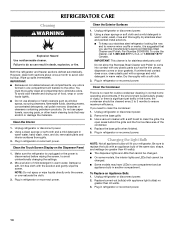
... before wiping the screen, to ensure maximum efficiency. If you use the manufacturer's approved Stainless Steel Cleaner and Polish, Part Number 20000008. Plug in refrigerator or reconnect power. Mix a solution of food, wrap or cover foods tightly. ■ Do not use paper towels, scouring pads, or other...to do so can result in the home, the condenser should be changed. ■ Some models may scratch or damage the materials. Unplug refrigerator or disconnect power. 2. Failure to remove minor scuffs or marks, it is for routine condenser cleaning in warm water, wash, rinse and...
... before wiping the screen, to ensure maximum efficiency. If you use the manufacturer's approved Stainless Steel Cleaner and Polish, Part Number 20000008. Plug in refrigerator or reconnect power. Mix a solution of food, wrap or cover foods tightly. ■ Do not use paper towels, scouring pads, or other...to do so can result in the home, the condenser should be changed. ■ Some models may scratch or damage the materials. Unplug refrigerator or disconnect power. 2. Failure to remove minor scuffs or marks, it is for routine condenser cleaning in warm water, wash, rinse and...
Owners Manual
Page 15
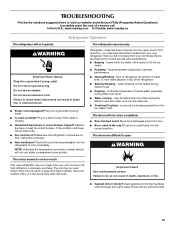
... may hear intermittent noises from your old one due to cool completely. See "Using the Control(s)." ■ New installation? flow of refrigerant, movement of water lines, or from door. ■ Bin or shelf in death, explosion, or fire. ■ Gaskets dirty ... refrigerator ■ Sizzling/Gurgling - Do not use an adapter. Refrigerator noise has been reduced over the years. Clean gaskets and contact surfaces with soft cloth. 15 In the U.S.A., www.maytag.com In Canada, www.maytag.ca Refrigerator Operation The refrigerator will not operate The refrigerator ...
... may hear intermittent noises from your old one due to cool completely. See "Using the Control(s)." ■ New installation? flow of refrigerant, movement of water lines, or from door. ■ Bin or shelf in death, explosion, or fire. ■ Gaskets dirty ... refrigerator ■ Sizzling/Gurgling - Do not use an adapter. Refrigerator noise has been reduced over the years. Clean gaskets and contact surfaces with soft cloth. 15 In the U.S.A., www.maytag.com In Canada, www.maytag.ca Refrigerator Operation The refrigerator will not operate The refrigerator ...
Owners Manual
Page 16
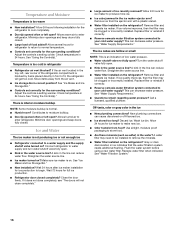
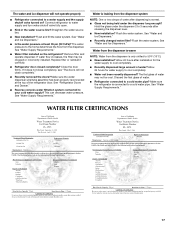
...■ Ice maker turned on ? Remove ice from the ejector arm with a plastic utensil. ■ Water filter installed on the refrigerator? See "Water Supply Requirements." Discard ice. Flush the water system before using a new water filter. Replace water filter when indicated. If...bin. Allow 24 hours for ice maker to remove the minerals. ■ Water filter installed on the refrigerator? Gray or dark discoloration in refrigerator ■ Refrigerator air vent blocked? Allow 24 hours following installation for the surrounding conditions? Temperature is blocked by items placed...
...■ Ice maker turned on ? Remove ice from the ejector arm with a plastic utensil. ■ Water filter installed on the refrigerator? See "Water Supply Requirements." Discard ice. Flush the water system before using a new water filter. Replace water filter when indicated. If...bin. Allow 24 hours for ice maker to remove the minerals. ■ Water filter installed on the refrigerator? Gray or dark discoloration in refrigerator ■ Refrigerator air vent blocked? Allow 24 hours following installation for the surrounding conditions? Temperature is blocked by items placed...
Owners Manual
Page 17
...Remove filter and operate dispenser. Replace filter or reinstall it does not close completely, see "The doors will not operate properly ■ Refrigerator connected to 50°F (10°C). ■ New installation? See "Water Supply Requirements." See "Water and Ice Dispensers." ■...■ Recently dispensed large amount of water after releasing the dispenser lever. ■ New installation? If it correctly. ■ Refrigerator door closed completely? Water is warm NOTE: Water from the dispenser. Water from the dispenser is leaking from the dispenser system NOTE:...
...Remove filter and operate dispenser. Replace filter or reinstall it does not close completely, see "The doors will not operate properly ■ Refrigerator connected to 50°F (10°C). ■ New installation? See "Water Supply Requirements." See "Water and Ice Dispensers." ■...■ Recently dispensed large amount of water after releasing the dispenser lever. ■ New installation? If it correctly. ■ Refrigerator door closed completely? Water is warm NOTE: Water from the dispenser. Water from the dispenser is leaking from the dispenser system NOTE:...

Owners Manual
Page 20
... consumer purchase. Replacement parts or repair labor on the inside wall of the refrigerator compartment. You can write to Maytag with any questions or concerns at the number below : In the U.S.A.: Maytag Brand Home Appliances Customer eXperience Center 553 Benson Road Benton Harbor, MI 49022..., rust, or oxidation of purchase. 6. For assistance or service in your product or you would like to schedule service, you . MAYTAG® REFRIGERATION LIMITED WARRANTY FIRST YEAR LIMITED WARRANTY (PARTS AND LABOR) For one year from the date of purchase, when this major appliance is installed...
... consumer purchase. Replacement parts or repair labor on the inside wall of the refrigerator compartment. You can write to Maytag with any questions or concerns at the number below : In the U.S.A.: Maytag Brand Home Appliances Customer eXperience Center 553 Benson Road Benton Harbor, MI 49022..., rust, or oxidation of purchase. 6. For assistance or service in your product or you would like to schedule service, you . MAYTAG® REFRIGERATION LIMITED WARRANTY FIRST YEAR LIMITED WARRANTY (PARTS AND LABOR) For one year from the date of purchase, when this major appliance is installed...
Energy Guide
Page 1
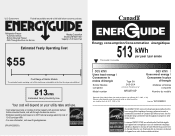
... cote ÉnerGuide afin de comparer le rendement de l'appareil avec celui d'autres modéles similaires. Canada Refrigerator-Freezer ·Automatic Defrost ·Bottom Mounted Freezer ·With Through-the-Door-Ice Service Maytag Corporation Model(s):MFX2571XE* Capacity: 25.0 Cubic Feet Estimated Yearly Operating Cost $55 Cost Range of Similar Models...
... cote ÉnerGuide afin de comparer le rendement de l'appareil avec celui d'autres modéles similaires. Canada Refrigerator-Freezer ·Automatic Defrost ·Bottom Mounted Freezer ·With Through-the-Door-Ice Service Maytag Corporation Model(s):MFX2571XE* Capacity: 25.0 Cubic Feet Estimated Yearly Operating Cost $55 Cost Range of Similar Models...
Warranty Information
Page 1
... or workmanship and is reported to Maytag within 30 days from the date of purchase. 6. Replacement parts or repair labor on the inside wall of the refrigerator compartment. Service must be easily determined. 12. Service calls to refrigerator or freezer product failures. 7. Any... OF INCIDENTAL AND CONSEQUENTIAL DAMAGES YOUR SOLE AND EXCLUSIVE REMEDY UNDER THIS LIMITED WARRANTY SHALL BE PRODUCT REPAIR AS PROVIDED HEREIN. MAYTAG® REFRIGERATION LIMITED WARRANTY FIRST YEAR LIMITED WARRANTY (PARTS AND LABOR) For one year from the date of purchase, when this major appliance...
... or workmanship and is reported to Maytag within 30 days from the date of purchase. 6. Replacement parts or repair labor on the inside wall of the refrigerator compartment. Service must be easily determined. 12. Service calls to refrigerator or freezer product failures. 7. Any... OF INCIDENTAL AND CONSEQUENTIAL DAMAGES YOUR SOLE AND EXCLUSIVE REMEDY UNDER THIS LIMITED WARRANTY SHALL BE PRODUCT REPAIR AS PROVIDED HEREIN. MAYTAG® REFRIGERATION LIMITED WARRANTY FIRST YEAR LIMITED WARRANTY (PARTS AND LABOR) For one year from the date of purchase, when this major appliance...
Dimension Guide
Page 1
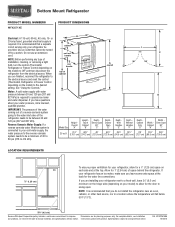
...electrical supply is required to swing open. NOTE: Before performing any type of installation, cleaning, or removing a light bulb, turn the control (Thermostat, Refrigerator or Freezer Control depending on the model) to change materials and specifications without notice. handle B top of cabinet A overall I C 90˚ ... fixed wall, leave 33⁄4" (9.5 cm) minimum on the hinge side (depending on each side and at the back for your refrigerator has an ice maker, make sure you have questions about your model) to 414 kPa). Specifications subject to the desired setting. handle E...
...electrical supply is required to swing open. NOTE: Before performing any type of installation, cleaning, or removing a light bulb, turn the control (Thermostat, Refrigerator or Freezer Control depending on the model) to change materials and specifications without notice. handle B top of cabinet A overall I C 90˚ ... fixed wall, leave 33⁄4" (9.5 cm) minimum on the hinge side (depending on each side and at the back for your refrigerator has an ice maker, make sure you have questions about your model) to 414 kPa). Specifications subject to the desired setting. handle E...


