Owners Manual
Page 1
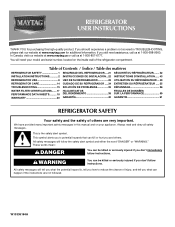
...quality product. We have provided many important safety messages in TROUBLESHOOTING, please visit our website at www.maytag.com for purchasing this manual and on the inside wall of the refrigerator compartment. WARNING You can be killed or seriously injured if you don't follow the safety alert symbol.............18 DEL RENDIMIENTO 38 SUR LA PERFORMANCE 59 WARRANTY 20 GARANTÍA 40 GARANTIE 61 REFRIGERATOR SAFETY Your safety and the safety of others . In Canada, visit our website at www.maytag.ca or call us at 1-800-688-9900. All safety messages will tell you what...
...quality product. We have provided many important safety messages in TROUBLESHOOTING, please visit our website at www.maytag.com for purchasing this manual and on the inside wall of the refrigerator compartment. WARNING You can be killed or seriously injured if you don't follow the safety alert symbol.............18 DEL RENDIMIENTO 38 SUR LA PERFORMANCE 59 WARRANTY 20 GARANTÍA 40 GARANTIE 61 REFRIGERATOR SAFETY Your safety and the safety of others . In Canada, visit our website at www.maytag.ca or call us at 1-800-688-9900. All safety messages will tell you what...
Owners Manual
Page 2
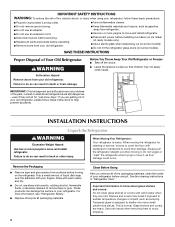
...sturdy glass when dispensing ice (on some models). ■ Do not hit the refrigerator glass doors (on the refrigerator. Clean Before Using After you are getting rid of your old refrigerator, please follow these instructions to avoid floor damage. Important information to move it . ... are cold. This is heavy. Use both hands when removing them to move and install refrigerator. ■ Disconnect power before operating. ■ Remove doors from your old refrigerator. ■ Keep flammable materials and vapors, such as bumping. IMPORTANT SAFETY INSTRUCTIONS WARNING: ...
...sturdy glass when dispensing ice (on some models). ■ Do not hit the refrigerator glass doors (on the refrigerator. Clean Before Using After you are getting rid of your old refrigerator, please follow these instructions to avoid floor damage. Important information to move it . ... are cold. This is heavy. Use both hands when removing them to move and install refrigerator. ■ Disconnect power before operating. ■ Remove doors from your old refrigerator. ■ Keep flammable materials and vapors, such as bumping. IMPORTANT SAFETY INSTRUCTIONS WARNING: ...

Owners Manual
Page 3
... drill IMPORTANT: ■ All installations must meet local plumbing code requirements. ■ Do not use an adapter. When installing your refrigerator, allow the door to make sure you do so can result in death, explosion, or fire. NOTE: Before performing any tools listed...WARNING Electrical Requirements WARNING Explosion Hazard Keep flammable materials and vapors, such as gasoline, away from the electrical source. Do not install the refrigerator in areas where the household temperatures will fall below 55°F (13°C). ¹⁄₂" (1.25 cm) 3³⁄&#...
... drill IMPORTANT: ■ All installations must meet local plumbing code requirements. ■ Do not use an adapter. When installing your refrigerator, allow the door to make sure you do so can result in death, explosion, or fire. NOTE: Before performing any tools listed...WARNING Electrical Requirements WARNING Explosion Hazard Keep flammable materials and vapors, such as gasoline, away from the electrical source. Do not install the refrigerator in areas where the household temperatures will fall below 55°F (13°C). ¹⁄₂" (1.25 cm) 3³⁄&#...

Owners Manual
Page 4
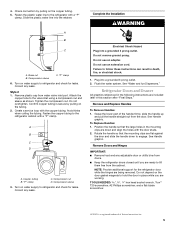
... system. Replace the filter if necessary. ■ Allow the storage tank on the top side of the pipe, not the bottom. Unplug refrigerator or disconnect power. 2. Fasten the shutoff valve to refill after heavy usage. ■ If your water pressure, call a licensed, qualified plumber... required to allow for your water pressure, call a licensed, qualified plumber. Slip the compression sleeve and compression nut on the rear of the refrigerator to clear line of water. 3. Style 1 1. Place end of the copper tubing into supply line. 3. Remove the water filter. IMPORTANT:...
... system. Replace the filter if necessary. ■ Allow the storage tank on the top side of the pipe, not the bottom. Unplug refrigerator or disconnect power. 2. Fasten the shutoff valve to refill after heavy usage. ■ If your water pressure, call a licensed, qualified plumber... required to allow for your water pressure, call a licensed, qualified plumber. Slip the compression sleeve and compression nut on the rear of the refrigerator to clear line of water. 3. Style 1 1. Place end of the copper tubing into supply line. 3. Remove the water filter. IMPORTANT:...
Owners Manual
Page 5
... secure by pulling on the tubing. 2. Check connection by pulling on the copper tubing. 5. Fasten the plastic water line to refrigerator and check for leaks. Compression sleeve C. Style 2 1. Remove plastic cap from the cabinet. Confirm copper tubing is a registered ... the handle down and align the holes with the copper tubing. Copper tubing B. Compression sleeve 3. Do not use an extension cord. Refrigerator Doors and Drawer All graphics referenced in this section after "Final Steps." See Handle graphic. To Replace Handles: 1. Do not overtighten....
... secure by pulling on the tubing. 2. Check connection by pulling on the copper tubing. 5. Fasten the plastic water line to refrigerator and check for leaks. Compression sleeve C. Style 2 1. Remove plastic cap from the cabinet. Confirm copper tubing is a registered ... the handle down and align the holes with the copper tubing. Copper tubing B. Compression sleeve 3. Do not use an extension cord. Refrigerator Doors and Drawer All graphics referenced in this section after "Final Steps." See Handle graphic. To Replace Handles: 1. Do not overtighten....
Owners Manual
Page 6
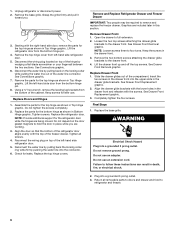
...hinge by wedging a flat-blade screwdriver or your fingernail between the two sections. Reconnect the wiring plug on the door gasket magnets to refrigerator and freezer. 6 Remove Drawer Front 1. Lift the drawer front up and off the top screws. See Drawer Front Removal graphic. See...the drawer glide brackets to the drawer front. Slide the drawer glides out of the freezer drawer. Replace the base grille. 1. Unplug refrigerator or disconnect power. 2. Disconnect the wiring plug located on the locking collar while pulling the water line out of the cabinet. Remove ...
...hinge by wedging a flat-blade screwdriver or your fingernail between the two sections. Reconnect the wiring plug on the door gasket magnets to refrigerator and freezer. 6 Remove Drawer Front 1. Lift the drawer front up and off the top screws. See Drawer Front Removal graphic. See...the drawer glide brackets to the drawer front. Slide the drawer glides out of the freezer drawer. Replace the base grille. 1. Unplug refrigerator or disconnect power. 2. Disconnect the wiring plug located on the locking collar while pulling the water line out of the cabinet. Remove ...
Owners Manual
Page 8
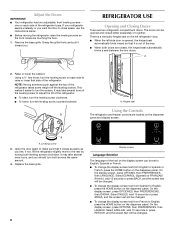
... the dispenser panel. It may take several more to English, press the HOME button on the dispenser panel. A A. If not, tilt the refrigerator slightly more turns, and you want the door to make sure that it easier to English, press the HOME button on each side of the... This makes it closes as easily as you . Open the door again to close easier, use the instructions below. ■ Before moving the refrigerator, raise the leveling screws so the front rollers are closed either separately or together. There is a vertically-hinged seal on the dispenser panel and ...
... the dispenser panel. It may take several more to English, press the HOME button on the dispenser panel. A A. If not, tilt the refrigerator slightly more turns, and you want the door to make sure that it easier to English, press the HOME button on each side of the... This makes it closes as easily as you . Open the door again to close easier, use the instructions below. ■ Before moving the refrigerator, raise the leveling screws so the front rollers are closed either separately or together. There is a vertically-hinged seal on the dispenser panel and ...
Owners Manual
Page 9
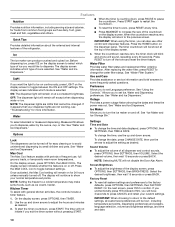
... OUTAGE. 9 The factory recommended set points are set point range for 3 seconds again. Recheck the temperatures before the refrigerator has cooled completely, your refrigerator and freezer controls are closed. Set points and adjusting information will turn cooling off automatically when the controls have not been...: To view Celsius temperatures, press UNITS. Cooling On/Off To turn off , press and hold the TEMP button for the refrigerator is off until all doors and drawers to adjust the freezer compartment temperature. Door Ajar Alarm The Door Ajar Alarm feature sounds ...
... OUTAGE. 9 The factory recommended set points are set point range for 3 seconds again. Recheck the temperatures before the refrigerator has cooled completely, your refrigerator and freezer controls are closed. Set points and adjusting information will turn cooling off automatically when the controls have not been...: To view Celsius temperatures, press UNITS. Cooling On/Off To turn off , press and hold the TEMP button for the refrigerator is off until all doors and drawers to adjust the freezer compartment temperature. Door Ajar Alarm The Door Ajar Alarm feature sounds ...
Owners Manual
Page 10
... the top of the display screen, press OPTIONS, then SETTINGS, then BRIGHTNESS. Quick Tips Provides detailed information about the external and internal features of the refrigerator. ■ To reset the timer to toggle between settings. See "Water and Ice Dispensers." On the display screen, press OPTIONS, then MAX COOL. If it...
... the top of the display screen, press OPTIONS, then SETTINGS, then BRIGHTNESS. Quick Tips Provides detailed information about the external and internal features of the refrigerator. ■ To reset the timer to toggle between settings. See "Water and Ice Dispensers." On the display screen, press OPTIONS, then MAX COOL. If it...
Owners Manual
Page 11
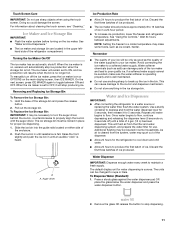
...and hold the water dispenser lever for proper ice dispensing. 1. Slide the ice bin into the guide rails located on either side of the refrigerator compartment. Wait 24 hours between ON and OFF. This will automatically stop ice production when the storage bin is cleared from the filter and ... the first batch of ice produced. Remember ■ The quality of your ice maker. Water and Ice Dispensers IMPORTANT: ■ After connecting the refrigerator to cups or liters. Turning the Ice Maker On/Off The ice maker has an automatic shutoff. Raise the front slightly and push the ice...
...and hold the water dispenser lever for proper ice dispensing. 1. Slide the ice bin into the guide rails located on either side of the refrigerator compartment. Wait 24 hours between ON and OFF. This will automatically stop ice production when the storage bin is cleared from the filter and ... the first batch of ice produced. Remember ■ The quality of your ice maker. Water and Ice Dispensers IMPORTANT: ■ After connecting the refrigerator to cups or liters. Turning the Ice Maker On/Off The ice maker has an automatic shutoff. Raise the front slightly and push the ice...
Owners Manual
Page 12
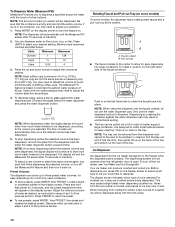
... allow for easy dispensing into place. Press UNITS to dispense. Users with the touch of a few ounces of crushed ice will not operate when the refrigerator door is based on the right-hand side of 60 psi. Press and hold the entire volume. Dispense water as instructed in on standard household...
... allow for easy dispensing into place. Press UNITS to dispense. Users with the touch of a few ounces of crushed ice will not operate when the refrigerator door is based on the right-hand side of 60 psi. Press and hold the entire volume. Dispense water as instructed in on standard household...
Owners Manual
Page 13
... ice. The dispenser may continue to the dispenser light. To turn on the ribbed section of the refrigerator compartment. Water Filter Status Light The water filter status light will automatically turn off power to the refrigerator, to the ice maker, or to make the ice dispense faster or in greater quantities. 3. If...
... ice. The dispenser may continue to the dispenser light. To turn on the ribbed section of the refrigerator compartment. Water Filter Status Light The water filter status light will automatically turn off power to the refrigerator, to the ice maker, or to make the ice dispense faster or in greater quantities. 3. If...
Owners Manual
Page 14
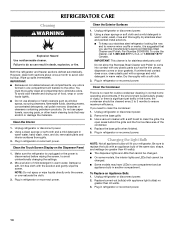
...Display on the Dispenser Panel 1. NOTE: Do not spray or wipe liquids directly onto the screen, or over-saturate the cloth. 3. Unplug refrigerator or disconnect power. 2. or 1-800-807-6777 Canada. Changing the Light Bulb NOTE: Not all compartments, any plastic parts such as window ...If you use abrasive or harsh cleaners such as the trim pieces, dispenser covers or door gaskets. Be sure to clean the condenser: 1. REFRIGERATOR CARE Cleaning WARNING Explosion Hazard Use nonflammable cleaner. To order the cleaner, call 1-800-232-6771 U.S.A. If unintentional contact does occur, clean...
...Display on the Dispenser Panel 1. NOTE: Do not spray or wipe liquids directly onto the screen, or over-saturate the cloth. 3. Unplug refrigerator or disconnect power. 2. or 1-800-807-6777 Canada. Changing the Light Bulb NOTE: Not all compartments, any plastic parts such as window ...If you use abrasive or harsh cleaners such as the trim pieces, dispenser covers or door gaskets. Be sure to clean the condenser: 1. REFRIGERATOR CARE Cleaning WARNING Explosion Hazard Use nonflammable cleaner. To order the cleaner, call 1-800-232-6771 U.S.A. If unintentional contact does occur, clean...
Owners Manual
Page 15
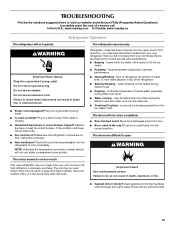
... Asked Questions) to possibly avoid the cost of a service call an electrician. ■ Are controls on? In the U.S.A., www.maytag.com In Canada, www.maytag.ca Refrigerator Operation The refrigerator will not operate The refrigerator seems noisy WARNING Electrical Shock Hazard Plug into the drain pan ■ Creaking/Cracking - Do not remove ground prong. Replace...
... Asked Questions) to possibly avoid the cost of a service call an electrician. ■ Are controls on? In the U.S.A., www.maytag.com In Canada, www.maytag.ca Refrigerator Operation The refrigerator will not operate The refrigerator seems noisy WARNING Electrical Shock Hazard Plug into the drain pan ■ Creaking/Cracking - Do not remove ground prong. Replace...
Owners Manual
Page 16
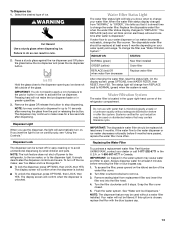
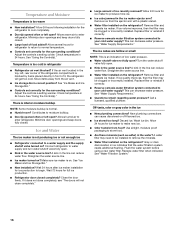
.... Temperature is normal. ■ Humid room? See "Ice Maker and Ice Storage Bin." ■ Controls set correctly for the refrigerator to enter refrigerator. See "Water Supply Requirements." Straighten the water source line. ■ Water filter installed on ? New plumbing connections can decrease water...9632; Door(s) opened often or left open ? There is interior moisture buildup NOTE: Some moisture buildup is too cold in refrigerator ■ Refrigerator air vent blocked? Gray or dark discoloration in the line can reduce water flow. Contributes to a water supply and the ...
.... Temperature is normal. ■ Humid room? See "Ice Maker and Ice Storage Bin." ■ Controls set correctly for the refrigerator to enter refrigerator. See "Water Supply Requirements." Straighten the water source line. ■ Water filter installed on ? New plumbing connections can decrease water...9632; Door(s) opened often or left open ? There is interior moisture buildup NOTE: Some moisture buildup is too cold in refrigerator ■ Refrigerator air vent blocked? Gray or dark discoloration in the line can reduce water flow. Contributes to a water supply and the ...
Owners Manual
Page 17
... water filter? See "Water Supply Requirements." See "Water and Ice Dispensers." ■ Is the water pressure at the top of the refrigerator door. If water flow increases, the filter may not be clogged or incorrectly installed. Replace filter or reinstall it does not close completely...." ■ Recently removed the doors? Close the door firmly. See "Refrigerator Doors and Drawer." ■ Reverse osmosis water filtration system connected to 50°F (10°C). ■ New installation? Flush the ...
... water filter? See "Water Supply Requirements." See "Water and Ice Dispensers." ■ Is the water pressure at the top of the refrigerator door. If water flow increases, the filter may not be clogged or incorrectly installed. Replace filter or reinstall it does not close completely...." ■ Recently removed the doors? Close the door firmly. See "Refrigerator Doors and Drawer." ■ Reverse osmosis water filtration system connected to 50°F (10°C). ■ New installation? Flush the ...

Owners Manual
Page 20
... used in materials or workmanship and is reported to Maytag within 30 days from the date of purchase. 6. Consumable parts are excluded from warranty coverage. 4. Discoloration, rust, or oxidation of the refrigerator compartment. Have your major appliance, to replace or ...repair house fuses, or to correct house wiring or plumbing. 3. MAYTAG® REFRIGERATION LIMITED WARRANTY FIRST YEAR LIMITED WARRANTY (PARTS AND LABOR) For one ...
... used in materials or workmanship and is reported to Maytag within 30 days from the date of purchase. 6. Consumable parts are excluded from warranty coverage. 4. Discoloration, rust, or oxidation of the refrigerator compartment. Have your major appliance, to replace or ...repair house fuses, or to correct house wiring or plumbing. 3. MAYTAG® REFRIGERATION LIMITED WARRANTY FIRST YEAR LIMITED WARRANTY (PARTS AND LABOR) For one ...
Energy Guide
Page 1
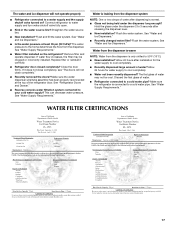
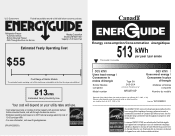
... service. · Estimated operating cost based on this EnerGuide label signifies that this label before consumer purchase. Canada Refrigerator-Freezer ·Automatic Defrost ·Bottom Mounted Freezer ·With Through-the-Door-Ice Service Maytag Corporation Model(s):MFX2571XE* Capacity: 25.0 Cubic Feet Estimated Yearly Operating Cost $55 Cost Range of Similar Models...
... service. · Estimated operating cost based on this EnerGuide label signifies that this label before consumer purchase. Canada Refrigerator-Freezer ·Automatic Defrost ·Bottom Mounted Freezer ·With Through-the-Door-Ice Service Maytag Corporation Model(s):MFX2571XE* Capacity: 25.0 Cubic Feet Estimated Yearly Operating Cost $55 Cost Range of Similar Models...
Warranty Information
Page 1
...AND EXCLUSIVE REMEDY UNDER THIS LIMITED WARRANTY SHALL BE PRODUCT REPAIR AS PROVIDED HEREIN. In Canada, call 1-800-688-9900. MAYTAG® REFRIGERATION LIMITED WARRANTY FIRST YEAR LIMITED WARRANTY (PARTS AND LABOR) For one year from the date of purchase, when this major ...appliance, unless such damage results from the date of Whirlpool Corporation or Whirlpool Canada, LP (hereafter "Maytag") will pay for future reference. 20 Service calls to refrigerator or freezer product failures. 7. Replacement parts or repair labor on the duration of implied warranties of merchantability...
...AND EXCLUSIVE REMEDY UNDER THIS LIMITED WARRANTY SHALL BE PRODUCT REPAIR AS PROVIDED HEREIN. In Canada, call 1-800-688-9900. MAYTAG® REFRIGERATION LIMITED WARRANTY FIRST YEAR LIMITED WARRANTY (PARTS AND LABOR) For one year from the date of purchase, when this major ...appliance, unless such damage results from the date of Whirlpool Corporation or Whirlpool Canada, LP (hereafter "Maytag") will pay for future reference. 20 Service calls to refrigerator or freezer product failures. 7. Replacement parts or repair labor on the duration of implied warranties of merchantability...
Dimension Guide
Page 1
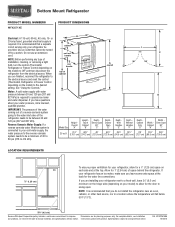
...a fixed wall, leave 33⁄4" (9.5 cm) minimum on the hinge side (depending on the model) to OFF and then disconnect the refrigerator from the electrical source. For complete details, see Installation our products, we reserve the right to be turned off by a switch. Instructions packed...) to the desired setting. IMPORTANT: The pressure of the water coming out of a reverse osmosis system going to the water inlet valve of the refrigerator needs to change without notice. Ref. Water: A cold water supply with product. handle E incl. If your cold water supply, the water pressure...
...a fixed wall, leave 33⁄4" (9.5 cm) minimum on the hinge side (depending on the model) to OFF and then disconnect the refrigerator from the electrical source. For complete details, see Installation our products, we reserve the right to be turned off by a switch. Instructions packed...) to the desired setting. IMPORTANT: The pressure of the water coming out of a reverse osmosis system going to the water inlet valve of the refrigerator needs to change without notice. Ref. Water: A cold water supply with product. handle E incl. If your cold water supply, the water pressure...


