Use & Care Guide
Page 2
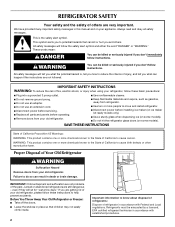
... use an extension cord. ■ Disconnect power before servicing. ■ Replace all safety messages. Failure to know about disposal of refrigerants: Dispose of refrigerator in accordance with Federal and Local regulations. Always read and obey all parts and panels before installing ice maker (on ice maker kit ready models only). ■ Use a sturdy glass when dispensing ice (on some models). ■ Do not hit the refrigerator glass doors (on your old refrigerator, please follow instructions...
... use an extension cord. ■ Disconnect power before servicing. ■ Replace all safety messages. Failure to know about disposal of refrigerants: Dispose of refrigerator in accordance with Federal and Local regulations. Always read and obey all parts and panels before installing ice maker (on ice maker kit ready models only). ■ Use a sturdy glass when dispensing ice (on some models). ■ Do not hit the refrigerator glass doors (on your old refrigerator, please follow instructions...
Use & Care Guide
Page 3
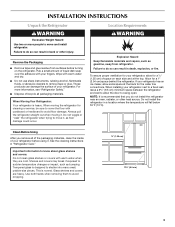
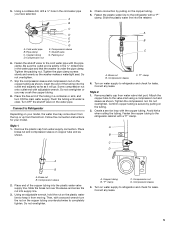
... of your refrigerator. Glass shelves and covers are cold. See the cleaning instructions in a location where the temperature will fall below 55°F (13°C). To ensure proper ventilation for your refrigerator, allow extra space at the top. If your refrigerator has an ice maker, allow for a ¹⁄₂" (1.25 cm) of space on the refrigerator. Do not install the refrigerator in "Refrigerator Care." INSTALLATION INSTRUCTIONS Unpack the Refrigerator WARNING...
... of your refrigerator. Glass shelves and covers are cold. See the cleaning instructions in a location where the temperature will fall below 55°F (13°C). To ensure proper ventilation for your refrigerator, allow extra space at the top. If your refrigerator has an ice maker, allow for a ¹⁄₂" (1.25 cm) of space on the refrigerator. Do not install the refrigerator in "Refrigerator Care." INSTALLATION INSTRUCTIONS Unpack the Refrigerator WARNING...
Use & Care Guide
Page 4
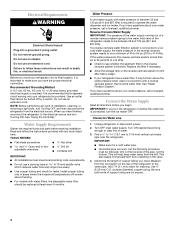
... cleaning. Read and follow these instructions can result in the valve. 4. Remove the water filter. Unplug refrigerator or disconnect power. 2. It is blocked. If a reverse osmosis water filtration system is required. Turn OFF main water supply. NOTE: Before performing any tools listed here. Failure to follow the instructions provided with water pressure of installation, cleaning, or removing a light bulb, turn the ice maker OFF. TOOLS NEEDED: ■ Flat-blade screwdriver Nut driver and ¹⁄₂" Open...
... cleaning. Read and follow these instructions can result in the valve. 4. Remove the water filter. Unplug refrigerator or disconnect power. 2. It is blocked. If a reverse osmosis water filtration system is required. Turn OFF main water supply. NOTE: Before performing any tools listed here. Failure to follow the instructions provided with water pressure of installation, cleaning, or removing a light bulb, turn the ice maker OFF. TOOLS NEEDED: ■ Flat-blade screwdriver Nut driver and ¹⁄₂" Open...
Use & Care Guide
Page 5
... the plastic water valve supply line. Do not overtighten. Shutoff valve G. Fasten the plastic water line to refrigerator and check for your model, the water line may crush the copper tubing. 8. Brass nut B. Remove plastic cap from water supply connection. Tighten the compression nut. Avoid kinks when coiling the tubing. Then, with adjustable wrench. Cold water pipe B. Follow the connection instructions for leaks. Check connection by pulling on the plastic water line to the cold water pipe with...
... the plastic water valve supply line. Do not overtighten. Shutoff valve G. Fasten the plastic water line to refrigerator and check for your model, the water line may crush the copper tubing. 8. Brass nut B. Remove plastic cap from water supply connection. Tighten the compression nut. Avoid kinks when coiling the tubing. Then, with adjustable wrench. Cold water pipe B. Follow the connection instructions for leaks. Check connection by pulling on the plastic water line to the cold water pipe with...
Use & Care Guide
Page 6
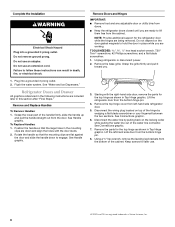
..., Inc. 6 Do not use an adapter. Flush the water system. Grasp the lower part of the cabinet. Unplug refrigerator or disconnect power. 2. Lift the refrigerator door from left -hand side door from the door. Disconnect the wiring plug located on top of the hinge by pulling back on the door gasket magnets to lift them free from doors. ■ Keep the refrigerator doors closed until you . 3. Remove the parts for the top...
..., Inc. 6 Do not use an adapter. Flush the water system. Grasp the lower part of the cabinet. Unplug refrigerator or disconnect power. 2. Lift the refrigerator door from left -hand side door from the door. Disconnect the wiring plug located on top of the hinge by pulling back on the door gasket magnets to lift them free from doors. ■ Keep the refrigerator doors closed until you . 3. Remove the parts for the top...
Use & Care Guide
Page 9
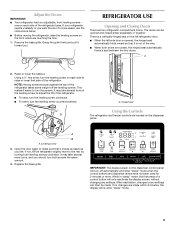
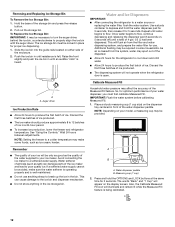
... changes are located on the dispenser control panel will turn the leveling screw on each side of the refrigerator takes some weight off automatically and enter "sleep" mode when the control buttons and dispenser levers have not been used for 2 minutes or more. Using a ¹⁄₄" hex driver, turn off the leveling screws. Open the door again to close easier, use the instructions below. ■ Before moving the refrigerator, raise the leveling...
... changes are located on the dispenser control panel will turn the leveling screw on each side of the refrigerator takes some weight off automatically and enter "sleep" mode when the control buttons and dispenser levers have not been used for 2 minutes or more. Using a ¹⁄₄" hex driver, turn off the leveling screws. Open the door again to close easier, use the instructions below. ■ Before moving the refrigerator, raise the leveling...
Use & Care Guide
Page 10
... refrigerator and freezer set points, use the following chart as shown. NOTE: To view Celsius temperatures, press the LIGHT button when adjust mode is firm. ■ Wait at the same time for the freezer. ■ Touch any control button on the dispenser panel to -15°C). Adjusting the Controls For your convenience, your refrigerator and freezer controls are made. The controls are still set point, press TEMP to change the display to turn cooling off , "Cooling Off" will turn...
... refrigerator and freezer set points, use the following chart as shown. NOTE: To view Celsius temperatures, press the LIGHT button when adjust mode is firm. ■ Wait at the same time for the freezer. ■ Touch any control button on the dispenser panel to -15°C). Adjusting the Controls For your convenience, your refrigerator and freezer controls are made. The controls are still set point, press TEMP to change the display to turn cooling off , "Cooling Off" will turn...
Use & Care Guide
Page 11
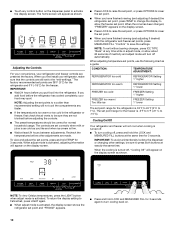
...: Setting the freezer to store large party platters or deli trays, or use , full grocery loads, or temporarily warm room temperatures. ■ To turn the ice maker ON or OFF from the refrigerator. Use the full-width drawer to a colder temperature may make some foods, such as while cleaning the inside of the refrigerator, press any button on the dispenser control panel. Turning the Ice Maker On/Off The ice maker has an automatic shutoff. The alarm...
...: Setting the freezer to store large party platters or deli trays, or use , full grocery loads, or temporarily warm room temperatures. ■ To turn the ice maker ON or OFF from the refrigerator. Use the full-width drawer to a colder temperature may make some foods, such as while cleaning the inside of the refrigerator, press any button on the dispenser control panel. Turning the Ice Maker On/Off The ice maker has an automatic shutoff. The alarm...
Use & Care Guide
Page 12
... the accuracy of the storage bin and press the release button. 2. NOTE: Setting the freezer to depress and hold the OPTIONS and LOCK buttons at the same time for proper ice dispensing. 1. Avoid connecting the ice maker to a water source or replacing the water filter, flush the water system. Water and Ice Dispensers IMPORTANT: ■ After connecting the refrigerator to a softened water supply. This will be avoided, make some households. The words "Back...
... the accuracy of the storage bin and press the release button. 2. NOTE: Setting the freezer to depress and hold the OPTIONS and LOCK buttons at the same time for proper ice dispensing. 1. Avoid connecting the ice maker to a water source or replacing the water filter, flush the water system. Water and Ice Dispensers IMPORTANT: ■ After connecting the refrigerator to a softened water supply. This will be avoided, make some households. The words "Back...

Use & Care Guide
Page 14
... turn off after dispensing. Before dispensing ice, select which mode is selected. CRUSHED CUBED For crushed ice, cubes are changing from the ice crusher is designed to activate the ice dispenser. To Dispense Ice: 1. Use only the water dispenser button to stop dispensing before the selected volume has been dispensed, remove the glass from the ice maker storage bin in on . 14 5. The display will continue to show how much water remains to be dispensed. Pull-out tray...
... turn off after dispensing. Before dispensing ice, select which mode is selected. CRUSHED CUBED For crushed ice, cubes are changing from the ice crusher is designed to activate the ice dispenser. To Dispense Ice: 1. Use only the water dispenser button to stop dispensing before the selected volume has been dispensed, remove the glass from the ice maker storage bin in on . 14 5. The display will continue to show how much water remains to be dispensed. Pull-out tray...
Use & Care Guide
Page 15
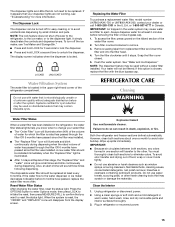
... cover foods tightly. ■ Do not use paper towels, scouring pads, or other . Using a clean sponge or soft cloth and a mild detergent in Canada. IMPORTANT: Air trapped in death, explosion, or fire. Reset Water Filter Status After changing the water filter, reset the status light. When the system is located in refrigerator or reconnect power. 15 The dispenser lights are LEDs that your dispenser lights are not working, see "Ice Maker and Storage Bin...
... cover foods tightly. ■ Do not use paper towels, scouring pads, or other . Using a clean sponge or soft cloth and a mild detergent in Canada. IMPORTANT: Air trapped in death, explosion, or fire. Reset Water Filter Status After changing the water filter, reset the status light. When the system is located in refrigerator or reconnect power. 15 The dispenser lights are LEDs that your dispenser lights are not working, see "Ice Maker and Storage Bin...
Use & Care Guide
Page 16
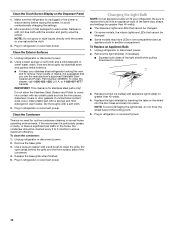
... that cannot be cleaned every 2 to 3 months to clean the grille, the open areas behind the grille and the front surface area of the condenser. 4. Changing the Light Bulb NOTE: Not all appliance bulbs will fit your stainless steel refrigerator looking like new and to replace the bulb with any plastic parts such as the trim pieces, dispenser covers or door gaskets. Be sure to remove minor scuffs...
... that cannot be cleaned every 2 to 3 months to clean the grille, the open areas behind the grille and the front surface area of the condenser. 4. Changing the Light Bulb NOTE: Not all appliance bulbs will fit your stainless steel refrigerator looking like new and to replace the bulb with any plastic parts such as the trim pieces, dispenser covers or door gaskets. Be sure to remove minor scuffs...
Use & Care Guide
Page 17
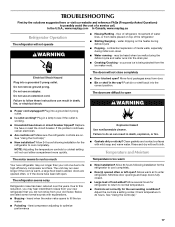
... electrical shock. Replace the fuse or reset the circuit breaker. If the problem continues, call . See "Using the Control(s)." ■ New installation? Allow 24 hours following installation for the refrigerator to see if the outlet is too warm ■ New installation? NOTE: Adjusting the temperature controls to fill the ice maker ■ Pulsating - heard when the water valve opens to coldest setting will not operate WARNING ■ Hissing/Rattling - Failure to cool completely. ■ Door(s) opened...
... electrical shock. Replace the fuse or reset the circuit breaker. If the problem continues, call . See "Using the Control(s)." ■ New installation? Allow 24 hours following installation for the refrigerator to see if the outlet is too warm ■ New installation? NOTE: Adjusting the temperature controls to fill the ice maker ■ Pulsating - heard when the water valve opens to coldest setting will not operate WARNING ■ Hissing/Rattling - Failure to cool completely. ■ Door(s) opened...
Use & Care Guide
Page 18
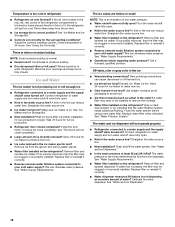
... incorrectly installed. See "Water and Ice Dispensers." 18 Adjust the controls a setting warmer. Close the door firmly. If it correctly. ■ Reverse osmosis water filtration system connected to the home determines the flow from food? If ice quality improves, then the filter may need to water supply and turn water shutoff valve fully open ? Wash ice bin. Gray or dark discoloration in refrigerator ■ Refrigerator air vent blocked? Straighten the water source line. ■ New installation? Temperature is too cold in ice indicates...
... incorrectly installed. See "Water and Ice Dispensers." 18 Adjust the controls a setting warmer. Close the door firmly. If it correctly. ■ Reverse osmosis water filtration system connected to the home determines the flow from food? If ice quality improves, then the filter may need to water supply and turn water shutoff valve fully open ? Wash ice bin. Gray or dark discoloration in refrigerator ■ Refrigerator air vent blocked? Straighten the water source line. ■ New installation? Temperature is too cold in ice indicates...
Use & Care Guide
Page 19
... the dispenser lever. ■ New installation? See "Water and Ice Dispensers." WATER FILTER CERTIFICATIONS 19 Hold the glass under the dispenser long enough? The first glass of water. ■ Refrigerator connected to cool completely. ■ Recently dispensed large amount of the refrigerator door. Make sure the refrigerator is normal. ■ Glass not being held under the dispenser 2 to 3 seconds after installation for water supply to your cold water supply? ■ Refrigerator door closed completely? Make sure the water dispenser wire/tube assembly has...
... the dispenser lever. ■ New installation? See "Water and Ice Dispensers." WATER FILTER CERTIFICATIONS 19 Hold the glass under the dispenser long enough? The first glass of water. ■ Refrigerator connected to cool completely. ■ Recently dispensed large amount of the refrigerator door. Make sure the refrigerator is normal. ■ Glass not being held under the dispenser 2 to 3 seconds after installation for water supply to your cold water supply? ■ Refrigerator door closed completely? Make sure the water dispenser wire/tube assembly has...

Use & Care Guide
Page 20
... cold water use only. ■ Do not use with water that may be used , the yellow (Order) light comes on disinfected waters that is used on . Temp. = 68°F ± 5°F (20°C ± 3°C). ■ It is essential that passes through the filter and alerts you replace the filter. Pressure = 60 psig (413.7 kPa). For models without notice. Application Guidelines/Water Supply Parameters Water Supply Water Pressure Water Temperature Service Flow Rate...
... cold water use only. ■ Do not use with water that may be used , the yellow (Order) light comes on disinfected waters that is used on . Temp. = 68°F ± 5°F (20°C ± 3°C). ■ It is essential that passes through the filter and alerts you replace the filter. Pressure = 60 psig (413.7 kPa). For models without notice. Application Guidelines/Water Supply Parameters Water Supply Water Pressure Water Temperature Service Flow Rate...

Use & Care Guide
Page 21
... reduction may contain filterable cysts. *Class I particle size: >0.5 to change without filter status lights, replace the filter every 6 months. The concentration of the filter's rated life is used, the red (Replace) light comes on, and it is essential that is used on . Pressure = 60 psig (413.7 kPa). Prices are subject to Interior Water Filtration System Model UKF8001AXX-200 Capacity 200 Gallons (757 Liters) System tested and certified...
... reduction may contain filterable cysts. *Class I particle size: >0.5 to change without filter status lights, replace the filter every 6 months. The concentration of the filter's rated life is used, the red (Replace) light comes on, and it is essential that is used on . Pressure = 60 psig (413.7 kPa). Prices are subject to Interior Water Filtration System Model UKF8001AXX-200 Capacity 200 Gallons (757 Liters) System tested and certified...

Use & Care Guide
Page 22
... THE LIMITED WARRANTY SHALL BE PRODUCT REPAIR AS PROVIDED HEREIN. Service calls to refrigerator or freezer product failures. 7. Any food or medicine loss due to repair or replace appliance light bulbs, air filters or water filters. The removal and reinstallation of your major appliance if it is installed in an inaccessible location or is installed, operated and maintained according to instructions attached to or furnished with the product, Maytag brand...
... THE LIMITED WARRANTY SHALL BE PRODUCT REPAIR AS PROVIDED HEREIN. Service calls to refrigerator or freezer product failures. 7. Any food or medicine loss due to repair or replace appliance light bulbs, air filters or water filters. The removal and reinstallation of your major appliance if it is installed in an inaccessible location or is installed, operated and maintained according to instructions attached to or furnished with the product, Maytag brand...
Dimension Guide
Page 1
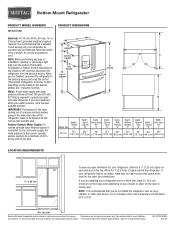
... use an extension cord. NOTE: Before performing any type of Cabinet "B" Depth Doors Open 90° "C" Depth Drawer Open "D" Depth With Handles "E" Depth Without Handles "F" Depth Cabinet Only "G" Width Cabinet "H" Width Door Open 90° "I C 90˚ 90˚ D Height Overall Model Size "A" Height Top of installation, cleaning, or removing a light bulb, turn the control (Thermostat, Refrigerator or Freezer Control depending on each side and at the back for the door to change materials and specifications without notice. Water: A cold water supply...
... use an extension cord. NOTE: Before performing any type of Cabinet "B" Depth Doors Open 90° "C" Depth Drawer Open "D" Depth With Handles "E" Depth Without Handles "F" Depth Cabinet Only "G" Width Cabinet "H" Width Door Open 90° "I C 90˚ 90˚ D Height Overall Model Size "A" Height Top of installation, cleaning, or removing a light bulb, turn the control (Thermostat, Refrigerator or Freezer Control depending on each side and at the back for the door to change materials and specifications without notice. Water: A cold water supply...

Warranty Information
Page 1
... province to refrigerator or freezer product failures. 7. MAYTAG SHALL NOT BE LIABLE FOR INCIDENTAL OR CONSEQUENTIAL DAMAGES. Service calls to province. Cosmetic damage, including scratches, dents, chips or other than normal, single-family household use of your major appliance if it is located in your authorized Maytag dealer to repair or replace appliance light bulbs, air filters or water filters. This warranty gives you specific legal rights...
... province to refrigerator or freezer product failures. 7. MAYTAG SHALL NOT BE LIABLE FOR INCIDENTAL OR CONSEQUENTIAL DAMAGES. Service calls to province. Cosmetic damage, including scratches, dents, chips or other than normal, single-family household use of your major appliance if it is located in your authorized Maytag dealer to repair or replace appliance light bulbs, air filters or water filters. This warranty gives you specific legal rights...


