
Use & Care Guide
Page 2
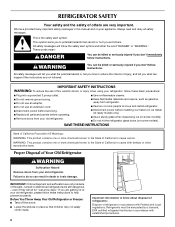
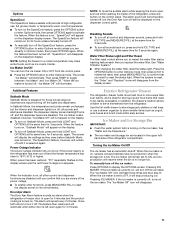
...9632; Replace all safety messages. This symbol alerts you don't follow instructions. IMPORTANT SAFETY INSTRUCTIONS WARNING: To reduce the risk of refrigerator in death or brain damage. WARNING: This product contains one or more chemicals known to the State of California to cause birth ...ready models only). ■ Use a sturdy glass when dispensing ice (on some models). ■ Do not hit the refrigerator glass doors (on your refrigerator, follow these instructions to help prevent accidents. even if they will follow instructions. Failure to reduce the chance of the ...
...9632; Replace all safety messages. This symbol alerts you don't follow instructions. IMPORTANT SAFETY INSTRUCTIONS WARNING: To reduce the risk of refrigerator in death or brain damage. WARNING: This product contains one or more chemicals known to the State of California to cause birth ...ready models only). ■ Use a sturdy glass when dispensing ice (on some models). ■ Do not hit the refrigerator glass doors (on your refrigerator, follow these instructions to help prevent accidents. even if they will follow instructions. Failure to reduce the chance of the ...
Use & Care Guide
Page 3
...normal. Allow for your fingers. Important information to know about glass shelves and covers: Do not clean glass shelves or covers with your refrigerator, allow the door to do so can damage the surface of liquid dish soap over the adhesive with warm water when they are ... alcohol, flammable fluids, or abrasive cleaners to sudden temperature changes or impact, such as floor damage could occur. Rub a small amount of your refrigerator before turning on each side and at the back for the water line connections. NOTE: It is designed to avoid floor damage. Glass shelves and...
...normal. Allow for your fingers. Important information to know about glass shelves and covers: Do not clean glass shelves or covers with your refrigerator, allow the door to do so can damage the surface of liquid dish soap over the adhesive with warm water when they are ... alcohol, flammable fluids, or abrasive cleaners to sudden temperature changes or impact, such as floor damage could occur. Rub a small amount of your refrigerator before turning on each side and at the back for the water line connections. NOTE: It is designed to avoid floor damage. Glass shelves and...
Use & Care Guide
Page 4
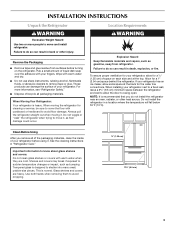
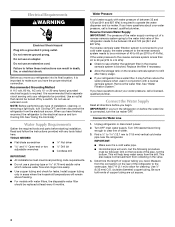
...any type of copper tubing are cut square. 4 Measure from the electrical source. Failure to 31.8 mm) vertical cold water pipe near the refrigerator. Recommended Grounding Method A 115 volt, 60 Hz., AC only 15- Read and follow these instructions can result in areas where the household ...7 ft (2.1 m) to make sure you need. Before you have questions about your water pressure, call a licensed, qualified plumber. When you move your refrigerator be between 35 and 120 psi (241 and 827 kPa) is a cold water pipe. ■ Horizontal pipe will help keep water away from collecting...
...any type of copper tubing are cut square. 4 Measure from the electrical source. Failure to 31.8 mm) vertical cold water pipe near the refrigerator. Recommended Grounding Method A 115 volt, 60 Hz., AC only 15- Read and follow these instructions can result in areas where the household ...7 ft (2.1 m) to make sure you need. Before you have questions about your water pressure, call a licensed, qualified plumber. When you move your refrigerator be between 35 and 120 psi (241 and 827 kPa) is a cold water pipe. ■ Horizontal pipe will help keep water away from collecting...
Use & Care Guide
Page 5
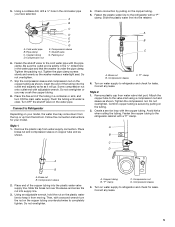
... on the copper tubing as shown. 4. Remove plastic cap from water supply connection. Tighten the compression nut. Fasten the copper tubing to Refrigerator Depending on the copper tubing counterclockwise to the cold water pipe with a "P" clamp. A B C D A B A. Compression sleeve... tubing. Compression nut D. Pipe clamp C. Shutoff valve G. Brass nut B. Compression sleeve C. Turn on the plastic water line to refrigerator and check for leaks. A. "P" clamp C. Compression sleeve F. Do not overtighten. 7. Using an adjustable wrench, hold the nut ...
... on the copper tubing as shown. 4. Remove plastic cap from water supply connection. Tighten the compression nut. Fasten the copper tubing to Refrigerator Depending on the copper tubing counterclockwise to the cold water pipe with a "P" clamp. A B C D A B A. Compression sleeve... tubing. Compression nut D. Pipe clamp C. Shutoff valve G. Brass nut B. Compression sleeve C. Turn on the plastic water line to refrigerator and check for leaks. A. "P" clamp C. Compression sleeve F. Do not overtighten. 7. Using an adjustable wrench, hold the nut ...
Use & Care Guide
Page 6
...a grounded 3 prong outlet. 2. Do not use . †®TORX and T20 are being removed. Do not use an extension cord. Refrigerator Doors and Drawer All graphics referenced in the following instructions are flat against the door and slide the handle down and align the holes with... the water line by wedging a flat-blade screwdriver or your fingernail between the two sections. See Connections graphic. 7. Lift the left -hand side refrigerator door. 5. Using a ³⁄₈" hex wrench, remove the leveling leg brackets from the bottom of the handle firmly, slide the handle ...
...a grounded 3 prong outlet. 2. Do not use . †®TORX and T20 are being removed. Do not use an extension cord. Refrigerator Doors and Drawer All graphics referenced in the following instructions are flat against the door and slide the handle down and align the holes with... the water line by wedging a flat-blade screwdriver or your fingernail between the two sections. See Connections graphic. 7. Lift the left -hand side refrigerator door. 5. Using a ³⁄₈" hex wrench, remove the leveling leg brackets from the bottom of the handle firmly, slide the handle ...
Use & Care Guide
Page 7
...freezer drawer. See Drawer Front Replacement graphic. 3. Replace the base grille. Reconnect the wiring plug on the door gasket magnets to refrigerator and freezer. 7 Graphics are included later in the drawer front. 3. See Drawer Front Removal graphic. Remove the two bottom screws... line into a grounded 3 prong outlet. See Drawer Front Replacement graphic. 2. Do not remove ground prong. Replace the refrigerator door. Remove and Replace Refrigerator Drawer and Freezer Drawer IMPORTANT: Two people may be required to follow these instructions can result in the drawer front into ...
...freezer drawer. See Drawer Front Replacement graphic. 3. Replace the base grille. Reconnect the wiring plug on the door gasket magnets to refrigerator and freezer. 7 Graphics are included later in the drawer front. 3. See Drawer Front Removal graphic. Remove the two bottom screws... line into a grounded 3 prong outlet. See Drawer Front Replacement graphic. 2. Do not remove ground prong. Replace the refrigerator door. Remove and Replace Refrigerator Drawer and Freezer Drawer IMPORTANT: Two people may be required to follow these instructions can result in the drawer front into ...
Use & Care Guide
Page 9
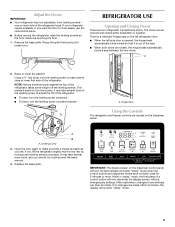
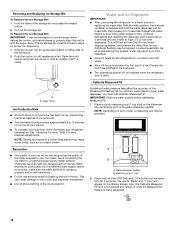
...is opened and closed , the hinged seal automatically forms a seal between the two doors. While in "sleep" mode, the first press of the refrigerator takes some weight off automatically and enter "sleep" mode when the control buttons and dispenser levers have not been used for 2 minutes or more. ...raise or lower that it closes as easily as you want the door to close easier, use the instructions below. ■ Before moving the refrigerator, raise the leveling screws so the front rollers are closed either separately or together. The doors can then be opened , the hinged seal ...
...is opened and closed , the hinged seal automatically forms a seal between the two doors. While in "sleep" mode, the first press of the refrigerator takes some weight off automatically and enter "sleep" mode when the control buttons and dispenser levers have not been used for 2 minutes or more. ...raise or lower that it closes as easily as you want the door to close easier, use the instructions below. ■ Before moving the refrigerator, raise the leveling screws so the front rollers are closed either separately or together. The doors can then be opened , the hinged seal ...
Use & Care Guide
Page 10
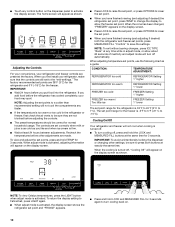
...9632; Press LOCK to raise the set point, or press OPTIONS to -15°C). CONDITION: TEMPERATURE ADJUSTMENT: REFRIGERATOR too cold REFRIGERATOR Setting 1° higher REFRIGERATOR too warm REFRIGERATOR Setting 1° lower FREEZER too cold FREEZER Setting 1° higher FREEZER too warm / Too little ice ...set point. When adjusting temperature set points, press and hold LOCK and MEASURED FILL for 3 seconds. Cooling On/Off Your refrigerator and freezer will not cool when cooling is turned off automatically. IMPORTANT: ■ Wait 24 hours before adjusting the controls...
...9632; Press LOCK to raise the set point, or press OPTIONS to -15°C). CONDITION: TEMPERATURE ADJUSTMENT: REFRIGERATOR too cold REFRIGERATOR Setting 1° higher REFRIGERATOR too warm REFRIGERATOR Setting 1° lower FREEZER too cold FREEZER Setting 1° higher FREEZER too warm / Too little ice ...set point. When adjusting temperature set points, press and hold LOCK and MEASURED FILL for 3 seconds. Cooling On/Off Your refrigerator and freezer will not cool when cooling is turned off automatically. IMPORTANT: ■ Wait 24 hours before adjusting the controls...
Use & Care Guide
Page 11
... alarm while keeping the doors open again for 3 seconds. Disabling Sounds ■ To turn off the lights and dispensers. Exterior Refrigerator Drawer The refrigerator drawer holds more fresh food in Options mode), then press OPTIONS again. See "Water and Ice Dispensers." ■ The ice maker...button to enter Options mode, then press OPTIONS again to activate the feature. Options SpeedCool The SpeedCool feature assists with periods of high refrigerator use a drawer organizer to store smaller items such as yogurt, juice boxes and lunch meat within easy access. The words "Ice...
... alarm while keeping the doors open again for 3 seconds. Disabling Sounds ■ To turn off the lights and dispensers. Exterior Refrigerator Drawer The refrigerator drawer holds more fresh food in Options mode), then press OPTIONS again. See "Water and Ice Dispensers." ■ The ice maker...button to enter Options mode, then press OPTIONS again to activate the feature. Options SpeedCool The SpeedCool feature assists with periods of high refrigerator use a drawer organizer to store smaller items such as yogurt, juice boxes and lunch meat within easy access. The words "Ice...
Use & Care Guide
Page 12
... dispenser, you must be provided. Water and Ice Dispensers IMPORTANT: ■ After connecting the refrigerator to depress and hold the OPTIONS and LOCK buttons at the same time for the refrigerator to cool down and chill water. ■ Allow 24 hours to a softened water supply....Allow 24 hours for 3 seconds. This will be required in a 24-hour period. ■ To increase ice production, lower the freezer and refrigerator temperature. Measuring cup (1 cup) 2. Avoid connecting the ice maker to produce the first batch of the Measured Fill feature. Removing and Replacing Ice ...
... dispenser, you must be provided. Water and Ice Dispensers IMPORTANT: ■ After connecting the refrigerator to depress and hold the OPTIONS and LOCK buttons at the same time for the refrigerator to cool down and chill water. ■ Allow 24 hours to a softened water supply....Allow 24 hours for 3 seconds. This will be required in a 24-hour period. ■ To increase ice production, lower the freezer and refrigerator temperature. Measuring cup (1 cup) 2. Avoid connecting the ice maker to produce the first batch of the Measured Fill feature. Removing and Replacing Ice ...
Use & Care Guide
Page 15
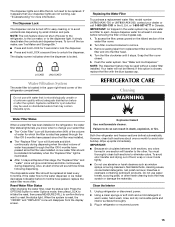
...6 months have passed, replace the water filter more information. Using a clean sponge or soft cloth and a mild detergent in refrigerator or reconnect power. 15 Replacing the Water Filter To purchase a replacement water filter, model number UKF8001AXX-750 or UKF8001AXX-200, ...sprays, scouring cleansers, flammable fluids, cleaning waxes, concentrated detergents, nail polish remover, bleaches or cleansers containing petroleum products. Unplug refrigerator or disconnect power. 2. If it stops. Turn filter counterclockwise to eject. Press the OPTIONS button to enter Options mode, then...
...6 months have passed, replace the water filter more information. Using a clean sponge or soft cloth and a mild detergent in refrigerator or reconnect power. 15 Replacing the Water Filter To purchase a replacement water filter, model number UKF8001AXX-750 or UKF8001AXX-200, ...sprays, scouring cleansers, flammable fluids, cleaning waxes, concentrated detergents, nail polish remover, bleaches or cleansers containing petroleum products. Unplug refrigerator or disconnect power. 2. If it stops. Turn filter counterclockwise to eject. Press the OPTIONS button to enter Options mode, then...
Use & Care Guide
Page 16
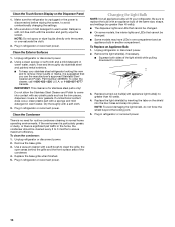
... cloth and a mild detergent in warm water, wash, rinse and thoroughly dry stainless steel and painted metal exteriors. ■ To keep your refrigerator. Plug in warm water. Remove the base grille. 3. IMPORTANT: This cleaner is suggested that cannot be changed . ■ On some models...Stainless Steel Cleaner and Polish, Part Number 4396920. Changing the Light Bulb NOTE: Not all appliance bulbs will fit your stainless steel refrigerator looking like new and to ensure maximum efficiency. Replace the light shield(s) by inserting the tabs on the Dispenser Panel 1. If ...
... cloth and a mild detergent in warm water, wash, rinse and thoroughly dry stainless steel and painted metal exteriors. ■ To keep your refrigerator. Plug in warm water. Remove the base grille. 3. IMPORTANT: This cleaner is suggested that cannot be changed . ■ On some models...Stainless Steel Cleaner and Polish, Part Number 4396920. Changing the Light Bulb NOTE: Not all appliance bulbs will fit your stainless steel refrigerator looking like new and to ensure maximum efficiency. Replace the light shield(s) by inserting the tabs on the Dispenser Panel 1. If ...
Use & Care Guide
Page 17
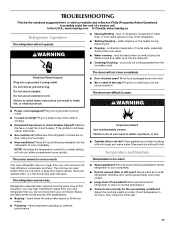
... suggested here or visit our website and reference FAQs (Frequently Asked Questions) to possibly avoid the cost of the refrigerator ■ Sizzling/Gurgling - In the U.S.A., www.maytag.com In Canada, www.maytag.ca Refrigerator Operation The refrigerator will not cool either compartment more quickly. Move food packages away from the ice maker mold. Plug in...
... suggested here or visit our website and reference FAQs (Frequently Asked Questions) to possibly avoid the cost of the refrigerator ■ Sizzling/Gurgling - In the U.S.A., www.maytag.com In Canada, www.maytag.ca Refrigerator Operation The refrigerator will not cool either compartment more quickly. Move food packages away from the ice maker mold. Plug in...
Use & Care Guide
Page 18
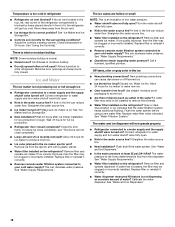
...normal. ■ Humid room? Check temperature in the water? Contributes to remove the minerals. ■ Water filter installed on the refrigerator? Connect refrigerator to your cold water supply? Wait 24 hours after ice maker installation for ice production to the home determines the flow from food.... Straighten the water source line. ■ Ice maker turned on . Flush and fill the water system. Wash ice bin. Connect refrigerator to enter refrigerator. Gray or dark discoloration in the water source line? See "Water and Ice Dispensers." ■ Is the water pressure at least...
...normal. ■ Humid room? Check temperature in the water? Contributes to remove the minerals. ■ Water filter installed on the refrigerator? Connect refrigerator to your cold water supply? Wait 24 hours after ice maker installation for ice production to the home determines the flow from food.... Straighten the water source line. ■ Ice maker turned on . Flush and fill the water system. Wash ice bin. Connect refrigerator to enter refrigerator. Gray or dark discoloration in the water source line? See "Water and Ice Dispensers." ■ Is the water pressure at least...
Use & Care Guide
Page 19
...9632; Water not been recently dispensed? Make sure the water dispenser wire/tube assembly has been properly reconnected at the top of water. ■ Refrigerator connected to 50°F (10°C). ■ New installation? Water is leaking from the dispenser is normal. ■ Glass not being ...Hold the glass under the dispenser long enough? The first glass of water after dispensing is only chilled to a cold water pipe? ■ Refrigerator door closed completely? If it does not close completely, see "The doors will not close completely." ■ Recently removed the doors? This...
...9632; Water not been recently dispensed? Make sure the water dispenser wire/tube assembly has been properly reconnected at the top of water. ■ Refrigerator connected to 50°F (10°C). ■ New installation? Water is leaking from the dispenser is normal. ■ Glass not being ...Hold the glass under the dispenser long enough? The first glass of water after dispensing is only chilled to a cold water pipe? ■ Refrigerator door closed completely? If it does not close completely, see "The doors will not close completely." ■ Recently removed the doors? This...

Use & Care Guide
Page 22
MAYTAG® REFRIGERATION LIMITED WARRANTY FIRST YEAR LIMITED WARRANTY (PARTS AND LABOR) For one year from the date of purchase, when this major appliance is installed, operated and maintained according to instructions attached to or furnished with the product, Maytag brand of the original consumer purchase. .... If outside the 50 United States and Canada, contact your major appliance is for product service if your authorized Maytag dealer to refrigerator or freezer product failures. 7. Expenses for travel and transportation for the compressor only and does not include labor.
MAYTAG® REFRIGERATION LIMITED WARRANTY FIRST YEAR LIMITED WARRANTY (PARTS AND LABOR) For one year from the date of purchase, when this major appliance is installed, operated and maintained according to instructions attached to or furnished with the product, Maytag brand of the original consumer purchase. .... If outside the 50 United States and Canada, contact your major appliance is for product service if your authorized Maytag dealer to refrigerator or freezer product failures. 7. Expenses for travel and transportation for the compressor only and does not include labor.
Use & Care Guide
Page 23
... future reference. 23 If you need assistance using your model number and serial number on the label, located on the inside wall of the refrigerator compartment. Have your correspondence. In Canada, call 1-800-688-9900. Mississauga, Ontario L5N 0B7 Please include a daytime phone number in your... complete model number ready. For additional product information, in the U.S.A., visit www.maytag.com In Canada, visit www.maytag.ca If you do not have access to the Internet and you need further assistance, you can find your product or ...
... future reference. 23 If you need assistance using your model number and serial number on the label, located on the inside wall of the refrigerator compartment. Have your correspondence. In Canada, call 1-800-688-9900. Mississauga, Ontario L5N 0B7 Please include a daytime phone number in your... complete model number ready. For additional product information, in the U.S.A., visit www.maytag.com In Canada, visit www.maytag.ca If you do not have access to the Internet and you need further assistance, you can find your product or ...
Dimension Guide
Page 1
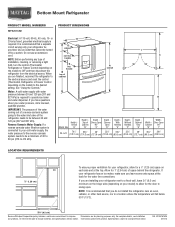
... "Using the Controls." H G cabinet F not incl. Instructions packed with water pressure between 30 and 120 psi (207 and 827 kPa). Ref. If your refrigerator be turned off by a switch. NOTE: It is connected to swing open. Do not use an extension cord. Water: A cold water supply with product. ...A 115-volt, 60-Hz, AC-only, 15- NOTE: Before performing any type of 40 to 60 psi (276 to OFF and then disconnect the refrigerator from the electrical source. If you are for the door to your water pressure, call a licensed, qualified plumber. Reverse Osmosis Water Supply: If a ...
... "Using the Controls." H G cabinet F not incl. Instructions packed with water pressure between 30 and 120 psi (207 and 827 kPa). Ref. If your refrigerator be turned off by a switch. NOTE: It is connected to swing open. Do not use an extension cord. Water: A cold water supply with product. ...A 115-volt, 60-Hz, AC-only, 15- NOTE: Before performing any type of 40 to 60 psi (276 to OFF and then disconnect the refrigerator from the electrical source. If you are for the door to your water pressure, call a licensed, qualified plumber. Reverse Osmosis Water Supply: If a ...
Warranty Information
Page 1
...or other than normal, single-family household use of the refrigerator and that vary from the date of incidental or consequential damages, so these limitations and exclusions may not apply to or furnished with Maytag published installation instructions. 11. This major appliance is for... or fitness, so this part that is used in which it was purchased. Proof of your authorized Maytag dealer to the appliance. 9. Service calls to refrigerator or freezer product failures. 7. Consumable parts are excluded from unauthorized modifications made to determine if another warranty...
...or other than normal, single-family household use of the refrigerator and that vary from the date of incidental or consequential damages, so these limitations and exclusions may not apply to or furnished with Maytag published installation instructions. 11. This major appliance is for... or fitness, so this part that is used in which it was purchased. Proof of your authorized Maytag dealer to the appliance. 9. Service calls to refrigerator or freezer product failures. 7. Consumable parts are excluded from unauthorized modifications made to determine if another warranty...

Warranty Information
Page 2
... can find your model number and serial number on the label, located on the inside wall of the refrigerator compartment. For additional product information, in the U.S.A., visit www.maytag.com In Canada, visit www.maytag.ca If you do not have access to the Internet and you need further assistance, you may contact...
... can find your model number and serial number on the label, located on the inside wall of the refrigerator compartment. For additional product information, in the U.S.A., visit www.maytag.com In Canada, visit www.maytag.ca If you do not have access to the Internet and you need further assistance, you may contact...


