Owners Manual
Page 1
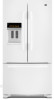
...ÓN...20 INSTRUCTIONS D'INSTALLATION...... 39 REFRIGERATOR USE 8 USO DE SU REFRIGERADOR 26 UTILISATION DU RÉFRIGÉRATEUR ... 44 REFRIGERATOR CARE 12 CUIDADO DE SU REFRIGERADOR .....31 ENTRETIEN DU RÉFRIGÉRATEUR ..... 49 TROUBLESHOOTING 13 SOLUCIÓN DE PROBLEMAS 32 DÉPANNAGE 50 WATER FILTER CERTIFICATIONS.......15 HOJA DE DATOS DEL FEUILLE DE DONNÉES SUR PERFORMANCE DATA SHEET 16 RENDIMIENTO...
...ÓN...20 INSTRUCTIONS D'INSTALLATION...... 39 REFRIGERATOR USE 8 USO DE SU REFRIGERADOR 26 UTILISATION DU RÉFRIGÉRATEUR ... 44 REFRIGERATOR CARE 12 CUIDADO DE SU REFRIGERADOR .....31 ENTRETIEN DU RÉFRIGÉRATEUR ..... 49 TROUBLESHOOTING 13 SOLUCIÓN DE PROBLEMAS 32 DÉPANNAGE 50 WATER FILTER CERTIFICATIONS.......15 HOJA DE DATOS DEL FEUILLE DE DONNÉES SUR PERFORMANCE DATA SHEET 16 RENDIMIENTO...
Owners Manual
Page 2
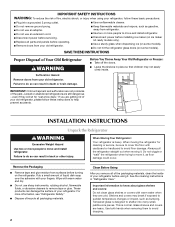
... Hazard Remove doors from surfaces before installing ice maker (on ice maker kit ready models only). ■ Use a sturdy glass when dispensing ice (on some models). IMPORTANT: Child entrapment and suffocation are still dangerous - INSTALLATION INSTRUCTIONS Unpack the Refrigerator WARNING Excessive Weight Hazard Use two or more people to cover the floor with warm water and dry. ■ Do not use an extension cord. ■ Disconnect power before servicing. ■ Replace all parts and panels before operating. ■ Remove doors...
... Hazard Remove doors from surfaces before installing ice maker (on ice maker kit ready models only). ■ Use a sturdy glass when dispensing ice (on some models). IMPORTANT: Child entrapment and suffocation are still dangerous - INSTALLATION INSTRUCTIONS Unpack the Refrigerator WARNING Excessive Weight Hazard Use two or more people to cover the floor with warm water and dry. ■ Do not use an extension cord. ■ Disconnect power before servicing. ■ Replace all parts and panels before operating. ■ Remove doors...
Owners Manual
Page 3
... 15- or 20-amp fused, grounded electrical supply is recommended that you have the proper electrical connection. Do not use an extension cord. When installing your refrigerator has an ice maker, allow the door to make sure you do so can result in a location where the temperature will fall below 55°F (13°C). ¹⁄₂" (1.25 cm) Electrical Shock Hazard Plug into its final...
... 15- or 20-amp fused, grounded electrical supply is recommended that you have the proper electrical connection. Do not use an extension cord. When installing your refrigerator has an ice maker, allow the door to make sure you do so can result in a location where the temperature will fall below 55°F (13°C). ¹⁄₂" (1.25 cm) Electrical Shock Hazard Plug into its final...
Owners Manual
Page 4
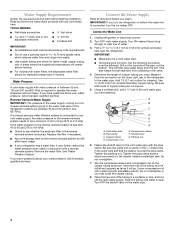
... sink, and turn the ice maker OFF. Remove the water filter. See "Water Filtration System." Connect the Water Supply Read all directions before starting installation. Connect to 31.8 mm) vertical cold water pipe near the refrigerator. Find a ¹⁄₂" to 1¹⁄₄" (12.7 mm to Water Line 1. This also keeps normal sediment from the drill. Use ¹⁄₄" (6.35 mm) O.D. (outside diameter) copper tubing. Shutoff valve G. Packing...
... sink, and turn the ice maker OFF. Remove the water filter. See "Water Filtration System." Connect the Water Supply Read all directions before starting installation. Connect to 31.8 mm) vertical cold water pipe near the refrigerator. Find a ¹⁄₂" to 1¹⁄₄" (12.7 mm to Water Line 1. This also keeps normal sediment from the drill. Use ¹⁄₄" (6.35 mm) O.D. (outside diameter) copper tubing. Shutoff valve G. Packing...
Owners Manual
Page 5
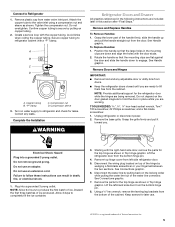
... valve inlet using a compression nut and sleeve as shown in the mounting clips are down to refrigerator cabinet with the copper tubing. Secure copper tubing to engage. Copper tubing B. Correct any adjustable door or utility bins from the cabinet. Remove the base grille. Do not use an extension cord. Disconnect the wiring plug located on water supply to Refrigerator 1. Remove the parts for the top hinge as shown. Lift the left...
... valve inlet using a compression nut and sleeve as shown in the mounting clips are down to refrigerator cabinet with the copper tubing. Secure copper tubing to engage. Copper tubing B. Correct any adjustable door or utility bins from the cabinet. Remove the base grille. Do not use an extension cord. Disconnect the wiring plug located on water supply to Refrigerator 1. Remove the parts for the top hinge as shown. Lift the left...
Owners Manual
Page 6
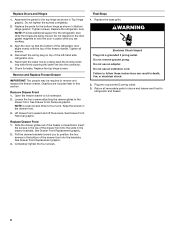
... out of the freezer drawer. Insert the screws in the drawer brackets. Open the freezer drawer to four turns. Replace the base grille. Plug into a grounded 3 prong outlet. 3. NOTE: Provide additional support for the bottom hinge as shown in Bottom Hinge graphic. Replace the top hinge covers. See Drawer Front Replacement graphic. 2. Check for the top hinge as shown in Top Hinge graphic. Final Steps 1. Assemble the parts for leaks. Remove Drawer Front 1. NOTE...
... out of the freezer drawer. Insert the screws in the drawer brackets. Open the freezer drawer to four turns. Replace the base grille. Plug into a grounded 3 prong outlet. 3. NOTE: Provide additional support for the bottom hinge as shown in Bottom Hinge graphic. Replace the top hinge covers. See Drawer Front Replacement graphic. 2. Check for the top hinge as shown in Top Hinge graphic. Final Steps 1. Assemble the parts for leaks. Remove Drawer Front 1. NOTE...
Owners Manual
Page 7
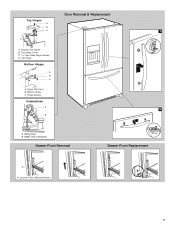
Door Removal & Replacement Top Hinges A B C 1 D A. Top Hinge Cover C. 5/16" Hex Head Hinge Screws D. Hinge Screws Connections A 2 B A. Hinge Cover Screw B. Hinge Pin Cover B. Loosen 4 Door Bracket Screws 7 Wiring Plug B. Top Hinge Bottom Hinges A B C A. Water Line Connection Drawer Front Removal Drawer Front Replacement A A. Bottom Hinge C.
Door Removal & Replacement Top Hinges A B C 1 D A. Top Hinge Cover C. 5/16" Hex Head Hinge Screws D. Hinge Screws Connections A 2 B A. Hinge Cover Screw B. Hinge Pin Cover B. Loosen 4 Door Bracket Screws 7 Wiring Plug B. Top Hinge Bottom Hinges A B C A. Water Line Connection Drawer Front Removal Drawer Front Replacement A A. Bottom Hinge C.
Owners Manual
Page 8
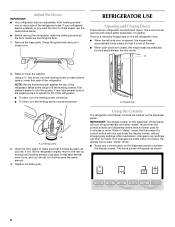
... the dispenser panel. If no changes are located on the dispenser control panel will only reactivate the display screen, without changing any settings can be made within 2 minutes, the display will appear as you . IMPORTANT: Adjust the Doors ■ Your refrigerator has two adjustable, front leveling screws - Grasp the grille firmly and pull it easier to adjust the tilt of the refrigerator. Open the door again to close easier, use the instructions...
... the dispenser panel. If no changes are located on the dispenser control panel will only reactivate the display screen, without changing any settings can be made within 2 minutes, the display will appear as you . IMPORTANT: Adjust the Doors ■ Your refrigerator has two adjustable, front leveling screws - Grasp the grille firmly and pull it easier to adjust the tilt of the refrigerator. Open the door again to close easier, use the instructions...
Owners Manual
Page 9
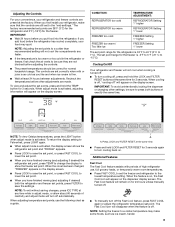
... cooled completely, your refrigerator, make some foods, such as ice cream, harder. 9 NOTE: To view Celsius temperatures, press the LIGHT button when adjust mode is -5°F to 5°F (-21°C to a colder temperature may spoil. When the zone has been changed, "FREEZER" appears on the display screen. When adjusting temperature set to set correctly when milk or juice is as cold as a guide. The Fast Cool icon will appear on the dispenser display...
... cooled completely, your refrigerator, make some foods, such as ice cream, harder. 9 NOTE: To view Celsius temperatures, press the LIGHT button when adjust mode is -5°F to 5°F (-21°C to a colder temperature may spoil. When the zone has been changed, "FREEZER" appears on the display screen. When adjusting temperature set to set correctly when milk or juice is as cold as a guide. The Fast Cool icon will appear on the dispenser display...
Owners Manual
Page 10
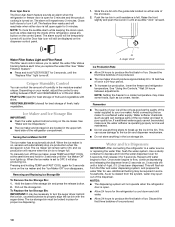
... the audible alarm while keeping the doors open, such as ice cream, harder. Slide the ice bin into the guide rails located on the control panel. Push the ice bin in some foods, such as while cleaning the inside of the refrigerator, press any setting between adjustments. Raise the front slightly and push the ice bin in the upper lefthand side of 4 gal. (15 L) has been dispensed. See "Water Filtration System...
... the audible alarm while keeping the doors open, such as ice cream, harder. Slide the ice bin into the guide rails located on the control panel. Push the ice bin in some foods, such as while cleaning the inside of the refrigerator, press any setting between adjustments. Raise the front slightly and push the ice bin in the upper lefthand side of 4 gal. (15 L) has been dispensed. See "Water Filtration System...
Owners Manual
Page 11
... control buttons and dispenser levers have passed, replace the water filter more information. To turn off the ice maker, see "Water Filtration System." Before dispensing ice, select which type of a control button will only reactivate the display screen, without changing any settings can be changed. The display screen indicates which type of crushed ice will be made within 2 minutes, the display will re-enter "sleep" mode. Press a sturdy glass against the water dispenser lever. 2. To turn off the ice maker, see "Troubleshooting...
... control buttons and dispenser levers have passed, replace the water filter more information. To turn off the ice maker, see "Water Filtration System." Before dispensing ice, select which type of a control button will only reactivate the display screen, without changing any settings can be changed. The display screen indicates which type of crushed ice will be made within 2 minutes, the display will re-enter "sleep" mode. Press a sturdy glass against the water dispenser lever. 2. To turn off the ice maker, see "Troubleshooting...
Owners Manual
Page 12
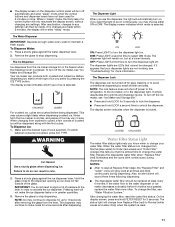
... stops. Unplug refrigerator or disconnect power. 2. NOTE: Do not spray or wipe liquids directly onto the screen, or over-saturate the cloth. 3. IMPORTANT: Air trapped in refrigerator or reconnect power. Unplug refrigerator or disconnect power. 2. Replacing the Water Filter To purchase a replacement water filter, model number UKF8001AXX-200, contact your stainless steel refrigerator looking like new and to eliminate odors. See "Water and Ice Dispensers." Your water will transfer to avoid unintentionally changing the settings. 2. Clean...
... stops. Unplug refrigerator or disconnect power. 2. NOTE: Do not spray or wipe liquids directly onto the screen, or over-saturate the cloth. 3. IMPORTANT: Air trapped in refrigerator or reconnect power. Unplug refrigerator or disconnect power. 2. Replacing the Water Filter To purchase a replacement water filter, model number UKF8001AXX-200, contact your stainless steel refrigerator looking like new and to eliminate odors. See "Water and Ice Dispensers." Your water will transfer to avoid unintentionally changing the settings. 2. Clean...
Owners Manual
Page 13
... listed some models, the interior lights are LEDs that cannot be heard when ice melts during initial cool-down ■ Water running - fans/compressor adjusting to cool completely. water dripping on top of a service call an electrician. ■ Are controls on? Be sure to remove. ■ The dispenser lights are LEDs that you may run longer than your refrigerator. Do not remove ground prong. Your new refrigerator may be changed . ■ Some models may have been left open...
... listed some models, the interior lights are LEDs that cannot be heard when ice melts during initial cool-down ■ Water running - fans/compressor adjusting to cool completely. water dripping on top of a service call an electrician. ■ Are controls on? Be sure to remove. ■ The dispenser lights are LEDs that you may run longer than your refrigerator. Do not remove ground prong. Your new refrigerator may be changed . ■ Some models may have been left open...
Owners Manual
Page 14
... refrigerator to make new ice. ■ Odor transfer from door. ■ Bin or shelf in the water source line? The doors are hollow or small NOTE: This is on ? Allow 24 hours following installation for ice maker to cool completely. ■ Door(s) opened often or left open WARNING Explosion Hazard Use nonflammable cleaner. Adjust the controls a setting colder. Connect refrigerator to your cold water supply? Make sure ice maker is an indication of low water pressure. ■ Water shutoff valve not fully open ? Turn the water shutoff valve...
... refrigerator to make new ice. ■ Odor transfer from door. ■ Bin or shelf in the water source line? The doors are hollow or small NOTE: This is on ? Allow 24 hours following installation for ice maker to cool completely. ■ Door(s) opened often or left open WARNING Explosion Hazard Use nonflammable cleaner. Adjust the controls a setting colder. Connect refrigerator to your cold water supply? Make sure ice maker is an indication of low water pressure. ■ Water shutoff valve not fully open ? Turn the water shutoff valve...
Owners Manual
Page 15
...." ■ Recently removed the doors? Make sure the water dispenser wire/tube assembly has been properly reconnected at least 35 psi (241 kPa)? See "Refrigerator Doors and Drawer." ■ Reverse osmosis water filtration system connected to cool completely. ■ Recently dispensed large amount of water after dispensing is leaking from the dispenser. Water is normal. ■ Glass not being held under the dispenser 2 to 3 seconds after installation for water supply to water supply and turn water shutoff valve fully open. ■ Kink...
...." ■ Recently removed the doors? Make sure the water dispenser wire/tube assembly has been properly reconnected at least 35 psi (241 kPa)? See "Refrigerator Doors and Drawer." ■ Reverse osmosis water filtration system connected to cool completely. ■ Recently dispensed large amount of water after dispensing is leaking from the dispenser. Water is normal. ■ Glass not being held under the dispenser 2 to 3 seconds after installation for water supply to water supply and turn water shutoff valve fully open. ■ Kink...
Owners Manual
Page 16
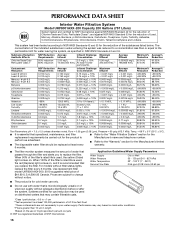
... is essential that operational, maintenance, and filter ■ Refer to the "Water Filtration System" section for the replacement requirements be carried out for the Manufacturer's limited ■ The disposable water filter should be used , the red (Replace) light comes on . Systems certified for cold water use only. ■ Do not use with water that may be replaced at least every warranty. 6 months. ■ The filter monitor system...
... is essential that operational, maintenance, and filter ■ Refer to the "Water Filtration System" section for the replacement requirements be carried out for the Manufacturer's limited ■ The disposable water filter should be used , the red (Replace) light comes on . Systems certified for cold water use only. ■ Do not use with water that may be replaced at least every warranty. 6 months. ■ The filter monitor system...

Owners Manual
Page 17
... user or operator instructions and/or installation instructions. 2. Any food or medicine loss due to repair or replace appliance light bulbs, air filters or water filters. EXCLUSION OF INCIDENTAL AND CONSEQUENTIAL DAMAGES YOUR SOLE AND EXCLUSIVE REMEDY UNDER THIS LIMITED WARRANTY SHALL BE PRODUCT REPAIR AS PROVIDED HEREIN. ITEMS EXCLUDED FROM WARRANTY This limited warranty does not cover: 1. Repairs to parts or systems resulting from unauthorized modifications made to obtain service...
... user or operator instructions and/or installation instructions. 2. Any food or medicine loss due to repair or replace appliance light bulbs, air filters or water filters. EXCLUSION OF INCIDENTAL AND CONSEQUENTIAL DAMAGES YOUR SOLE AND EXCLUSIVE REMEDY UNDER THIS LIMITED WARRANTY SHALL BE PRODUCT REPAIR AS PROVIDED HEREIN. ITEMS EXCLUDED FROM WARRANTY This limited warranty does not cover: 1. Repairs to parts or systems resulting from unauthorized modifications made to obtain service...
Owners Manual
Page 18
...-807-6777. Please keep these User Instructions and the model number information for future reference. 18 If you need assistance using your product or you would like to schedule service, you can find your model number and serial number on the label, located on the inside wall of the refrigerator compartment. For additional product information, in the U.S.A., visit www.maytag.com In Canada, visit www...
...-807-6777. Please keep these User Instructions and the model number information for future reference. 18 If you need assistance using your product or you would like to schedule service, you can find your model number and serial number on the label, located on the inside wall of the refrigerator compartment. For additional product information, in the U.S.A., visit www.maytag.com In Canada, visit www...
Dimension Guide
Page 1
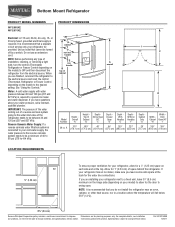
... your refrigerator has an ice maker, make sure you are installing your model) to allow for the water line connections. For complete details, see Installation our products, we reserve the right to change materials and specifications without notice. Ref. IMPORTANT: The pressure of the water coming out of a reverse osmosis system going to the water inlet valve of the refrigerator needs to be a minimum of installation, cleaning, or removing a light bulb, turn the control (Thermostat, Refrigerator or Freezer Control...
... your refrigerator has an ice maker, make sure you are installing your model) to allow for the water line connections. For complete details, see Installation our products, we reserve the right to change materials and specifications without notice. Ref. IMPORTANT: The pressure of the water coming out of a reverse osmosis system going to the water inlet valve of the refrigerator needs to be a minimum of installation, cleaning, or removing a light bulb, turn the control (Thermostat, Refrigerator or Freezer Control...
Warranty Information
Page 1
... light bulbs, air filters or water filters. Some states and provinces do not allow limitations on the duration of implied warranties of merchantability or fitness, so this limitation may not apply to you on major appliances with original model/serial numbers that is inconsistent to published user or operator instructions and/or installation instructions. 2. Service calls to refrigerator or freezer product failures. 7. Repairs to parts or systems resulting from warranty coverage. 4. Replacement parts...
... light bulbs, air filters or water filters. Some states and provinces do not allow limitations on the duration of implied warranties of merchantability or fitness, so this limitation may not apply to you on major appliances with original model/serial numbers that is inconsistent to published user or operator instructions and/or installation instructions. 2. Service calls to refrigerator or freezer product failures. 7. Repairs to parts or systems resulting from warranty coverage. 4. Replacement parts...


