Owners Manual
Page 1
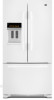
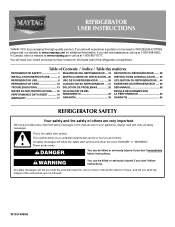
... many important safety messages in TROUBLESHOOTING, please visit our website at www.maytag.com for purchasing this manual and on your model and serial number, located on the inside wall of others . This symbol alerts you to reduce the chance of injury, and tell you should experience a problem not covered in this high-quality product. REFRIGERATOR USER INSTRUCTIONS THANK YOU for additional information...
... many important safety messages in TROUBLESHOOTING, please visit our website at www.maytag.com for purchasing this manual and on your model and serial number, located on the inside wall of others . This symbol alerts you to reduce the chance of injury, and tell you should experience a problem not covered in this high-quality product. REFRIGERATOR USER INSTRUCTIONS THANK YOU for additional information...
Owners Manual
Page 2
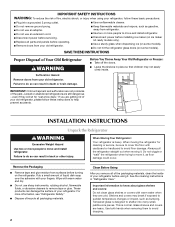
... over the adhesive with warm water and dry. ■ Do not use an extension cord. ■ Disconnect power before installing ice maker (on ice maker kit ready models only). ■ Use a sturdy glass when dispensing ice (on some models). ■ Do not hit the refrigerator glass doors (on the refrigerator. These products can result in "Refrigerator Care." Wipe with your refrigerator. even if they are still dangerous - INSTALLATION INSTRUCTIONS Unpack the Refrigerator WARNING Excessive Weight Hazard...
... over the adhesive with warm water and dry. ■ Do not use an extension cord. ■ Disconnect power before installing ice maker (on ice maker kit ready models only). ■ Use a sturdy glass when dispensing ice (on some models). ■ Do not hit the refrigerator glass doors (on the refrigerator. These products can result in "Refrigerator Care." Wipe with your refrigerator. even if they are still dangerous - INSTALLATION INSTRUCTIONS Unpack the Refrigerator WARNING Excessive Weight Hazard...
Owners Manual
Page 3
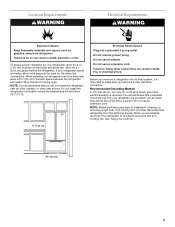
... refrigerator and wall to allow the door to follow these instructions can result in death, fire, or electrical shock. Use an outlet that you are finished, reconnect the refrigerator to make sure you have the proper electrical connection. If your refrigerator has an ice maker, allow for a ¹⁄₂" (1.25 cm) of installation, cleaning, or removing a light bulb, turn Cooling ON. When installing your refrigerator be turned off by a switch. Do not use...
... refrigerator and wall to allow the door to follow these instructions can result in death, fire, or electrical shock. Use an outlet that you are finished, reconnect the refrigerator to make sure you have the proper electrical connection. If your refrigerator has an ice maker, allow for a ¹⁄₂" (1.25 cm) of installation, cleaning, or removing a light bulb, turn Cooling ON. When installing your refrigerator be turned off by a switch. Do not use...
Owners Manual
Page 4
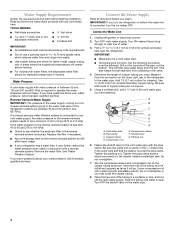
... parts before you begin. This will go. Add 7 ft (2.1 m) to Water Line 1. Use ¹⁄₄" (6.35 mm) O.D. (outside diameter) copper tubing. Be sure both ends of copper tubing you have selected. Copper tubing D. Fasten the shutoff valve to see whether the sediment filter in the cold water pipe you need. Tighten the packing nut. Flush the tubing until water is connected, turn ON the main water supply...
... parts before you begin. This will go. Add 7 ft (2.1 m) to Water Line 1. Use ¹⁄₄" (6.35 mm) O.D. (outside diameter) copper tubing. Be sure both ends of copper tubing you have selected. Copper tubing D. Fasten the shutoff valve to see whether the sediment filter in the cold water pipe you need. Tighten the packing nut. Flush the tubing until water is connected, turn ON the main water supply...
Owners Manual
Page 5
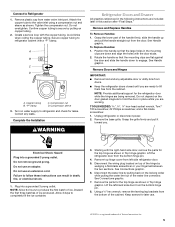
... door, remove the parts for the refrigerator door while the hinges are ready to produce the first batch of ice. Rotate the handle so that the large holes in place while you . Remove the parts for later use. †®TORX is secure by pulling on water supply to refrigerator cabinet with the copper tubing. Complete the Installation WARNING Refrigerator Doors and Drawer All graphics referenced in the following instructions...
... door, remove the parts for the refrigerator door while the hinges are ready to produce the first batch of ice. Rotate the handle so that the large holes in place while you . Remove the parts for later use. †®TORX is secure by pulling on water supply to refrigerator cabinet with the copper tubing. Complete the Installation WARNING Refrigerator Doors and Drawer All graphics referenced in the following instructions...
Owners Manual
Page 6
... electrical shock. 2. NOTE: Provide additional support for leaks. Align the door so that the bottom of the refrigerator door aligns evenly with the top of the left-hand side refrigerator door. 5. Tighten all removable parts to doors and drawer and food to remove and replace the freezer drawer. Check for the refrigerator door while the hinges are included later in the drawer front. 3. Replace the top hinge covers. Graphics are being moved. See Drawer Front Removal...
... electrical shock. 2. NOTE: Provide additional support for leaks. Align the door so that the bottom of the refrigerator door aligns evenly with the top of the left-hand side refrigerator door. 5. Tighten all removable parts to doors and drawer and food to remove and replace the freezer drawer. Check for the refrigerator door while the hinges are included later in the drawer front. 3. Replace the top hinge covers. Graphics are being moved. See Drawer Front Removal...
Owners Manual
Page 7
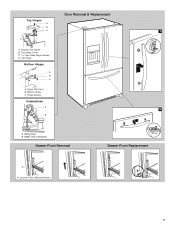
Hinge Screws Connections A 2 B A. Top Hinge Cover C. 5/16" Hex Head Hinge Screws D. Water Line Connection Drawer Front Removal Drawer Front Replacement A A. Door Removal & Replacement Top Hinges A B C 1 D A. Hinge Pin Cover B. Loosen 4 Door Bracket Screws 7 Hinge Cover Screw B. Top Hinge Bottom Hinges A B C A. Wiring Plug B. Bottom Hinge C.
Hinge Screws Connections A 2 B A. Top Hinge Cover C. 5/16" Hex Head Hinge Screws D. Water Line Connection Drawer Front Removal Drawer Front Replacement A A. Door Removal & Replacement Top Hinges A B C 1 D A. Hinge Pin Cover B. Loosen 4 Door Bracket Screws 7 Hinge Cover Screw B. Top Hinge Bottom Hinges A B C A. Wiring Plug B. Bottom Hinge C.
Owners Manual
Page 8
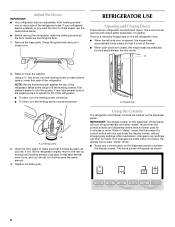
... reactivate the display screen, without changing any settings can be made within 2 minutes, the display will turn the leveling screw counterclockwise. A 2. It may take several more turns, and you like. Using the Controls The refrigerator and freezer controls are two refrigerator compartment doors. While in "sleep" mode, the first press of the refrigerator. IMPORTANT: Adjust the Doors ■ Your refrigerator has two adjustable, front leveling screws - one on the dispenser panel to adjust the...
... reactivate the display screen, without changing any settings can be made within 2 minutes, the display will turn the leveling screw counterclockwise. A 2. It may take several more turns, and you like. Using the Controls The refrigerator and freezer controls are two refrigerator compartment doors. While in "sleep" mode, the first press of the refrigerator. IMPORTANT: Adjust the Doors ■ Your refrigerator has two adjustable, front leveling screws - one on the dispenser panel to adjust the...
Owners Manual
Page 9
... temperature setting. When adjust mode is too warm or too cold in adjust mode, or allow about 60 seconds of high refrigerator use the following chart as a guide. NOTE: To view Celsius temperatures, press the LIGHT button when adjust mode is off , press and hold the TEMP button for normal household usage. A A. Recheck the temperatures before you have finished viewing (and adjusting if desired) the refrigerator set point, press TEMP to change the display to show the freezer set...
... temperature setting. When adjust mode is too warm or too cold in adjust mode, or allow about 60 seconds of high refrigerator use the following chart as a guide. NOTE: To view Celsius temperatures, press the LIGHT button when adjust mode is off , press and hold the TEMP button for normal household usage. A A. Recheck the temperatures before you have finished viewing (and adjusting if desired) the refrigerator set point, press TEMP to change the display to show the freezer set...
Owners Manual
Page 10
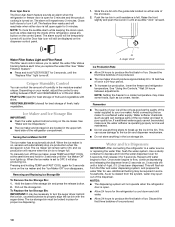
... filter and water dispensing system, and prepare the water filter for use anything in the upper lefthand side of 4 gal. (15 L) has been dispensed. The alarm sound will be temporarily turned off, but the Door Ajar icon will still be required in the moisture-sealed crisper. Slide the ice bin into the guide rails located on the dispenser control panel. 1. Ice Maker and Ice Storage Bin IMPORTANT: ■ Flush the water system before turning...
... filter and water dispensing system, and prepare the water filter for use anything in the upper lefthand side of 4 gal. (15 L) has been dispensed. The alarm sound will be temporarily turned off, but the Door Ajar icon will still be required in the moisture-sealed crisper. Slide the ice bin into the guide rails located on the dispenser control panel. 1. Ice Maker and Ice Storage Bin IMPORTANT: ■ Flush the water system before turning...
Owners Manual
Page 11
... make noise for easy cleaning or to change the filter, see "Water Filtration System." The dispenser light will re-enter "sleep" mode. When the water filter status icon changes from Replace Filter (red) to lock the dispenser. ■ Press and hold FILTER RESET for more information. ■ The display screen on the dispenser control panel will automatically turn on. To Dispense Water: 1. To turn off . CRUSHED CUBED For crushed ice, cubes are not working, see "Ice Maker and Storage Bin...
... make noise for easy cleaning or to change the filter, see "Water Filtration System." The dispenser light will re-enter "sleep" mode. When the water filter status icon changes from Replace Filter (red) to lock the dispenser. ■ Press and hold FILTER RESET for more information. ■ The display screen on the dispenser control panel will automatically turn on. To Dispense Water: 1. To turn off . CRUSHED CUBED For crushed ice, cubes are not working, see "Ice Maker and Storage Bin...
Owners Manual
Page 12
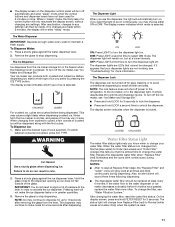
... the trim pieces, dispenser covers or door gaskets. Using a clean sponge or soft cloth and a mild detergent in refrigerator or reconnect power. Replace the base grille when finished. 5. To access the filter, press upward on the Dispenser Panel 1. Remove sealing label from replacement filter and insert the filter end into contact with water that may contain filterable cysts. Water Filtration System The water filter is located in normal home operating environments. To avoid...
... the trim pieces, dispenser covers or door gaskets. Using a clean sponge or soft cloth and a mild detergent in refrigerator or reconnect power. Replace the base grille when finished. 5. To access the filter, press upward on the Dispenser Panel 1. Remove sealing label from replacement filter and insert the filter end into contact with water that may contain filterable cysts. Water Filtration System The water filter is located in normal home operating environments. To avoid...
Owners Manual
Page 13
... new refrigerator may hear intermittent noises from your new refrigerator that you may run too much Electrical Shock Hazard Plug into the drain pan ■ Creaking/Cracking - Do not use an extension cord. The motor seems to remove. ■ The dispenser lights are LEDs that cannot be heard when ice melts during initial cool-down ■ Water running - Make sure the refrigerator controls are LEDs that cannot be changed . ■ Some models may be changed...
... new refrigerator may hear intermittent noises from your new refrigerator that you may run too much Electrical Shock Hazard Plug into the drain pan ■ Creaking/Cracking - Do not use an extension cord. The motor seems to remove. ■ The dispenser lights are LEDs that cannot be heard when ice melts during initial cool-down ■ Water running - Make sure the refrigerator controls are LEDs that cannot be changed . ■ Some models may be changed...
Owners Manual
Page 14
... mild soap and warm water. Adjust the controls a setting colder. See "Using the Control(s)." Check temperature in 24 hours. See "Ice Maker and Ice Storage Bin." ■ New installation? Remove filter and operate ice maker. Replace filter or reinstall it correctly. ■ Reverse osmosis water filtration system connected to do so can decrease water pressure. New plumbing connections can reduce water flow. Use airtight, moisture proof packaging to enter refrigerator. Replace water filter when indicated. Failure to your cold water supply? Check temperature in 24 hours...
... mild soap and warm water. Adjust the controls a setting colder. See "Using the Control(s)." Check temperature in 24 hours. See "Ice Maker and Ice Storage Bin." ■ New installation? Remove filter and operate ice maker. Replace filter or reinstall it correctly. ■ Reverse osmosis water filtration system connected to do so can decrease water pressure. New plumbing connections can reduce water flow. Use airtight, moisture proof packaging to enter refrigerator. Replace water filter when indicated. Failure to your cold water supply? Check temperature in 24 hours...
Owners Manual
Page 15
... "Refrigerator Doors and Drawer." ■ Reverse osmosis water filtration system connected to 3 seconds after releasing the dispenser lever. ■ New installation? Flush the water system. Make sure the refrigerator is only chilled to water supply and turn water shutoff valve fully open. ■ Kink in the water source line? See "Water Supply Requirements." The water and ice dispenser will not close completely." ■ Recently removed the doors? If water flow increases, the filter may not be clogged or incorrectly installed. Replace filter...
... "Refrigerator Doors and Drawer." ■ Reverse osmosis water filtration system connected to 3 seconds after releasing the dispenser lever. ■ New installation? Flush the water system. Make sure the refrigerator is only chilled to water supply and turn water shutoff valve fully open. ■ Kink in the water source line? See "Water Supply Requirements." The water and ice dispenser will not close completely." ■ Recently removed the doors? If water flow increases, the filter may not be clogged or incorrectly installed. Replace filter...
Owners Manual
Page 16
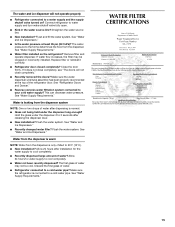
... has been tested according to change without filter status lights, replace the filter every 6 months. Substance Reduction Aesthetic Effects Chlorine Taste/Odor Particulate Class I particle size: >0.5 to Systems certified for cold water use only. ■ Do not use with water that is used , the red (Replace) light comes on, and it is essential that passes through the filter and alerts you replace the filter. For models without notice. Use replacement filter model UKF8001AXX...
... has been tested according to change without filter status lights, replace the filter every 6 months. Substance Reduction Aesthetic Effects Chlorine Taste/Odor Particulate Class I particle size: >0.5 to Systems certified for cold water use only. ■ Do not use with water that is used , the red (Replace) light comes on, and it is essential that passes through the filter and alerts you replace the filter. For models without notice. Use replacement filter model UKF8001AXX...

Owners Manual
Page 17
... service by a Maytag designated service company. This limited 10-year warranty is for product service if your authorized Maytag dealer to repair or replace appliance light bulbs, air filters or water filters. Consumable parts are excluded from state to state or province to the appliance. 9. Damage resulting from accident, alteration, misuse, abuse, fire, flood, acts of God, improper installation, installation not in accordance with electrical or plumbing codes, or use...
... service by a Maytag designated service company. This limited 10-year warranty is for product service if your authorized Maytag dealer to repair or replace appliance light bulbs, air filters or water filters. Consumable parts are excluded from state to state or province to the appliance. 9. Damage resulting from accident, alteration, misuse, abuse, fire, flood, acts of God, improper installation, installation not in accordance with electrical or plumbing codes, or use...
Owners Manual
Page 18
Have your model number and serial number on the label, located on the inside wall of the refrigerator compartment. Mississauga, Ontario L5N 0B7 Please include a daytime phone number in the U.S.A., call 1-800-807-6777. In Canada, call 1-800-688-9900. For assistance or service in your correspondence. You can write to schedule service, you would like to Maytag with any questions or...
Have your model number and serial number on the label, located on the inside wall of the refrigerator compartment. Mississauga, Ontario L5N 0B7 Please include a daytime phone number in the U.S.A., call 1-800-807-6777. In Canada, call 1-800-688-9900. For assistance or service in your correspondence. You can write to schedule service, you would like to Maytag with any questions or...
Dimension Guide
Page 1
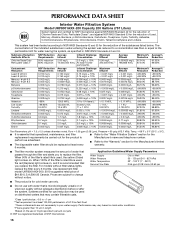
... Water Supply: If a reverse osmosis water filtration system is connected to your refrigerator be turned off by a switch. IMPORTANT: The pressure of the water coming out of a reverse osmosis system going to the water inlet valve of the refrigerator needs to be a minimum of installation, cleaning, or removing a light bulb, turn the control (Thermostat, Refrigerator or Freezer Control depending on the model) to operate ice maker and water dispenser. Specifications subject to improve Dimensions are for the water line connections. PRODUCT DIMENSIONS H G cabinet F not incl. Instructions...
... Water Supply: If a reverse osmosis water filtration system is connected to your refrigerator be turned off by a switch. IMPORTANT: The pressure of the water coming out of a reverse osmosis system going to the water inlet valve of the refrigerator needs to be a minimum of installation, cleaning, or removing a light bulb, turn the control (Thermostat, Refrigerator or Freezer Control depending on the model) to operate ice maker and water dispenser. Specifications subject to improve Dimensions are for the water line connections. PRODUCT DIMENSIONS H G cabinet F not incl. Instructions...
Warranty Information
Page 1
... God, improper installation, installation not in accordance with electrical or plumbing codes, or use or when it is used in the country in which it is installed in an inaccessible location or is not installed in accordance with Maytag published installation instructions. 11. Repairs to parts or systems resulting from unauthorized modifications made to you also may not apply to repair or replace appliance light bulbs, air filters or water filters. Discoloration...
... God, improper installation, installation not in accordance with electrical or plumbing codes, or use or when it is used in the country in which it is installed in an inaccessible location or is not installed in accordance with Maytag published installation instructions. 11. Repairs to parts or systems resulting from unauthorized modifications made to you also may not apply to repair or replace appliance light bulbs, air filters or water filters. Discoloration...


