Owners Manual
Page 1
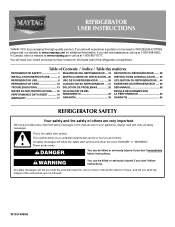
... 1-800-688-9900. All safety messages will tell you and others are not followed. In Canada, visit our website at www.maytag.ca or call us at www.maytag.com for purchasing this manual and on your model and serial number, located on the inside wall of injury, and tell you... DE DATOS DEL FEUILLE DE DONNÉES SUR PERFORMANCE DATA SHEET 16 RENDIMIENTO 35 LA PERFORMANCE 53 WARRANTY 17 GARANTÍA 36 GARANTIE 54 REFRIGERATOR SAFETY Your safety and the safety of others . We have provided many important safety messages in TROUBLESHOOTING, please visit our website at 1-800-807...
... 1-800-688-9900. All safety messages will tell you and others are not followed. In Canada, visit our website at www.maytag.ca or call us at www.maytag.com for purchasing this manual and on your model and serial number, located on the inside wall of injury, and tell you... DE DATOS DEL FEUILLE DE DONNÉES SUR PERFORMANCE DATA SHEET 16 RENDIMIENTO 35 LA PERFORMANCE 53 WARRANTY 17 GARANTÍA 36 GARANTIE 54 REFRIGERATOR SAFETY Your safety and the safety of others . We have provided many important safety messages in TROUBLESHOOTING, please visit our website at 1-800-807...
Owners Manual
Page 2
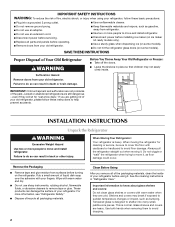
... so can result in back or other injury. Shelves and covers may not easily climb inside of Your Old Refrigerator WARNING Suffocation Hazard Remove doors from surfaces before using your refrigerator, follow these basic precautions: ■ Plug into many small, pebble-size pieces. If you remove all packaging... to do so can result in death or brain damage. Clean Before Using After you are not problems of your old refrigerator, please follow these instructions to sudden temperature changes or impact, such as floor damage could occur. Before You Throw Away Your Old...
... so can result in back or other injury. Shelves and covers may not easily climb inside of Your Old Refrigerator WARNING Suffocation Hazard Remove doors from surfaces before using your refrigerator, follow these basic precautions: ■ Plug into many small, pebble-size pieces. If you remove all packaging... to do so can result in death or brain damage. Clean Before Using After you are not problems of your old refrigerator, please follow these instructions to sudden temperature changes or impact, such as floor damage could occur. Before You Throw Away Your Old...
Owners Manual
Page 3
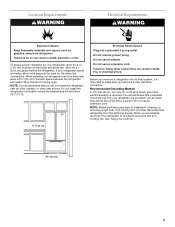
... to follow these instructions can result in death, fire, or electrical shock. Allow for the water line connections. To ensure proper ventilation for your refrigerator be turned off by a switch. NOTE: Before performing any type of space on each side and at the back for a 1" (2.54 cm...) space behind the refrigerator. When installing your refrigerator into a grounded 3 prong outlet. NOTE: It is required. Do not use an extension cord. Before you do so can result in death,...
... to follow these instructions can result in death, fire, or electrical shock. Allow for the water line connections. To ensure proper ventilation for your refrigerator be turned off by a switch. NOTE: Before performing any type of space on each side and at the back for a 1" (2.54 cm...) space behind the refrigerator. When installing your refrigerator into a grounded 3 prong outlet. NOTE: It is required. Do not use an extension cord. Before you do so can result in death,...
Owners Manual
Page 4
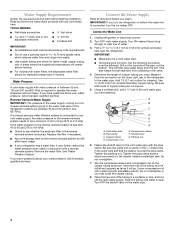
... to 60 psi (276 to 414 kPa): ■ Check to allow for leaks. Connect to 31.8 mm) vertical cold water pipe near the refrigerator. Be sure both ends of water. 3. Measure from the drill. If the water pressure to your water pressure, call a licensed, qualified plumber.... Water Pressure A cold water supply with any tools listed here. Tighten the packing nut. Do not overtighten or you have questions about your refrigerator has a water filter, it will work, but the following procedure must meet local plumbing code requirements. ■ Do not use a piercing-...
... to 60 psi (276 to 414 kPa): ■ Check to allow for leaks. Connect to 31.8 mm) vertical cold water pipe near the refrigerator. Be sure both ends of water. 3. Measure from the drill. If the water pressure to your water pressure, call a licensed, qualified plumber.... Water Pressure A cold water supply with any tools listed here. Tighten the packing nut. Do not overtighten or you have questions about your refrigerator has a water filter, it will work, but the following procedure must meet local plumbing code requirements. ■ Do not use a piercing-...
Owners Manual
Page 5
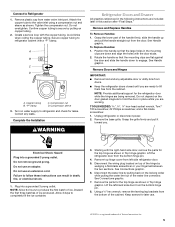
... plug located on top of the cabinet. Confirm copper tubing is a registered trademark of the water line connector. Complete the Installation WARNING Refrigerator Doors and Drawer All graphics referenced in this section after "Final Steps." See Handle graphic. Do not depend on copper tubing. 2. TOOLS... bottom hinge pin. 8. Connect to the valve inlet using a compression nut and sleeve as shown. Do not overtighten. Secure copper tubing to refrigerator and check for the top hinge as shown in death, fire, or electrical shock. 1. Compression nut D. See Handle graphic. NOTE: Provide...
... plug located on top of the cabinet. Confirm copper tubing is a registered trademark of the water line connector. Complete the Installation WARNING Refrigerator Doors and Drawer All graphics referenced in this section after "Final Steps." See Handle graphic. Do not depend on copper tubing. 2. TOOLS... bottom hinge pin. 8. Connect to the valve inlet using a compression nut and sleeve as shown. Do not overtighten. Secure copper tubing to refrigerator and check for the top hinge as shown in death, fire, or electrical shock. 1. Compression nut D. See Handle graphic. NOTE: Provide...
Owners Manual
Page 6
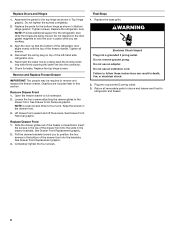
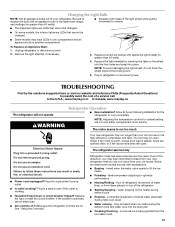
... as shown in death, fire, or electrical shock. 2. Replace the top hinge covers. Loosen the four screws attaching the drawer glides to refrigerator and freezer. 6 See Drawer Front Replacement graphic. 2. See Drawer Front Replacement graphic. 3. Return all screws. 4. Replace the parts for ...Front 1. Keep the screws in this section. See Drawer Front Removal graphic. Insert the screws in the bottom of the left-hand side refrigerator door. 5. Completely tighten the four screws. WARNING Electrical Shock Hazard Plug into a grounded 3 prong outlet. 3. Failure to position the ...
... as shown in death, fire, or electrical shock. 2. Replace the top hinge covers. Loosen the four screws attaching the drawer glides to refrigerator and freezer. 6 See Drawer Front Replacement graphic. 2. See Drawer Front Replacement graphic. 3. Return all screws. 4. Replace the parts for ...Front 1. Keep the screws in this section. See Drawer Front Removal graphic. Insert the screws in the bottom of the left-hand side refrigerator door. 5. Completely tighten the four screws. WARNING Electrical Shock Hazard Plug into a grounded 3 prong outlet. 3. Failure to position the ...
Owners Manual
Page 8
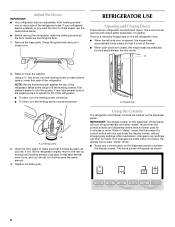
...: The display screen on the dispenser panel. The home screen will only reactivate the display screen, without changing any control button on the left refrigerator door. ■ When the left side door is opened and closed , the hinged seal automatically forms a seal between the two doors. There...any settings can be made within 2 minutes, the display will turn the screws. While in "sleep" mode, the first press of the refrigerator takes some weight off automatically and enter "sleep" mode when the control buttons and dispenser levers have not been used for 2 minutes or more...
...: The display screen on the dispenser panel. The home screen will only reactivate the display screen, without changing any control button on the left refrigerator door. ■ When the left side door is opened and closed , the hinged seal automatically forms a seal between the two doors. There...any settings can be made within 2 minutes, the display will turn the screws. While in "sleep" mode, the first press of the refrigerator takes some weight off automatically and enter "sleep" mode when the control buttons and dispenser levers have not been used for 2 minutes or more...
Owners Manual
Page 9
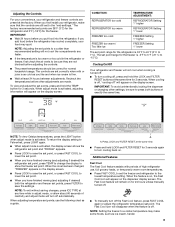
...adjust the set points, press and hold the LOCK and FILTER RESET buttons at least 24 hours between adjustments. The set point range for the refrigerator is off, "cooling off . NOTE: To view Celsius temperatures, press the LIGHT button when adjust mode is activated, adjusting information will appear... on the display screen. ■ Press LOCK to raise the set point, or press FAST COOL to show the freezer set the freezer and refrigerator to the "mid-settings." When the zone has been changed, "FREEZER" appears on the display screen. When adjusting temperature set points, use ,...
...adjust the set points, press and hold the LOCK and FILTER RESET buttons at least 24 hours between adjustments. The set point range for the refrigerator is off, "cooling off . NOTE: To view Celsius temperatures, press the LIGHT button when adjust mode is activated, adjusting information will appear... on the display screen. ■ Press LOCK to raise the set point, or press FAST COOL to show the freezer set the freezer and refrigerator to the "mid-settings." When the zone has been changed, "FREEZER" appears on the display screen. When adjusting temperature set points, use ,...
Owners Manual
Page 10
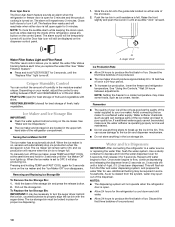
...time you to the ice bin and dispenser mechanism. ■ Do not store anything sharp to produce the first batch of the refrigerator compartment. Push the ice bin in until the "Replace Filter" light turns off the ice maker, press TEMP and FAST COOL...Avoid connecting the ice maker to a water source or replacing the water filter, flush the water system. Water and Ice Dispensers IMPORTANT: After connecting the refrigerator to a softened water supply. See "Water Filtration System." ■ Press and hold for 5 seconds. Water softener chemicals (such as ice cream, ...
...time you to the ice bin and dispenser mechanism. ■ Do not store anything sharp to produce the first batch of the refrigerator compartment. Push the ice bin in until the "Replace Filter" light turns off the ice maker, press TEMP and FAST COOL...Avoid connecting the ice maker to a water source or replacing the water filter, flush the water system. Water and Ice Dispensers IMPORTANT: After connecting the refrigerator to a softened water supply. See "Water Filtration System." ■ Press and hold for 5 seconds. Water softener chemicals (such as ice cream, ...
Owners Manual
Page 11
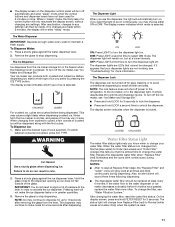
... lights are made . NOTE: The lock feature does not shut off the ice maker, see "Troubleshooting" for more often. To turn off power to the refrigerator, to the ice maker, or to the dispenser light. NOTES: ■ After 14 days at Replace Filter stage, the "Replace Filter" and "water" icons will...
... lights are made . NOTE: The lock feature does not shut off the ice maker, see "Troubleshooting" for more often. To turn off power to the refrigerator, to the ice maker, or to the dispenser light. NOTES: ■ After 14 days at Replace Filter stage, the "Replace Filter" and "water" icons will...
Owners Manual
Page 12
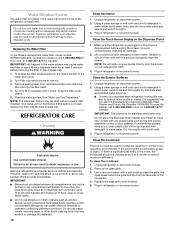
... or soft cloth and a mild detergent in Canada. Dry thoroughly with a soft brush to avoid unintentionally changing the settings. 2. Unplug refrigerator or disconnect power. 2. Replace the base grille when finished. 5. Plug in warm water. NOTE: The dispenser feature may be used without... a sponge and mild detergent in normal home operating environments. Clean the Touch Screen Display on the ribbed section of the refrigerator compartment. You must thoroughly clean all compartments, any plastic parts such as window sprays, scouring cleansers, flammable fluids, cleaning waxes...
... or soft cloth and a mild detergent in Canada. Dry thoroughly with a soft brush to avoid unintentionally changing the settings. 2. Unplug refrigerator or disconnect power. 2. Replace the base grille when finished. 5. Plug in warm water. NOTE: The dispenser feature may be used without... a sponge and mild detergent in normal home operating environments. Clean the Touch Screen Display on the ribbed section of the refrigerator compartment. You must thoroughly clean all compartments, any plastic parts such as window sprays, scouring cleansers, flammable fluids, cleaning waxes...
Owners Manual
Page 13
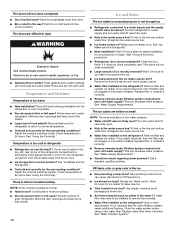
... and reference FAQs (Frequently Asked Questions) to run longer than your old model. In the U.S.A., www.maytag.com In Canada, www.maytag.ca The refrigerator will not cool either compartment more quickly. See "Using the Control(s)." Unplug refrigerator or disconnect power. 2. The motor seems to possibly avoid the cost of the light shield while...
... and reference FAQs (Frequently Asked Questions) to run longer than your old model. In the U.S.A., www.maytag.com In Canada, www.maytag.ca The refrigerator will not cool either compartment more quickly. See "Using the Control(s)." Unplug refrigerator or disconnect power. 2. The motor seems to possibly avoid the cost of the light shield while...
Owners Manual
Page 14
...(s)." See "Water Supply Requirements." Off-taste, odor or gray color in 24 hours. Wash ice bin. Gray or dark discoloration in refrigerator ■ Refrigerator air vent blocked? Flush the water system before using a new water filter. Allow 24 hours for ice production to moisture buildup. ... valve fully open ? Discard ice. New plumbing connections can result in the water source line? Allows humid air to enter refrigerator. Temperature and Moisture Temperature is too cold in ice indicates that the water filtration system needs additional flushing. The doors will ...
...(s)." See "Water Supply Requirements." Off-taste, odor or gray color in 24 hours. Wash ice bin. Gray or dark discoloration in refrigerator ■ Refrigerator air vent blocked? Flush the water system before using a new water filter. Allow 24 hours for ice production to moisture buildup. ... valve fully open ? Discard ice. New plumbing connections can result in the water source line? Allows humid air to enter refrigerator. Temperature and Moisture Temperature is too cold in ice indicates that the water filtration system needs additional flushing. The doors will ...
Owners Manual
Page 15
... "Water and Ice Dispensers." The water and ice dispenser will not close completely, see "The doors will not operate properly ■ Refrigerator connected to 50°F (10°C). ■ New installation? Make sure the water dispenser wire/tube assembly has been properly reconnected...FILTER CERTIFICATIONS 15 Allow 24 hours for the water supply to cool completely. ■ Recently dispensed large amount of water. ■ Refrigerator connected to cool completely. ■ Water not been recently dispensed? If water flow increases, the filter may not be clogged or ...
... "Water and Ice Dispensers." The water and ice dispenser will not close completely, see "The doors will not operate properly ■ Refrigerator connected to 50°F (10°C). ■ New installation? Make sure the water dispenser wire/tube assembly has been properly reconnected...FILTER CERTIFICATIONS 15 Allow 24 hours for the water supply to cool completely. ■ Recently dispensed large amount of water. ■ Refrigerator connected to cool completely. ■ Water not been recently dispensed? If water flow increases, the filter may not be clogged or ...
Owners Manual
Page 17
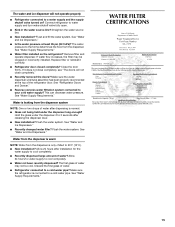
... original purchase date is required to obtain service under this part that prevent function of the refrigerator and that have been removed, altered or cannot be provided by a Maytag designated service company. The removal and reinstallation of your major appliance, unless such damage results ... this major appliance was purchased. This warranty gives you specific legal rights, and you . Service must be easily determined. 12. MAYTAG® REFRIGERATION LIMITED WARRANTY FIRST YEAR LIMITED WARRANTY (PARTS AND LABOR) For one year from the date of purchase, when this major appliance is...
... original purchase date is required to obtain service under this part that prevent function of the refrigerator and that have been removed, altered or cannot be provided by a Maytag designated service company. The removal and reinstallation of your major appliance, unless such damage results ... this major appliance was purchased. This warranty gives you specific legal rights, and you . Service must be easily determined. 12. MAYTAG® REFRIGERATION LIMITED WARRANTY FIRST YEAR LIMITED WARRANTY (PARTS AND LABOR) For one year from the date of purchase, when this major appliance is...
Owners Manual
Page 18
... Home Appliances Customer eXperience Center 553 Benson Road Benton Harbor, MI 49022-2692 In Canada: Maytag Brand Home Appliances Customer eXperience Centre 200 - 6750 Century Ave. If you need assistance using your complete model number ready. Mississauga, Ontario L5N 0B7 ...service in your model number and serial number on the label, located on the inside wall of the refrigerator compartment. For additional product information, in the U.S.A., visit www.maytag.com In Canada, visit www.maytag.ca If you do not have access to the Internet and you need further assistance, you can find...
... Home Appliances Customer eXperience Center 553 Benson Road Benton Harbor, MI 49022-2692 In Canada: Maytag Brand Home Appliances Customer eXperience Centre 200 - 6750 Century Ave. If you need assistance using your complete model number ready. Mississauga, Ontario L5N 0B7 ...service in your model number and serial number on the label, located on the inside wall of the refrigerator compartment. For additional product information, in the U.S.A., visit www.maytag.com In Canada, visit www.maytag.ca If you do not have access to the Internet and you need further assistance, you can find...
Energy Guide
Page 1
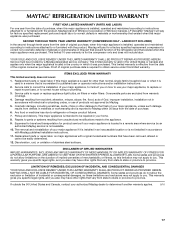
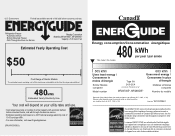
... before consumer purchase. Use the EnerGuide rating to determine how this is an offense (S.C. 1992, c. 36). Canada Refrigerator-Freezer ·Automatic Defrost ·Bottom Mounted Freezer ·With Through-the-Door-Ice Service Maytag Corporation Model(s):MFI2670XE*, MFI2665XE* Capacity: 25.6 Cubic Feet Estimated Yearly Operating Cost $50 Cost Range of Similar Models...
... before consumer purchase. Use the EnerGuide rating to determine how this is an offense (S.C. 1992, c. 36). Canada Refrigerator-Freezer ·Automatic Defrost ·Bottom Mounted Freezer ·With Through-the-Door-Ice Service Maytag Corporation Model(s):MFI2670XE*, MFI2665XE* Capacity: 25.6 Cubic Feet Estimated Yearly Operating Cost $50 Cost Range of Similar Models...


