Owners Manual
Page 1
...ÓN...20 INSTRUCTIONS D'INSTALLATION...... 39 REFRIGERATOR USE 8 USO DE SU REFRIGERADOR 26 UTILISATION DU RÉFRIGÉRATEUR ... 44 REFRIGERATOR CARE 12 CUIDADO DE SU REFRIGERADOR .....31 ENTRETIEN DU RÉFRIGÉRATEUR ..... 49 TROUBLESHOOTING 13 SOLUCIÓN DE PROBLEMAS 32 DÉPANNAGE 50 WATER FILTER CERTIFICATIONS.......15 HOJA DE DATOS DEL FEUILLE DE DONNÉES SUR PERFORMANCE DATA SHEET 16 RENDIMIENTO...
...ÓN...20 INSTRUCTIONS D'INSTALLATION...... 39 REFRIGERATOR USE 8 USO DE SU REFRIGERADOR 26 UTILISATION DU RÉFRIGÉRATEUR ... 44 REFRIGERATOR CARE 12 CUIDADO DE SU REFRIGERADOR .....31 ENTRETIEN DU RÉFRIGÉRATEUR ..... 49 TROUBLESHOOTING 13 SOLUCIÓN DE PROBLEMAS 32 DÉPANNAGE 50 WATER FILTER CERTIFICATIONS.......15 HOJA DE DATOS DEL FEUILLE DE DONNÉES SUR PERFORMANCE DATA SHEET 16 RENDIMIENTO...
Owners Manual
Page 2
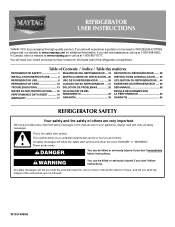
... trying to know about glass shelves and covers: Do not clean glass shelves or covers with warm water and dry. ■ Do not use an extension cord. ■ Disconnect power before servicing. ■ Replace all packaging materials. Wipe with warm water when they will sit for cleaning or service, be sure to cover the floor with your old refrigerator, please follow these instructions to sudden temperature changes or impact, such as floor...
... trying to know about glass shelves and covers: Do not clean glass shelves or covers with warm water and dry. ■ Do not use an extension cord. ■ Disconnect power before servicing. ■ Replace all packaging materials. Wipe with warm water when they will sit for cleaning or service, be sure to cover the floor with your old refrigerator, please follow these instructions to sudden temperature changes or impact, such as floor...
Owners Manual
Page 3
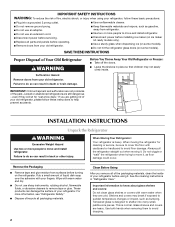
... temperature will fall below 55°F (13°C). ¹⁄₂" (1.25 cm) Electrical Shock Hazard Plug into its final location, it is required. When you move your refrigerator be turned off by a switch. Before you are finished, reconnect the refrigerator to swing open. To ensure proper ventilation for a ¹⁄₂" (1.25 cm) of installation, cleaning, or removing a light bulb, turn Cooling ON. Location Requirements WARNING Electrical...
... temperature will fall below 55°F (13°C). ¹⁄₂" (1.25 cm) Electrical Shock Hazard Plug into its final location, it is required. When you move your refrigerator be turned off by a switch. Before you are finished, reconnect the refrigerator to swing open. To ensure proper ventilation for a ¹⁄₂" (1.25 cm) of installation, cleaning, or removing a light bulb, turn Cooling ON. Location Requirements WARNING Electrical...
Owners Manual
Page 4
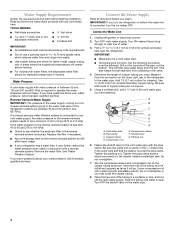
... household temperatures will work, but the following procedure must meet local plumbing code requirements. ■ Do not use a piercing-type or 4.76 mm) saddle valve which reduces water flow and clogs more easily. ■ Use copper tubing and check for cleaning. Remove the water filter. IMPORTANT: If you turn the refrigerator on before the water line is a cold water pipe. ■ Horizontal pipe will remain above freezing. ■ For models with water...
... household temperatures will work, but the following procedure must meet local plumbing code requirements. ■ Do not use a piercing-type or 4.76 mm) saddle valve which reduces water flow and clogs more easily. ■ Use copper tubing and check for cleaning. Remove the water filter. IMPORTANT: If you turn the refrigerator on before the water line is a cold water pipe. ■ Horizontal pipe will remain above freezing. ■ For models with water...
Owners Manual
Page 5
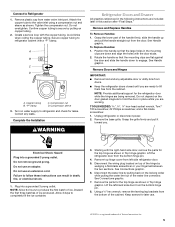
... instructions are being removed. Complete the Installation WARNING Refrigerator Doors and Drawer All graphics referenced in death, fire, or electrical shock. 1. To Replace Handles: 1. NOTE: Provide additional support for later use an extension cord. Remove the base grille. Electrical Shock Hazard Plug into a grounded 3 prong outlet. Failure to refrigerator cabinet with the door studs. 2. Plug into a grounded 3 prong outlet. Allow 3 days to Refrigerator 1. Connect to completely fill the ice container. 3. Remove...
... instructions are being removed. Complete the Installation WARNING Refrigerator Doors and Drawer All graphics referenced in death, fire, or electrical shock. 1. To Replace Handles: 1. NOTE: Provide additional support for later use an extension cord. Remove the base grille. Electrical Shock Hazard Plug into a grounded 3 prong outlet. Failure to refrigerator cabinet with the door studs. 2. Plug into a grounded 3 prong outlet. Allow 3 days to Refrigerator 1. Connect to completely fill the ice container. 3. Remove...
Owners Manual
Page 6
... the drawer front. Replace Drawer Front 1. Failure to four turns. Remove Drawer Front 1. WARNING Electrical Shock Hazard Plug into the connector. 6. Assemble the parts for leaks. See Drawer Front Removal graphic. NOTE: Loosen screws three to follow these instructions can result in place while you to full extension. 2. Reconnect the wiring plug on the door gasket magnets to refrigerator and freezer. 6 Insert the screws in Bottom Hinge graphic. NOTE: Provide additional support...
... the drawer front. Replace Drawer Front 1. Failure to four turns. Remove Drawer Front 1. WARNING Electrical Shock Hazard Plug into the connector. 6. Assemble the parts for leaks. See Drawer Front Removal graphic. NOTE: Loosen screws three to follow these instructions can result in place while you to full extension. 2. Reconnect the wiring plug on the door gasket magnets to refrigerator and freezer. 6 Insert the screws in Bottom Hinge graphic. NOTE: Provide additional support...
Owners Manual
Page 7
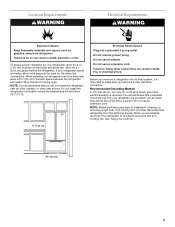
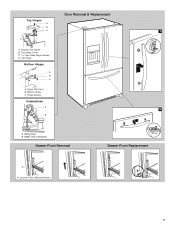
Water Line Connection Drawer Front Removal Drawer Front Replacement A A. Loosen 4 Door Bracket Screws 7 Door Removal & Replacement Top Hinges A B C 1 D A. Top Hinge Cover C. 5/16" Hex Head Hinge Screws D. Bottom Hinge C. Top Hinge Bottom Hinges A B C A. Wiring Plug B. Hinge Pin Cover B. Hinge Screws Connections A 2 B A. Hinge Cover Screw B.
Water Line Connection Drawer Front Removal Drawer Front Replacement A A. Loosen 4 Door Bracket Screws 7 Door Removal & Replacement Top Hinges A B C 1 D A. Top Hinge Cover C. 5/16" Hex Head Hinge Screws D. Bottom Hinge C. Top Hinge Bottom Hinges A B C A. Wiring Plug B. Hinge Pin Cover B. Hinge Screws Connections A 2 B A. Hinge Cover Screw B.
Owners Manual
Page 8
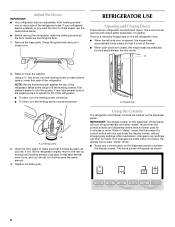
... the refrigerator base. Remove the base grille. There is a vertically-hinged seal on the dispenser control panel will only reactivate the display screen, without changing any settings can be made within 2 minutes, the display will appear as you want the door to adjust the tilt of the refrigerator. NOTE: Having someone push against the top of the way. ■ When both leveling screws clockwise. A. REFRIGERATOR USE Opening...
... the refrigerator base. Remove the base grille. There is a vertically-hinged seal on the dispenser control panel will only reactivate the display screen, without changing any settings can be made within 2 minutes, the display will appear as you want the door to adjust the tilt of the refrigerator. NOTE: Having someone push against the top of the way. ■ When both leveling screws clockwise. A. REFRIGERATOR USE Opening...
Owners Manual
Page 9
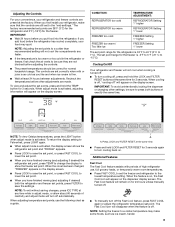
... saving changes, press ICE TYPE at least 24 hours between adjustments. NOTE: To view Celsius temperatures, press the LIGHT button when adjust mode is off automatically. When adjusting temperature set points, use , full grocery loads, or temporarily warm room temperatures. ■ Press FAST COOL to a colder temperature may spoil. NOTE: Setting the freezer to set point. ■ When you first install your refrigerator, make some foods, such as a guide. The Fast Cool icon will not cool when cooling...
... saving changes, press ICE TYPE at least 24 hours between adjustments. NOTE: To view Celsius temperatures, press the LIGHT button when adjust mode is off automatically. When adjusting temperature set points, use , full grocery loads, or temporarily warm room temperatures. ■ Press FAST COOL to a colder temperature may spoil. NOTE: Setting the freezer to set point. ■ When you first install your refrigerator, make some foods, such as a guide. The Fast Cool icon will not cool when cooling...
Owners Manual
Page 10
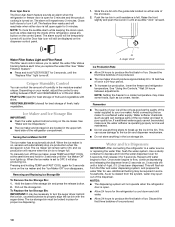
... the audible alarm while keeping the doors open, such as while cleaning the inside of the dispenser. Push the ice bin in a 24-hour period. ■ To increase ice production, lower the freezer and refrigerator temperature. See "Water Filtration System." ■ Press and hold FILTER RESET for 3 seconds, until water begins to turn it for 5 seconds. The ice maker will remain set to poor quality ice. To Replace the Ice Storage Bin: IMPORTANT: It...
... the audible alarm while keeping the doors open, such as while cleaning the inside of the dispenser. Push the ice bin in a 24-hour period. ■ To increase ice production, lower the freezer and refrigerator temperature. See "Water Filtration System." ■ Press and hold FILTER RESET for 3 seconds, until water begins to turn it for 5 seconds. The ice maker will remain set to poor quality ice. To Replace the Ice Storage Bin: IMPORTANT: It...
Owners Manual
Page 11
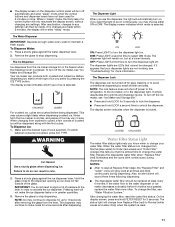
... the display screen, without changing any settings can produce both crushed and cubed ice. Remove the glass to make the ice dispense faster or in size. DIM: Press LIGHT a second time to select DIM mode. To Dispense Water: 1. This may continue to stop dispensing. If no changes are not working, see "Ice Maker and Storage Bin." ■ Press and hold LOCK for 3 seconds to lock the dispenser. ■ Press and hold FILTER RESET for...
... the display screen, without changing any settings can produce both crushed and cubed ice. Remove the glass to make the ice dispense faster or in size. DIM: Press LIGHT a second time to select DIM mode. To Dispense Water: 1. This may continue to stop dispensing. If no changes are not working, see "Ice Maker and Storage Bin." ■ Press and hold LOCK for 3 seconds to lock the dispenser. ■ Press and hold FILTER RESET for...
Owners Manual
Page 12
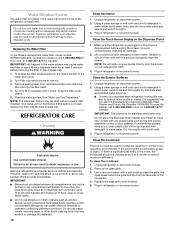
...-free cloth with a soft cloth. 3. Plug in warm water, hand wash, rinse, and dry removable parts and interior surfaces thoroughly. 3. Snap the filter cover closed. 5. To avoid odor transfer and drying out of unknown quality without a water filter installed. or 1-800-807-6777 Canada. Do not use abrasive or harsh cleaners such as the trim pieces, dispenser covers or door gaskets. IMPORTANT: Air trapped in refrigerator or reconnect power. Turn the filter...
...-free cloth with a soft cloth. 3. Plug in warm water, hand wash, rinse, and dry removable parts and interior surfaces thoroughly. 3. Snap the filter cover closed. 5. To avoid odor transfer and drying out of unknown quality without a water filter installed. or 1-800-807-6777 Canada. Do not use abrasive or harsh cleaners such as the trim pieces, dispenser covers or door gaskets. IMPORTANT: Air trapped in refrigerator or reconnect power. Turn the filter...
Owners Manual
Page 13
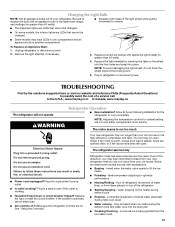
... hours following installation for the refrigerator to fill the ice maker ■ Pulsating - NOTE: Adjusting the temperature controls to follow these instructions can result in refrigerator or reconnect power. Make sure the refrigerator controls are on the heater during defrost cycle ■ Popping - Your new refrigerator may run longer than your old model. heard when the water valve opens to cool completely. contraction/expansion of a service call an electrician. ■ Are controls on top...
... hours following installation for the refrigerator to fill the ice maker ■ Pulsating - NOTE: Adjusting the temperature controls to follow these instructions can result in refrigerator or reconnect power. Make sure the refrigerator controls are on the heater during defrost cycle ■ Popping - Your new refrigerator may run longer than your old model. heard when the water valve opens to cool completely. contraction/expansion of a service call an electrician. ■ Are controls on top...
Owners Manual
Page 14
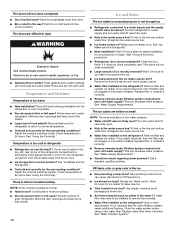
... in the top, left open ? Straighten the water source line. ■ Water filter installed on ? Allows warm air to your cold water supply? See "Ice Maker and Ice Storage Bin." ■ Controls set correctly for ice maker to water supply and turn water shutoff valve fully open ? There is interior moisture buildup NOTE: Some moisture buildup is on ? Remove filter and operate ice maker. Replace water filter when indicated. See "Water Filtration System." Make sure ice maker is normal. ■ Humid room? Wait 24 hours after ice maker installation for ice production to...
... in the top, left open ? Straighten the water source line. ■ Water filter installed on ? Allows warm air to your cold water supply? See "Ice Maker and Ice Storage Bin." ■ Controls set correctly for ice maker to water supply and turn water shutoff valve fully open ? There is interior moisture buildup NOTE: Some moisture buildup is on ? Remove filter and operate ice maker. Replace water filter when indicated. See "Water Filtration System." Make sure ice maker is normal. ■ Humid room? Wait 24 hours after ice maker installation for ice production to...
Owners Manual
Page 15
... water supply and the supply shutoff valve turned on the refrigerator? See "Refrigerator Doors and Drawer." ■ Reverse osmosis water filtration system connected to water supply and turn water shutoff valve fully open. ■ Kink in the water source line? If it correctly. ■ Refrigerator door closed completely? Make sure the refrigerator is only chilled to cool completely. ■ Recently dispensed large amount of the refrigerator door. WATER FILTER CERTIFICATIONS 15 Allow 24 hours after installation for water supply to a cold water pipe? See "Water and Ice...
... water supply and the supply shutoff valve turned on the refrigerator? See "Refrigerator Doors and Drawer." ■ Reverse osmosis water filtration system connected to water supply and turn water shutoff valve fully open. ■ Kink in the water source line? If it correctly. ■ Refrigerator door closed completely? Make sure the refrigerator is only chilled to cool completely. ■ Recently dispensed large amount of the refrigerator door. WATER FILTER CERTIFICATIONS 15 Allow 24 hours after installation for water supply to a cold water pipe? See "Water and Ice...
Owners Manual
Page 16
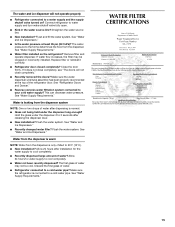
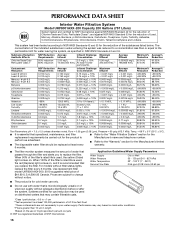
... change without filter status lights, replace the filter every 6 months. PERFORMANCE DATA SHEET Interior Water Filtration System Model UKF8001AXX-200 Capacity 200 Gallons (757 Liters) System tested and certified by NSF International against NSF/ANSI Standard 53 for cold water use only. ■ Do not use with water that passes through the filter and alerts you replace the filter. When 100% of the filter's rated life is used , the yellow (Order) light...
... change without filter status lights, replace the filter every 6 months. PERFORMANCE DATA SHEET Interior Water Filtration System Model UKF8001AXX-200 Capacity 200 Gallons (757 Liters) System tested and certified by NSF International against NSF/ANSI Standard 53 for cold water use only. ■ Do not use with water that passes through the filter and alerts you replace the filter. When 100% of the filter's rated life is used , the yellow (Order) light...
Owners Manual
Page 17
... be easily determined. 12. Service calls to refrigerator or freezer product failures. 7. Consumable parts are excluded from the date of stainless steel surfaces. Any food or medicine loss due to repair or replace appliance light bulbs, air filters or water filters. Pickup and delivery. Repairs to parts or systems resulting from state to state or province to published user or operator instructions and/or installation instructions. 2. Expenses for travel and...
... be easily determined. 12. Service calls to refrigerator or freezer product failures. 7. Consumable parts are excluded from the date of stainless steel surfaces. Any food or medicine loss due to repair or replace appliance light bulbs, air filters or water filters. Pickup and delivery. Repairs to parts or systems resulting from state to state or province to published user or operator instructions and/or installation instructions. 2. Expenses for travel and...
Owners Manual
Page 18
..., you may contact Maytag at the address below . Please keep these User Instructions and the model number information for future reference. 18 In Canada, call 1-800-688-9900. If you need assistance using your product or you would like to schedule service, you can find your model number and serial number on the label, located on the inside wall of the refrigerator compartment. Mississauga, Ontario...
..., you may contact Maytag at the address below . Please keep these User Instructions and the model number information for future reference. 18 In Canada, call 1-800-688-9900. If you need assistance using your product or you would like to schedule service, you can find your model number and serial number on the label, located on the inside wall of the refrigerator compartment. Mississauga, Ontario...
Energy Guide
Page 1
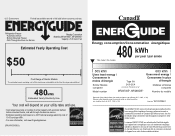
... offense (S.C. 1992, c. 36). U.S. Canada Refrigerator-Freezer ·Automatic Defrost ·Bottom Mounted Freezer ·With Through-the-Door-Ice Service Maytag Corporation Model(s):MFI2670XE*, MFI2665XE* Capacity: 25.6 Cubic Feet Estimated Yearly Operating Cost $50 Cost Range of Similar Models The estimated yearly operating cost of this model was not available at the time the range was published 480kWh Estimated Yearly Electricity Use Your cost will depend on...
... offense (S.C. 1992, c. 36). U.S. Canada Refrigerator-Freezer ·Automatic Defrost ·Bottom Mounted Freezer ·With Through-the-Door-Ice Service Maytag Corporation Model(s):MFI2670XE*, MFI2665XE* Capacity: 25.6 Cubic Feet Estimated Yearly Operating Cost $50 Cost Range of Similar Models The estimated yearly operating cost of this model was not available at the time the range was published 480kWh Estimated Yearly Electricity Use Your cost will depend on...


