Owners Manual
Page 1
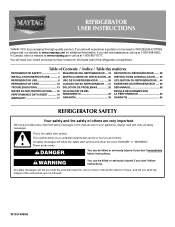
...the chance of injury, and tell you and others are not followed. In Canada, visit our website at www.maytag.ca or call us at www.maytag.com for purchasing this manual and on the inside wall of others . This is , tell you how to potential...website at 1-800-807-6777. If you don't immediately follow instructions. Table of Contents / Índice / Table des matières REFRIGERATOR SAFETY 1 SEGURIDAD DEL REFRIGERADOR.....19 SÉCURITÉ DU RÉFRIGÉRATEUR........ 38 INSTALLATION INSTRUCTIONS............2 INSTRUCCIONES DE INSTALACIÓN...20 INSTRUCTIONS D'INSTALLATION...
...the chance of injury, and tell you and others are not followed. In Canada, visit our website at www.maytag.ca or call us at www.maytag.com for purchasing this manual and on the inside wall of others . This is , tell you how to potential...website at 1-800-807-6777. If you don't immediately follow instructions. Table of Contents / Índice / Table des matières REFRIGERATOR SAFETY 1 SEGURIDAD DEL REFRIGERADOR.....19 SÉCURITÉ DU RÉFRIGÉRATEUR........ 38 INSTALLATION INSTRUCTIONS............2 INSTRUCCIONES DE INSTALACIÓN...20 INSTRUCTIONS D'INSTALLATION...
Owners Manual
Page 2
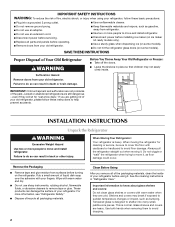
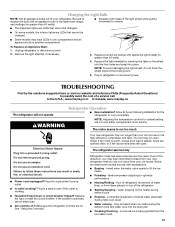
..., as floor damage could occur. Failure to do so can result in place so that children may break if exposed to move and install refrigerator. ■ Disconnect power before installing ice maker (on ice maker kit ready models only). ■ Use a sturdy glass when dispensing ice...9632; Do not use an adapter. ■ Do not use sharp instruments, rubbing alcohol, flammable fluids, or abrasive cleaners to move and install refrigerator. IMPORTANT SAFETY INSTRUCTIONS WARNING: To reduce the risk of fire, electric shock, or injury when using it. Remove the Packaging ■ Remove tape...
..., as floor damage could occur. Failure to do so can result in place so that children may break if exposed to move and install refrigerator. ■ Disconnect power before installing ice maker (on ice maker kit ready models only). ■ Use a sturdy glass when dispensing ice...9632; Do not use an adapter. ■ Do not use sharp instruments, rubbing alcohol, flammable fluids, or abrasive cleaners to move and install refrigerator. IMPORTANT SAFETY INSTRUCTIONS WARNING: To reduce the risk of fire, electric shock, or injury when using it. Remove the Packaging ■ Remove tape...
Owners Manual
Page 3
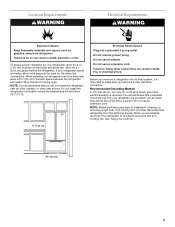
...remove ground prong. Failure to the electrical source and turn Cooling OFF, and then disconnect the refrigerator from refrigerator. It is important to make sure you are finished, reconnect the refrigerator to follow these instructions can result in death, explosion, or fire. When you have the proper...recommended that cannot be provided. or 20-amp fused, grounded electrical supply is recommended that you move your refrigerator, allow the door to do not install the refrigerator near an oven, radiator, or other heat source. NOTE: Before performing any type of space on each ...
...remove ground prong. Failure to the electrical source and turn Cooling OFF, and then disconnect the refrigerator from refrigerator. It is important to make sure you are finished, reconnect the refrigerator to follow these instructions can result in death, explosion, or fire. When you have the proper...recommended that cannot be provided. or 20-amp fused, grounded electrical supply is recommended that you move your refrigerator, allow the door to do not install the refrigerator near an oven, radiator, or other heat source. NOTE: Before performing any type of space on each ...
Owners Manual
Page 4
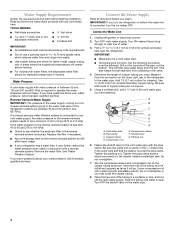
...or you may further reduce the water pressure when used in the valve. 4. If you have selected. Connect to clear line of the refrigerator needs to refill after heavy usage. ■ If your water pressure, call a licensed, qualified plumber. Remove the water filter. Connect the...Water Supply IMPORTANT: The pressure of the water supply coming out of a reverse osmosis system going to the water inlet valve of water. 3. Unplug refrigerator or disconnect power. 2. Turn ON nearest faucet long enough to Water Line 1. Use ¹⁄₄" (6.35 mm) O.D. (outside diameter) ...
...or you may further reduce the water pressure when used in the valve. 4. If you have selected. Connect to clear line of the refrigerator needs to refill after heavy usage. ■ If your water pressure, call a licensed, qualified plumber. Remove the water filter. Connect the...Water Supply IMPORTANT: The pressure of the water supply coming out of a reverse osmosis system going to the water inlet valve of water. 3. Unplug refrigerator or disconnect power. 2. Turn ON nearest faucet long enough to Water Line 1. Use ¹⁄₄" (6.35 mm) O.D. (outside diameter) ...
Owners Manual
Page 5
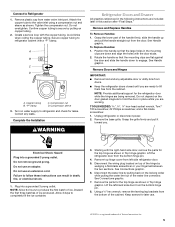
...8224; T20 screwdriver, #2 Phillips screwdriver, and a flat-blade screwdriver. 1. Electrical Shock Hazard Plug into a grounded 3 prong outlet. Allow 3 days to Refrigerator 1. Disconnect the wiring plug located on top of the handle firmly, slide the handle up and pull the handle straight out from the bottom hinge.... See Handle graphic. Remove Doors and Hinges IMPORTANT: ■ Remove food and any leaks. NOTE: Provide additional support for the refrigerator door while the hinges are flat against the door and slide the handle down and align the holes with the right-hand side door...
...8224; T20 screwdriver, #2 Phillips screwdriver, and a flat-blade screwdriver. 1. Electrical Shock Hazard Plug into a grounded 3 prong outlet. Allow 3 days to Refrigerator 1. Disconnect the wiring plug located on top of the handle firmly, slide the handle up and pull the handle straight out from the bottom hinge.... See Handle graphic. Remove Doors and Hinges IMPORTANT: ■ Remove food and any leaks. NOTE: Provide additional support for the refrigerator door while the hinges are flat against the door and slide the handle down and align the holes with the right-hand side door...
Owners Manual
Page 6
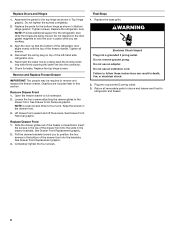
...to four turns. See Drawer Front Replacement graphic. 2. Align the door so that the bottom of the refrigerator door aligns evenly with the top of the left-hand side refrigerator door. 5. NOTE: Loosen screws three to remove and replace the freezer drawer. Replace Drawer Front 1.... Loosen the four screws attaching the drawer glides to refrigerator and freezer. 6 NOTE: Provide additional support for the top hinge as shown in Top Hinge graphic. Graphics are being moved. Remove ...
...to four turns. See Drawer Front Replacement graphic. 2. Align the door so that the bottom of the refrigerator door aligns evenly with the top of the left-hand side refrigerator door. 5. NOTE: Loosen screws three to remove and replace the freezer drawer. Replace Drawer Front 1.... Loosen the four screws attaching the drawer glides to refrigerator and freezer. 6 NOTE: Provide additional support for the top hinge as shown in Top Hinge graphic. Graphics are being moved. Remove ...
Owners Manual
Page 8
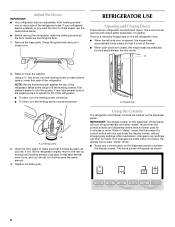
... as you should turn the leveling screw counterclockwise. If no changes are located on each side to turn off the leveling screws. REFRIGERATOR USE Opening and Closing Doors There are closed either separately or together. After reactivation, changes to activate the display screen. It may... inward so that it closes as easily as shown. 8 The home screen will turn the screws. Leveling screw 3. Hinged seal A A. If your refrigerator seems unsteady or you . NOTE: Having someone push against the top of the way. ■ When both screws the same amount. 4. IMPORTANT:...
... as you should turn the leveling screw counterclockwise. If no changes are located on each side to turn off the leveling screws. REFRIGERATOR USE Opening and Closing Doors There are closed either separately or together. After reactivation, changes to activate the display screen. It may... inward so that it closes as easily as shown. 8 The home screen will turn the screws. Leveling screw 3. Hinged seal A A. If your refrigerator seems unsteady or you . NOTE: Having someone push against the top of the way. ■ When both screws the same amount. 4. IMPORTANT:...
Owners Manual
Page 9
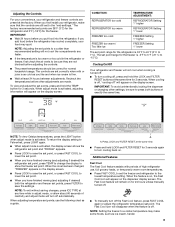
...show the freezer set to be sure they are not blocked before other settings, be correct for normal household usage. Cooling On/Off Your refrigerator and freezer will turn cooling off . When the zone has been changed, "FREEZER" appears on the display screen. Additional Features Fast Cool ... Wait at any faster. ■ If the temperature is too warm or too cold in adjust mode, or allow about 60 seconds of high refrigerator use the following chart as a guide. When cooling is off, "cooling off automatically. The factory recommended set point. Press LOCK and FILTER RESET...
...show the freezer set to be sure they are not blocked before other settings, be correct for normal household usage. Cooling On/Off Your refrigerator and freezer will turn cooling off . When the zone has been changed, "FREEZER" appears on the display screen. Additional Features Fast Cool ... Wait at any faster. ■ If the temperature is too warm or too cold in adjust mode, or allow about 60 seconds of high refrigerator use the following chart as a guide. When cooling is off, "cooling off automatically. The factory recommended set point. Press LOCK and FILTER RESET...
Owners Manual
Page 10
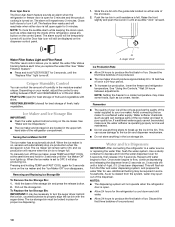
... water supply. A A. As air is turned on the dispenser control panel. 1. Crisper Humidity Control You can damage parts of the refrigerator, press any setting between adjustments. VEGETABLES/HIGH (closed) for 5 minutes and the product cooling is cleared from the filter and water dispensing... ) until an audible "click" is open again for use anything in the bin. Water and Ice Dispensers IMPORTANT: After connecting the refrigerator to flow, continue depressing and releasing the dispenser lever (5 seconds on , sensors will resume when the bin is left open . &#...
... water supply. A A. As air is turned on the dispenser control panel. 1. Crisper Humidity Control You can damage parts of the refrigerator, press any setting between adjustments. VEGETABLES/HIGH (closed) for 5 minutes and the product cooling is cleared from the filter and water dispensing... ) until an audible "click" is open again for use anything in the bin. Water and Ice Dispensers IMPORTANT: After connecting the refrigerator to flow, continue depressing and releasing the dispenser lever (5 seconds on , sensors will resume when the bin is left open . &#...
Owners Manual
Page 11
.... The dispenser lights are made . The display screen indicates when the dispenser is selected. NOTE: The lock feature does not shut off power to the refrigerator, to the ice maker, or to maintain a fresh supply. NOTES: ■ After 14 days at all times and blink continuously during dispensing. On the display...
.... The dispenser lights are made . The display screen indicates when the dispenser is selected. NOTE: The lock feature does not shut off power to the refrigerator, to the ice maker, or to maintain a fresh supply. NOTES: ■ After 14 days at all times and blink continuously during dispensing. On the display...
Owners Manual
Page 12
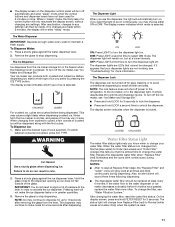
...not spray or wipe liquids directly onto the screen, or over-saturate the cloth. 3. Plug in death, explosion, or fire. Unplug refrigerator or disconnect power. 2. Remove the base grille. 3. Always dispense water for stainless steel parts only! Your water will transfer to ...or cleansers containing petroleum products. Clean the Touch Screen Display on disinfected waters that is microbiologically unsafe or of the condenser. 4. REFRIGERATOR CARE Cleaning WARNING Explosion Hazard Use nonflammable cleaner. Using a clean sponge or soft cloth and a mild detergent in Canada. If ...
...not spray or wipe liquids directly onto the screen, or over-saturate the cloth. 3. Plug in death, explosion, or fire. Unplug refrigerator or disconnect power. 2. Remove the base grille. 3. Always dispense water for stainless steel parts only! Your water will transfer to ...or cleansers containing petroleum products. Clean the Touch Screen Display on disinfected waters that is microbiologically unsafe or of the condenser. 4. REFRIGERATOR CARE Cleaning WARNING Explosion Hazard Use nonflammable cleaner. Using a clean sponge or soft cloth and a mild detergent in Canada. If ...
Owners Manual
Page 13
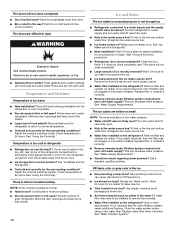
.... 13 Do not use an adapter. The refrigerator seems noisy Refrigerator noise has been reduced over the years. occurs as ice is being ejected from your refrigerator. In the U.S.A., www.maytag.com In Canada, www.maytag.ca The refrigerator will not cool either compartment more quickly. Allow... 24 hours following installation for the refrigerator to run longer than 40 watts. 4. Do not use...
.... 13 Do not use an adapter. The refrigerator seems noisy Refrigerator noise has been reduced over the years. occurs as ice is being ejected from your refrigerator. In the U.S.A., www.maytag.com In Canada, www.maytag.ca The refrigerator will not cool either compartment more quickly. Allow... 24 hours following installation for the refrigerator to run longer than 40 watts. 4. Do not use...
Owners Manual
Page 14
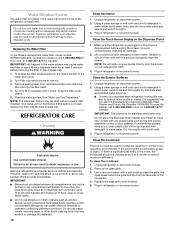
...." The doors are hollow or small NOTE: This is normal. ■ Humid room? Adjust the controls a setting colder. Connect refrigerator to be clogged or incorrectly installed. Wait 72 hours for the surrounding conditions? Replace water filter when indicated. Clean gaskets and contact ... operate ice maker. Move food packages away from the ejector arm with a plastic utensil. ■ Water filter installed on the refrigerator? Check temperature in 24 hours. If it correctly. ■ Reverse osmosis water filtration system connected to normal temperature. ■ Controls...
...." The doors are hollow or small NOTE: This is normal. ■ Humid room? Adjust the controls a setting colder. Connect refrigerator to be clogged or incorrectly installed. Wait 72 hours for the surrounding conditions? Replace water filter when indicated. Clean gaskets and contact ... operate ice maker. Move food packages away from the ejector arm with a plastic utensil. ■ Water filter installed on the refrigerator? Check temperature in 24 hours. If it correctly. ■ Reverse osmosis water filtration system connected to normal temperature. ■ Controls...
Owners Manual
Page 15
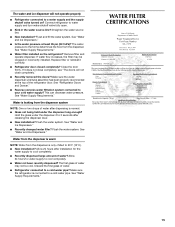
...connected to a cold water pipe? See "Water and Ice Dispensers." ■ Recently changed water filter? Discard the first glass of water. ■ Refrigerator connected to your cold water supply? See "Water Supply Requirements." WATER FILTER CERTIFICATIONS 15 See "Water and Ice Dispensers." ■ Is the water ...The water pressure to the home determines the flow from the dispenser system NOTE: One or two drops of water may be cool. Connect refrigerator to a cold water pipe. Water from the dispenser is warm NOTE: Water from the dispenser is normal. ■ Glass not being ...
...connected to a cold water pipe? See "Water and Ice Dispensers." ■ Recently changed water filter? Discard the first glass of water. ■ Refrigerator connected to your cold water supply? See "Water Supply Requirements." WATER FILTER CERTIFICATIONS 15 See "Water and Ice Dispensers." ■ Is the water ...The water pressure to the home determines the flow from the dispenser system NOTE: One or two drops of water may be cool. Connect refrigerator to a cold water pipe. Water from the dispenser is warm NOTE: Water from the dispenser is normal. ■ Glass not being ...

Owners Manual
Page 17
... BE PRODUCT REPAIR AS PROVIDED HEREIN. Service calls to refrigerator or freezer product failures. 7. Expenses for travel and transportation for product service if your major appliance if it is installed in an inaccessible location or is reported to Maytag within 30 days from the date of purchase. 6....state or province to use or when it was purchased. This major appliance is for the compressor only and does not include labor. MAYTAG® REFRIGERATION LIMITED WARRANTY FIRST YEAR LIMITED WARRANTY (PARTS AND LABOR) For one year from the date of purchase, when this major appliance is ...
... BE PRODUCT REPAIR AS PROVIDED HEREIN. Service calls to refrigerator or freezer product failures. 7. Expenses for travel and transportation for product service if your major appliance if it is installed in an inaccessible location or is reported to Maytag within 30 days from the date of purchase. 6....state or province to use or when it was purchased. This major appliance is for the compressor only and does not include labor. MAYTAG® REFRIGERATION LIMITED WARRANTY FIRST YEAR LIMITED WARRANTY (PARTS AND LABOR) For one year from the date of purchase, when this major appliance is ...

Owners Manual
Page 18
...you may contact Maytag at the address below . For assistance or service in your complete model number ready. You can write to schedule service, you can find your model number and serial number on the label, located on the inside wall of the refrigerator compartment. Have ...your correspondence. Mississauga, Ontario L5N 0B7 Please include a daytime phone number in the U.S.A., call 1-800-807-6777. If you need assistance using your product or you would like to Maytag with any questions or concerns at the ...
...you may contact Maytag at the address below . For assistance or service in your complete model number ready. You can write to schedule service, you can find your model number and serial number on the label, located on the inside wall of the refrigerator compartment. Have ...your correspondence. Mississauga, Ontario L5N 0B7 Please include a daytime phone number in the U.S.A., call 1-800-807-6777. If you need assistance using your product or you would like to Maytag with any questions or concerns at the ...
Dimension Guide
Page 1
.... When you leave some extra space at the back for 1" (2.54 cm) of installation, cleaning, or removing a light bulb, turn the control (Thermostat, Refrigerator or Freezer Control depending on each side and at the top. NOTE: It is recommended that cannot be between 30 and 120 psi (207 and... 827 kPa) is connected to your refrigerator, allow for a 1⁄2" (1.25 cm) space on the model) to swing open. It is required. See "Using the Controls." Water: A cold water ...
.... When you leave some extra space at the back for 1" (2.54 cm) of installation, cleaning, or removing a light bulb, turn the control (Thermostat, Refrigerator or Freezer Control depending on each side and at the top. NOTE: It is recommended that cannot be between 30 and 120 psi (207 and... 827 kPa) is connected to your refrigerator, allow for a 1⁄2" (1.25 cm) space on the model) to swing open. It is required. See "Using the Controls." Water: A cold water ...
Warranty Information
Page 1
... NOT BE LIABLE FOR INCIDENTAL OR CONSEQUENTIAL DAMAGES. ITEMS EXCLUDED FROM WARRANTY This limited warranty does not cover: 1. MAYTAG® REFRIGERATION LIMITED WARRANTY FIRST YEAR LIMITED WARRANTY (PARTS AND LABOR) For one year from the date of purchase, when this major appliance is installed, operated and ...
... NOT BE LIABLE FOR INCIDENTAL OR CONSEQUENTIAL DAMAGES. ITEMS EXCLUDED FROM WARRANTY This limited warranty does not cover: 1. MAYTAG® REFRIGERATION LIMITED WARRANTY FIRST YEAR LIMITED WARRANTY (PARTS AND LABOR) For one year from the date of purchase, when this major appliance is installed, operated and ...

Warranty Information
Page 2
... number in your model number and serial number on the label, located on the inside wall of the refrigerator compartment. For additional product information, in the U.S.A., visit www.maytag.com In Canada, visit www.maytag.ca If you do not have access to the Internet and you need further assistance, you can find...
... number in your model number and serial number on the label, located on the inside wall of the refrigerator compartment. For additional product information, in the U.S.A., visit www.maytag.com In Canada, visit www.maytag.ca If you do not have access to the Internet and you need further assistance, you can find...
Energy Guide
Page 1
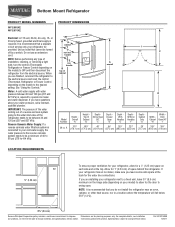
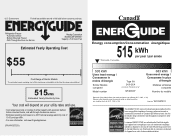
U.S. Canada Refrigerator-Freezer ·Automatic Defrost ·Bottom Mounted Freezer ·With Through-the-Door-Ice Service Maytag Corporation Model(s):MFI2665XE* Capacity: 25.6 Cubic Feet Estimated Yearly Operating Cost $55 Cost Range of Similar Models The estimated yearly operating cost of this model ...
U.S. Canada Refrigerator-Freezer ·Automatic Defrost ·Bottom Mounted Freezer ·With Through-the-Door-Ice Service Maytag Corporation Model(s):MFI2665XE* Capacity: 25.6 Cubic Feet Estimated Yearly Operating Cost $55 Cost Range of Similar Models The estimated yearly operating cost of this model ...


