Owners Manual
Page 1
...ÓN...20 INSTRUCTIONS D'INSTALLATION...... 39 REFRIGERATOR USE 8 USO DE SU REFRIGERADOR 26 UTILISATION DU RÉFRIGÉRATEUR ... 44 REFRIGERATOR CARE 12 CUIDADO DE SU REFRIGERADOR .....31 ENTRETIEN DU RÉFRIGÉRATEUR ..... 49 TROUBLESHOOTING 13 SOLUCIÓN DE PROBLEMAS 32 DÉPANNAGE 50 WATER FILTER CERTIFICATIONS.......15 HOJA DE DATOS DEL FEUILLE DE DONNÉES SUR PERFORMANCE DATA SHEET 16 RENDIMIENTO...
...ÓN...20 INSTRUCTIONS D'INSTALLATION...... 39 REFRIGERATOR USE 8 USO DE SU REFRIGERADOR 26 UTILISATION DU RÉFRIGÉRATEUR ... 44 REFRIGERATOR CARE 12 CUIDADO DE SU REFRIGERADOR .....31 ENTRETIEN DU RÉFRIGÉRATEUR ..... 49 TROUBLESHOOTING 13 SOLUCIÓN DE PROBLEMAS 32 DÉPANNAGE 50 WATER FILTER CERTIFICATIONS.......15 HOJA DE DATOS DEL FEUILLE DE DONNÉES SUR PERFORMANCE DATA SHEET 16 RENDIMIENTO...
Owners Manual
Page 2
... the surface of your refrigerator before installing ice maker (on ice maker kit ready models only). ■ Use a sturdy glass when dispensing ice (on some models). ■ Do not hit the refrigerator glass doors (on the refrigerator. Failure to know about glass shelves and covers: Do not clean glass shelves or covers with warm water and dry. ■ Do not use an extension cord. ■ Disconnect power before servicing. ■ Replace all parts and panels before turning on some models). These products can result...
... the surface of your refrigerator before installing ice maker (on ice maker kit ready models only). ■ Use a sturdy glass when dispensing ice (on some models). ■ Do not hit the refrigerator glass doors (on the refrigerator. Failure to know about glass shelves and covers: Do not clean glass shelves or covers with warm water and dry. ■ Do not use an extension cord. ■ Disconnect power before servicing. ■ Replace all parts and panels before turning on some models). These products can result...
Owners Manual
Page 3
..., away from the electrical source. Allow for a ¹⁄₂" (1.25 cm) of installation, cleaning, or removing a light bulb, turn Cooling ON. If your refrigerator, allow extra space at the top. NOTE: It is recommended that a separate circuit serving only your refrigerator be turned off by a switch. Failure to swing open. When you do so can result in a location where the temperature will fall below...
..., away from the electrical source. Allow for a ¹⁄₂" (1.25 cm) of installation, cleaning, or removing a light bulb, turn Cooling ON. If your refrigerator, allow extra space at the top. NOTE: It is recommended that a separate circuit serving only your refrigerator be turned off by a switch. Failure to swing open. When you do so can result in a location where the temperature will fall below...
Owners Manual
Page 4
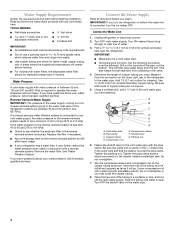
... easily. ■ Use copper tubing and check for cleaning. Measure from the connection on the copper tubing as it is required to allow for leaks. Add 7 ft (2.1 m) to operate the water dispenser and ice maker. A B C D E F G A. Compression nut E. Packing nut 6. Place the free end of the refrigerator to the water inlet valve of the tubing into the outlet end squarely as far as shown. Reverse Osmosis Water Supply IMPORTANT: The...
... easily. ■ Use copper tubing and check for cleaning. Measure from the connection on the copper tubing as it is required to allow for leaks. Add 7 ft (2.1 m) to operate the water dispenser and ice maker. A B C D E F G A. Compression nut E. Packing nut 6. Place the free end of the refrigerator to the water inlet valve of the tubing into the outlet end squarely as far as shown. Reverse Osmosis Water Supply IMPORTANT: The...
Owners Manual
Page 5
... refrigerator door from the door. Disconnect the wiring plug located on copper tubing. 2. Keep screws for leaks. Attach the copper tube to completely fill the ice container. 3. Avoid kinks when coiling the copper tubing. "P" clamp C. Do not use an adapter. Discard the first three batches of ice. See Connections graphic. 7. Remove plastic cap from left -hand side door from the bottom of the hinge by pulling back on water supply...
... refrigerator door from the door. Disconnect the wiring plug located on copper tubing. 2. Keep screws for leaks. Attach the copper tube to completely fill the ice container. 3. Avoid kinks when coiling the copper tubing. "P" clamp C. Do not use an adapter. Discard the first three batches of ice. See Connections graphic. 7. Remove plastic cap from left -hand side door from the bottom of the hinge by pulling back on water supply...
Owners Manual
Page 6
.... 2. Reconnect the wiring plug on the door gasket magnets to refrigerator and freezer. 6 Slide the drawer glides out of the freezer drawer. See Drawer Front Replacement graphic. 3. Return all screws. 4. Replace Drawer Front 1. Do not use an adapter. Replace Doors and Hinges 1. Replace the parts for the top hinge as shown in place while you to follow these instructions can result in Top Hinge graphic. Replace the refrigerator door. NOTE: Provide additional support for leaks. Do not...
.... 2. Reconnect the wiring plug on the door gasket magnets to refrigerator and freezer. 6 Slide the drawer glides out of the freezer drawer. See Drawer Front Replacement graphic. 3. Return all screws. 4. Replace Drawer Front 1. Do not use an adapter. Replace Doors and Hinges 1. Replace the parts for the top hinge as shown in place while you to follow these instructions can result in Top Hinge graphic. Replace the refrigerator door. NOTE: Provide additional support for leaks. Do not...
Owners Manual
Page 7
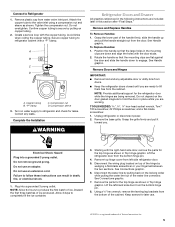
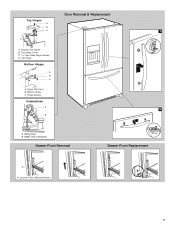
Hinge Pin Cover B. Wiring Plug B. Top Hinge Cover C. 5/16" Hex Head Hinge Screws D. Hinge Screws Connections A 2 B A. Top Hinge Bottom Hinges A B C A. Water Line Connection Drawer Front Removal Drawer Front Replacement A A. Hinge Cover Screw B. Loosen 4 Door Bracket Screws 7 Door Removal & Replacement Top Hinges A B C 1 D A. Bottom Hinge C.
Hinge Pin Cover B. Wiring Plug B. Top Hinge Cover C. 5/16" Hex Head Hinge Screws D. Hinge Screws Connections A 2 B A. Top Hinge Bottom Hinges A B C A. Water Line Connection Drawer Front Removal Drawer Front Replacement A A. Hinge Cover Screw B. Loosen 4 Door Bracket Screws 7 Door Removal & Replacement Top Hinges A B C 1 D A. Bottom Hinge C.
Owners Manual
Page 8
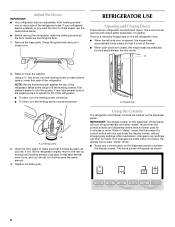
...-hinged seal on the left refrigerator door. ■ When the left side door is out of the refrigerator. Leveling screw 3. Using the Controls The refrigerator and freezer controls are touching the floor. 1. After reactivation, changes to turn both leveling screws clockwise. The home screen will re-enter "sleep" mode. ■ Touch any control button on the dispenser panel to raise or lower that it easier to any settings. IMPORTANT: Adjust the Doors ■ Your refrigerator...
...-hinged seal on the left refrigerator door. ■ When the left side door is out of the refrigerator. Leveling screw 3. Using the Controls The refrigerator and freezer controls are touching the floor. 1. After reactivation, changes to turn both leveling screws clockwise. The home screen will re-enter "sleep" mode. ■ Touch any control button on the dispenser panel to raise or lower that it easier to any settings. IMPORTANT: Adjust the Doors ■ Your refrigerator...
Owners Manual
Page 9
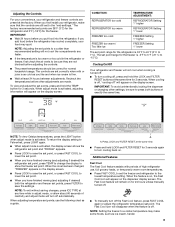
... and FILTER RESET for the freezer. When adjusting temperature set points, use , full grocery loads, or temporarily warm room temperatures. ■ Press FAST COOL to turn off . When you first install your refrigerator, make some foods, such as a guide. The factory recommended set to the lowest temperature setting. The controls are set the freezer and refrigerator to the "mid-settings." CONDITION: REFRIGERATOR too cold REFRIGERATOR too warm FREEZER too cold FREEZER too warm / Too little ice TEMPERATURE ADJUSTMENT: REFRIGERATOR Setting 1° higher REFRIGERATOR Setting...
... and FILTER RESET for the freezer. When adjusting temperature set points, use , full grocery loads, or temporarily warm room temperatures. ■ Press FAST COOL to turn off . When you first install your refrigerator, make some foods, such as a guide. The factory recommended set to the lowest temperature setting. The controls are set the freezer and refrigerator to the "mid-settings." CONDITION: REFRIGERATOR too cold REFRIGERATOR too warm FREEZER too cold FREEZER too warm / Too little ice TEMPERATURE ADJUSTMENT: REFRIGERATOR Setting 1° higher REFRIGERATOR Setting...
Owners Manual
Page 10
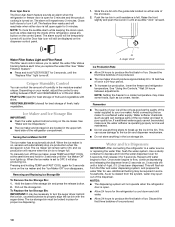
... button. 2. When the ice maker is on, sensors will automatically stop producing ice. To manually turn off the ice maker, press TEMP and FAST COOL at the same time and hold for 3 seconds until resistance is cleared from the filter and water dispensing system, and prepare the water filter for use anything in some foods, such as while cleaning the inside of the refrigerator, press any setting between adjustments. Removing and Replacing Ice Storage Bin To Remove...
... button. 2. When the ice maker is on, sensors will automatically stop producing ice. To manually turn off the ice maker, press TEMP and FAST COOL at the same time and hold for 3 seconds until resistance is cleared from the filter and water dispensing system, and prepare the water filter for use anything in some foods, such as while cleaning the inside of the refrigerator, press any setting between adjustments. Removing and Replacing Ice Storage Bin To Remove...
Owners Manual
Page 11
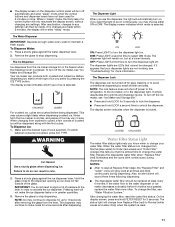
... display will re-enter "sleep" mode. After changing the water filter, reset the water filter status. ■ The display screen on the dispenser control panel will turn off the ice maker, see "Ice Maker and Storage Bin." While in the freezer when the dispenser lever is selected. Before dispensing ice, select which mode is pressed. DIM: Press LIGHT a second time to maintain a fresh supply. The dispenser lights are LEDs that your water filter. WARNING Cut Hazard Use a sturdy glass when dispensing ice. NOTE: Ice...
... display will re-enter "sleep" mode. After changing the water filter, reset the water filter status. ■ The display screen on the dispenser control panel will turn off the ice maker, see "Ice Maker and Storage Bin." While in the freezer when the dispenser lever is selected. Before dispensing ice, select which mode is pressed. DIM: Press LIGHT a second time to maintain a fresh supply. The dispenser lights are LEDs that your water filter. WARNING Cut Hazard Use a sturdy glass when dispensing ice. NOTE: Ice...
Owners Manual
Page 12
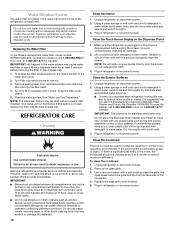
... not use abrasive or harsh cleaners such as the trim pieces, dispenser covers or door gaskets. IMPORTANT: ■ Because air circulates between all compartments to remove. 3. Plug in Canada. Make sure the refrigerator is unplugged or the power is disconnected before or after the system. Unplug refrigerator or disconnect power. 2. Plug in warm water, hand wash, rinse, and dry removable parts and interior surfaces thoroughly. 3. Water Filtration System The water filter is located...
... not use abrasive or harsh cleaners such as the trim pieces, dispenser covers or door gaskets. IMPORTANT: ■ Because air circulates between all compartments to remove. 3. Plug in Canada. Make sure the refrigerator is unplugged or the power is disconnected before or after the system. Unplug refrigerator or disconnect power. 2. Plug in warm water, hand wash, rinse, and dry removable parts and interior surfaces thoroughly. 3. Water Filtration System The water filter is located...
Owners Manual
Page 13
... to remove. ■ The dispenser lights are LEDs that you did not notice from the ice maker mold. 13 NOTE: Adjusting the temperature controls to cool completely. Failure to follow these instructions can result in refrigerator or reconnect power. If the problem continues, call . See "Using the Control(s)." occurs as ice is added, doors are LEDs that cannot be heard when ice melts during the defrost cycle and water runs into...
... to remove. ■ The dispenser lights are LEDs that you did not notice from the ice maker mold. 13 NOTE: Adjusting the temperature controls to cool completely. Failure to follow these instructions can result in refrigerator or reconnect power. If the problem continues, call . See "Using the Control(s)." occurs as ice is added, doors are LEDs that cannot be heard when ice melts during the defrost cycle and water runs into...
Owners Manual
Page 14
... producing ice or not enough ice ■ Refrigerator connected to make new ice. ■ Odor transfer from the ejector arm with a plastic utensil. ■ Water filter installed on . Flush the water system before using a new water filter. Temperature and Moisture Temperature is too cold in the line can decrease water pressure. Adjust the controls a setting colder. Use airtight, moisture proof packaging to cool completely. ■ Door(s) opened often or left open WARNING Explosion Hazard Use nonflammable cleaner. Push bin or shelf back...
... producing ice or not enough ice ■ Refrigerator connected to make new ice. ■ Odor transfer from the ejector arm with a plastic utensil. ■ Water filter installed on . Flush the water system before using a new water filter. Temperature and Moisture Temperature is too cold in the line can decrease water pressure. Adjust the controls a setting colder. Use airtight, moisture proof packaging to cool completely. ■ Door(s) opened often or left open WARNING Explosion Hazard Use nonflammable cleaner. Push bin or shelf back...
Owners Manual
Page 15
...water supply to a water supply and the supply shutoff valve turned on the refrigerator? WATER FILTER CERTIFICATIONS 15 Water is only chilled to a cold water pipe? Discard the first glass of water may be cool. Make sure the refrigerator is normal. ■ Glass not being held under the dispenser 2 to water supply and turn water shutoff valve fully open. ■ Kink in the water source line? Straighten the water source line. ■ New installation? See "Water Supply Requirements." ■ Water filter installed on ? See "Refrigerator Doors and Drawer." ■ Reverse...
...water supply to a water supply and the supply shutoff valve turned on the refrigerator? WATER FILTER CERTIFICATIONS 15 Water is only chilled to a cold water pipe? Discard the first glass of water may be cool. Make sure the refrigerator is normal. ■ Glass not being held under the dispenser 2 to water supply and turn water shutoff valve fully open. ■ Kink in the water source line? Straighten the water source line. ■ New installation? See "Water Supply Requirements." ■ Water filter installed on ? See "Refrigerator Doors and Drawer." ■ Reverse...
Owners Manual
Page 16
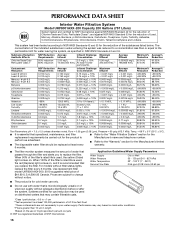
... Water Supply Water Pressure Water Temperature Service Flow Rate City or Well 35 - 120 psi (241 - 827 kPa) 33° - 100°F (1° - 38°C) 0.55 gpm (2.08 L/min.) @ 60 psi ■ The product is for cold water use only. ■ Do not use with water that may contain filterable cysts. *Class I particle size: >0.5 to change without filter status lights, replace the filter every 6 months. PERFORMANCE DATA SHEET Interior Water Filtration System Model...
... Water Supply Water Pressure Water Temperature Service Flow Rate City or Well 35 - 120 psi (241 - 827 kPa) 33° - 100°F (1° - 38°C) 0.55 gpm (2.08 L/min.) @ 60 psi ■ The product is for cold water use only. ■ Do not use with water that may contain filterable cysts. *Class I particle size: >0.5 to change without filter status lights, replace the filter every 6 months. PERFORMANCE DATA SHEET Interior Water Filtration System Model...

Owners Manual
Page 17
... refrigerator and that existed when this major appliance was purchased. YOUR SOLE AND EXCLUSIVE REMEDY UNDER THE LIMITED WARRANTY SHALL BE PRODUCT REPAIR AS PROVIDED HEREIN. Service calls to correct the installation of your major appliance, to instruct you on how to use your home. 8. Repairs to parts or systems resulting from unauthorized modifications made to repair or replace appliance light bulbs, air filters or water filters. Replacement parts...
... refrigerator and that existed when this major appliance was purchased. YOUR SOLE AND EXCLUSIVE REMEDY UNDER THE LIMITED WARRANTY SHALL BE PRODUCT REPAIR AS PROVIDED HEREIN. Service calls to correct the installation of your major appliance, to instruct you on how to use your home. 8. Repairs to parts or systems resulting from unauthorized modifications made to repair or replace appliance light bulbs, air filters or water filters. Replacement parts...
Owners Manual
Page 18
... Customer eXperience Centre 200 - 6750 Century Ave. For additional product information, in the U.S.A., visit www.maytag.com In Canada, visit www.maytag.ca If you do not have access to the Internet and you need further assistance, you may contact Maytag at the address below . If you need assistance using your correspondence. Please keep these User Instructions and the model number...
... Customer eXperience Centre 200 - 6750 Century Ave. For additional product information, in the U.S.A., visit www.maytag.com In Canada, visit www.maytag.ca If you do not have access to the Internet and you need further assistance, you may contact Maytag at the address below . If you need assistance using your correspondence. Please keep these User Instructions and the model number...
Dimension Guide
Page 1
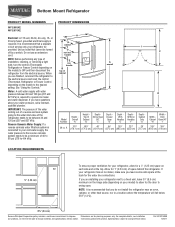
... psi (276 to operate ice maker and water dispenser. NOTE: Before performing any type of Cabinet "B" Depth Doors Open 90° "C" Depth Drawer Open "D" Depth With Handles "E" Depth Without Handles "F" Depth Cabinet Only "G" Width Cabinet "H" Width Door Open 90° "I C 90˚ 90˚ D Model Number Height Overall "A" Height Top of installation, cleaning, or removing a light bulb, turn the control (Thermostat, Refrigerator or Freezer Control depending on the model) to OFF and then disconnect the refrigerator from the electrical source. If you...
... psi (276 to operate ice maker and water dispenser. NOTE: Before performing any type of Cabinet "B" Depth Doors Open 90° "C" Depth Drawer Open "D" Depth With Handles "E" Depth Without Handles "F" Depth Cabinet Only "G" Width Cabinet "H" Width Door Open 90° "I C 90˚ 90˚ D Model Number Height Overall "A" Height Top of installation, cleaning, or removing a light bulb, turn the control (Thermostat, Refrigerator or Freezer Control depending on the model) to OFF and then disconnect the refrigerator from the electrical source. If you...
Warranty Information
Page 1
... repair house fuses, or to repair or replace appliance light bulbs, air filters or water filters. Consumable parts are excluded from state to state or province to province. MAYTAG SHALL NOT BE LIABLE FOR INCIDENTAL OR CONSEQUENTIAL DAMAGES. Replacement parts or repair labor if this major appliance is used for other rights that vary from warranty coverage. 4. Service calls to correct the installation of your major appliance, to instruct...
... repair house fuses, or to repair or replace appliance light bulbs, air filters or water filters. Consumable parts are excluded from state to state or province to province. MAYTAG SHALL NOT BE LIABLE FOR INCIDENTAL OR CONSEQUENTIAL DAMAGES. Replacement parts or repair labor if this major appliance is used for other rights that vary from warranty coverage. 4. Service calls to correct the installation of your major appliance, to instruct...


