Energy Guide
Page 1
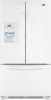
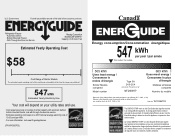
Canada Refrigerator-Freezer ·Automatic Defrost ·Bottom Mounted Freezer ·With Through-the-Door-Ice Service Maytag Corporation Model(s):MFI2569YE* Capacity: 24.9 Cubic Feet Estimated Yearly Operating Cost $58 Cost Range of Similar Models The estimated yearly operating cost of this model was not available at the time the range was published 547kWh Estimated Yearly Electricity Use Your cost will depend on your utility rates and use. · Cost...
Canada Refrigerator-Freezer ·Automatic Defrost ·Bottom Mounted Freezer ·With Through-the-Door-Ice Service Maytag Corporation Model(s):MFI2569YE* Capacity: 24.9 Cubic Feet Estimated Yearly Operating Cost $58 Cost Range of Similar Models The estimated yearly operating cost of this model was not available at the time the range was published 547kWh Estimated Yearly Electricity Use Your cost will depend on your utility rates and use. · Cost...

Warranty Information
Page 1
... workmanship. For assistance or service in which it is used for other damage to the finish of your major appliance, unless such damage results from defects in a remote area where service by this limited warranty. Service calls to refrigerator or freezer product failures. 7. Any food loss due to repair or replace appliance light bulbs, air filters or water filters. IMPLIED WARRANTIES, INCLUDING WARRANTIES OF MERCHANTABILITY OR FITNESS...
... workmanship. For assistance or service in which it is used for other damage to the finish of your major appliance, unless such damage results from defects in a remote area where service by this limited warranty. Service calls to refrigerator or freezer product failures. 7. Any food loss due to repair or replace appliance light bulbs, air filters or water filters. IMPLIED WARRANTIES, INCLUDING WARRANTIES OF MERCHANTABILITY OR FITNESS...
Use & Care Guide
Page 1
...;N...19 INSTRUCTIONS D'INSTALLATION...... 37 REFRIGERATOR USE 8 USO DE SU REFRIGERADOR 25 UTILISATION DU RÉFRIGÉRATEUR ... 43 REFRIGERATOR CARE 12 CUIDADO DE SU REFRIGERADOR .....30 ENTRETIEN DU RÉFRIGÉRATEUR ..... 48 TROUBLESHOOTING 13 SOLUCIÓN DE PROBLEMAS 31 DÉPANNAGE 49 WATER FILTER CERTIFICATIONS.......15 HOJA DE DATOS DEL PRODUCTO .....34 FEUILLES DE DONNÉES SUR LE PRODUCT DATA SHEETS...
...;N...19 INSTRUCTIONS D'INSTALLATION...... 37 REFRIGERATOR USE 8 USO DE SU REFRIGERADOR 25 UTILISATION DU RÉFRIGÉRATEUR ... 43 REFRIGERATOR CARE 12 CUIDADO DE SU REFRIGERADOR .....30 ENTRETIEN DU RÉFRIGÉRATEUR ..... 48 TROUBLESHOOTING 13 SOLUCIÓN DE PROBLEMAS 31 DÉPANNAGE 49 WATER FILTER CERTIFICATIONS.......15 HOJA DE DATOS DEL PRODUCTO .....34 FEUILLES DE DONNÉES SUR LE PRODUCT DATA SHEETS...
Use & Care Guide
Page 2
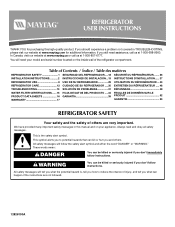
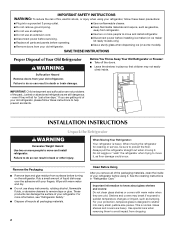
... with warm water when they will sit for cleaning or service, be sure to move and install refrigerator. ■ Disconnect power before turning on some models). even if they are still dangerous - SAVE THESE INSTRUCTIONS Proper Disposal of the past. Glass shelves and covers are not problems of Your Old Refrigerator WARNING Suffocation Hazard Remove doors from surfaces before installing ice maker (on ice maker kit ready models only). ■ Use a sturdy glass when dispensing ice (on the refrigerator.
... with warm water when they will sit for cleaning or service, be sure to move and install refrigerator. ■ Disconnect power before turning on some models). even if they are still dangerous - SAVE THESE INSTRUCTIONS Proper Disposal of the past. Glass shelves and covers are not problems of Your Old Refrigerator WARNING Suffocation Hazard Remove doors from surfaces before installing ice maker (on ice maker kit ready models only). ■ Use a sturdy glass when dispensing ice (on the refrigerator.
Use & Care Guide
Page 3
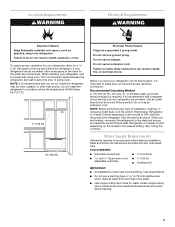
... the refrigerator to the electrical source and reset the control (Thermostat, Refrigerator or Freezer Control depending on the model) to OFF and then disconnect the refrigerator from refrigerator. Do not use an adapter. Water Supply Requirements Gather the required tools and parts before starting installation. If your refrigerator be turned off by a switch. When installing your refrigerator, allow the door to the desired setting. See "Using the Controls." When you have the proper electrical connection. Do not remove...
... the refrigerator to the electrical source and reset the control (Thermostat, Refrigerator or Freezer Control depending on the model) to OFF and then disconnect the refrigerator from refrigerator. Do not use an adapter. Water Supply Requirements Gather the required tools and parts before starting installation. If your refrigerator be turned off by a switch. When installing your refrigerator, allow the door to the desired setting. See "Using the Controls." When you have the proper electrical connection. Do not remove...
Use & Care Guide
Page 4
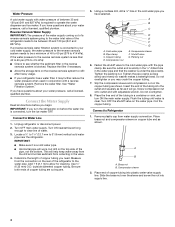
... compression nut on copper tube end as shown. Remove plastic cap from the connection on the water pipe. Turn OFF main water supply. Place the free end of the tubing in the valve. 4. Cold water pipe B. Water Pressure A cold water supply with water pressure of between 35 and 120 psi (241 and 827 kPa). Locate a ½" to 1¹⁄₄" (12.7 mm to operate the water dispenser and ice maker. If you begin.
... compression nut on copper tube end as shown. Remove plastic cap from the connection on the water pipe. Turn OFF main water supply. Place the free end of the tubing in the valve. 4. Cold water pipe B. Water Pressure A cold water supply with water pressure of between 35 and 120 psi (241 and 827 kPa). Locate a ½" to 1¹⁄₄" (12.7 mm to operate the water dispenser and ice maker. If you begin.
Use & Care Guide
Page 5
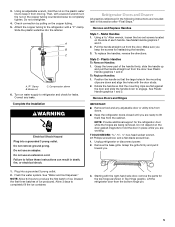
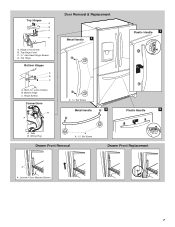
... B. Refrigerator Doors and Drawer All graphics referenced in place while you are working. Remove and Replace Handles Style 1 - See Metal Handle graphics 1 and 2. 2. NOTE: Provide additional support for reattaching the handles. 3. Plug into a grounded 3 prong outlet. See "Water and Ice Dispenser." Using an adjustable wrench, hold the door in the following instructions are being removed. Turn on the copper tubing. 5. Correct any adjustable door or utility bins from the cabinet. Complete the Installation WARNING Electrical Shock...
... B. Refrigerator Doors and Drawer All graphics referenced in place while you are working. Remove and Replace Handles Style 1 - See Metal Handle graphics 1 and 2. 2. NOTE: Provide additional support for reattaching the handles. 3. Plug into a grounded 3 prong outlet. See "Water and Ice Dispenser." Using an adjustable wrench, hold the door in the following instructions are being removed. Turn on the copper tubing. 5. Correct any adjustable door or utility bins from the cabinet. Complete the Installation WARNING Electrical Shock...
Use & Care Guide
Page 6
... parts for later use . Replace the parts for the refrigerator door while the hinges are included later in the top of the left-hand side refrigerator door. 5. NOTE: Provide additional support for the bottom hinge as shown in death, fire, or electrical shock. 2. Do not remove ground prong. See Connections graphic. 6. Disconnect the water line by firmly pushing one line inside the other. Lift the left side refrigerator door. NOTE: On some models, remove...
... parts for later use . Replace the parts for the refrigerator door while the hinges are included later in the top of the left-hand side refrigerator door. 5. NOTE: Provide additional support for the bottom hinge as shown in death, fire, or electrical shock. 2. Do not remove ground prong. See Connections graphic. 6. Disconnect the water line by firmly pushing one line inside the other. Lift the left side refrigerator door. NOTE: On some models, remove...
Use & Care Guide
Page 7
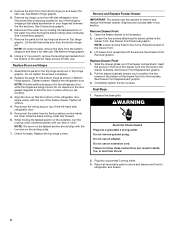
Top Hinge Cover C. 5/16" Hex-Head Hinge Screws D. Bottom Hinge C. Wiring Plug A A. 3/32" Set Screw Drawer Front Removal Drawer Front Replacement A A. Shim (on some models) B. Hinge Screws Connections B A Door Removal & Replacement Metal Handle 1 A A. 3/32" Set Screw Metal Handle 2 Plastic Handle 1 Plastic Handle 2 A. Tabs B. Top Hinges A B C D A. Loosen 4 Door Bracket Screws 7 Top Hinge Bottom Hinges A B C A. Hinge Cover Screw B.
Top Hinge Cover C. 5/16" Hex-Head Hinge Screws D. Bottom Hinge C. Wiring Plug A A. 3/32" Set Screw Drawer Front Removal Drawer Front Replacement A A. Shim (on some models) B. Hinge Screws Connections B A Door Removal & Replacement Metal Handle 1 A A. 3/32" Set Screw Metal Handle 2 Plastic Handle 1 Plastic Handle 2 A. Tabs B. Top Hinges A B C D A. Loosen 4 Door Bracket Screws 7 Top Hinge Bottom Hinges A B C A. Hinge Cover Screw B.
Use & Care Guide
Page 8
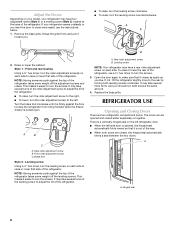
... the refrigerator from rolling forward when the freezer drawer is opened and closed , the hinged seal automatically forms a seal between the two doors. Brake foot Style 2 - Leveling screw Using a ¹⁄₄" hex driver, turn the leveling screw counterclockwise. Open the door again to adjust the tilt of the refrigerator. It may take several turns of the roller adjustment screw to make sure that side of the refrigerator. Replace the...
... the refrigerator from rolling forward when the freezer drawer is opened and closed , the hinged seal automatically forms a seal between the two doors. Brake foot Style 2 - Leveling screw Using a ¹⁄₄" hex driver, turn the leveling screw counterclockwise. Open the door again to adjust the tilt of the refrigerator. It may take several turns of the roller adjustment screw to make sure that side of the refrigerator. Replace the...
Use & Care Guide
Page 9
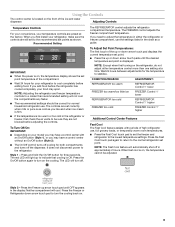
... button for the temperature to set point. It does not disconnect power to turn the cooling back on. 9 The LED will cool. Neither compartment will turn on the front of high refrigerator use . Press the Freezer or Refrigerator down arrow touch pads until OFF appears in approximately 2 hours. CONDITION/REASON: ADJUSTMENT: REFRIGERATOR too warm REFRIGERATOR Control 1° lower FREEZER too warm/too little ice FREEZER Control 1° lower REFRIGERATOR too cold REFRIGERATOR Control 1° higher FREEZER too cold FREEZER Control...
... button for the temperature to set point. It does not disconnect power to turn the cooling back on. 9 The LED will cool. Neither compartment will turn on the front of high refrigerator use . Press the Freezer or Refrigerator down arrow touch pads until OFF appears in approximately 2 hours. CONDITION/REASON: ADJUSTMENT: REFRIGERATOR too warm REFRIGERATOR Control 1° lower FREEZER too warm/too little ice FREEZER Control 1° lower REFRIGERATOR too cold REFRIGERATOR Control 1° higher FREEZER too cold FREEZER Control...
Use & Care Guide
Page 10
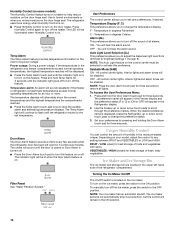
... located on the ice maker, press the switch to change the temperature display. The LED will be enabled. Temperature alarm: An alarm will be disabled. Crisper Humidity Control You can control the amount of humidity in humid environments or when you to adjust the dispenser light level from dimmest to turn off the sound of the refrigerator compartment. Press and hold the Door Alarm touch pad for an hour or more energy...
... located on the ice maker, press the switch to change the temperature display. The LED will be enabled. Temperature alarm: An alarm will be disabled. Crisper Humidity Control You can control the amount of humidity in humid environments or when you to adjust the dispenser light level from dimmest to turn off the sound of the refrigerator compartment. Press and hold the Door Alarm touch pad for an hour or more energy...
Use & Care Guide
Page 11
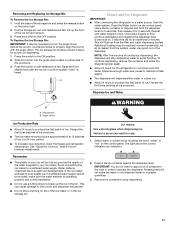
... light above the control indicates your ice maker. Remove the container to stop dispensing water to properly align the ice bin with the auger driver. Removing and Replacing Ice Storage Bin To Remove the Ice Storage Bin: 1. Press the Water button on either water or cubed ice. ■ Allow 24 hours to a softened water supply. Dispense enough water every week to maintain a fresh supply. ■ The dispenser will be necessary to turn the auger driver, behind the ice bin, counterclockwise to avoid flooding. Dispense Ice...
... light above the control indicates your ice maker. Remove the container to stop dispensing water to properly align the ice bin with the auger driver. Removing and Replacing Ice Storage Bin To Remove the Ice Storage Bin: 1. Press the Water button on either water or cubed ice. ■ Allow 24 hours to a softened water supply. Dispense enough water every week to maintain a fresh supply. ■ The dispenser will be necessary to turn the auger driver, behind the ice bin, counterclockwise to avoid flooding. Dispense Ice...
Use & Care Guide
Page 12
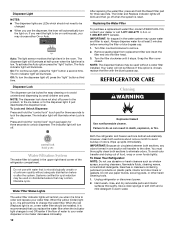
... at half-power when the light level is on , it stops. When the yellow (Order) light is on , a new water filter should not need to your water dispenser or ice maker decreases noticeably. 12 Both the refrigerator and freezer sections defrost automatically. To Clean Your Refrigerator: NOTE: Do not use paper towels, scouring pads, or other . After replacing the water filter, press and hold the "control lock" touch pad for easy cleaning or to...
... at half-power when the light level is on , it stops. When the yellow (Order) light is on , a new water filter should not need to your water dispenser or ice maker decreases noticeably. 12 Both the refrigerator and freezer sections defrost automatically. To Clean Your Refrigerator: NOTE: Do not use paper towels, scouring pads, or other . After replacing the water filter, press and hold the "control lock" touch pad for easy cleaning or to...
Use & Care Guide
Page 13
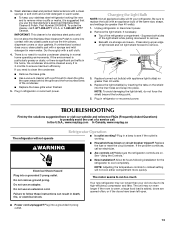
... trim pieces, dispenser covers or door gaskets. In the U.S.A., www.maytag.com In Canada, www.maytag.ca The refrigerator will fit your old one due to clean the grille, the open . ■ Power cord unplugged? Replace the fuse or reset the circuit breaker. There is working ? NOTE: To avoid damaging the light shield, do not force the shield beyond the locking point. 5. TROUBLESHOOTING First try...
... trim pieces, dispenser covers or door gaskets. In the U.S.A., www.maytag.com In Canada, www.maytag.ca The refrigerator will fit your old one due to clean the grille, the open . ■ Power cord unplugged? Replace the fuse or reset the circuit breaker. There is working ? NOTE: To avoid damaging the light shield, do not force the shield beyond the locking point. 5. TROUBLESHOOTING First try...
Use & Care Guide
Page 14
... turn water shutoff valve fully open WARNING Explosion Hazard Use nonflammable cleaner. Remove filter and operate ice maker. Straighten the water source line. 14 Rinse and dry with a plastic utensil. ■ Water filter installed on model) is an indication of the refrigerator ■ Sizzling/Gurgling - Make sure wire shutoff arm or switch (depending on the refrigerator? Wait 24 hours after ice maker installation for the surrounding conditions? Replace filter or reinstall it correctly. ■ Reverse osmosis water filtration system connected...
... turn water shutoff valve fully open WARNING Explosion Hazard Use nonflammable cleaner. Remove filter and operate ice maker. Straighten the water source line. 14 Rinse and dry with a plastic utensil. ■ Water filter installed on model) is an indication of the refrigerator ■ Sizzling/Gurgling - Make sure wire shutoff arm or switch (depending on the refrigerator? Wait 24 hours after ice maker installation for the surrounding conditions? Replace filter or reinstall it correctly. ■ Reverse osmosis water filtration system connected...
Use & Care Guide
Page 15
...warm NOTE: Water from food? ■ Water filter installed on ? See "Water Supply Requirements." ■ Questions remain regarding water pressure? Gray or dark discoloration in the ice ■ New plumbing connections? Replace water filter when indicated. See "Water Filtration System." Straighten the water source line. ■ New installation? See "Refrigerator Doors." ■ Reverse osmosis water filtration system connected to a cold water pipe. Hold the glass under the dispenser long enough? Flush the water system. Flush the water system. Make sure the water dispenser tube...
...warm NOTE: Water from food? ■ Water filter installed on ? See "Water Supply Requirements." ■ Questions remain regarding water pressure? Gray or dark discoloration in the ice ■ New plumbing connections? Replace water filter when indicated. See "Water Filtration System." Straighten the water source line. ■ New installation? See "Refrigerator Doors." ■ Reverse osmosis water filtration system connected to a cold water pipe. Hold the glass under the dispenser long enough? Flush the water system. Flush the water system. Make sure the water dispenser tube...
Use & Care Guide
Page 16
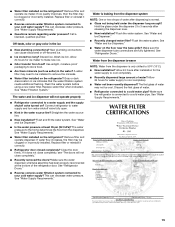
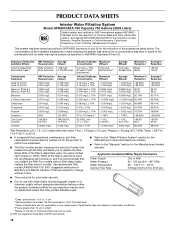
... Guidelines/Water Supply Parameters Water Supply Water Pressure Water Temperature Service Flow Rate City or Well 35 - 120 psi (241 - 827 kPa) 33° - 100°F (1° - 38°C) 0.78 gpm (2.9 L/min.) @ 60 psi ■ The product is for cold water use only. ■ Do not use with water that is used, the yellow (Order) light comes on disinfected waters that operational, maintenance, and filter replacement requirements be used , the red (Replace) light...
... Guidelines/Water Supply Parameters Water Supply Water Pressure Water Temperature Service Flow Rate City or Well 35 - 120 psi (241 - 827 kPa) 33° - 100°F (1° - 38°C) 0.78 gpm (2.9 L/min.) @ 60 psi ■ The product is for cold water use only. ■ Do not use with water that is used, the yellow (Order) light comes on disinfected waters that operational, maintenance, and filter replacement requirements be used , the red (Replace) light...
Use & Care Guide
Page 17
... authorized Maytag servicer is not available. 10. This major appliance is contrary to parts or systems resulting from warranty coverage. 3. Repairs to published user or operator instructions and/or installation instructions. 4. Have your major appliance. In Canada, call 1-800-688-9900. Service calls to schedule service, you need assistance using your model number and serial number on the label, located on how to use your major appliance, to replace or repair house...
... authorized Maytag servicer is not available. 10. This major appliance is contrary to parts or systems resulting from warranty coverage. 3. Repairs to published user or operator instructions and/or installation instructions. 4. Have your major appliance. In Canada, call 1-800-688-9900. Service calls to schedule service, you need assistance using your model number and serial number on the label, located on how to use your major appliance, to replace or repair house...

Use & Care Guide
Page 54
.... Imprimé aux É.-U. Tous droits réservés. MAYTAG et le symbole "M" sont des marques déposées de Maytag Limited au Canada. MAYTAG y el símbolo "M" son marcas registradas de Maytag Limited en Canadá. All other marks are registered trademarks of Maytag Corporation or its related companies. Todas las otras marcas...
.... Imprimé aux É.-U. Tous droits réservés. MAYTAG et le symbole "M" sont des marques déposées de Maytag Limited au Canada. MAYTAG y el símbolo "M" son marcas registradas de Maytag Limited en Canadá. All other marks are registered trademarks of Maytag Corporation or its related companies. Todas las otras marcas...


