Use & Care Guide
Page 3
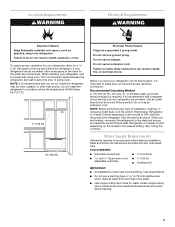
Failure to swing open. To ensure proper ventilation for a ¹⁄₂" (1.25 cm) space at the back for leaks. Recommended Grounding Method A 115 Volt, 60 Hz., AC only, 15- Do not use an adapter. NOTE: Before performing any tools listed ...is important to follow the instructions provided with any type of installation, cleaning, or removing a light bulb, turn the control (Thermostat, Refrigerator or Freezer Control depending on the model) to OFF and then disconnect the refrigerator from refrigerator. TOOLS NEEDED: ■ Flat-blade screwdriver Nut driver and &#...
Failure to swing open. To ensure proper ventilation for a ¹⁄₂" (1.25 cm) space at the back for leaks. Recommended Grounding Method A 115 Volt, 60 Hz., AC only, 15- Do not use an adapter. NOTE: Before performing any tools listed ...is important to follow the instructions provided with any type of installation, cleaning, or removing a light bulb, turn the control (Thermostat, Refrigerator or Freezer Control depending on the model) to OFF and then disconnect the refrigerator from refrigerator. TOOLS NEEDED: ■ Flat-blade screwdriver Nut driver and &#...
Use & Care Guide
Page 6
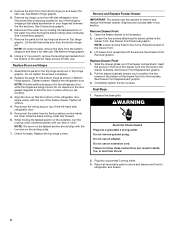
... See Connections graphic. 7. NOTE: Provide additional support for later use . Do not depend on the door gasket magnets to refrigerator and freezer. 6 Tighten all removable parts to doors and drawer and food to hold the door in the drawer brackets. See Drawer Front Removal ...extension. 2. Completely tighten the four screws. Lift the left -hand side refrigerator door. 5. Keep screws for later use. Replace the parts for leaks. Replace the top hinge covers. Keep the screws in the drawer front. 3. See Bottom Hinge graphic. 8. Lift drawer front upward and off...
... See Connections graphic. 7. NOTE: Provide additional support for later use . Do not depend on the door gasket magnets to refrigerator and freezer. 6 Tighten all removable parts to doors and drawer and food to hold the door in the drawer brackets. See Drawer Front Removal ...extension. 2. Completely tighten the four screws. Lift the left -hand side refrigerator door. 5. Keep screws for later use. Replace the parts for leaks. Replace the top hinge covers. Keep the screws in the drawer front. 3. See Bottom Hinge graphic. 8. Lift drawer front upward and off...


