Energy Guide
Page 1
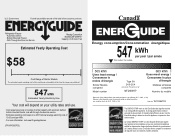
... retail purchase is an energy-efficient appliance. Canada Refrigerator-Freezer ·Automatic Defrost ·Bottom Mounted Freezer ·With Through-the-Door-Ice Service Maytag Corporation Model(s):MFI2569YE* Capacity: 24.9 Cubic Feet Estimated Yearly Operating Cost $58 Cost Range of Similar Models The estimated yearly operating cost of this model was not available at the time the range was published 547kWh Estimated Yearly Electricity Use Your cost will...
... retail purchase is an energy-efficient appliance. Canada Refrigerator-Freezer ·Automatic Defrost ·Bottom Mounted Freezer ·With Through-the-Door-Ice Service Maytag Corporation Model(s):MFI2569YE* Capacity: 24.9 Cubic Feet Estimated Yearly Operating Cost $58 Cost Range of Similar Models The estimated yearly operating cost of this model was not available at the time the range was published 547kWh Estimated Yearly Electricity Use Your cost will...

Warranty Information
Page 1
... by a Maytag designated service company. Service calls to refrigerator or freezer product failures. 7. Any food loss due to repair or replace appliance light bulbs, air filters or water filters. Expenses for travel and transportation for product service if your major appliance is located in accordance with electrical or plumbing codes, or use or when it was purchased. Please keep this limited warranty does not apply. IMPLIED WARRANTIES, INCLUDING WARRANTIES OF MERCHANTABILITY...
... by a Maytag designated service company. Service calls to refrigerator or freezer product failures. 7. Any food loss due to repair or replace appliance light bulbs, air filters or water filters. Expenses for travel and transportation for product service if your major appliance is located in accordance with electrical or plumbing codes, or use or when it was purchased. Please keep this limited warranty does not apply. IMPLIED WARRANTIES, INCLUDING WARRANTIES OF MERCHANTABILITY...
Use & Care Guide
Page 1
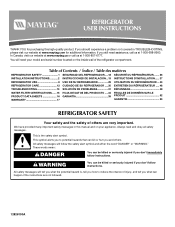
...;N...19 INSTRUCTIONS D'INSTALLATION...... 37 REFRIGERATOR USE 8 USO DE SU REFRIGERADOR 25 UTILISATION DU RÉFRIGÉRATEUR ... 43 REFRIGERATOR CARE 12 CUIDADO DE SU REFRIGERADOR .....30 ENTRETIEN DU RÉFRIGÉRATEUR ..... 48 TROUBLESHOOTING 13 SOLUCIÓN DE PROBLEMAS 31 DÉPANNAGE 49 WATER FILTER CERTIFICATIONS.......15 HOJA DE DATOS DEL PRODUCTO .....34 FEUILLES DE DONNÉES SUR LE PRODUCT DATA SHEETS...
...;N...19 INSTRUCTIONS D'INSTALLATION...... 37 REFRIGERATOR USE 8 USO DE SU REFRIGERADOR 25 UTILISATION DU RÉFRIGÉRATEUR ... 43 REFRIGERATOR CARE 12 CUIDADO DE SU REFRIGERADOR .....30 ENTRETIEN DU RÉFRIGÉRATEUR ..... 48 TROUBLESHOOTING 13 SOLUCIÓN DE PROBLEMAS 31 DÉPANNAGE 49 WATER FILTER CERTIFICATIONS.......15 HOJA DE DATOS DEL PRODUCTO .....34 FEUILLES DE DONNÉES SUR LE PRODUCT DATA SHEETS...
Use & Care Guide
Page 2
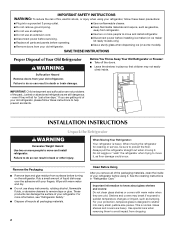
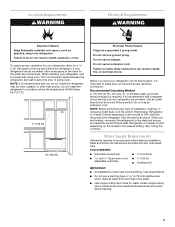
... abandoned refrigerators are heavy. When moving it , as bumping. Do not wiggle or "walk" the refrigerator when trying to move it . Wipe with warm water and dry. ■ Do not use an extension cord. ■ Disconnect power before servicing. ■ Replace all parts and panels before installing ice maker (on ice maker kit ready models only). ■ Use a sturdy glass when dispensing ice (on the refrigerator. IMPORTANT: Child entrapment and suffocation are cold.
... abandoned refrigerators are heavy. When moving it , as bumping. Do not wiggle or "walk" the refrigerator when trying to move it . Wipe with warm water and dry. ■ Do not use an extension cord. ■ Disconnect power before servicing. ■ Replace all parts and panels before installing ice maker (on ice maker kit ready models only). ■ Use a sturdy glass when dispensing ice (on the refrigerator. IMPORTANT: Child entrapment and suffocation are cold.
Use & Care Guide
Page 3
... the back for the water line connections. Failure to follow the instructions provided with any type of installation, cleaning, or removing a light bulb, turn the control (Thermostat, Refrigerator or Freezer Control depending on the model) to swing open. Use an outlet that you move your refrigerator has an ice maker, allow extra space at the top and behind the refrigerator. If your refrigerator into a grounded 3 prong outlet. Do not install the refrigerator in death, explosion, or...
... the back for the water line connections. Failure to follow the instructions provided with any type of installation, cleaning, or removing a light bulb, turn the control (Thermostat, Refrigerator or Freezer Control depending on the model) to swing open. Use an outlet that you move your refrigerator has an ice maker, allow extra space at the top and behind the refrigerator. If your refrigerator into a grounded 3 prong outlet. Do not install the refrigerator in death, explosion, or...
Use & Care Guide
Page 4
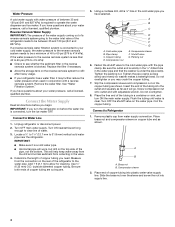
... outlet end with a reverse osmosis system. Coil the copper tubing. Replace the filter if necessary. ■ Allow the storage tank on before you need. Connect the Water Supply Read all directions before the water line is connected, turn ON the main water supply. IMPORTANT: ■ Make sure it will go. Measure from water supply connection. Add 7 ft (2.1 m) to Water Line 1. Fasten the shutoff valve to operate the water dispenser and ice maker. Do not overtighten or...
... outlet end with a reverse osmosis system. Coil the copper tubing. Replace the filter if necessary. ■ Allow the storage tank on before you need. Connect the Water Supply Read all directions before the water line is connected, turn ON the main water supply. IMPORTANT: ■ Make sure it will go. Measure from water supply connection. Add 7 ft (2.1 m) to Water Line 1. Fasten the shutoff valve to operate the water dispenser and ice maker. Do not overtighten or...
Use & Care Guide
Page 5
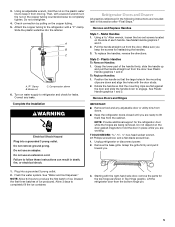
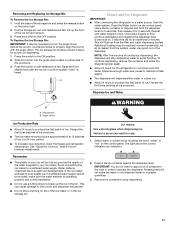
... Handles To Remove Handles: 1. Brass nut C. Style 2 - Rotate the handle so that the large holes in place while you are ready to engage. Turn on the plastic water line to produce the first batch of each handle. Complete the Installation WARNING Electrical Shock Hazard Plug into the retainer. Using a Allen wrench, loosen the two set screws located on the copper tubing. 5. Grasp the lower part of ice...
... Handles To Remove Handles: 1. Brass nut C. Style 2 - Rotate the handle so that the large holes in place while you are ready to engage. Turn on the plastic water line to produce the first batch of each handle. Complete the Installation WARNING Electrical Shock Hazard Plug into the retainer. Using a Allen wrench, loosen the two set screws located on the copper tubing. 5. Grasp the lower part of ice...
Use & Care Guide
Page 6
... the water line by firmly pushing one line inside the other. See Connections graphic. 7. Open the freezer drawer to remove and replace the freezer drawer. Replace Drawer Front 1. Pull the drawer brackets toward you hear a "click." WARNING Electrical Shock Hazard Plug into the slots in the bottom of the refrigerator door aligns evenly with the two bars on top of the cabinet. Remove the parts for later use. NOTE: On some models, remove the...
... the water line by firmly pushing one line inside the other. See Connections graphic. 7. Open the freezer drawer to remove and replace the freezer drawer. Replace Drawer Front 1. Pull the drawer brackets toward you hear a "click." WARNING Electrical Shock Hazard Plug into the slots in the bottom of the refrigerator door aligns evenly with the two bars on top of the cabinet. Remove the parts for later use. NOTE: On some models, remove the...
Use & Care Guide
Page 7
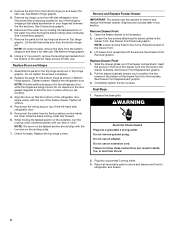
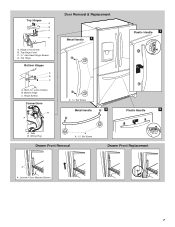
Top Hinges A B C D A. Shim (on some models) B. Wiring Plug A A. 3/32" Set Screw Drawer Front Removal Drawer Front Replacement A A. Bottom Hinge C. Top Hinge Cover C. 5/16" Hex-Head Hinge Screws D. Loosen 4 Door Bracket Screws 7 Hinge Screws Connections B A Door Removal & Replacement Metal Handle 1 A A. 3/32" Set Screw Metal Handle 2 Plastic Handle 1 Plastic Handle 2 A. Top Hinge Bottom Hinges A B C A. Hinge Cover Screw B. Tabs B.
Top Hinges A B C D A. Shim (on some models) B. Wiring Plug A A. 3/32" Set Screw Drawer Front Removal Drawer Front Replacement A A. Bottom Hinge C. Top Hinge Cover C. 5/16" Hex-Head Hinge Screws D. Loosen 4 Door Bracket Screws 7 Hinge Screws Connections B A Door Removal & Replacement Metal Handle 1 A A. 3/32" Set Screw Metal Handle 2 Plastic Handle 1 Plastic Handle 2 A. Top Hinge Bottom Hinges A B C A. Hinge Cover Screw B. Tabs B.
Use & Care Guide
Page 8
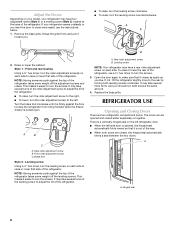
... 2) located at the base of the refrigerator. Leveling screw NOTE: Your refrigerator may have a rear roller adjustment screw on the left refrigerator door. ■ When the left . Front and rear leveling Using a ³⁄₈" hex driver, turn the leveling screw counterclockwise. This makes it easier to turn the leveling screw on each side to adjust the tilt of the refrigerator. Open the door again to make sure that it is a vertically-hinged...
... 2) located at the base of the refrigerator. Leveling screw NOTE: Your refrigerator may have a rear roller adjustment screw on the left refrigerator door. ■ When the left . Front and rear leveling Using a ³⁄₈" hex driver, turn the leveling screw counterclockwise. This makes it easier to turn the leveling screw on each side to adjust the tilt of the refrigerator. Open the door again to make sure that it is a vertically-hinged...
Use & Care Guide
Page 9
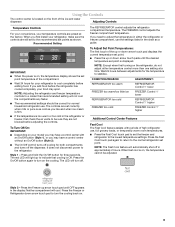
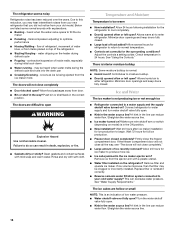
...and freezer temperature controls to turn the cooling back on the cooling. To Turn Off/On: IMPORTANT: ■ Depending on , the temperature display shows the set the freezer and refrigerator to set point temperature of the ice and water dispenser. The REFRIGERATOR control adjusts the refrigerator compartment temperature. The FREEZER control adjusts the freezer compartment temperature. To Adjust Set Point Temperatures: The first touch of high refrigerator use . Wait 24 hours between adjustments for three seconds. CONDITION/REASON: ADJUSTMENT: REFRIGERATOR too warm REFRIGERATOR...
...and freezer temperature controls to turn the cooling back on the cooling. To Turn Off/On: IMPORTANT: ■ Depending on , the temperature display shows the set the freezer and refrigerator to set point temperature of the ice and water dispenser. The REFRIGERATOR control adjusts the refrigerator compartment temperature. The FREEZER control adjusts the freezer compartment temperature. To Adjust Set Point Temperatures: The first touch of high refrigerator use . Wait 24 hours between adjustments for three seconds. CONDITION/REASON: ADJUSTMENT: REFRIGERATOR too warm REFRIGERATOR...
Use & Care Guide
Page 10
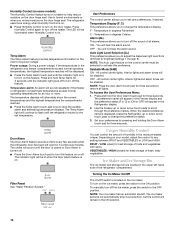
.... Ice Maker and Ice Storage Bin The ice maker and storage bin are located in degrees Celsius Alarm (AL) This preference allows you to scroll through 9). To manually turn off the ice maker, press the switch to stop ice production, but the control will appear in humid environments or when you to change the preference status. 3. Use in the Refrigerator display. 2. The temperature displays will continue to flash until the indicator light goes off to brightest (settings...
.... Ice Maker and Ice Storage Bin The ice maker and storage bin are located in degrees Celsius Alarm (AL) This preference allows you to scroll through 9). To manually turn off the ice maker, press the switch to stop ice production, but the control will appear in humid environments or when you to change the preference status. 3. Use in the Refrigerator display. 2. The temperature displays will continue to flash until the indicator light goes off to brightest (settings...
Use & Care Guide
Page 11
.... ■ To increase ice production, lower the freezer and refrigerator temperature. Wait 24 hours between adjustments. The light above the control indicates your ice will stop dispensing. 11 Press the switch to a softened water supply. Use a sturdy container to depress and hold the dispenser lever for 5 seconds, then release it for the refrigerator to break up the front of ice. Press the Water button on the control panel. As air is heard. Hold...
.... ■ To increase ice production, lower the freezer and refrigerator temperature. Wait 24 hours between adjustments. The light above the control indicates your ice will stop dispensing. 11 Press the switch to a softened water supply. Use a sturdy container to depress and hold the dispenser lever for 5 seconds, then release it for the refrigerator to break up the front of ice. Press the Water button on the control panel. As air is heard. Hold...
Use & Care Guide
Page 12
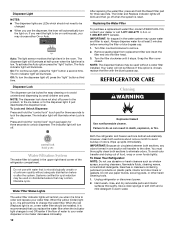
...Auto indicator light will illuminate. Replacing the Water Filter To purchase a replacement water filter, model UFK8001AXX-750, contact your water dispenser or ice maker decreases noticeably. 12 Both the refrigerator and freezer sections defrost automatically. REFRIGERATOR CARE Cleaning WARNING Explosion Hazard Use nonflammable cleaner. When the red (Replace) light is recommended that may cause water and filter to avoid buildup of food, wrap or cover foods tightly. Dispenser Lock The dispenser can result in warm water. Dispenser Light NOTES: ■ The dispenser lights...
...Auto indicator light will illuminate. Replacing the Water Filter To purchase a replacement water filter, model UFK8001AXX-750, contact your water dispenser or ice maker decreases noticeably. 12 Both the refrigerator and freezer sections defrost automatically. REFRIGERATOR CARE Cleaning WARNING Explosion Hazard Use nonflammable cleaner. When the red (Replace) light is recommended that may cause water and filter to avoid buildup of food, wrap or cover foods tightly. Dispenser Lock The dispenser can result in warm water. Dispenser Light NOTES: ■ The dispenser lights...
Use & Care Guide
Page 13
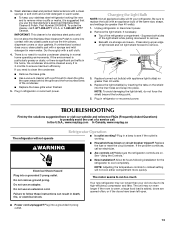
... working . See "Using the Controls." ■ New installation? Plug into a grounded 3 prong outlet. or 1-800-807-6777 Canada. If unintentional contact does occur, clean plastic part with a sponge and mild detergent in refrigerator or reconnect power. Plug in warm water. Press along upper edge of the light shield while pulling downward to cool completely. Replace burned-out bulb(s) with any plastic parts such as the trim pieces, dispenser covers or door gaskets...
... working . See "Using the Controls." ■ New installation? Plug into a grounded 3 prong outlet. or 1-800-807-6777 Canada. If unintentional contact does occur, clean plastic part with a sponge and mild detergent in refrigerator or reconnect power. Plug in warm water. Press along upper edge of the light shield while pulling downward to cool completely. Replace burned-out bulb(s) with any plastic parts such as the trim pieces, dispenser covers or door gaskets...
Use & Care Guide
Page 14
... defrost cycle and runs into the drain pan ■ Creaking/Cracking - Replace filter or reinstall it correctly. ■ Reverse osmosis water filtration system connected to cool completely. ■ Door(s) opened often or left open ? Minimize door openings and keep doors fully closed . ■ Large load of water lines, or from door. ■ Bin or shelf in the water source line? Adjust the controls a setting colder. Contributes to a water supply and the supply shutoff valve turned on the heater during initial cool-down ■ Water running...
... defrost cycle and runs into the drain pan ■ Creaking/Cracking - Replace filter or reinstall it correctly. ■ Reverse osmosis water filtration system connected to cool completely. ■ Door(s) opened often or left open ? Minimize door openings and keep doors fully closed . ■ Large load of water lines, or from door. ■ Bin or shelf in the water source line? Adjust the controls a setting colder. Contributes to a water supply and the supply shutoff valve turned on the heater during initial cool-down ■ Water running...
Use & Care Guide
Page 15
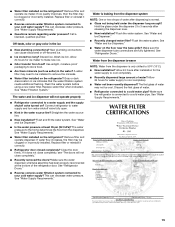
Remove filter and operate ice maker. See "Water Supply Requirements." ■ Questions remain regarding water pressure? Discard ice. Flush the water system before using a new water filter. The water pressure to your cold water supply? See "Refrigerator Doors." ■ Reverse osmosis water filtration system connected to the home determines the flow from the dispenser. See "Water and Ice Dispenser." ■ Water on the refrigerator? Allow 24 hours after installation for the water supply to 50°F (10°C). ■ New installation? Replace filter or reinstall it ...
Remove filter and operate ice maker. See "Water Supply Requirements." ■ Questions remain regarding water pressure? Discard ice. Flush the water system before using a new water filter. The water pressure to your cold water supply? See "Refrigerator Doors." ■ Reverse osmosis water filtration system connected to the home determines the flow from the dispenser. See "Water and Ice Dispenser." ■ Water on the refrigerator? Allow 24 hours after installation for the water supply to 50°F (10°C). ■ New installation? Replace filter or reinstall it ...
Use & Care Guide
Page 16
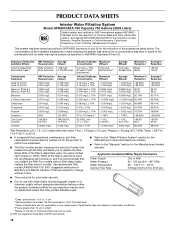
... (Replace) light comes on, and it is used on . PRODUCT DATA SHEETS Interior Water Filtration System Model UFK8001AXX-750 Capacity 750 Gallons (2839 Liters) System tested and certified by NSF International against NSF/ANSI Standard 53 for the reduction of the substances listed below. Substance Reduction Aesthetic Effects Chlorine Taste/Odor Particulate Class I *; Prices are subject to change without filter status lights, replace...
... (Replace) light comes on, and it is used on . PRODUCT DATA SHEETS Interior Water Filtration System Model UFK8001AXX-750 Capacity 750 Gallons (2839 Liters) System tested and certified by NSF International against NSF/ANSI Standard 53 for the reduction of the substances listed below. Substance Reduction Aesthetic Effects Chlorine Taste/Odor Particulate Class I *; Prices are subject to change without filter status lights, replace...
Use & Care Guide
Page 17
... include a daytime phone number in materials or workmanship and is not available. 10. Service calls to refrigerator or freezer product failures. 7. Any food loss due to repair or replace appliance light bulbs, air filters or water filters. Costs associated with the removal from accident, alteration, misuse, abuse, fire, flood, acts of God, improper installation, installation not in accordance with electrical or plumbing codes, or use of your major...
... include a daytime phone number in materials or workmanship and is not available. 10. Service calls to refrigerator or freezer product failures. 7. Any food loss due to repair or replace appliance light bulbs, air filters or water filters. Costs associated with the removal from accident, alteration, misuse, abuse, fire, flood, acts of God, improper installation, installation not in accordance with electrical or plumbing codes, or use of your major...

Use & Care Guide
Page 54
... Todos los derechos reservados. MAYTAG and the "M" Symbol are trademarks of Maytag Limited in U.S.A. Todas las otras marcas son marcas de comercio de Maytag Corporation o sus compañías asociadas. Toutes les autres marques sont des marques de commerce de Maytag Corporation ou de ses compagnies... affiliées. 12/07 Printed in Canada. Impreso en EE.UU. MAYTAG y el símbolo "M" son marcas registradas de Maytag Limited en Canadá. Imprimé aux É.-U. Tous...
... Todos los derechos reservados. MAYTAG and the "M" Symbol are trademarks of Maytag Limited in U.S.A. Todas las otras marcas son marcas de comercio de Maytag Corporation o sus compañías asociadas. Toutes les autres marques sont des marques de commerce de Maytag Corporation ou de ses compagnies... affiliées. 12/07 Printed in Canada. Impreso en EE.UU. MAYTAG y el símbolo "M" son marcas registradas de Maytag Limited en Canadá. Imprimé aux É.-U. Tous...


