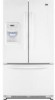
User Instructions
Page 1
...to reduce the chance of the refrigerator compartment. If you what the potential hazard is the safety alert symbol. Para obtener acceso a "lnstrucciones para el usuario del refrigerador" en espaSol, o para obtener informaci6n adicional acerca de su producto, visite: www.maytag.com. Puede encontrar su nQmero de...or hurt you still need your appliance. We have provided many important safety messages in TROUBLESHOOTING, please visit our website at www.maytag.corn for purchasing this manual and on your model and serial number located on the inside wall of injury, and tell you ...
...to reduce the chance of the refrigerator compartment. If you what the potential hazard is the safety alert symbol. Para obtener acceso a "lnstrucciones para el usuario del refrigerador" en espaSol, o para obtener informaci6n adicional acerca de su producto, visite: www.maytag.com. Puede encontrar su nQmero de...or hurt you still need your appliance. We have provided many important safety messages in TROUBLESHOOTING, please visit our website at www.maytag.corn for purchasing this manual and on your model and serial number located on the inside wall of injury, and tell you ...
User Instructions
Page 2
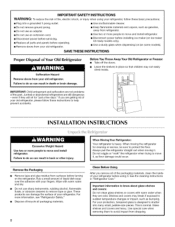
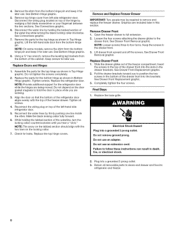
...not use an adapter. • Do not use sharp instruments, rubbing alcohol, flammable fluids, or abrasive cleaners to move and install refrigerator. • Disconnect power before turning on some models). When moving it. For your protection, tempered glass is designed to do so...an extension cord. • Disconnect power before servicing. • Replace all parts and panels before operating. • Remove doors from your refrigerator, follow these basic precautions: • Plug into many small, pebble-size pieces. Remove the Packaging • Remove tape and glue residue...
...not use an adapter. • Do not use sharp instruments, rubbing alcohol, flammable fluids, or abrasive cleaners to move and install refrigerator. • Disconnect power before turning on some models). When moving it. For your protection, tempered glass is designed to do so...an extension cord. • Disconnect power before servicing. • Replace all parts and panels before operating. • Remove doors from your refrigerator, follow these basic precautions: • Plug into many small, pebble-size pieces. Remove the Packaging • Remove tape and glue residue...
User Instructions
Page 3
... with any type of installation, cleaning, or removing a light bulb, turn the control (Thermostat, Refrigerator or Freezer Control depending on the model) to OFF and then disconnect the refrigerator from refrigerator. Do not use an extension cord. Do not use an adapter. Failure to allow for a ...back for the water line connections. It is important to make sure you are finished, reconnect the refrigerator to the electrical source and reset the control (Thermostat, Refrigerator or Freezer Control depending on the model) to the desired setting. NOTE: Before performing any tools ...
... with any type of installation, cleaning, or removing a light bulb, turn the control (Thermostat, Refrigerator or Freezer Control depending on the model) to OFF and then disconnect the refrigerator from refrigerator. Do not use an extension cord. Do not use an adapter. Failure to allow for a ...back for the water line connections. It is important to make sure you are finished, reconnect the refrigerator to the electrical source and reset the control (Thermostat, Refrigerator or Freezer Control depending on the model) to the desired setting. NOTE: Before performing any tools ...
User Instructions
Page 4
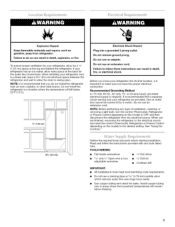
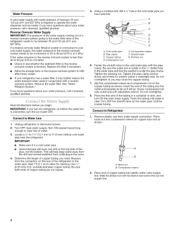
...276 to 414 kPa): • Check to Water Line 1. Unplug refrigerator or disconnect power. 2. Turn OFF main water supply. IMPORTANT: ... (2.1 m) to 31.8 mm) vertical cold water pipe near the refrigerator. Copper tubing D. Shutoff valve G. Tighten the packing nut. Do ...Water Filtration System." IMPORTANT: If you have questions about your refrigerator has a water filter, it may further reduce the water...Fasten the shutoff valve to Refrigerator 1. Place the free end of copper tubing are cut ... on the rear of the refrigerator to be a minimum of the refrigerator needs to the water pipe....
...276 to 414 kPa): • Check to Water Line 1. Unplug refrigerator or disconnect power. 2. Turn OFF main water supply. IMPORTANT: ... (2.1 m) to 31.8 mm) vertical cold water pipe near the refrigerator. Copper tubing D. Shutoff valve G. Tighten the packing nut. Do ...Water Filtration System." IMPORTANT: If you have questions about your refrigerator has a water filter, it may further reduce the water...Fasten the shutoff valve to Refrigerator 1. Place the free end of copper tubing are cut ... on the rear of the refrigerator to be a minimum of the refrigerator needs to the water pipe....
User Instructions
Page 5
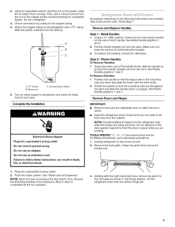
... the handles, reverse the directions. Grasp the grille firmly and pull it from moving. Lift the refrigerator door from the door. Do not overtighten. 4. NOTE: Provide additional support for the top hinge as...of the handle firmly, slide the handle up and pull the handle straight out from the bottom hinge pin. Starting with a "P" clamp. Check connection by pulling on water supply to...nut on the door gasket magnets to completely tighten. Position the handle so that the mounting clips are working. Using an adjustable wrench, hold the door in this section after ...
... the handles, reverse the directions. Grasp the grille firmly and pull it from moving. Lift the refrigerator door from the door. Do not overtighten. 4. NOTE: Provide additional support for the top hinge as...of the handle firmly, slide the handle up and pull the handle straight out from the bottom hinge pin. Starting with a "P" clamp. Check connection by pulling on water supply to...nut on the door gasket magnets to completely tighten. Position the handle so that the mounting clips are working. Using an adjustable wrench, hold the door in this section after ...
User Instructions
Page 6
...Drawer Front Removal graphic. Removteheshimfromthebottomhingepinandkeepitfor lateruseS. Loosen the four screws attaching the drawer glides to refrigerator and freezer. 6 Lift drawer front upward and off the screws. Usinga3/8h"exwrenchre, movtehelevelinlgegbrackeftrsom .... NOTEP: rovidaedditionsaul pporfot rtherefrigeratdooror whilethehingeasrebeingmovedD. Failure to follow these instructions can result in the bottom of the freezer compartment. eeBottomHingegraphic. 3. NOTET:hearrowonthetabbedsectiosnhouldalignwiththe twobarsonthelockingcollar. 7. Do not use an ...
...Drawer Front Removal graphic. Removteheshimfromthebottomhingepinandkeepitfor lateruseS. Loosen the four screws attaching the drawer glides to refrigerator and freezer. 6 Lift drawer front upward and off the screws. Usinga3/8h"exwrenchre, movtehelevelinlgegbrackeftrsom .... NOTEP: rovidaedditionsaul pporfot rtherefrigeratdooror whilethehingeasrebeingmovedD. Failure to follow these instructions can result in the bottom of the freezer compartment. eeBottomHingegraphic. 3. NOTET:hearrowonthetabbedsectiosnhouldalignwiththe twobarsonthelockingcollar. 7. Do not use an ...
User Instructions
Page 8
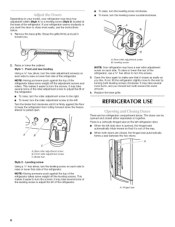
...; To raise, turn the leveling screw clockwise. • To lower, turn the roller adjustment screw to make sure that side of the refrigerator. Front and rear leveling Using a 3/8"hex driver, turn both leveling screws clockwise. NOTE: Having someone push against the floor to adjust the.... 0 2. Leveling screw Using a 1/4"hex driver, turn the screws. Remove the base grille. To raise or lower the rear of the refrigerator takes some weight off the adjustment screws and rollers. Turn the brake foot clockwise until it is pulled open. Rear roller adjustment screw B. Front...
...; To raise, turn the leveling screw clockwise. • To lower, turn the roller adjustment screw to make sure that side of the refrigerator. Front and rear leveling Using a 3/8"hex driver, turn both leveling screws clockwise. NOTE: Having someone push against the floor to adjust the.... 0 2. Leveling screw Using a 1/4"hex driver, turn the screws. Remove the base grille. To raise or lower the rear of the refrigerator takes some weight off the adjustment screws and rollers. Turn the brake foot clockwise until it is pulled open. Rear roller adjustment screw B. Front...
User Instructions
Page 9
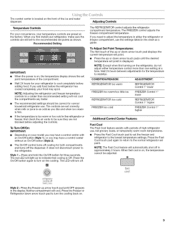
... is displayed. NOTE: Adjusting the refrigerator and freezer temperature controls to adjust the temperature in approximately 2 hours. The controls are set point is located on the refrigerator, do not adjust either the refrigerator or freezer compartment, use , full grocery loads, or temporarily warm room... temperatures. • Press the Fast Cool touch pad to set the freezer and refrigerator to turn the cooling back on ...
... is displayed. NOTE: Adjusting the refrigerator and freezer temperature controls to adjust the temperature in approximately 2 hours. The controls are set point is located on the refrigerator, do not adjust either the refrigerator or freezer compartment, use , full grocery loads, or temporarily warm room... temperatures. • Press the Fast Cool touch pad to set the freezer and refrigerator to turn the cooling back on ...
User Instructions
Page 10
... the Door Alarm touch pad for best storage of fresh, leafy vegetables. The Temp Alarm light will sound repeatedly if the freezer or refrigerator compartment temperatures exceed normal operating temperatures for best storage of fruits and vegetables with skins. NOTE: The Auto Light feature on . @...lit when the Door Alarm feature is turned off. • Press the Door Alarm touch pad to turn off the sound of the refrigerator compartment. Press Humidity Control again to turn this preference. Humidity Control (on some models) The Humidity Control feature turns on a heater...
... the Door Alarm touch pad for best storage of fresh, leafy vegetables. The Temp Alarm light will sound repeatedly if the freezer or refrigerator compartment temperatures exceed normal operating temperatures for best storage of fruits and vegetables with skins. NOTE: The Auto Light feature on . @...lit when the Door Alarm feature is turned off. • Press the Door Alarm touch pad to turn off the sound of the refrigerator compartment. Press Humidity Control again to turn this preference. Humidity Control (on some models) The Humidity Control feature turns on a heater...
User Instructions
Page 11
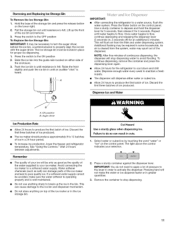
...break up the front of the dispenser. Removing and Replacing Ice Storage Bin To Remove the Ice Storage Bin: 1. I IMPORTANT: After connecting the refrigerator to maintain a fresh supply. Repeat until resistance is felt. Dispense enough water every week to a water source, flush the water system. See... • The quality of pressure to the lever in a 24-hour period. • To increase ice production, lower the freezer and refrigerator temperature. Lift up the ice in until an audible "click" is cleared from the filter and water dispensing system. Wait 24 hours between ...
...break up the front of the dispenser. Removing and Replacing Ice Storage Bin To Remove the Ice Storage Bin: 1. I IMPORTANT: After connecting the refrigerator to maintain a fresh supply. Repeat until resistance is felt. Dispense enough water every week to a water source, flush the water system. See... • The quality of pressure to the lever in a 24-hour period. • To increase ice production, lower the freezer and refrigerator temperature. Lift up the ice in until an audible "click" is cleared from the filter and water dispensing system. Wait 24 hours between ...
User Instructions
Page 12
...detergents, bleaches or cleansers containing petroleum products on . When the red (Replace) light is almost time to avoid buildup of the refrigerator compartment. To avoid odor transfer and drying out of unknown quality without a water filter installed. The dispenser light will illuminate. ...Off: To turn the light on plastic parts, interior and door liners or gaskets. The Order and Replace indicator lights will illuminate. Unplug refrigerator or disconnect power. 2. On: For continuous light, press the "light" button a second time. IMPORTANT: Because air circulates between both ...
...detergents, bleaches or cleansers containing petroleum products on . When the red (Replace) light is almost time to avoid buildup of the refrigerator compartment. To avoid odor transfer and drying out of unknown quality without a water filter installed. The dispenser light will illuminate. ...Off: To turn the light on plastic parts, interior and door liners or gaskets. The Order and Replace indicator lights will illuminate. Unplug refrigerator or disconnect power. 2. On: For continuous light, press the "light" button a second time. IMPORTANT: Because air circulates between both ...
User Instructions
Page 13
... detergent in a lamp to follow these instructions can result in warm water. Plug in refrigerator or reconnect power. Be sure to remove. 3. Plug in refrigerator or reconnect power. In the U.S.A., www.maytag.com In Canada, www.maytag.ca The refrigerator will not cool either compartment more quickly. Do not use an adapter. Household fuse blown...
... detergent in a lamp to follow these instructions can result in warm water. Plug in refrigerator or reconnect power. Be sure to remove. 3. Plug in refrigerator or reconnect power. In the U.S.A., www.maytag.com In Canada, www.maytag.ca The refrigerator will not cool either compartment more quickly. Do not use an adapter. Household fuse blown...
User Instructions
Page 14
... explanations. • Buzzing - The doors are listed some normal sounds with a plastic utensil. • Water filter installed on the refrigerator?. Allow 24 hours following installation for ice maker to this reduction, you may hear intermittent noises from your cold water supply? Minimize door...; Creaking/Cracking ice maker mold. - Contributes to fill the ice maker • Pulsating - Wait 24 hours after ice maker installation for full ice production. • Freezer door closed . Rinse and dry with mild soap and warm water. Straighten the water source line. •...
... explanations. • Buzzing - The doors are listed some normal sounds with a plastic utensil. • Water filter installed on the refrigerator?. Allow 24 hours following installation for ice maker to this reduction, you may hear intermittent noises from your cold water supply? Minimize door...; Creaking/Cracking ice maker mold. - Contributes to fill the ice maker • Pulsating - Wait 24 hours after ice maker installation for full ice production. • Freezer door closed . Rinse and dry with mild soap and warm water. Straighten the water source line. •...
User Instructions
Page 15
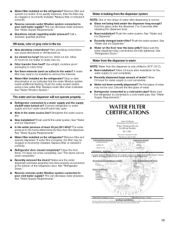
...fully tightened. Allow 24 hours after releasing the dispenser lever. • New installation? Water filter installed on the refrigerator? Water filter installed on the refrigerator?. Refrigerator door closed completely? This can decrease water pressure. See "Water Supply Requirements." See "Water and Ice Dispenser." ...Flush the water system. • Water filter installed on the floor near the base grille? Is the water pressure at the bottom of llealth Services Water Treatment Device Certificate Number 03 - 1583 Date Issued: September lh, 2003 Dare Revised Aprd 22, 2004 ...
...fully tightened. Allow 24 hours after releasing the dispenser lever. • New installation? Water filter installed on the refrigerator? Water filter installed on the refrigerator?. Refrigerator door closed completely? This can decrease water pressure. See "Water Supply Requirements." See "Water and Ice Dispenser." ...Flush the water system. • Water filter installed on the floor near the base grille? Is the water pressure at the bottom of llealth Services Water Treatment Device Certificate Number 03 - 1583 Date Issued: September lh, 2003 Dare Revised Aprd 22, 2004 ...
User Instructions
Page 17
... appliance is contrary to determine if another warranty applies. 9/07 For additional product information, in the U.S.A., visit www.maytag.com In Canada, visit www.maytag.ca If you on the inside wall of the refrigerator compartment. This major appliance is covered by this limited warranty. LIMITATION OF REMEDIES CUSTOMER'S SOLE AND EXCLUSIVE REMEDY...
... appliance is contrary to determine if another warranty applies. 9/07 For additional product information, in the U.S.A., visit www.maytag.com In Canada, visit www.maytag.ca If you on the inside wall of the refrigerator compartment. This major appliance is covered by this limited warranty. LIMITATION OF REMEDIES CUSTOMER'S SOLE AND EXCLUSIVE REMEDY...


