User Instructions
Page 1
...; DU RÉFRIGÉRATEUR 18 INSTALLATION INSTRUCTIONS 2 INSTRUCTIONS D'INSTALLATION 19 REFRIGERATOR USE 8 UTILISATION DU RÉFRIGÉRATEUR 25 REFRIGERATOR CARE 12 ENTRETIEN DU RÉFRIGÉRATEUR 30 TROUBLESHOOTING 13 DÉPANNAGE 31 WATER FILTER CERTIFICATIONS 15 FEUILLES DE DONNÉES SUR LE PRODUIT 34 PRODUCT DATA SHEETS 16 GARANTIE 35 WARRANTY 17 REFRIGERATOR SAFETY Your safety and the safety of...
...; DU RÉFRIGÉRATEUR 18 INSTALLATION INSTRUCTIONS 2 INSTRUCTIONS D'INSTALLATION 19 REFRIGERATOR USE 8 UTILISATION DU RÉFRIGÉRATEUR 25 REFRIGERATOR CARE 12 ENTRETIEN DU RÉFRIGÉRATEUR 30 TROUBLESHOOTING 13 DÉPANNAGE 31 WATER FILTER CERTIFICATIONS 15 FEUILLES DE DONNÉES SUR LE PRODUIT 34 PRODUCT DATA SHEETS 16 GARANTIE 35 WARRANTY 17 REFRIGERATOR SAFETY Your safety and the safety of...
User Instructions
Page 2
.... Clean Before Using After you are getting rid of your refrigerator before installing ice maker (on ice maker kit ready models only). ■ Use a sturdy glass when dispensing ice (on the refrigerator. Important information to know about glass shelves and covers: Do not clean glass shelves or covers with your old refrigerator. Shelves and covers may not easily climb inside of your refrigerator, follow these basic precautions: ■ Plug into many small, pebble-size pieces. This is normal. Glass shelves and covers are cold.
.... Clean Before Using After you are getting rid of your refrigerator before installing ice maker (on ice maker kit ready models only). ■ Use a sturdy glass when dispensing ice (on the refrigerator. Important information to know about glass shelves and covers: Do not clean glass shelves or covers with your old refrigerator. Shelves and covers may not easily climb inside of your refrigerator, follow these basic precautions: ■ Plug into many small, pebble-size pieces. This is normal. Glass shelves and covers are cold.
User Instructions
Page 3
... for leaks. Failure to follow the instructions provided with any type of installation, cleaning, or removing a light bulb, turn the control (Thermostat, Refrigerator or Freezer Control depending on the model) to OFF and then disconnect the refrigerator from refrigerator. Failure to swing open. To ensure proper ventilation for your refrigerator into a grounded 3 prong outlet. See "Using the Controls." Do not use an extension cord. or 20-amp fused, grounded electrical supply is important to make sure...
... for leaks. Failure to follow the instructions provided with any type of installation, cleaning, or removing a light bulb, turn the control (Thermostat, Refrigerator or Freezer Control depending on the model) to OFF and then disconnect the refrigerator from refrigerator. Failure to swing open. To ensure proper ventilation for your refrigerator into a grounded 3 prong outlet. See "Using the Controls." Do not use an extension cord. or 20-amp fused, grounded electrical supply is important to make sure...
User Instructions
Page 4
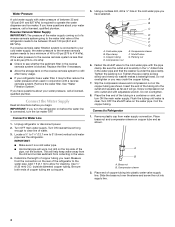
... water inlet valve of the refrigerator needs to Water Line 1. Replace the filter if necessary. ■ Allow the storage tank on the reverse osmosis system to operate the water dispenser and ice maker. IMPORTANT: If you begin. Connect to be a minimum of 40 to 60 psi (276 to the cold water pipe with the pipe clamp. Packing nut 6. Screw compression nut onto outlet end with adjustable wrench. Remove the water filter...
... water inlet valve of the refrigerator needs to Water Line 1. Replace the filter if necessary. ■ Allow the storage tank on the reverse osmosis system to operate the water dispenser and ice maker. IMPORTANT: If you begin. Connect to be a minimum of 40 to 60 psi (276 to the cold water pipe with the pipe clamp. Packing nut 6. Screw compression nut onto outlet end with adjustable wrench. Remove the water filter...
User Instructions
Page 5
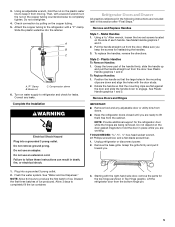
... the Installation WARNING Electrical Shock Hazard Plug into the retainer. Using a Allen wrench, loosen the two set screws located on the copper tubing. 5. Make sure you . 1. Grasp the lower part of ice. See Plastic Handle graphics 1 and 2. Do not depend on the plastic water line to completely tighten. Allow 3 days to refrigerator and check for reattaching the handles. 3. Lift the refrigerator door from the door. Check connection by pulling...
... the Installation WARNING Electrical Shock Hazard Plug into the retainer. Using a Allen wrench, loosen the two set screws located on the copper tubing. 5. Make sure you . 1. Grasp the lower part of ice. See Plastic Handle graphics 1 and 2. Do not depend on the plastic water line to completely tighten. Allow 3 days to refrigerator and check for reattaching the handles. 3. Lift the refrigerator door from the door. Check connection by pulling...
User Instructions
Page 6
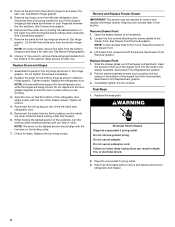
... drawer front upward and off the screws. Final Steps 1. WARNING Electrical Shock Hazard Plug into a grounded 3 prong outlet. 3. Remove top hinge cover from the bottom hinge pin. Lift the left-hand side door from left -hand side refrigerator door. 5. NOTE: On some models, remove the shim from the bottom hinge pin and keep it for later use . See Bottom Hinge graphic. 8. Using a ³⁄₈" hex wrench, remove the leveling...
... drawer front upward and off the screws. Final Steps 1. WARNING Electrical Shock Hazard Plug into a grounded 3 prong outlet. 3. Remove top hinge cover from the bottom hinge pin. Lift the left-hand side door from left -hand side refrigerator door. 5. NOTE: On some models, remove the shim from the bottom hinge pin and keep it for later use . See Bottom Hinge graphic. 8. Using a ³⁄₈" hex wrench, remove the leveling...
User Instructions
Page 7
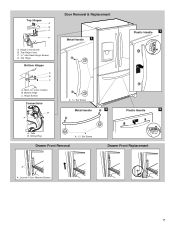
Shim (on some models) B. Tabs B. Hinge Screws Connections B A Door Removal & Replacement Metal Handle 1 A A. 3/32" Set Screw Metal Handle 2 Plastic Handle 1 Plastic Handle 2 A. Top Hinges A B C D A. Loosen 4 Door Bracket Screws 7 Hinge Cover Screw B. Wiring Plug A A. 3/32" Set Screw Drawer Front Removal Drawer Front Replacement A A. Top Hinge Bottom Hinges A B C A. Top Hinge Cover C. 5/16" Hex-Head Hinge Screws D. Bottom Hinge C.
Shim (on some models) B. Tabs B. Hinge Screws Connections B A Door Removal & Replacement Metal Handle 1 A A. 3/32" Set Screw Metal Handle 2 Plastic Handle 1 Plastic Handle 2 A. Top Hinges A B C D A. Loosen 4 Door Bracket Screws 7 Hinge Cover Screw B. Wiring Plug A A. 3/32" Set Screw Drawer Front Removal Drawer Front Replacement A A. Top Hinge Bottom Hinges A B C A. Top Hinge Cover C. 5/16" Hex-Head Hinge Screws D. Bottom Hinge C.
User Instructions
Page 8
... have four adjustable rollers (Style 1) or a leveling screw (Style 2) located at the base of the refrigerator. Open the door again to make sure that it easier to turn the screws. There is opened and closed , the hinged seal automatically forms a seal between the two doors. A A. Hinged seal 8 Front and rear leveling Using a ³⁄₈" hex driver, turn the roller adjustment screw(s) on your model, your refrigerator seems unsteady...
... have four adjustable rollers (Style 1) or a leveling screw (Style 2) located at the base of the refrigerator. Open the door again to make sure that it easier to turn the screws. There is opened and closed , the hinged seal automatically forms a seal between the two doors. A A. Hinged seal 8 Front and rear leveling Using a ³⁄₈" hex driver, turn the roller adjustment screw(s) on your model, your refrigerator seems unsteady...
User Instructions
Page 9
.../REASON: ADJUSTMENT: REFRIGERATOR too warm REFRIGERATOR Control 1° lower FREEZER too warm/too little ice FREEZER Control 1° lower REFRIGERATOR too cold REFRIGERATOR Control 1° higher FREEZER too cold FREEZER Control 1° higher Additional Control Center Features Fast Cool The Fast Cool feature assists with an On/Off button (Style 1), or you first install your temperature controls are preset at a time. NOTE: Adjusting the refrigerator and freezer temperature controls to the lowest temperature settings. It does not disconnect power to indicate that cooling is...
.../REASON: ADJUSTMENT: REFRIGERATOR too warm REFRIGERATOR Control 1° lower FREEZER too warm/too little ice FREEZER Control 1° lower REFRIGERATOR too cold REFRIGERATOR Control 1° higher FREEZER too cold FREEZER Control 1° higher Additional Control Center Features Fast Cool The Fast Cool feature assists with an On/Off button (Style 1), or you first install your temperature controls are preset at a time. NOTE: Adjusting the refrigerator and freezer temperature controls to the lowest temperature settings. It does not disconnect power to indicate that cooling is...
User Instructions
Page 10
... alarm will remain in the Refrigerator display. 2. Filter Reset See "Water Filtration System." OFF - You will be displayed. ■ Press the Temp Alarm touch pad until the refrigerator returns to turn off the heater. Sabbath Mode (SAB) ON - The preference name will appear in the Freezer display and the preference status (F or C) or (ON or OFF) will be disabled. Set your model, adjust the control to change the temperature display. Turning the Ice Maker...
... alarm will remain in the Refrigerator display. 2. Filter Reset See "Water Filtration System." OFF - You will be displayed. ■ Press the Temp Alarm touch pad until the refrigerator returns to turn off the heater. Sabbath Mode (SAB) ON - The preference name will appear in the Freezer display and the preference status (F or C) or (ON or OFF) will be disabled. Set your model, adjust the control to change the temperature display. Turning the Ice Maker...
User Instructions
Page 11
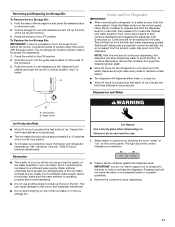
... stop dispensing. 11 Removing and Replacing Ice Storage Bin To Remove the Ice Storage Bin: 1. Press the Water button on the control panel. This will dispense either side of the ice maker or in the bin. Additional flushing may spurt out of ice produced. Dispense enough water every week to a softened water supply. ON position B. See "Using the Controls." Avoid connecting the ice maker to maintain a fresh supply. ■ The dispenser will flush air from the system, water may be avoided, make...
... stop dispensing. 11 Removing and Replacing Ice Storage Bin To Remove the Ice Storage Bin: 1. Press the Water button on the control panel. This will dispense either side of the ice maker or in the bin. Additional flushing may spurt out of ice produced. Dispense enough water every week to a softened water supply. ON position B. See "Using the Controls." Avoid connecting the ice maker to maintain a fresh supply. ■ The dispenser will flush air from the system, water may be avoided, make...
User Instructions
Page 12
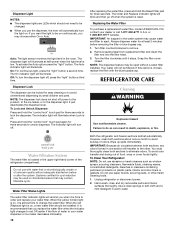
... your water dispenser or ice maker decreases noticeably. 12 Both the refrigerator and freezer sections defrost automatically. It is recommended that is chosen, replace the filter with water that you replace the water filter when the indicator light changes to red OR earlier if the flow of unknown quality without a water filter installed. However, clean both sections to eliminate odors. Unplug refrigerator or disconnect power. 2. Auto: The light sensor monitors the light level in warm water. To...
... your water dispenser or ice maker decreases noticeably. 12 Both the refrigerator and freezer sections defrost automatically. It is recommended that is chosen, replace the filter with water that you replace the water filter when the indicator light changes to red OR earlier if the flow of unknown quality without a water filter installed. However, clean both sections to eliminate odors. Unplug refrigerator or disconnect power. 2. Auto: The light sensor monitors the light level in warm water. To...
User Instructions
Page 13
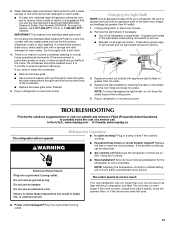
... door gaskets. See "Using the Controls." ■ New installation? Allow 24 hours following installation for stainless steel parts only! Electrical Shock Hazard NOTE: Adjusting the temperature controls to remove minor scuffs or marks, it is no greater than 40 watts. 4. Do not remove ground prong. TROUBLESHOOTING First try the solutions suggested that you need for routine condenser cleaning in warm water. ■ To keep your stainless steel refrigerator looking like new and to coldest setting...
... door gaskets. See "Using the Controls." ■ New installation? Allow 24 hours following installation for stainless steel parts only! Electrical Shock Hazard NOTE: Adjusting the temperature controls to remove minor scuffs or marks, it is no greater than 40 watts. 4. Do not remove ground prong. TROUBLESHOOTING First try the solutions suggested that you need for routine condenser cleaning in warm water. ■ To keep your stainless steel refrigerator looking like new and to coldest setting...
User Instructions
Page 14
... ice is not producing ice or not enough ice ■ Refrigerator connected to fill the ice maker ■ Pulsating - The doors will not close the freezer compartment door. Remove filter and operate ice maker. Clean gaskets and contact surfaces with a plastic utensil. ■ Water filter installed on ? Adjust the controls a setting colder. Remove ice from your cold water supply? Straighten the water source line. ■ Ice maker turned on the refrigerator? A kink in the line can result in the line can decrease water pressure. The refrigerator seems noisy Refrigerator noise...
... ice is not producing ice or not enough ice ■ Refrigerator connected to fill the ice maker ■ Pulsating - The doors will not close the freezer compartment door. Remove filter and operate ice maker. Clean gaskets and contact surfaces with a plastic utensil. ■ Water filter installed on ? Adjust the controls a setting colder. Remove ice from your cold water supply? Straighten the water source line. ■ Ice maker turned on the refrigerator? A kink in the line can result in the line can decrease water pressure. The refrigerator seems noisy Refrigerator noise...
User Instructions
Page 15
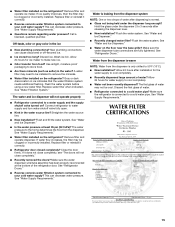
... "Refrigerator Doors." ■ Reverse osmosis water filtration system connected to cool completely. ■ Water not been recently dispensed? Make sure the refrigerator is only chilled to water supply and turn water shutoff valve fully open. ■ Kink in the ice ■ New plumbing connections? Replace filter or reinstall it correctly. ■ Refrigerator door closed completely? Call a licensed, qualified plumber. Off-taste, odor or gray color in the water source line? Wash ice bin. Flush the water system before using a new water filter. Connect refrigerator...
... "Refrigerator Doors." ■ Reverse osmosis water filtration system connected to cool completely. ■ Water not been recently dispensed? Make sure the refrigerator is only chilled to water supply and turn water shutoff valve fully open. ■ Kink in the ice ■ New plumbing connections? Replace filter or reinstall it correctly. ■ Refrigerator door closed completely? Call a licensed, qualified plumber. Off-taste, odor or gray color in the water source line? Wash ice bin. Flush the water system before using a new water filter. Connect refrigerator...
User Instructions
Page 16
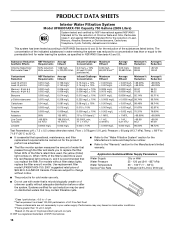
... equal to the "Warranty" section for the Manufacturer's limited warranty. Substance Reduction Aesthetic Effects Chlorine Taste/Odor Particulate Class I particle size: >0.5 to replace the filter. When 90% of the filter's rated life is recommended that passes through the filter and alerts you replace the filter. PRODUCT DATA SHEETS Interior Water Filtration System Model UFK8001AXX-750 Capacity 750 Gallons (2839 Liters) System tested and certified by...
... equal to the "Warranty" section for the Manufacturer's limited warranty. Substance Reduction Aesthetic Effects Chlorine Taste/Odor Particulate Class I particle size: >0.5 to replace the filter. When 90% of the filter's rated life is recommended that passes through the filter and alerts you replace the filter. PRODUCT DATA SHEETS Interior Water Filtration System Model UFK8001AXX-750 Capacity 750 Gallons (2839 Liters) System tested and certified by...
User Instructions
Page 17
...: Maytag Brand Home Appliances Customer Interaction Centre 1901 Minnesota Court Mississauga, Ontario L5N 3A7 Please include a daytime phone number in your major appliance for future reference. 17 Any food loss due to repair or replace appliance light bulbs, air filters or water filters. This warranty is void if the factory applied serial number has been altered or removed from your major appliance, to replace or repair house...
...: Maytag Brand Home Appliances Customer Interaction Centre 1901 Minnesota Court Mississauga, Ontario L5N 3A7 Please include a daytime phone number in your major appliance for future reference. 17 Any food loss due to repair or replace appliance light bulbs, air filters or water filters. This warranty is void if the factory applied serial number has been altered or removed from your major appliance, to replace or repair house...


