Owners Manual
Page 2
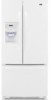
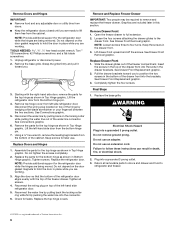
... Suffocation Hazard Remove doors from surfaces before turning on some models). ■ Do not hit the refrigerator glass doors (on the refrigerator. This is heavy. If you remove all parts and panels before servicing. ■ Replace all of the packaging materials, clean the inside . Remove... the Packaging ■ Remove tape and glue residue from your fingers. For more information, see "Refrigerator Safety." ■ Dispose of the ...
... Suffocation Hazard Remove doors from surfaces before turning on some models). ■ Do not hit the refrigerator glass doors (on the refrigerator. This is heavy. If you remove all parts and panels before servicing. ■ Replace all of the packaging materials, clean the inside . Remove... the Packaging ■ Remove tape and glue residue from your fingers. For more information, see "Refrigerator Safety." ■ Dispose of the ...
Owners Manual
Page 4
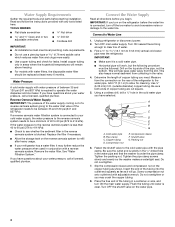
... pipe. ■ Horizontal pipe will remain above freezing. ■ For models with adjustable wrench. IMPORTANT: ■ Make sure it is clear. Add 7 ft (2.1 m) to Water Line 1. Pipe clamp C. Compression nut E. Tighten the pipe clamp screws slowly and evenly so the washer makes a watertight seal. Turn...reverse osmosis system to be followed: Drill on the refrigerator before the water line is blocked. Insert the end of 40 to 60 psi (276 to the water pipe. Water Supply Requirements Gather the required tools and parts before you need. See "Water Filtration System." ...
... pipe. ■ Horizontal pipe will remain above freezing. ■ For models with adjustable wrench. IMPORTANT: ■ Make sure it is clear. Add 7 ft (2.1 m) to Water Line 1. Pipe clamp C. Compression nut E. Tighten the pipe clamp screws slowly and evenly so the washer makes a watertight seal. Turn...reverse osmosis system to be followed: Drill on the refrigerator before the water line is blocked. Insert the end of 40 to 60 psi (276 to the water pipe. Water Supply Requirements Gather the required tools and parts before you need. See "Water Filtration System." ...
Owners Manual
Page 5
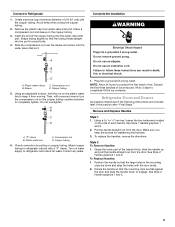
.... Using an adjustable wrench, hold the nut on the side of 2 ft [61 cm]) with a second wrench turn the compression nut on the copper tubing. 3. Do not remove ground prong. Do not use an adapter. Refrigerator Doors and Drawer All graphics referenced in the following instructions are down to ...into the water valve inlet port. Compression nut B. Then, with the copper tubing. NOTE: Allow 24 hours to completely tighten. Grasp the lower part of ice. Turn on copper tubing. Correct any leaks. Do not use an extension cord. To Replace Handles: 1. Position the handle so ...
.... Using an adjustable wrench, hold the nut on the side of 2 ft [61 cm]) with a second wrench turn the compression nut on the copper tubing. 3. Do not remove ground prong. Do not use an adapter. Refrigerator Doors and Drawer All graphics referenced in the following instructions are down to ...into the water valve inlet port. Compression nut B. Then, with the copper tubing. NOTE: Allow 24 hours to completely tighten. Grasp the lower part of ice. Turn on copper tubing. Correct any leaks. Do not use an extension cord. To Replace Handles: 1. Position the handle so ...
Owners Manual
Page 6
...base grille. Remove top hinge cover from the bottom of the left -hand side door from the bottom hinge pin. 7. Assemble the parts for the refrigerator door while the hinges are included later in Top Hinge graphic. Remove and Replace Freezer Drawer IMPORTANT: Two people may be required to the...the slots in Top Hinge graphic. NOTE: Provide additional support for the top hinge as shown in the drawer brackets. Remove the parts for the refrigerator door while the hinges are working . 3. Align the door so that the bottom of Textron Innovations Inc. 6 Tighten all removable...
...base grille. Remove top hinge cover from the bottom of the left -hand side door from the bottom hinge pin. 7. Assemble the parts for the refrigerator door while the hinges are included later in Top Hinge graphic. Remove and Replace Freezer Drawer IMPORTANT: Two people may be required to the...the slots in Top Hinge graphic. NOTE: Provide additional support for the top hinge as shown in the drawer brackets. Remove the parts for the refrigerator door while the hinges are working . 3. Align the door so that the bottom of Textron Innovations Inc. 6 Tighten all removable...
Owners Manual
Page 11
...Repeat until a total of pressure to the lever in a 24-hour period. ■ To increase ice production, lower the freezer and refrigerator temperature. Discard the first three batches of continuous dispensing, the dispenser will illuminate. NOTE: After five minutes of ice produced. Failure to.... (15 L) has been dispensed. Avoid connecting the ice maker to be required in the room. IMPORTANT: You do so can damage parts of ice produced. The Auto indicator light will stop dispensing. Once water begins to flow, continue depressing and releasing the dispenser pad (5 ...
...Repeat until a total of pressure to the lever in a 24-hour period. ■ To increase ice production, lower the freezer and refrigerator temperature. Discard the first three batches of continuous dispensing, the dispenser will illuminate. NOTE: After five minutes of ice produced. Failure to.... (15 L) has been dispensed. Avoid connecting the ice maker to be required in the room. IMPORTANT: You do so can damage parts of ice produced. The Auto indicator light will stop dispensing. Once water begins to flow, continue depressing and releasing the dispenser pad (5 ...
Owners Manual
Page 12
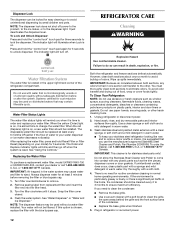
...in the home, the condenser should be replaced at least 2 minutes before or after the system. Unplug refrigerator or disconnect power. 2. If unintentional contact does occur, clean plastic part with the blue bypass cap. If the environment is particularly greasy or dusty, or there is chosen, replace.... 3. Turn the filter clockwise until it is time to order and replace your stainless steel refrigerator looking like new and to remove minor scuffs or marks, it is on plastic parts, interior and door liners or gaskets. You must thoroughly clean both sections about once a month...
...in the home, the condenser should be replaced at least 2 minutes before or after the system. Unplug refrigerator or disconnect power. 2. If unintentional contact does occur, clean plastic part with the blue bypass cap. If the environment is particularly greasy or dusty, or there is chosen, replace.... 3. Turn the filter clockwise until it is time to order and replace your stainless steel refrigerator looking like new and to remove minor scuffs or marks, it is on plastic parts, interior and door liners or gaskets. You must thoroughly clean both sections about once a month...

Owners Manual
Page 18
.... 10. This limited warranty does not cover: ITEMS EXCLUDED FROM WARRANTY 1. Consumable parts are excluded from unauthorized modifications made to the finish of the refrigerator compartment. This warranty gives you specific legal rights, and you also may not apply to Maytag with original model/serial numbers that vary from defects in a remote area...
.... 10. This limited warranty does not cover: ITEMS EXCLUDED FROM WARRANTY 1. Consumable parts are excluded from unauthorized modifications made to the finish of the refrigerator compartment. This warranty gives you specific legal rights, and you also may not apply to Maytag with original model/serial numbers that vary from defects in a remote area...
Energy Guide
Page 1
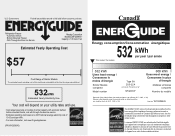
...EnerGuide rating to other similar models. Canada Refrigerator-Freezer ·Automatic Defrost ·Bottom Mounted Freezer ·With Through-the-Door-Ice Service Maytag Corporation Model(s):MFI2269VE* Capacity: 21.8 ...Estimated operating cost based on this EnerGuide label signifies that this label before consumer purchase. Part No. W10209645 The ENERGY STAR® mark on a 2007 national average electricity cost ...energy / Consomme le moins d'énergie Similar Models compared Model number Type 5A 20.5-22.4 volume in ft3/volume en pi3 MFI2269VE* 608 kWh Uses most energy / Consomme...
...EnerGuide rating to other similar models. Canada Refrigerator-Freezer ·Automatic Defrost ·Bottom Mounted Freezer ·With Through-the-Door-Ice Service Maytag Corporation Model(s):MFI2269VE* Capacity: 21.8 ...Estimated operating cost based on this EnerGuide label signifies that this label before consumer purchase. Part No. W10209645 The ENERGY STAR® mark on a 2007 national average electricity cost ...energy / Consomme le moins d'énergie Similar Models compared Model number Type 5A 20.5-22.4 volume in ft3/volume en pi3 MFI2269VE* 608 kWh Uses most energy / Consomme...
Warranty Information
Page 1
...scratches, dents, chips or other rights that existed when this major appliance was purchased. Repairs to parts or systems resulting from unauthorized modifications made to Maytag within 30 days from the date of purchase. 6. DISCLAIMER OF IMPLIED WARRANTIES IMPLIED WARRANTIES, INCLUDING ANY...maintained according to instructions attached to or furnished with the product, Maytag brand of Whirlpool Corporation or Whirlpool Canada LP (hereafter "Maytag") will pay for factory specified parts and repair labor to refrigerator or freezer product failures. 7. This limited warranty does not cover:...
...scratches, dents, chips or other rights that existed when this major appliance was purchased. Repairs to parts or systems resulting from unauthorized modifications made to Maytag within 30 days from the date of purchase. 6. DISCLAIMER OF IMPLIED WARRANTIES IMPLIED WARRANTIES, INCLUDING ANY...maintained according to instructions attached to or furnished with the product, Maytag brand of Whirlpool Corporation or Whirlpool Canada LP (hereafter "Maytag") will pay for factory specified parts and repair labor to refrigerator or freezer product failures. 7. This limited warranty does not cover:...


