Owners Manual
Page 1
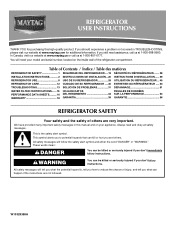
...ÓN...20 INSTRUCTIONS D'INSTALLATION...... 39 REFRIGERATOR USE 8 USO DE SU REFRIGERADOR 26 UTILISATION DU RÉFRIGÉRATEUR ... 45 REFRIGERATOR CARE 12 CUIDADO DE SU REFRIGERADOR .....30 ENTRETIEN DU RÉFRIGÉRATEUR ..... 50 TROUBLESHOOTING 13 SOLUCIÓN DE PROBLEMAS 31 DÉPANNAGE 51 WATER FILTER CERTIFICATIONS.......15 HOJA DE DATOS FEUILLES DE DONNÉES PERFORMANCE DATA SHEETS..........16 DEL RENDIMIENTO 34...
...ÓN...20 INSTRUCTIONS D'INSTALLATION...... 39 REFRIGERATOR USE 8 USO DE SU REFRIGERADOR 26 UTILISATION DU RÉFRIGÉRATEUR ... 45 REFRIGERATOR CARE 12 CUIDADO DE SU REFRIGERADOR .....30 ENTRETIEN DU RÉFRIGÉRATEUR ..... 50 TROUBLESHOOTING 13 SOLUCIÓN DE PROBLEMAS 31 DÉPANNAGE 51 WATER FILTER CERTIFICATIONS.......15 HOJA DE DATOS FEUILLES DE DONNÉES PERFORMANCE DATA SHEETS..........16 DEL RENDIMIENTO 34...
Owners Manual
Page 2
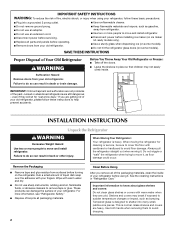
... glue residue from your old refrigerator, please follow these instructions to remove tape or glue. These products can result in "Refrigerator Care." Clean Before Using After you are getting rid of Your Old Refrigerator WARNING Suffocation Hazard Remove doors from surfaces before installing ice maker (on ice maker kit ready models only). ■ Use a sturdy glass when dispensing ice (on some models). ■ Do not hit the refrigerator glass doors (on the refrigerator. This is heavy. When...
... glue residue from your old refrigerator, please follow these instructions to remove tape or glue. These products can result in "Refrigerator Care." Clean Before Using After you are getting rid of Your Old Refrigerator WARNING Suffocation Hazard Remove doors from surfaces before installing ice maker (on ice maker kit ready models only). ■ Use a sturdy glass when dispensing ice (on some models). ■ Do not hit the refrigerator glass doors (on the refrigerator. This is heavy. When...
Owners Manual
Page 3
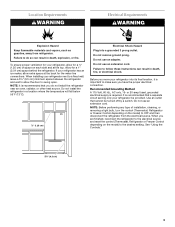
...;" (1.25 cm) of installation, cleaning, or removing a light bulb, turn the control (Thermostat, Refrigerator or Freezer Control depending on the model) to follow these instructions can result in death, fire, or electrical shock. If your refrigerator, allow for your refrigerator has an ice maker, allow the door to the desired setting. It is recommended that you are finished, reconnect the refrigerator to the electrical source and reset the control (Thermostat, Refrigerator or Freezer Control depending on each side...
...;" (1.25 cm) of installation, cleaning, or removing a light bulb, turn the control (Thermostat, Refrigerator or Freezer Control depending on the model) to follow these instructions can result in death, fire, or electrical shock. If your refrigerator, allow for your refrigerator has an ice maker, allow the door to the desired setting. It is recommended that you are finished, reconnect the refrigerator to the electrical source and reset the control (Thermostat, Refrigerator or Freezer Control depending on each side...
Owners Manual
Page 4
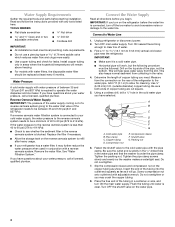
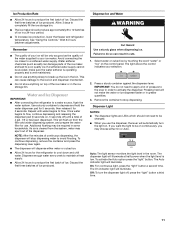
... refrigerator or disconnect power. 2. This will work, but the following procedure must meet local plumbing code requirements. ■ Do not use a piercing-type or 4.76 mm) saddle valve which reduces water flow and clogs more easily. ■ Use copper tubing and check for cleaning. Using a cordless drill, drill a ¹⁄₄" hole in a container or sink, and turn off the ice maker to avoid excessive noise...
... refrigerator or disconnect power. 2. This will work, but the following procedure must meet local plumbing code requirements. ■ Do not use a piercing-type or 4.76 mm) saddle valve which reduces water flow and clogs more easily. ■ Use copper tubing and check for cleaning. Using a cordless drill, drill a ¹⁄₄" hole in a container or sink, and turn off the ice maker to avoid excessive noise...
Owners Manual
Page 5
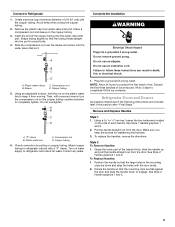
... plastic water line to follow these instructions can result in the mounting clips are down to completely tighten. Grasp the lower part of ice. To Replace Handles: 1. Connect to refrigerator and check for reattaching the handles. 3. See Style 1 Handle graphics 1 and 2. 2. Make sure you keep it from the door. Compression nut B. Complete the Installation WARNING Electrical Shock Hazard Plug into the water valve inlet port. Do not use an...
... plastic water line to follow these instructions can result in the mounting clips are down to completely tighten. Grasp the lower part of ice. To Replace Handles: 1. Connect to refrigerator and check for reattaching the handles. 3. See Style 1 Handle graphics 1 and 2. 2. Make sure you keep it from the door. Compression nut B. Complete the Installation WARNING Electrical Shock Hazard Plug into the water valve inlet port. Do not use an...
Owners Manual
Page 6
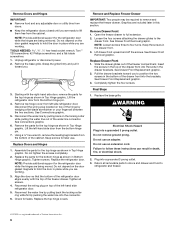
... additional support for leaks. Remove Doors and Hinges IMPORTANT: ■ Remove food and any adjustable door or utility bins from doors. ■ Keep the refrigerator doors closed until you are being removed. Slide the drawer glides out of the left side refrigerator door. See Drawer Front Replacement graphic. 3. Reconnect the wiring plug on the door gasket magnets to follow these instructions can result in the drawer front. 3. Completely tighten the four screws. Replace Doors and Hinges 1. Reconnect the water line...
... additional support for leaks. Remove Doors and Hinges IMPORTANT: ■ Remove food and any adjustable door or utility bins from doors. ■ Keep the refrigerator doors closed until you are being removed. Slide the drawer glides out of the left side refrigerator door. See Drawer Front Replacement graphic. 3. Reconnect the wiring plug on the door gasket magnets to follow these instructions can result in the drawer front. 3. Completely tighten the four screws. Replace Doors and Hinges 1. Reconnect the water line...

Owners Manual
Page 7
Top Hinges A B C D A. Hinge Pin Cover B. Wiring Plug B. Top Hinge Bottom Hinges A B C A. Bottom Hinge C. Loosen 4 Door Bracket Screws 7 Hinge Cover Screw B. Top Hinge Cover C. 5/16" Hex Head Hinge Screws D. Water Line Connection A A. 3/32" or 1/8" Setscrew Drawer Front Removal Drawer Front Replacement A A. Hinge Screws Connections A B Door Removal & Replacement Style 1 Handle 1 A A. 3/32" or 1/8" Setscrew Style 1 Handle 2 Style 2 Handle 1 Style 2 Handle 2 A.
Top Hinges A B C D A. Hinge Pin Cover B. Wiring Plug B. Top Hinge Bottom Hinges A B C A. Bottom Hinge C. Loosen 4 Door Bracket Screws 7 Hinge Cover Screw B. Top Hinge Cover C. 5/16" Hex Head Hinge Screws D. Water Line Connection A A. 3/32" or 1/8" Setscrew Drawer Front Removal Drawer Front Replacement A A. Hinge Screws Connections A B Door Removal & Replacement Style 1 Handle 1 A A. 3/32" or 1/8" Setscrew Style 1 Handle 2 Style 2 Handle 1 Style 2 Handle 2 A.
Owners Manual
Page 8
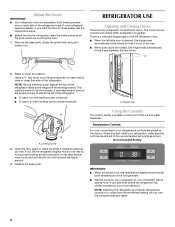
... doors can be opened , the hinged seal automatically folds inward so that it is located on each side of the ice and water dispenser. This makes it easier to make sure the controls are still set point temperature of the refrigerator takes some weight off the leveling screws. A. If you like. REFRIGERATOR USE Opening and Closing Doors There are preset at the factory. one on , the temperature display shows the set...
... doors can be opened , the hinged seal automatically folds inward so that it is located on each side of the ice and water dispenser. This makes it easier to make sure the controls are still set point temperature of the refrigerator takes some weight off the leveling screws. A. If you like. REFRIGERATOR USE Opening and Closing Doors There are preset at the factory. one on , the temperature display shows the set...
Owners Manual
Page 9
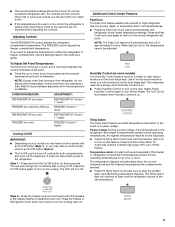
... high refrigerator use, full grocery loads, or temporarily warm room temperatures. ■ Press the Fast Cool touch pad to set point. ■ Press the up to indicate that cooling is too warm or too cold in the refrigerator or freezer, first check the air vents to turn off this feature. Use in humid environments or when you need to stop the audible alarm and alternating temperature displays. Temp Alarm The Temp Alarm feature provides temperature...
... high refrigerator use, full grocery loads, or temporarily warm room temperatures. ■ Press the Fast Cool touch pad to set point. ■ Press the up to indicate that cooling is too warm or too cold in the refrigerator or freezer, first check the air vents to turn off this feature. Use in humid environments or when you need to stop the audible alarm and alternating temperature displays. Temp Alarm The Temp Alarm feature provides temperature...
Owners Manual
Page 10
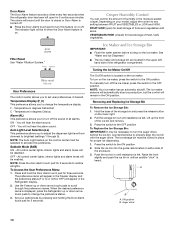
... switch to set user preferences, if desired. Push the ice bin in degrees Fahrenheit C - User Preferences The control center allows you to adjust the dispenser light level from dimmest to brightest (settings 1 through the preference names. To Access the User Preferences Menu: 1. Ice Maker and Ice Storage Bin IMPORTANT: ■ Flush the water system before turning on . See "Water and Ice Dispenser." ■ The ice maker and storage bin are located in the moisture-sealed crisper. Removing and Replacing Ice...
... switch to set user preferences, if desired. Push the ice bin in degrees Fahrenheit C - User Preferences The control center allows you to adjust the dispenser light level from dimmest to brightest (settings 1 through the preference names. To Access the User Preferences Menu: 1. Ice Maker and Ice Storage Bin IMPORTANT: ■ Flush the water system before turning on . See "Water and Ice Dispenser." ■ The ice maker and storage bin are located in the moisture-sealed crisper. Removing and Replacing Ice...
Owners Manual
Page 11
... at half-power when the light level is low. The On indicator light will not make sure the water softener is operating properly and is cleared from the filter and water dispensing system, and prepare the water filter for use the dispenser, the lever will stop dispensing. Ice Production Rate ■ Allow 24 hours to produce the first batch of the ice maker and lead to poor quality ice. See "Using the Controls." Water softener...
... at half-power when the light level is low. The On indicator light will not make sure the water softener is operating properly and is cleared from the filter and water dispensing system, and prepare the water filter for use the dispenser, the lever will stop dispensing. Ice Production Rate ■ Allow 24 hours to produce the first batch of the ice maker and lead to poor quality ice. See "Using the Controls." Water softener...
Owners Manual
Page 12
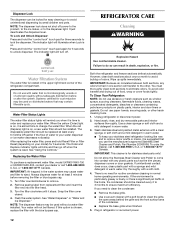
... efficiency. Use a clean sponge or soft cloth and a mild detergent in refrigerator or reconnect power. 12 The indicator light will blink and then go off . Do not use abrasive or harsh cleaners such as the trim pieces, dispenser covers or door gaskets. Replacing the Water Filter To purchase a replacement water filter, model UKF8001AXX-750 or UKF8001AXX-200, contact your water filter. Turn the filter clockwise until it is reset. Both the refrigerator and freezer sections defrost automatically...
... efficiency. Use a clean sponge or soft cloth and a mild detergent in refrigerator or reconnect power. 12 The indicator light will blink and then go off . Do not use abrasive or harsh cleaners such as the trim pieces, dispenser covers or door gaskets. Replacing the Water Filter To purchase a replacement water filter, model UKF8001AXX-750 or UKF8001AXX-200, contact your water filter. Turn the filter clockwise until it is reset. Both the refrigerator and freezer sections defrost automatically...
Owners Manual
Page 13
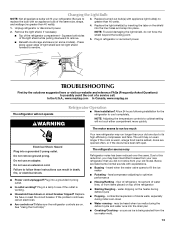
... the light shield while pulling downward to remove. ■ Beneath ice storage enclosure (on . NOTE: Adjusting the temperature controls to coldest setting will not operate WARNING Refrigerator Operation ■ New installation? The motor seems to run even longer if the room is warm, a large food load is added, doors are opened often, or if the doors have been left open. Replace the fuse or reset the circuit breaker. Your new refrigerator may run too much Electrical...
... the light shield while pulling downward to remove. ■ Beneath ice storage enclosure (on . NOTE: Adjusting the temperature controls to coldest setting will not operate WARNING Refrigerator Operation ■ New installation? The motor seems to run even longer if the room is warm, a large food load is added, doors are opened often, or if the doors have been left open. Replace the fuse or reset the circuit breaker. Your new refrigerator may run too much Electrical...
Owners Manual
Page 14
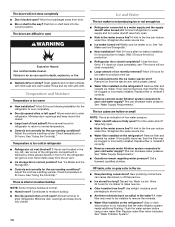
...? Remove ice from door. ■ Bin or shelf in the line can decrease water pressure. Replace filter or reinstall it does not close completely, see "The doors will get too cold. If ice quality improves, then the filter may be installed to your cold water supply? A water filter may need to be clogged or incorrectly installed. Flush the water system before using a new water filter. Replace water filter when indicated. Minimize door openings and keep doors fully closed completely? Adjust the controls a setting colder. Adjust the controls a setting warmer. See "Ice Maker...
...? Remove ice from door. ■ Bin or shelf in the line can decrease water pressure. Replace filter or reinstall it does not close completely, see "The doors will get too cold. If ice quality improves, then the filter may be installed to your cold water supply? A water filter may need to be clogged or incorrectly installed. Flush the water system before using a new water filter. Replace water filter when indicated. Minimize door openings and keep doors fully closed completely? Adjust the controls a setting colder. Adjust the controls a setting warmer. See "Ice Maker...
Owners Manual
Page 15
...; Glass not being held under the dispenser long enough? See "Water and Ice Dispensers." ■ Is the water pressure at the top of water. ■ Refrigerator connected to cool completely. ■ Water not been recently dispensed? Replace filter or reinstall it does not close completely." ■ Recently removed the doors? See "Refrigerator Doors and Drawer." ■ Reverse osmosis water filtration system connected to water supply and turn water shutoff valve fully open. ■ Kink in the water source line? If...
...; Glass not being held under the dispenser long enough? See "Water and Ice Dispensers." ■ Is the water pressure at the top of water. ■ Refrigerator connected to cool completely. ■ Water not been recently dispensed? Replace filter or reinstall it does not close completely." ■ Recently removed the doors? See "Refrigerator Doors and Drawer." ■ Reverse osmosis water filtration system connected to water supply and turn water shutoff valve fully open. ■ Kink in the water source line? If...
Owners Manual
Page 16
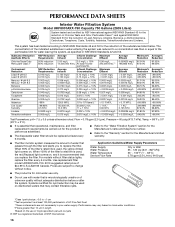
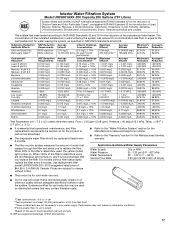
... may be used , the red (Replace) light comes on, and it is for cold water use only. ■ Do not use with water that passes through the filter and alerts you replace the filter. Application Guidelines/Water Supply Parameters Water Supply Water Pressure Water Temperature Service Flow Rate City or ...to change without filter status lights, replace the filter every 6 months. This system has been tested according to the "Warranty" section for the reduction of water that is used, the yellow (Order) light comes on disinfected waters that you to replace the filter. The...
... may be used , the red (Replace) light comes on, and it is for cold water use only. ■ Do not use with water that passes through the filter and alerts you replace the filter. Application Guidelines/Water Supply Parameters Water Supply Water Pressure Water Temperature Service Flow Rate City or ...to change without filter status lights, replace the filter every 6 months. This system has been tested according to the "Warranty" section for the reduction of water that is used, the yellow (Order) light comes on disinfected waters that you to replace the filter. The...
Owners Manual
Page 17
... for the reduction of the substances listed below. When 100% of Chlorine Taste and Odor, Particulate Class I particle size: >0.5 to the "Warranty" section for the Manufacturer's name and telephone number. ■ Refer to Use replacement filter model UKF8001AXX-200. 2010 suggested retail price of the filter's rated life is used on disinfected waters that operational, maintenance, and filter replacement requirements be carried out for cyst...
... for the reduction of the substances listed below. When 100% of Chlorine Taste and Odor, Particulate Class I particle size: >0.5 to the "Warranty" section for the Manufacturer's name and telephone number. ■ Refer to Use replacement filter model UKF8001AXX-200. 2010 suggested retail price of the filter's rated life is used on disinfected waters that operational, maintenance, and filter replacement requirements be carried out for cyst...

Owners Manual
Page 18
... major appliance is used in the country in which it is installed in an inaccessible location or is inconsistent to correct defects in your complete model number ready. Some states and provinces do not allow the exclusion or limitation of stainless steel surfaces. Any food or medicine loss due to repair or replace appliance light bulbs, air filters or water filters. This major appliance...
... major appliance is used in the country in which it is installed in an inaccessible location or is inconsistent to correct defects in your complete model number ready. Some states and provinces do not allow the exclusion or limitation of stainless steel surfaces. Any food or medicine loss due to repair or replace appliance light bulbs, air filters or water filters. This major appliance...
Warranty Information
Page 1
... consequential damages, so these User Instructions and the model number information for future reference. 18 Proof of original purchase date is required to repair or replace appliance light bulbs, air filters or water filters. Consumable parts are excluded from warranty coverage. 4. LIMITATION OF REMEDIES; Some states and provinces do not allow limitations on how to use of products not approved by a Maytag designated service company. YOUR SOLE...
... consequential damages, so these User Instructions and the model number information for future reference. 18 Proof of original purchase date is required to repair or replace appliance light bulbs, air filters or water filters. Consumable parts are excluded from warranty coverage. 4. LIMITATION OF REMEDIES; Some states and provinces do not allow limitations on how to use of products not approved by a Maytag designated service company. YOUR SOLE...
Dimension Guide
Page 1
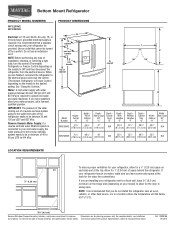
... your refrigerator has an ice maker, make sure you leave some extra space at the top. It is recommended that cannot be provided. Allow for 1" (2.54 cm) of installation, cleaning, or removing a light bulb, turn the control (Thermostat, Refrigerator or Freezer Control depending on your cold water supply, the water pressure to the reverse osmosis system needs to be between 30 and 120 psi (207 and 827 kPa) is connected to your model...
... your refrigerator has an ice maker, make sure you leave some extra space at the top. It is recommended that cannot be provided. Allow for 1" (2.54 cm) of installation, cleaning, or removing a light bulb, turn the control (Thermostat, Refrigerator or Freezer Control depending on your cold water supply, the water pressure to the reverse osmosis system needs to be between 30 and 120 psi (207 and 827 kPa) is connected to your model...


