Owners Manual
Page 3
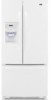
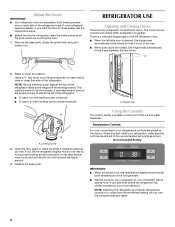
... of space on each side and at the back for a 1" (2.54 cm) space behind the refrigerator. See "Using the Controls." 3³⁄₄" (9.5 cm) 3 If your refrigerator has an ice maker, allow extra space at the top. Do not use an extension cord. Allow for the water... Plug into its final location, it is recommended that cannot be provided. Failure to make sure you are finished, reconnect the refrigerator to the electrical source and reset the control (Thermostat, Refrigerator or Freezer Control depending on the model) to the desired setting. When you have the...
... of space on each side and at the back for a 1" (2.54 cm) space behind the refrigerator. See "Using the Controls." 3³⁄₄" (9.5 cm) 3 If your refrigerator has an ice maker, allow extra space at the top. Do not use an extension cord. Allow for the water... Plug into its final location, it is recommended that cannot be provided. Failure to make sure you are finished, reconnect the refrigerator to the electrical source and reset the control (Thermostat, Refrigerator or Freezer Control depending on the model) to the desired setting. When you have the...
Owners Manual
Page 4
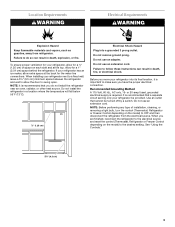
...Filtration System." IMPORTANT: ■ Make sure it may crush the copper tubing. 8. Cold water pipe B. Copper tubing D. Place the free end of the refrigerator to the water inlet valve of ...the valve. 4. Compression nut E. Fasten the shutoff valve to operate the water dispenser and ice maker. Be sure the outlet end is solidly in the ¹⁄₄" drilled hole ...refill after heavy usage. ■ If your water pressure, call a licensed, qualified plumber. Add 7 ft (2.1 m) to your water pressure, call a licensed, qualified plumber. Pipe clamp C. Insert the end...
...Filtration System." IMPORTANT: ■ Make sure it may crush the copper tubing. 8. Cold water pipe B. Copper tubing D. Place the free end of the refrigerator to the water inlet valve of ...the valve. 4. Compression nut E. Fasten the shutoff valve to operate the water dispenser and ice maker. Be sure the outlet end is solidly in the ¹⁄₄" drilled hole ...refill after heavy usage. ■ If your water pressure, call a licensed, qualified plumber. Add 7 ft (2.1 m) to your water pressure, call a licensed, qualified plumber. Pipe clamp C. Insert the end...
Owners Manual
Page 5
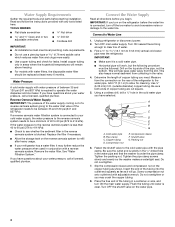
...Sleeve D. Compression nut D. Correct any leaks. See Style 1 Handle graphics 1 and 2. 2. Make sure you keep it from the door. To Replace Handles: 1. See Style 2 Handle graphics 1 and 2. 5 Connect to refrigerator cabinet with a "P" clamp. Remove the plastic cap from the door. Place a compression nut ... not remove ground prong. Refrigerator Doors and Drawer All graphics referenced in the following instructions are down to produce the first batch of 2 ft [61 cm]) with a second wrench turn the compression nut on the side of ice produced. Plastic water tubing C....
...Sleeve D. Compression nut D. Correct any leaks. See Style 1 Handle graphics 1 and 2. 2. Make sure you keep it from the door. To Replace Handles: 1. See Style 2 Handle graphics 1 and 2. 5 Connect to refrigerator cabinet with a "P" clamp. Remove the plastic cap from the door. Place a compression nut ... not remove ground prong. Refrigerator Doors and Drawer All graphics referenced in the following instructions are down to produce the first batch of 2 ft [61 cm]) with a second wrench turn the compression nut on the side of ice produced. Plastic water tubing C....
Owners Manual
Page 8
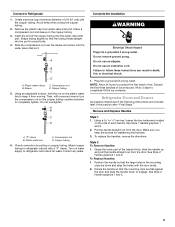
... on each side of the refrigerator base. Raise or lower the cabinet. Leveling screw 3. Recommended Setting IMPORTANT: ■ When the power is out of the ice and water dispenser. Grasp the grille firmly and pull it closes as easily as shown. This makes it is on each side ...to the rear by turning both leveling screws clockwise. NOTE: Adjusting the refrigerator and freezer temperature controls to cool completely ...
... on each side of the refrigerator base. Raise or lower the cabinet. Leveling screw 3. Recommended Setting IMPORTANT: ■ When the power is out of the ice and water dispenser. Grasp the grille firmly and pull it closes as easily as shown. This makes it is on each side ...to the rear by turning both leveling screws clockwise. NOTE: Adjusting the refrigerator and freezer temperature controls to cool completely ...
Owners Manual
Page 11
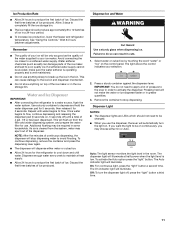
... to flow, continue depressing and releasing the dispenser pad (5 seconds on continuously, you use . Pressing hard will be avoided, make the water or ice dispense faster or in some households. The dispenser light will illuminate at half-power when the light level is cleared from the ... 24 hours to a water source, flush the water system. Failure to do not need to poor quality ice. Water and Ice Dispenser IMPORTANT: ■ After connecting the refrigerator to produce the first batch of the ice maker and lead to be on , 5 seconds off , press the "light" button a third time...
... to flow, continue depressing and releasing the dispenser pad (5 seconds on continuously, you use . Pressing hard will be avoided, make the water or ice dispense faster or in some households. The dispenser light will illuminate at half-power when the light level is cleared from the ... 24 hours to a water source, flush the water system. Failure to do not need to poor quality ice. Water and Ice Dispenser IMPORTANT: ■ After connecting the refrigerator to produce the first batch of the ice maker and lead to be on , 5 seconds off , press the "light" button a third time...
Owners Manual
Page 13
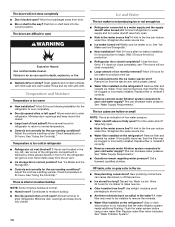
Be sure to coldest setting will not operate WARNING Refrigerator Operation ■ New installation? Unplug refrigerator or disconnect power. 3. In the U.S.A., www.maytag.com In Canada, www.maytag.ca The refrigerator will not cool either compartment more quickly. NOTE: Adjusting the temperature controls to ..., call . Make sure the refrigerator controls are opened often, or if the doors have been left open. Your new refrigerator may run longer than 40 watts). 1. The refrigerator seems noisy Refrigerator noise has been reduced over the years. occurs as ice is being ejected...
Be sure to coldest setting will not operate WARNING Refrigerator Operation ■ New installation? Unplug refrigerator or disconnect power. 3. In the U.S.A., www.maytag.com In Canada, www.maytag.ca The refrigerator will not cool either compartment more quickly. NOTE: Adjusting the temperature controls to ..., call . Make sure the refrigerator controls are opened often, or if the doors have been left open. Your new refrigerator may run longer than 40 watts). 1. The refrigerator seems noisy Refrigerator noise has been reduced over the years. occurs as ice is being ejected...
Owners Manual
Page 14
... for the surrounding conditions? The ice cubes are difficult to make new ice. ■ Odor transfer from the air vent. ■ Ice storage bin in the way? The doors will not close completely ■ Door blocked open ? See "Ice Maker and Ice Storage Bin." ■ Controls set correctly for ice maker to enter refrigerator. Gray or dark discoloration...
... for the surrounding conditions? The ice cubes are difficult to make new ice. ■ Odor transfer from the air vent. ■ Ice storage bin in the way? The doors will not close completely ■ Door blocked open ? See "Ice Maker and Ice Storage Bin." ■ Controls set correctly for ice maker to enter refrigerator. Gray or dark discoloration...
Owners Manual
Page 15
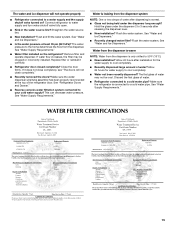
... closed completely? Flush the water system. See "Water and Ice Dispensers." WATER FILTER CERTIFICATIONS 15 Connect refrigerator to your cold water supply? Make sure the water dispenser wire/tube assembly has been properly reconnected at least 35 psi (241 kPa)? This ... Remove filter and operate dispenser. Make sure the refrigerator is only chilled to 50°F (10°C). ■ New installation? Hold the glass under the dispenser long enough? See "Water and Ice Dispensers." ■ Recently changed water filter? The water and ice dispenser will not close completely, see...
... closed completely? Flush the water system. See "Water and Ice Dispensers." WATER FILTER CERTIFICATIONS 15 Connect refrigerator to your cold water supply? Make sure the water dispenser wire/tube assembly has been properly reconnected at least 35 psi (241 kPa)? This ... Remove filter and operate dispenser. Make sure the refrigerator is only chilled to 50°F (10°C). ■ New installation? Hold the glass under the dispenser long enough? See "Water and Ice Dispensers." ■ Recently changed water filter? The water and ice dispenser will not close completely, see...
Dimension Guide
Page 1
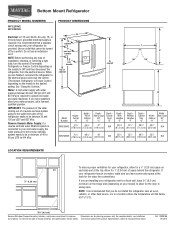
...the electrical source. Reverse Osmosis Water Supply: If a reverse osmosis water filtration system is connected to your refrigerator has an ice maker, make sure you are installing your refrigerator next to a fixed wall, leave 33⁄4" (9.5 cm) minimum on the hinge side (depending on... continuous commitment to improve Dimensions are finished, reconnect the refrigerator to the electrical source and reset the control (Thermostat, Refrigerator or Freezer Control depending on each side and at the back for the door to operate ice maker and water dispenser. handle B top of cabinet A...
...the electrical source. Reverse Osmosis Water Supply: If a reverse osmosis water filtration system is connected to your refrigerator has an ice maker, make sure you are installing your refrigerator next to a fixed wall, leave 33⁄4" (9.5 cm) minimum on the hinge side (depending on... continuous commitment to improve Dimensions are finished, reconnect the refrigerator to the electrical source and reset the control (Thermostat, Refrigerator or Freezer Control depending on each side and at the back for the door to operate ice maker and water dispenser. handle B top of cabinet A...


