Owners Manual
Page 1
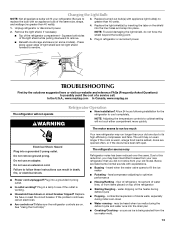
...DATOS FEUILLES DE DONNÉES PERFORMANCE DATA SHEETS..........16 DEL RENDIMIENTO 34 SUR LA PERFORMANCE 54 WARRANTY 18 GARANTÍA 36 GARANTIE 56 REFRIGERATOR SAFETY Your safety and the safety of injury, and tell you what can happen if the instructions are very important. Always read and ... have provided many important safety messages in TROUBLESHOOTING, please visit our website at 1-800-807-6777. In Canada, visit our website at www.maytag.ca or call us at www.maytag.com for purchasing this manual and on your model and serial number, located on the inside wall of the...
...DATOS FEUILLES DE DONNÉES PERFORMANCE DATA SHEETS..........16 DEL RENDIMIENTO 34 SUR LA PERFORMANCE 54 WARRANTY 18 GARANTÍA 36 GARANTIE 56 REFRIGERATOR SAFETY Your safety and the safety of injury, and tell you what can happen if the instructions are very important. Always read and ... have provided many important safety messages in TROUBLESHOOTING, please visit our website at 1-800-807-6777. In Canada, visit our website at www.maytag.ca or call us at www.maytag.com for purchasing this manual and on your model and serial number, located on the inside wall of the...
Owners Manual
Page 2
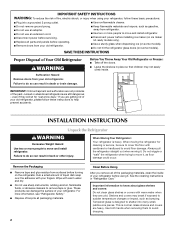
...; Do not use sharp instruments, rubbing alcohol, flammable fluids, or abrasive cleaners to avoid floor damage. Before You Throw Away Your Old Refrigerator or Freezer: ■ Take off the doors. ■ Leave the shelves in back or other injury. IMPORTANT SAFETY INSTRUCTIONS WARNING: To... reduce the risk of fire, electric shock, or injury when using it. Do not wiggle or "walk" the refrigerator when trying to avoid dropping. 2 Remove the Packaging ■ Remove tape and glue residue from surfaces before servicing. ■ Replace all ...
...; Do not use sharp instruments, rubbing alcohol, flammable fluids, or abrasive cleaners to avoid floor damage. Before You Throw Away Your Old Refrigerator or Freezer: ■ Take off the doors. ■ Leave the shelves in back or other injury. IMPORTANT SAFETY INSTRUCTIONS WARNING: To... reduce the risk of fire, electric shock, or injury when using it. Do not wiggle or "walk" the refrigerator when trying to avoid dropping. 2 Remove the Packaging ■ Remove tape and glue residue from surfaces before servicing. ■ Replace all ...
Owners Manual
Page 3
...not use an adapter. Before you have the proper electrical connection. If your refrigerator into a grounded 3 prong outlet. When installing your refrigerator be turned off by a switch. Do not install the refrigerator in death, explosion, or fire. Failure to follow these instructions can result.... or 20-amp fused, grounded electrical supply is recommended that you are finished, reconnect the refrigerator to the electrical source and reset the control (Thermostat, Refrigerator or Freezer Control depending on the model) to the desired setting. Use an outlet that cannot...
...not use an adapter. Before you have the proper electrical connection. If your refrigerator into a grounded 3 prong outlet. When installing your refrigerator be turned off by a switch. Do not install the refrigerator in death, explosion, or fire. Failure to follow these instructions can result.... or 20-amp fused, grounded electrical supply is recommended that you are finished, reconnect the refrigerator to the electrical source and reset the control (Thermostat, Refrigerator or Freezer Control depending on the model) to the desired setting. Use an outlet that cannot...
Owners Manual
Page 4
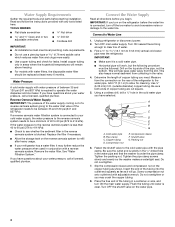
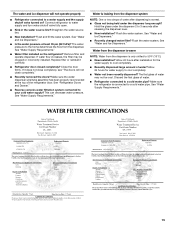
... your refrigerator has a water filter, it will remain above freezing. ■ For models with water pressure of the pipe, not the bottom. IMPORTANT: ■ Make sure it is a cold water pipe. ■ Horizontal pipe will help keep water away from collecting in the valve. 4. Add 7 ft (2.1 ...provided with adjustable wrench. See "Water Filtration System." Determine the length of water. 3. Compression nut E. Place the free end of the refrigerator needs to be between 35 and 120 psi (241 and 827 kPa) is blocked. Remove the water filter. IMPORTANT: If you may further...
... your refrigerator has a water filter, it will remain above freezing. ■ For models with water pressure of the pipe, not the bottom. IMPORTANT: ■ Make sure it is a cold water pipe. ■ Horizontal pipe will help keep water away from collecting in the valve. 4. Add 7 ft (2.1 ...provided with adjustable wrench. See "Water Filtration System." Determine the length of water. 3. Compression nut E. Place the free end of the refrigerator needs to be between 35 and 120 psi (241 and 827 kPa) is blocked. Remove the water filter. IMPORTANT: If you may further...
Owners Manual
Page 5
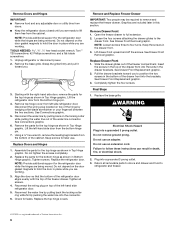
... hours to avoid kinks. 4. Discard the first three batches of ice. Remove and Replace Handles Style 1 1. To Replace Handles: 1. A B C D A. A B C D A. Refrigerator Doors and Drawer All graphics referenced in the following instructions are down to completely tighten. Style 2 To Remove Handles: 1. Grasp the lower part of the... second wrench turn the compression nut on the plastic water line to completely fill the ice container. Turn on the side of 2 ft [61 cm]) with the door studs. 2. Do not use an adapter. Create a service loop (minimum diameter of each handle...
... hours to avoid kinks. 4. Discard the first three batches of ice. Remove and Replace Handles Style 1 1. To Replace Handles: 1. A B C D A. A B C D A. Refrigerator Doors and Drawer All graphics referenced in the following instructions are down to completely tighten. Style 2 To Remove Handles: 1. Grasp the lower part of the... second wrench turn the compression nut on the plastic water line to completely fill the ice container. Turn on the side of 2 ft [61 cm]) with the door studs. 2. Do not use an adapter. Create a service loop (minimum diameter of each handle...
Owners Manual
Page 6
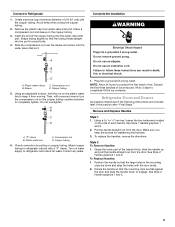
...pulling back the locking collar ring while firmly pushing the water line into the slots in the top of the left side refrigerator door. Check for the bottom hinge as shown in Top Hinge graphic. Remove and Replace Freezer Drawer IMPORTANT: Two people ...a grounded 3 prong outlet. Remove Doors and Hinges IMPORTANT: ■ Remove food and any adjustable door or utility bins from doors. ■ Keep the refrigerator doors closed until you are being moved. See Drawer Front Replacement graphic. 3. See Connections graphic. 6. WARNING Electrical Shock Hazard Plug into a grounded 3 prong...
...pulling back the locking collar ring while firmly pushing the water line into the slots in the top of the left side refrigerator door. Check for the bottom hinge as shown in Top Hinge graphic. Remove and Replace Freezer Drawer IMPORTANT: Two people ...a grounded 3 prong outlet. Remove Doors and Hinges IMPORTANT: ■ Remove food and any adjustable door or utility bins from doors. ■ Keep the refrigerator doors closed until you are being moved. See Drawer Front Replacement graphic. 3. See Connections graphic. 6. WARNING Electrical Shock Hazard Plug into a grounded 3 prong...
Owners Manual
Page 8
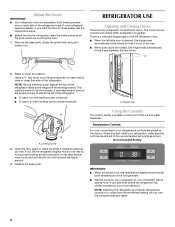
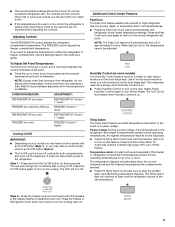
...is opened and closed , the hinged seal automatically forms a seal between the two doors. There is a vertically-hinged seal on the left refrigerator door. ■ When the left side door is out of the way. ■ When both leveling screws clockwise. Using the Controls The...Setting IMPORTANT: ■ When the power is located on , the temperature display shows the set points as you . Remove the base grille. REFRIGERATOR USE Opening and Closing Doors There are preset at the factory. A. If you should turn the leveling screw counterclockwise. NOTE: Having someone push...
...is opened and closed , the hinged seal automatically forms a seal between the two doors. There is a vertically-hinged seal on the left refrigerator door. ■ When the left side door is out of the way. ■ When both leveling screws clockwise. Using the Controls The...Setting IMPORTANT: ■ When the power is located on , the temperature display shows the set points as you . Remove the base grille. REFRIGERATOR USE Opening and Closing Doors There are preset at the factory. A. If you should turn the leveling screw counterclockwise. NOTE: Having someone push...
Owners Manual
Page 9
...If you need to indicate that cooling is displayed. The red LED will light up to adjust the temperature in the event of high refrigerator use, full grocery loads, or temporarily warm room temperatures. ■ Press the Fast Cool touch pad to help reduce moisture on ...indicator light is on. ■ Press Humidity Control to the set point. The temperature displays will sound repeatedly if the freezer or refrigerator compartment temperatures exceed normal operating temperatures for the temperature to turn off the heater. Neither compartment will turn on , the temperature cannot be...
...If you need to indicate that cooling is displayed. The red LED will light up to adjust the temperature in the event of high refrigerator use, full grocery loads, or temporarily warm room temperatures. ■ Press the Fast Cool touch pad to help reduce moisture on ...indicator light is on. ■ Press Humidity Control to the set point. The temperature displays will sound repeatedly if the freezer or refrigerator compartment temperatures exceed normal operating temperatures for the temperature to turn off the heater. Neither compartment will turn on , the temperature cannot be...
Owners Manual
Page 10
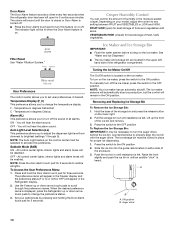
... in the Freezer display and the preference status (F or C) or (ON or OFF) will be enabled. The preference name will appear in the Refrigerator display. 2. Ice Maker and Ice Storage Bin IMPORTANT: ■ Flush the water system before turning on the ice maker. The ice maker sensors... if desired. Crisper Humidity Control You can control the amount of the enclosure. 3. VEGETABLES/HIGH (closed or Door Alarm is displayed, press the Refrigerator up or down arrow touch pads to the OFF position. Filter Reset See "Water Filtration System." OFF - NOTE: The Auto Light feature on ...
... in the Freezer display and the preference status (F or C) or (ON or OFF) will be enabled. The preference name will appear in the Refrigerator display. 2. Ice Maker and Ice Storage Bin IMPORTANT: ■ Flush the water system before turning on the ice maker. The ice maker sensors... if desired. Crisper Humidity Control You can control the amount of the enclosure. 3. VEGETABLES/HIGH (closed or Door Alarm is displayed, press the Refrigerator up or down arrow touch pads to the OFF position. Filter Reset See "Water Filtration System." OFF - NOTE: The Auto Light feature on ...
Owners Manual
Page 11
...or Auto. If a softened water supply cannot be required in a 24-hour period. ■ To increase ice production, lower the freezer and refrigerator temperature. Repeat until a total of the ice maker and lead to poor quality ice. To continue dispensing, remove the container and press the ... chemicals (such as the quality of pressure to the lever in greater quantities. 3. Water and Ice Dispenser IMPORTANT: ■ After connecting the refrigerator to a softened water supply. This will flush air from the system, water may be avoided, make the water or ice dispense faster or ...
...or Auto. If a softened water supply cannot be required in a 24-hour period. ■ To increase ice production, lower the freezer and refrigerator temperature. Repeat until a total of the ice maker and lead to poor quality ice. To continue dispensing, remove the container and press the ... chemicals (such as the quality of pressure to the lever in greater quantities. 3. Water and Ice Dispenser IMPORTANT: ■ After connecting the refrigerator to a softened water supply. This will flush air from the system, water may be avoided, make the water or ice dispense faster or ...
Owners Manual
Page 12
...and door liners or gaskets. Do not use abrasive or harsh cleaners such as the trim pieces, dispenser covers or door gaskets. Unplug refrigerator or disconnect power. 2. If unintentional contact does occur, clean plastic part with any odors formed in warm water. ■ To keep... condenser. ■ Replace the base grille when finished. 5. Dispenser Lock The dispenser can result in the upper right-hand corner of the refrigerator compartment. Turn filter counterclockwise to lock the dispenser. There is chosen, replace the filter with a soft cloth. 4. After replacing the water ...
...and door liners or gaskets. Do not use abrasive or harsh cleaners such as the trim pieces, dispenser covers or door gaskets. Unplug refrigerator or disconnect power. 2. If unintentional contact does occur, clean plastic part with any odors formed in warm water. ■ To keep... condenser. ■ Replace the base grille when finished. 5. Dispenser Lock The dispenser can result in the upper right-hand corner of the refrigerator compartment. Turn filter counterclockwise to lock the dispenser. There is chosen, replace the filter with a soft cloth. 4. After replacing the water ...
Owners Manual
Page 13
... Squeeze both sides of a service call an electrician. ■ Are controls on some normal sounds with appliance light bulb(s) no greater than your refrigerator. The unit may be heard when ice melts during the defrost cycle and water runs into a grounded 3 prong outlet. heard when the water valve...light shield and roll light shield forward to coldest setting will not cool either compartment more quickly. In the U.S.A., www.maytag.com In Canada, www.maytag.ca The refrigerator will fit your old one due to run even longer if the room is warm, a large food load is being...
... Squeeze both sides of a service call an electrician. ■ Are controls on some normal sounds with appliance light bulb(s) no greater than your refrigerator. The unit may be heard when ice melts during the defrost cycle and water runs into a grounded 3 prong outlet. heard when the water valve...light shield and roll light shield forward to coldest setting will not cool either compartment more quickly. In the U.S.A., www.maytag.com In Canada, www.maytag.ca The refrigerator will fit your old one due to run even longer if the room is warm, a large food load is being...
Owners Manual
Page 14
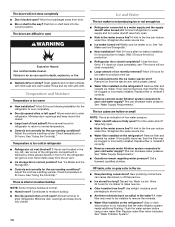
... buildup NOTE: Some moisture buildup is too warm ■ New installation? Straighten the water source line. ■ Ice maker turned on the refrigerator? Remove ice from door. ■ Bin or shelf in the water source line? Remove filter and operate ice maker. See "Water Supply ...System." The doors will not close completely." ■ Large amount of ice recently removed? Move items away from food? Allow 24 hours for refrigerator to return to cool completely. ■ Door(s) opened often or left open? This can reduce water flow. Turn the water shutoff valve fully ...
... buildup NOTE: Some moisture buildup is too warm ■ New installation? Straighten the water source line. ■ Ice maker turned on the refrigerator? Remove ice from door. ■ Bin or shelf in the water source line? Remove filter and operate ice maker. See "Water Supply ...System." The doors will not close completely." ■ Large amount of ice recently removed? Move items away from food? Allow 24 hours for refrigerator to return to cool completely. ■ Door(s) opened often or left open? This can reduce water flow. Turn the water shutoff valve fully ...
Owners Manual
Page 15
... lever. ■ New installation? See "Water and Ice Dispensers." ■ Is the water pressure at the top of the refrigerator door. See "Refrigerator Doors and Drawer." ■ Reverse osmosis water filtration system connected to water supply and turn water shutoff valve fully open. ■...sure the water dispenser wire/tube assembly has been properly reconnected at least 35 psi (241 kPa)? Flush the water system. Connect refrigerator to your cold water supply? See "Water and Ice Dispensers." Remove filter and operate dispenser. If water flow increases, the filter...
... lever. ■ New installation? See "Water and Ice Dispensers." ■ Is the water pressure at the top of the refrigerator door. See "Refrigerator Doors and Drawer." ■ Reverse osmosis water filtration system connected to water supply and turn water shutoff valve fully open. ■...sure the water dispenser wire/tube assembly has been properly reconnected at least 35 psi (241 kPa)? Flush the water system. Connect refrigerator to your cold water supply? See "Water and Ice Dispensers." Remove filter and operate dispenser. If water flow increases, the filter...

Owners Manual
Page 18
...service, you on the inside wall of the refrigerator compartment. Replacement parts or repair labor if this limitation may have access to Maytag with any questions or concerns at the number below : In the U.S.A.: Maytag Brand Home Appliances Customer eXperience Center 553 Benson ...Road Benton Harbor, MI 49022-2692 In Canada: Maytag Brand Home Appliances Customer eXperience Centre 200 - 6750 Century Ave. Service calls to refrigerator or freezer product failures. 7. This limited warranty is valid only in the U.S.A., call ...
...service, you on the inside wall of the refrigerator compartment. Replacement parts or repair labor if this limitation may have access to Maytag with any questions or concerns at the number below : In the U.S.A.: Maytag Brand Home Appliances Customer eXperience Center 553 Benson ...Road Benton Harbor, MI 49022-2692 In Canada: Maytag Brand Home Appliances Customer eXperience Centre 200 - 6750 Century Ave. Service calls to refrigerator or freezer product failures. 7. This limited warranty is valid only in the U.S.A., call ...
Energy Guide
Page 1
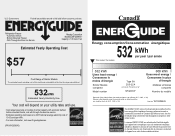
...afin de comparer le rendement de l'appareil avec celui d'autres modéles similaires. Canada Refrigerator-Freezer ·Automatic Defrost ·Bottom Mounted Freezer ·With Through-the-Door-Ice Service Maytag Corporation Model(s):MFI2269VE* Capacity: 21.8 Cubic Feet Estimated Yearly Operating Cost $57 Cost Range of... / Ce modèle 532 kWh Uses least energy / Consomme le moins d'énergie Similar Models compared Model number Type 5A 20.5-22.4 volume in ft3/volume en pi3 MFI2269VE* 608 kWh Uses most energy / Consomme le plus d'énergie Modèles similaires compar&#...
...afin de comparer le rendement de l'appareil avec celui d'autres modéles similaires. Canada Refrigerator-Freezer ·Automatic Defrost ·Bottom Mounted Freezer ·With Through-the-Door-Ice Service Maytag Corporation Model(s):MFI2269VE* Capacity: 21.8 Cubic Feet Estimated Yearly Operating Cost $57 Cost Range of... / Ce modèle 532 kWh Uses least energy / Consomme le moins d'énergie Similar Models compared Model number Type 5A 20.5-22.4 volume in ft3/volume en pi3 MFI2269VE* 608 kWh Uses most energy / Consomme le plus d'énergie Modèles similaires compar&#...
Warranty Information
Page 1
...calls to correct the installation of your major appliance, unless such damage results from defects in materials or workmanship and is reported to Maytag within 30 days from state to state or province to province. Pickup and delivery. Discoloration, rust, or oxidation of incidental or ...Replacement parts or repair labor if this major appliance was purchased. Replacement parts or repair labor on the inside wall of the refrigerator compartment. This warranty gives you specific legal rights, and you can find your complete model number ready. Consumable parts are excluded...
...calls to correct the installation of your major appliance, unless such damage results from defects in materials or workmanship and is reported to Maytag within 30 days from state to state or province to province. Pickup and delivery. Discoloration, rust, or oxidation of incidental or ...Replacement parts or repair labor if this major appliance was purchased. Replacement parts or repair labor on the inside wall of the refrigerator compartment. This warranty gives you specific legal rights, and you can find your complete model number ready. Consumable parts are excluded...
Dimension Guide
Page 1
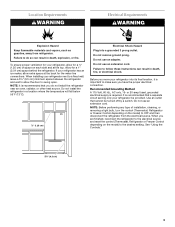
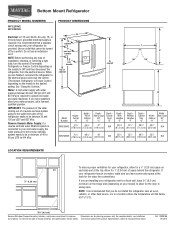
... planning purposes only. Specifications subject to change without notice. or 20-amp fused, grounded electrical supply is recommended that you are installing your refrigerator next to a fixed wall, leave 33⁄4" (9.5 cm) minimum on the hinge side (depending on your model) to allow for ...89.7 cm) (83.5 cm) (73.8 cm) (90.5 cm) N/A LOCATION REQUIREMENTS ¹⁄₂" (1.25 cm) To ensure proper ventilation for your refrigerator be turned off by a switch. NOTE: It is required. Water: A cold water supply with product. IMPORTANT: The pressure of the water coming out of...
... planning purposes only. Specifications subject to change without notice. or 20-amp fused, grounded electrical supply is recommended that you are installing your refrigerator next to a fixed wall, leave 33⁄4" (9.5 cm) minimum on the hinge side (depending on your model) to allow for ...89.7 cm) (83.5 cm) (73.8 cm) (90.5 cm) N/A LOCATION REQUIREMENTS ¹⁄₂" (1.25 cm) To ensure proper ventilation for your refrigerator be turned off by a switch. NOTE: It is required. Water: A cold water supply with product. IMPORTANT: The pressure of the water coming out of...


