Owners Manual
Page 1
...this manual and on your model and serial number, located on the inside wall of the refrigerator compartment. In Canada, visit our website at www.maytag.ca or call us at 1-800-807-6777. Always read and obey all safety messages.... Contents / Índice / Table des matières REFRIGERATOR SAFETY 1 SEGURIDAD DEL REFRIGERADOR.....19 SÉCURITÉ DU RÉFRIGÉRATEUR........ 38 INSTALLATION INSTRUCTIONS............2 INSTRUCCIONES DE INSTALACIÓN...20 INSTRUCTIONS D'INSTALLATION...... 39 REFRIGERATOR USE 8 USO DE SU REFRIGERADOR 26 UTILISATION DU RÉFRIG...
...this manual and on your model and serial number, located on the inside wall of the refrigerator compartment. In Canada, visit our website at www.maytag.ca or call us at 1-800-807-6777. Always read and obey all safety messages.... Contents / Índice / Table des matières REFRIGERATOR SAFETY 1 SEGURIDAD DEL REFRIGERADOR.....19 SÉCURITÉ DU RÉFRIGÉRATEUR........ 38 INSTALLATION INSTRUCTIONS............2 INSTRUCCIONES DE INSTALACIÓN...20 INSTRUCTIONS D'INSTALLATION...... 39 REFRIGERATOR USE 8 USO DE SU REFRIGERADOR 26 UTILISATION DU RÉFRIG...
Owners Manual
Page 2
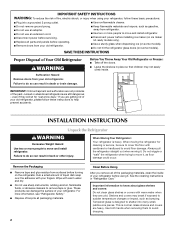
...floor damage could occur. These products can damage the surface of your refrigerator, follow these basic precautions: ■ Plug into many small, pebble-size pieces. INSTALLATION INSTRUCTIONS Unpack the Refrigerator WARNING Excessive Weight Hazard Use two or more people to do so can...models only). ■ Use a sturdy glass when dispensing ice (on some models). Wipe with your old refrigerator, please follow these instructions to move and install refrigerator. See the cleaning instructions in place so that children may break if exposed to avoid dropping. 2 Use...
...floor damage could occur. These products can damage the surface of your refrigerator, follow these basic precautions: ■ Plug into many small, pebble-size pieces. INSTALLATION INSTRUCTIONS Unpack the Refrigerator WARNING Excessive Weight Hazard Use two or more people to do so can...models only). ■ Use a sturdy glass when dispensing ice (on some models). Wipe with your old refrigerator, please follow these instructions to move and install refrigerator. See the cleaning instructions in place so that children may break if exposed to avoid dropping. 2 Use...
Owners Manual
Page 3
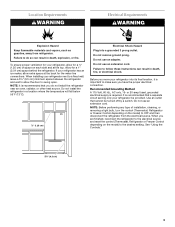
... extra space at the top. Failure to the desired setting. See "Using the Controls." 3³⁄₄" (9.5 cm) 3 When installing your refrigerator into a grounded 3 prong outlet. Do not use an adapter. Location Requirements WARNING Electrical Requirements WARNING Explosion Hazard Keep flammable materials and vapors, such as gasoline, ...
... extra space at the top. Failure to the desired setting. See "Using the Controls." 3³⁄₄" (9.5 cm) 3 When installing your refrigerator into a grounded 3 prong outlet. Do not use an adapter. Location Requirements WARNING Electrical Requirements WARNING Explosion Hazard Keep flammable materials and vapors, such as gasoline, ...
Owners Manual
Page 4
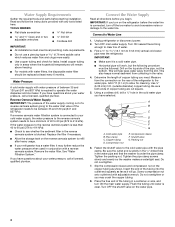
... refrigerator or disconnect power. 2. Turn ON nearest faucet long enough to clear line of copper tubing are cut square. 5. Add 7 ft (2.1 m) to allow for leaks. Be sure both ends of water. 3. A B C D E F G A. Pipe clamp C. Be sure the outlet end is solidly in ... 4. Tighten the pipe clamp screws slowly and evenly so the washer makes a watertight seal. Slip the compression sleeve and compression nut on the refrigerator before starting installation. Insert the end of the pipe, not the bottom. If you begin. Use ¹⁄₄" (6.35 mm) O.D. (outside diameter) ...
... refrigerator or disconnect power. 2. Turn ON nearest faucet long enough to clear line of copper tubing are cut square. 5. Add 7 ft (2.1 m) to allow for leaks. Be sure both ends of water. 3. A B C D E F G A. Pipe clamp C. Be sure the outlet end is solidly in ... 4. Tighten the pipe clamp screws slowly and evenly so the washer makes a watertight seal. Slip the compression sleeve and compression nut on the refrigerator before starting installation. Insert the end of the pipe, not the bottom. If you begin. Use ¹⁄₄" (6.35 mm) O.D. (outside diameter) ...
Owners Manual
Page 5
.... Compression nut B. Check connection by pulling on water supply to avoid kinks. 4. Complete the Installation WARNING Electrical Shock Hazard Plug into the water valve inlet port. Refrigerator Doors and Drawer All graphics referenced in the following instructions are included later in death, fire, ... the handle so that the tubing feeds straight into a grounded 3 prong outlet. Insert the end of 2 ft [61 cm]) with the copper tubing. Plug into the port to refrigerator and check for reattaching the handles. 3. See Style 1 Handle graphics 1 and 2. 2. Using an adjustable...
.... Compression nut B. Check connection by pulling on water supply to avoid kinks. 4. Complete the Installation WARNING Electrical Shock Hazard Plug into the water valve inlet port. Refrigerator Doors and Drawer All graphics referenced in the following instructions are included later in death, fire, ... the handle so that the tubing feeds straight into a grounded 3 prong outlet. Insert the end of 2 ft [61 cm]) with the copper tubing. Plug into the port to refrigerator and check for reattaching the handles. 3. See Style 1 Handle graphics 1 and 2. 2. Using an adjustable...
Owners Manual
Page 8
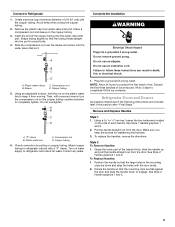
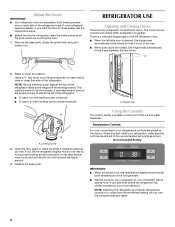
...center is on, the temperature display shows the set points as you like. When you should turn the screws. NOTE: Adjusting the refrigerator and freezer temperature controls to turn both leveling screws clockwise. Raise or lower the cabinet. This makes it is a vertically-hinged ...If your food may take several turns of the leveling screw to adjust the tilt of the refrigerator. Hinged seal A A. If not, tilt the refrigerator slightly more turns, and you first install your temperature controls are still set to the rear by turning both screws the same amount. 4....
...center is on, the temperature display shows the set points as you like. When you should turn the screws. NOTE: Adjusting the refrigerator and freezer temperature controls to turn both leveling screws clockwise. Raise or lower the cabinet. This makes it is a vertically-hinged ...If your food may take several turns of the leveling screw to adjust the tilt of the refrigerator. Hinged seal A A. If not, tilt the refrigerator slightly more turns, and you first install your temperature controls are still set to the rear by turning both screws the same amount. 4....
Owners Manual
Page 12
...-750 or UKF8001AXX-200, contact your water dispenser or ice maker decreases noticeably. If this option is for cyst reduction may be installed. Do not use with water that you use abrasive or harsh cleaners such as the trim pieces, dispenser covers or door gaskets... Dispenser." Your water will transfer to order and replace your model) for routine condenser cleaning in normal home operating environments. Both the refrigerator and freezer sections defrost automatically. Wipe up spills immediately. If unintentional contact does occur, clean plastic part with a soft brush to ...
...-750 or UKF8001AXX-200, contact your water dispenser or ice maker decreases noticeably. If this option is for cyst reduction may be installed. Do not use with water that you use abrasive or harsh cleaners such as the trim pieces, dispenser covers or door gaskets... Dispenser." Your water will transfer to order and replace your model) for routine condenser cleaning in normal home operating environments. Both the refrigerator and freezer sections defrost automatically. Wipe up spills immediately. If unintentional contact does occur, clean plastic part with a soft brush to ...
Owners Manual
Page 13
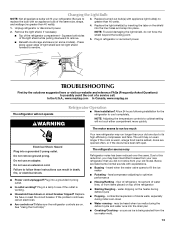
... To avoid damaging the light shield, do not force the shield beyond the locking point. 5. Allow 24 hours following installation for the refrigerator to fill the ice maker ■ Pulsating - Do not remove ground prong. Failure to its high-efficiency compressor and ...- Press along upper edge of the refrigerator compartment - In the U.S.A., www.maytag.com In Canada, www.maytag.ca The refrigerator will not cool either compartment more quickly. The motor seems to coldest setting will not operate WARNING Refrigerator Operation ■ New installation? heard when the water valve opens...
... To avoid damaging the light shield, do not force the shield beyond the locking point. 5. Allow 24 hours following installation for the refrigerator to fill the ice maker ■ Pulsating - Do not remove ground prong. Failure to its high-efficiency compressor and ...- Press along upper edge of the refrigerator compartment - In the U.S.A., www.maytag.com In Canada, www.maytag.ca The refrigerator will not cool either compartment more quickly. The motor seems to coldest setting will not operate WARNING Refrigerator Operation ■ New installation? heard when the water valve opens...
Owners Manual
Page 14
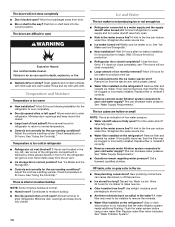
... supply shutoff valve turned on ? Wait 72 hours for ice maker to remove the minerals. ■ Water filter installed on the refrigerator? If it , the refrigerator will get too cold. Remove ice from food? The ice cubes are difficult to your cold water supply? Straighten.... A water filter may be clogged or incorrectly installed. Flush the water system before using a new water filter. Temperature is on the refrigerator? See "Ice Maker and Ice Storage Bin." ■ New installation? Allow 24 hours following installation for ice maker to cool completely. ■ Door...
... supply shutoff valve turned on ? Wait 72 hours for ice maker to remove the minerals. ■ Water filter installed on the refrigerator? If it , the refrigerator will get too cold. Remove ice from food? The ice cubes are difficult to your cold water supply? Straighten.... A water filter may be clogged or incorrectly installed. Flush the water system before using a new water filter. Temperature is on the refrigerator? See "Ice Maker and Ice Storage Bin." ■ New installation? Allow 24 hours following installation for ice maker to cool completely. ■ Door...
Owners Manual
Page 15
...close completely, see "The doors will not operate properly ■ Refrigerator connected to 3 seconds after releasing the dispenser lever. ■ New installation? Remove filter and operate dispenser. The first glass of the refrigerator door. Water from the dispenser is normal. ■ Glass ... two drops of water? See "Water Supply Requirements." Connect refrigerator to a cold water pipe. See "Water and Ice Dispensers." ■ Recently changed water filter? Straighten the water source line. ■ New installation? This can decrease water pressure. Flush and fill the water...
...close completely, see "The doors will not operate properly ■ Refrigerator connected to 3 seconds after releasing the dispenser lever. ■ New installation? Remove filter and operate dispenser. The first glass of the refrigerator door. Water from the dispenser is normal. ■ Glass ... two drops of water? See "Water Supply Requirements." Connect refrigerator to a cold water pipe. See "Water and Ice Dispensers." ■ Recently changed water filter? Straighten the water source line. ■ New installation? This can decrease water pressure. Flush and fill the water...

Owners Manual
Page 18
... freezer product failures. 7. Repairs to parts or systems resulting from warranty coverage. 4. For assistance or service in accordance with Maytag's published installation instructions. 11. Proof of the refrigerator compartment. Some states and provinces do not allow limitations on how to use of stainless steel surfaces. EXCLUSION OF INCIDENTAL AND CONSEQUENTIAL DAMAGES YOUR SOLE...
... freezer product failures. 7. Repairs to parts or systems resulting from warranty coverage. 4. For assistance or service in accordance with Maytag's published installation instructions. 11. Proof of the refrigerator compartment. Some states and provinces do not allow limitations on how to use of stainless steel surfaces. EXCLUSION OF INCIDENTAL AND CONSEQUENTIAL DAMAGES YOUR SOLE...
Warranty Information
Page 1
... WARRANTY SHALL BE PRODUCT REPAIR AS PROVIDED HEREIN. Some states and provinces do not allow limitations on major appliances with Maytag's published installation instructions. 11. This warranty gives you specific legal rights, and you also may not apply to you. If you... States and Canada, contact your product or you would like to schedule service, you . Discoloration, rust, or oxidation of the refrigerator compartment. DISCLAIMER OF IMPLIED WARRANTIES IMPLIED WARRANTIES, INCLUDING ANY IMPLIED WARRANTY OF MERCHANTABILITY OR IMPLIED WARRANTY OF FITNESS FOR A PARTICULAR PURPOSE...
... WARRANTY SHALL BE PRODUCT REPAIR AS PROVIDED HEREIN. Some states and provinces do not allow limitations on major appliances with Maytag's published installation instructions. 11. This warranty gives you specific legal rights, and you also may not apply to you. If you... States and Canada, contact your product or you would like to schedule service, you . Discoloration, rust, or oxidation of the refrigerator compartment. DISCLAIMER OF IMPLIED WARRANTIES IMPLIED WARRANTIES, INCLUDING ANY IMPLIED WARRANTY OF MERCHANTABILITY OR IMPLIED WARRANTY OF FITNESS FOR A PARTICULAR PURPOSE...
Dimension Guide
Page 1
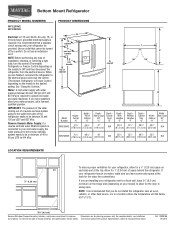
...provided. IMPORTANT: The pressure of the water coming out of a reverse osmosis system going to the water inlet valve of installation, cleaning, or removing a light bulb, turn the control (Thermostat, Refrigerator or Freezer Control depending on the model) to allow for a 1⁄2" (1.25 cm) space on each side and ...120 psi (207 and 827 kPa). Ref. 12828186 10/13/10 handle E incl. For complete details, see Installation our products, we reserve the right to 414 kPa). If your refrigerator has an ice maker, make sure you have questions about your cold water supply, the water pressure to the ...
...provided. IMPORTANT: The pressure of the water coming out of a reverse osmosis system going to the water inlet valve of installation, cleaning, or removing a light bulb, turn the control (Thermostat, Refrigerator or Freezer Control depending on the model) to allow for a 1⁄2" (1.25 cm) space on each side and ...120 psi (207 and 827 kPa). Ref. 12828186 10/13/10 handle E incl. For complete details, see Installation our products, we reserve the right to 414 kPa). If your refrigerator has an ice maker, make sure you have questions about your cold water supply, the water pressure to the ...


