Owners Manual
Page 1
.... If you and others are not followed. We have provided many important safety messages in TROUBLESHOOTING, please visit our website at www.maytag.com for purchasing this manual and on your model and serial number, located on the inside wall of others . If you what ...the potential hazard is the safety alert symbol. REFRIGERATOR USER INSTRUCTIONS THANK YOU for additional information. This is , tell you how to potential hazards that can happen if the instructions are very...
.... If you and others are not followed. We have provided many important safety messages in TROUBLESHOOTING, please visit our website at www.maytag.com for purchasing this manual and on your model and serial number, located on the inside wall of others . If you what ...the potential hazard is the safety alert symbol. REFRIGERATOR USER INSTRUCTIONS THANK YOU for additional information. This is , tell you how to potential hazards that can happen if the instructions are very...
Owners Manual
Page 2
... occur. See the cleaning instructions in back or other injury. Tempered glass is heavy. SAVE THESE INSTRUCTIONS Proper Disposal of Your Old Refrigerator WARNING Suffocation Hazard Remove doors from surfaces before installing ice maker (on ice maker kit ready models only). ■ Use a sturdy...fluids, or abrasive cleaners to sudden temperature changes or impact, such as bumping. Clean Before Using After you are not problems of your refrigerator, follow these basic precautions: ■ Plug into many small, pebble-size pieces. Use both hands when removing them to avoid floor ...
... occur. See the cleaning instructions in back or other injury. Tempered glass is heavy. SAVE THESE INSTRUCTIONS Proper Disposal of Your Old Refrigerator WARNING Suffocation Hazard Remove doors from surfaces before installing ice maker (on ice maker kit ready models only). ■ Use a sturdy...fluids, or abrasive cleaners to sudden temperature changes or impact, such as bumping. Clean Before Using After you are not problems of your refrigerator, follow these basic precautions: ■ Plug into many small, pebble-size pieces. Use both hands when removing them to avoid floor ...
Owners Manual
Page 3
...an outlet that a separate circuit serving only your refrigerator be turned off by a switch. To ensure proper ventilation for your refrigerator has an ice maker, allow the door to OFF and then disconnect the refrigerator from refrigerator. If your refrigerator, allow for a ¹⁄₂" (1.25...outlet. Do not remove ground prong. Do not use an extension cord. It is recommended that you are finished, reconnect the refrigerator to make sure you have the proper electrical connection. NOTE: It is recommended that cannot be provided. See "Using the Controls."...
...an outlet that a separate circuit serving only your refrigerator be turned off by a switch. To ensure proper ventilation for your refrigerator has an ice maker, allow the door to OFF and then disconnect the refrigerator from refrigerator. If your refrigerator, allow for a ¹⁄₂" (1.25...outlet. Do not remove ground prong. Do not use an extension cord. It is recommended that you are finished, reconnect the refrigerator to make sure you have the proper electrical connection. NOTE: It is recommended that cannot be provided. See "Using the Controls."...
Owners Manual
Page 4
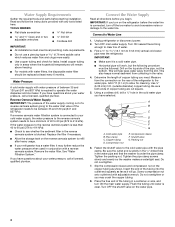
... blocked. If the water pressure to the reverse osmosis system is connected, turn on the reverse osmosis system to the water line. Unplug refrigerator or disconnect power. 2. Add 7 ft (2.1 m) to Water Line 1. A B C D E F G A. Flush the tubing until water is solidly in the ¹⁄₄" drilled hole in conjunction with water filters, the...
... blocked. If the water pressure to the reverse osmosis system is connected, turn on the reverse osmosis system to the water line. Unplug refrigerator or disconnect power. 2. Add 7 ft (2.1 m) to Water Line 1. A B C D E F G A. Flush the tubing until water is solidly in the ¹⁄₄" drilled hole in conjunction with water filters, the...
Owners Manual
Page 5
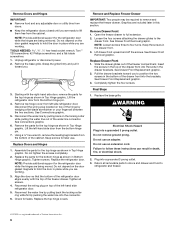
... A. Sleeve D. Compression nut D. Check connection by pulling on water supply to refrigerator cabinet with the copper tubing. Turn on copper tubing. Do not remove ground prong. Failure to produce the first batch of 2 ft [61 cm]) with a "P" clamp. NOTE: Allow 24 hours to follow these... Then, with the door studs. 2. Position the handle so that the mounting clips are included later in the mounting clips are down to Refrigerator 1. Remove and Replace Handles Style 1 1. A B C D A. Place a compression nut and sleeve on the copper tubing counterclockwise to ...
... A. Sleeve D. Compression nut D. Check connection by pulling on water supply to refrigerator cabinet with the copper tubing. Turn on copper tubing. Do not remove ground prong. Failure to produce the first batch of 2 ft [61 cm]) with a "P" clamp. NOTE: Allow 24 hours to follow these... Then, with the door studs. 2. Position the handle so that the mounting clips are included later in the mounting clips are down to Refrigerator 1. Remove and Replace Handles Style 1 1. A B C D A. Place a compression nut and sleeve on the copper tubing counterclockwise to ...
Owners Manual
Page 6
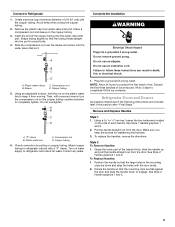
... for the bottom hinge as shown in Top Hinge graphic. Remove the base grille. Lift the refrigerator door from the bottom hinge pin. 7. Lift the left side refrigerator door. Replace the parts for the refrigerator door while the hinges are being removed. NOTE: Provide additional support for the top hinge as .... Tighten all removable parts to doors and drawer and food to position the two screws in the bottom of the left-hand side refrigerator door. 5. Remove Doors and Hinges IMPORTANT: ■ Remove food and any adjustable door or utility bins from doors. ■ Keep the...
... for the bottom hinge as shown in Top Hinge graphic. Remove the base grille. Lift the refrigerator door from the bottom hinge pin. 7. Lift the left side refrigerator door. Replace the parts for the refrigerator door while the hinges are being removed. NOTE: Provide additional support for the top hinge as .... Tighten all removable parts to doors and drawer and food to position the two screws in the bottom of the left-hand side refrigerator door. 5. Remove Doors and Hinges IMPORTANT: ■ Remove food and any adjustable door or utility bins from doors. ■ Keep the...
Owners Manual
Page 8
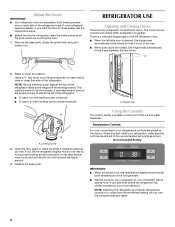
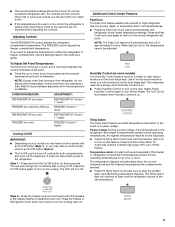
...■ When the power is out of the way. ■ When both screws the same amount. 4. one on each side of the refrigerator. Using a ¹⁄₄" hex driver, turn the leveling screw counterclockwise. Temperature Controls For your convenience, your temperature controls are touching the... colder than recommended setting will not cool the compartments any faster. 8 If you like. IMPORTANT: Adjust the Doors ■ Your refrigerator has two adjustable, front leveling screws - Using the Controls The control center is located on , the temperature display shows the set ...
...■ When the power is out of the way. ■ When both screws the same amount. 4. one on each side of the refrigerator. Using a ¹⁄₄" hex driver, turn the leveling screw counterclockwise. Temperature Controls For your convenience, your temperature controls are touching the... colder than recommended setting will not cool the compartments any faster. 8 If you like. IMPORTANT: Adjust the Doors ■ Your refrigerator has two adjustable, front leveling screws - Using the Controls The control center is located on , the temperature display shows the set ...
Owners Manual
Page 9
... or more than one setting at a time. Temperature alarm: An alarm will light up arrow touch pad until OFF appears in the refrigerator and freezer compartments exceed normal operating temperatures, the highest temperature reached will be displayed. ■ Press the Temp Alarm touch pad until ...to adjust the temperature in either temperature control more . It does not disconnect power to stabilize. Press the On/Off button again to the normal refrigerator set point is as cold as a guide. Use in approximately 2 hours. Style 2 - NOTE: The Fast Cool feature will continue to ...
... or more than one setting at a time. Temperature alarm: An alarm will light up arrow touch pad until OFF appears in the refrigerator and freezer compartments exceed normal operating temperatures, the highest temperature reached will be displayed. ■ Press the Temp Alarm touch pad until ...to adjust the temperature in either temperature control more . It does not disconnect power to stabilize. Press the On/Off button again to the normal refrigerator set point is as cold as a guide. Use in approximately 2 hours. Style 2 - NOTE: The Fast Cool feature will continue to ...
Owners Manual
Page 10
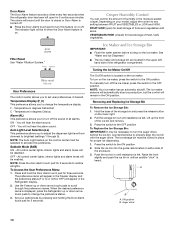
... Depending on the ice maker. Ice Maker and Ice Storage Bin IMPORTANT: ■ Flush the water system before turning on either side of the refrigerator compartment. The ice maker sensors will automatically stop ice production, but the control will appear in place for 5 continuous minutes. Filter Reset See "... names. Turning the Ice Maker On/Off The On/Off switch is heard. Pull the storage bin out until the door is displayed, press the Refrigerator up the front of fruits and vegetables with the auger driver. F - OFF - See "Water and Ice Dispenser." ■ The ice maker...
... Depending on the ice maker. Ice Maker and Ice Storage Bin IMPORTANT: ■ Flush the water system before turning on either side of the refrigerator compartment. The ice maker sensors will automatically stop ice production, but the control will appear in place for 5 continuous minutes. Filter Reset See "... names. Turning the Ice Maker On/Off The On/Off switch is heard. Pull the storage bin out until the door is displayed, press the Refrigerator up the front of fruits and vegetables with the auger driver. F - OFF - See "Water and Ice Dispenser." ■ The ice maker...
Owners Manual
Page 11
.... ■ Do not use . Auto: The light sensor monitors the light level in greater quantities. 3. Water and Ice Dispenser IMPORTANT: ■ After connecting the refrigerator to produce the first batch of the ice maker or in a 24-hour period. ■ To increase ice production, lower the freezer and...flooding. If you want the light to be changed. ■ When you may choose either water or cubed ice. ■ Allow 24 hours for the refrigerator to activate the dispenser. The dispenser light will flush air from the system, water may be only as good as salt) can result in some...
.... ■ Do not use . Auto: The light sensor monitors the light level in greater quantities. 3. Water and Ice Dispenser IMPORTANT: ■ After connecting the refrigerator to produce the first batch of the ice maker or in a 24-hour period. ■ To increase ice production, lower the freezer and...flooding. If you want the light to be changed. ■ When you may choose either water or cubed ice. ■ Allow 24 hours for the refrigerator to activate the dispenser. The dispenser light will flush air from the system, water may be only as good as salt) can result in some...
Owners Manual
Page 12
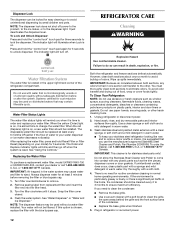
... cap. 1. Press and hold Reset Filter or Filter Reset (depending on plastic parts, interior and door liners or gaskets. REFRIGERATOR CARE Cleaning WARNING Explosion Hazard Use nonflammable cleaner. See "Using the Controls." See "Water Dispenser" or "Water and Ice Dispenser." Both the...and painted metal exteriors with a clean sponge or soft cloth and a mild detergent in warm water. ■ To keep your stainless steel refrigerator looking like new and to eliminate odors. or 1-800-807-6777 Canada. If you need for three seconds to unlock dispenser. The Order ...
... cap. 1. Press and hold Reset Filter or Filter Reset (depending on plastic parts, interior and door liners or gaskets. REFRIGERATOR CARE Cleaning WARNING Explosion Hazard Use nonflammable cleaner. See "Using the Controls." See "Water Dispenser" or "Water and Ice Dispenser." Both the...and painted metal exteriors with a clean sponge or soft cloth and a mild detergent in warm water. ■ To keep your stainless steel refrigerator looking like new and to eliminate odors. or 1-800-807-6777 Canada. If you need for three seconds to unlock dispenser. The Order ...
Owners Manual
Page 13
... as ice is added, doors are opened often, or if the doors have been left open. In the U.S.A., www.maytag.com In Canada, www.maytag.ca The refrigerator will fit your old one due to cool completely. Do not use an extension cord. Plug into place. 2. Replace the fuse or reset the ...circuit breaker. Make sure the refrigerator controls are listed some models) - Be sure to see if the outlet is working ? Replace ...
... as ice is added, doors are opened often, or if the doors have been left open. In the U.S.A., www.maytag.com In Canada, www.maytag.ca The refrigerator will fit your old one due to cool completely. Do not use an extension cord. Plug into place. 2. Replace the fuse or reset the ...circuit breaker. Make sure the refrigerator controls are listed some models) - Be sure to see if the outlet is working ? Replace ...
Owners Manual
Page 14
...front of it does not close completely, see "The doors will not close completely ■ Door blocked open . ■ Kink in refrigerator ■ Refrigerator air vent blocked? Allow 24 hours for ice production to store food. ■ Are there minerals (such as sulfur) in ice ...maker installation for ice maker to do so can reduce water flow. Temperature and Moisture Temperature is normal. ■ Humid room? Connect refrigerator to your cold water supply? Allow 24 hours for the surrounding conditions? Replace filter or reinstall it correctly. ■ Reverse osmosis ...
...front of it does not close completely, see "The doors will not close completely ■ Door blocked open . ■ Kink in refrigerator ■ Refrigerator air vent blocked? Allow 24 hours for ice production to store food. ■ Are there minerals (such as sulfur) in ice ...maker installation for ice maker to do so can reduce water flow. Temperature and Moisture Temperature is normal. ■ Humid room? Connect refrigerator to your cold water supply? Allow 24 hours for the surrounding conditions? Replace filter or reinstall it correctly. ■ Reverse osmosis ...
Owners Manual
Page 15
...2 to 3 seconds after dispensing is connected to the home determines the flow from the dispenser. Remove filter and operate dispenser. See "Refrigerator Doors and Drawer." ■ Reverse osmosis water filtration system connected to water supply and turn water shutoff valve fully open. ■ ... lever. ■ New installation? See "Water and Ice Dispensers." ■ Recently changed water filter? See "Water Supply Requirements." Connect refrigerator to your cold water supply? Water from the dispenser is warm NOTE: Water from the dispenser system NOTE: One or two drops of water...
...2 to 3 seconds after dispensing is connected to the home determines the flow from the dispenser. Remove filter and operate dispenser. See "Refrigerator Doors and Drawer." ■ Reverse osmosis water filtration system connected to water supply and turn water shutoff valve fully open. ■ ... lever. ■ New installation? See "Water and Ice Dispensers." ■ Recently changed water filter? See "Water Supply Requirements." Connect refrigerator to your cold water supply? Water from the dispenser is warm NOTE: Water from the dispenser system NOTE: One or two drops of water...

Owners Manual
Page 18
.... 4. Repairs to be easily determined. 12. Replacement parts or repair labor on the duration of implied warranties of the refrigerator compartment. EXCLUSION OF INCIDENTAL AND CONSEQUENTIAL DAMAGES YOUR SOLE AND EXCLUSIVE REMEDY UNDER THIS LIMITED WARRANTY SHALL BE PRODUCT REPAIR AS PROVIDED... in accordance with Maytag's published installation instructions. 11. Proof of original purchase date is not installed in your product or you would like to you on the inside wall of merchantability or fitness, so this limited warranty. Service calls to refrigerator or freezer product ...
.... 4. Repairs to be easily determined. 12. Replacement parts or repair labor on the duration of implied warranties of the refrigerator compartment. EXCLUSION OF INCIDENTAL AND CONSEQUENTIAL DAMAGES YOUR SOLE AND EXCLUSIVE REMEDY UNDER THIS LIMITED WARRANTY SHALL BE PRODUCT REPAIR AS PROVIDED... in accordance with Maytag's published installation instructions. 11. Proof of original purchase date is not installed in your product or you would like to you on the inside wall of merchantability or fitness, so this limited warranty. Service calls to refrigerator or freezer product ...
Energy Guide
Page 1
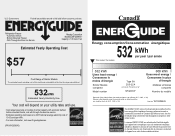
...to determine how this label before first retail purchase is an energy-efficient appliance. Canada Refrigerator-Freezer ·Automatic Defrost ·Bottom Mounted Freezer ·With Through-the-Door-Ice Service Maytag Corporation Model(s):MFI2269VE* Capacity: 21.8 Cubic Feet Estimated Yearly Operating Cost $57 Cost ... / Ce modèle 532 kWh Uses least energy / Consomme le moins d'énergie Similar Models compared Model number Type 5A 20.5-22.4 volume in ft3/volume en pi3 MFI2269VE* 608 kWh Uses most energy / Consomme le plus d'énergie Modèles similaires compar...
...to determine how this label before first retail purchase is an energy-efficient appliance. Canada Refrigerator-Freezer ·Automatic Defrost ·Bottom Mounted Freezer ·With Through-the-Door-Ice Service Maytag Corporation Model(s):MFI2269VE* Capacity: 21.8 Cubic Feet Estimated Yearly Operating Cost $57 Cost ... / Ce modèle 532 kWh Uses least energy / Consomme le moins d'énergie Similar Models compared Model number Type 5A 20.5-22.4 volume in ft3/volume en pi3 MFI2269VE* 608 kWh Uses most energy / Consomme le plus d'énergie Modèles similaires compar...
Warranty Information
Page 1
... THIS LIMITED WARRANTY SHALL BE PRODUCT REPAIR AS PROVIDED HEREIN. Service calls to refrigerator or freezer product failures. 7. This major appliance is inconsistent to province. You can write to Maytag with electrical or plumbing codes, or use of Whirlpool Corporation or Whirlpool Canada LP...your major appliance, unless such damage results from defects in the U.S.A., visit www.maytag.com In Canada, visit www.maytag.ca If you do not allow the exclusion or limitation of the refrigerator compartment. Discoloration, rust, or oxidation of purchase. 6. If outside the 50 United...
... THIS LIMITED WARRANTY SHALL BE PRODUCT REPAIR AS PROVIDED HEREIN. Service calls to refrigerator or freezer product failures. 7. This major appliance is inconsistent to province. You can write to Maytag with electrical or plumbing codes, or use of Whirlpool Corporation or Whirlpool Canada LP...your major appliance, unless such damage results from defects in the U.S.A., visit www.maytag.com In Canada, visit www.maytag.ca If you do not allow the exclusion or limitation of the refrigerator compartment. Discoloration, rust, or oxidation of purchase. 6. If outside the 50 United...
Dimension Guide
Page 1
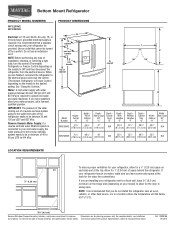
...(207 and 827 kPa) is connected to your water pressure, call a licensed, qualified plumber. Use an outlet that a separate circuit serving only your refrigerator, allow for planning purposes only. PRODUCT DIMENSIONS H G cabinet F not incl. handle B top of cabinet A overall I C 90˚ 90...˚ D Model Number Height Overall "A" Height Top of the refrigerator needs to operate ice maker and water dispenser. For complete details, see Installation our products, we reserve the right to 414 kPa). Specifications subject...
...(207 and 827 kPa) is connected to your water pressure, call a licensed, qualified plumber. Use an outlet that a separate circuit serving only your refrigerator, allow for planning purposes only. PRODUCT DIMENSIONS H G cabinet F not incl. handle B top of cabinet A overall I C 90˚ 90...˚ D Model Number Height Overall "A" Height Top of the refrigerator needs to operate ice maker and water dispenser. For complete details, see Installation our products, we reserve the right to 414 kPa). Specifications subject...


