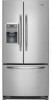
Owners Manual
Page 1
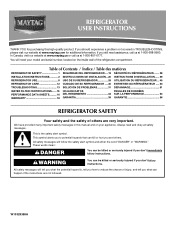
... the refrigerator compartment. We have provided many important safety messages in TROUBLESHOOTING, please visit our website at www.maytag.com for purchasing this manual and on the inside wall of others . All safety messages will need assistance, call us at 1-800-807-6777. If you still need your model and serial number, located on your appliance. If you should experience a problem not covered...
... the refrigerator compartment. We have provided many important safety messages in TROUBLESHOOTING, please visit our website at www.maytag.com for purchasing this manual and on the inside wall of others . All safety messages will need assistance, call us at 1-800-807-6777. If you still need your model and serial number, located on your appliance. If you should experience a problem not covered...
Owners Manual
Page 2
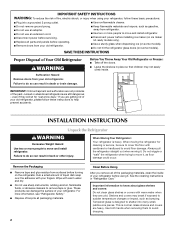
.... ■ Disconnect power before servicing. ■ Replace all parts and panels before using your old refrigerator. For more information, see "Refrigerator Safety." ■ Dispose of/recycle all of the packaging materials, clean the inside . Shelves and covers may not easily climb inside of your refrigerator before operating. ■ Remove doors from your fingers. INSTALLATION INSTRUCTIONS Unpack the Refrigerator WARNING Excessive Weight Hazard Use two or more people to sudden temperature changes or impact...
.... ■ Disconnect power before servicing. ■ Replace all parts and panels before using your old refrigerator. For more information, see "Refrigerator Safety." ■ Dispose of/recycle all of the packaging materials, clean the inside . Shelves and covers may not easily climb inside of your refrigerator before operating. ■ Remove doors from your fingers. INSTALLATION INSTRUCTIONS Unpack the Refrigerator WARNING Excessive Weight Hazard Use two or more people to sudden temperature changes or impact...
Owners Manual
Page 3
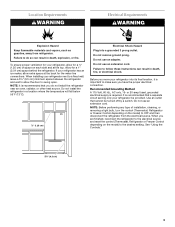
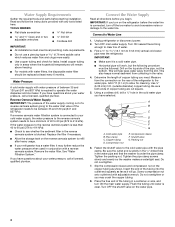
... vapors, such as gasoline, away from the electrical source. Use an outlet that you move your refrigerator has an ice maker, allow extra space at the back for a ¹⁄₂" (1.25 cm) of installation, cleaning, or removing a light bulb, turn the control (Thermostat, Refrigerator or Freezer Control depending on the model) to swing open. Failure to allow for the water line connections. Before you do so can result in death...
... vapors, such as gasoline, away from the electrical source. Use an outlet that you move your refrigerator has an ice maker, allow extra space at the back for a ¹⁄₂" (1.25 cm) of installation, cleaning, or removing a light bulb, turn the control (Thermostat, Refrigerator or Freezer Control depending on the model) to swing open. Failure to allow for the water line connections. Before you do so can result in death...
Owners Manual
Page 4
... cold water pipe you need. Read and follow the instructions provided with water pressure of copper tubing you have questions about your water pressure, call a licensed, qualified plumber. This will remain above freezing. ■ For models with adjustable wrench. Using a cordless drill, drill a ¹⁄₄" hole in the valve. 4. Add 7 ft (2.1 m) to clear line of copper tubing are cut square. 5. A B C D E F G A. If you turn off the ice maker...
... cold water pipe you need. Read and follow the instructions provided with water pressure of copper tubing you have questions about your water pressure, call a licensed, qualified plumber. This will remain above freezing. ■ For models with adjustable wrench. Using a cordless drill, drill a ¹⁄₄" hole in the valve. 4. Add 7 ft (2.1 m) to clear line of copper tubing are cut square. 5. A B C D E F G A. If you turn off the ice maker...
Owners Manual
Page 5
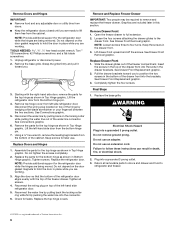
... from moving. Then, with the copper tubing. Correct any leaks. Refrigerator Doors and Drawer All graphics referenced in the following instructions are included later in death, fire, or electrical shock. 1. Make sure you keep it from the door. Grasp the lower part of ice produced. Compression nut B. See Style 1 Handle graphics 1 and 2. 2. To Replace Handles: 1. Do not use an extension cord. Avoid kinks when coiling...
... from moving. Then, with the copper tubing. Correct any leaks. Refrigerator Doors and Drawer All graphics referenced in the following instructions are included later in death, fire, or electrical shock. 1. Make sure you keep it from the door. Grasp the lower part of ice produced. Compression nut B. See Style 1 Handle graphics 1 and 2. 2. To Replace Handles: 1. Do not use an extension cord. Avoid kinks when coiling...
Owners Manual
Page 6
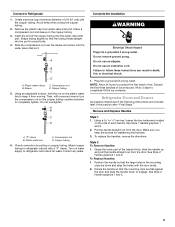
... refrigerator or disconnect power. 2. Lift the left-hand side door from left -hand side refrigerator door. 5. Replace Doors and Hinges 1. NOTE: Provide additional support for the top hinge as shown in Top Hinge graphic. Tighten all removable parts to doors and drawer and food to remove and replace the freezer drawer. Reconnect the wiring plug on top of the hinge by wedging a flat-blade screwdriver or your fingernail between the two sections. Reconnect the water line...
... refrigerator or disconnect power. 2. Lift the left-hand side door from left -hand side refrigerator door. 5. Replace Doors and Hinges 1. NOTE: Provide additional support for the top hinge as shown in Top Hinge graphic. Tighten all removable parts to doors and drawer and food to remove and replace the freezer drawer. Reconnect the wiring plug on top of the hinge by wedging a flat-blade screwdriver or your fingernail between the two sections. Reconnect the water line...

Owners Manual
Page 7
Top Hinge Cover C. 5/16" Hex Head Hinge Screws D. Loosen 4 Door Bracket Screws 7 Water Line Connection A A. 3/32" or 1/8" Setscrew Drawer Front Removal Drawer Front Replacement A A. Top Hinge Bottom Hinges A B C A. Hinge Pin Cover B. Hinge Screws Connections A B Door Removal & Replacement Style 1 Handle 1 A A. 3/32" or 1/8" Setscrew Style 1 Handle 2 Style 2 Handle 1 Style 2 Handle 2 A. Hinge Cover Screw B. Wiring Plug B. Top Hinges A B C D A. Bottom Hinge C.
Top Hinge Cover C. 5/16" Hex Head Hinge Screws D. Loosen 4 Door Bracket Screws 7 Water Line Connection A A. 3/32" or 1/8" Setscrew Drawer Front Removal Drawer Front Replacement A A. Top Hinge Bottom Hinges A B C A. Hinge Pin Cover B. Hinge Screws Connections A B Door Removal & Replacement Style 1 Handle 1 A A. 3/32" or 1/8" Setscrew Style 1 Handle 2 Style 2 Handle 1 Style 2 Handle 2 A. Hinge Cover Screw B. Wiring Plug B. Top Hinges A B C D A. Bottom Hinge C.
Owners Manual
Page 8
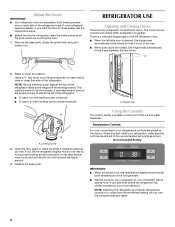
... ice and water dispenser. If you want the door to close easier, use the instructions below. ■ Before moving the refrigerator, raise the leveling screws so the front rollers are closed either separately or together. If your temperature controls are two refrigerator compartment doors. It may spoil. Hinged seal A A. Temperature Controls For your convenience, your refrigerator seems unsteady or you add food before adding food. Leveling screw 3. Remove...
... ice and water dispenser. If you want the door to close easier, use the instructions below. ■ Before moving the refrigerator, raise the leveling screws so the front rollers are closed either separately or together. If your temperature controls are two refrigerator compartment doors. It may spoil. Hinged seal A A. Temperature Controls For your convenience, your refrigerator seems unsteady or you add food before adding food. Leveling screw 3. Remove...
Owners Manual
Page 9
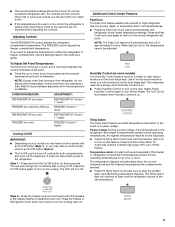
... juice is as cold as a guide. Temp Alarm The Temp Alarm feature provides temperature information in approximately 2 hours. Press and hold the On/Off button for the temperature to help reduce moisture on the door hinge seal. The controls are not blocked before adjusting the controls. CONDITION/REASON: ADJUSTMENT: REFRIGERATOR too warm REFRIGERATOR Control 1° lower FREEZER too warm/too little ice FREEZER Control 1° lower REFRIGERATOR too cold REFRIGERATOR Control 1° higher FREEZER too cold FREEZER Control 1° higher Cooling On/Off...
... juice is as cold as a guide. Temp Alarm The Temp Alarm feature provides temperature information in approximately 2 hours. Press and hold the On/Off button for the temperature to help reduce moisture on the door hinge seal. The controls are not blocked before adjusting the controls. CONDITION/REASON: ADJUSTMENT: REFRIGERATOR too warm REFRIGERATOR Control 1° lower FREEZER too warm/too little ice FREEZER Control 1° lower REFRIGERATOR too cold REFRIGERATOR Control 1° higher FREEZER too cold FREEZER Control 1° higher Cooling On/Off...
Owners Manual
Page 10
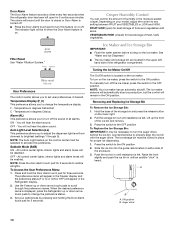
... or Door Alarm is displayed, press the Refrigerator up the front of the ice bin and remove. 3. See "Water and Ice Dispenser." ■ The ice maker and storage bin are located in the moisture-sealed crisper. To turn off . ■ Press the Door Alarm touch pad to set user preferences, if desired. Removing and Replacing Ice Storage Bin To Remove the Ice Storage Bin: 1. Slide the ice bin into the guide rails located on either side of humidity in the upper left open...
... or Door Alarm is displayed, press the Refrigerator up the front of the ice bin and remove. 3. See "Water and Ice Dispenser." ■ The ice maker and storage bin are located in the moisture-sealed crisper. To turn off . ■ Press the Door Alarm touch pad to set user preferences, if desired. Removing and Replacing Ice Storage Bin To Remove the Ice Storage Bin: 1. Slide the ice bin into the guide rails located on either side of humidity in the upper left open...
Owners Manual
Page 11
... "light" button a second time. Wait 24 hours between adjustments. Avoid connecting the ice maker to a water source, flush the water system. NOTE: After five minutes of the ice maker and lead to poor quality ice. The light above the control indicates your ice maker. Remove the container to apply a lot of the dispenser. The dispenser light will automatically turn the dispenser light off ) until water begins to flow. If you use anything on the control panel. Press...
... "light" button a second time. Wait 24 hours between adjustments. Avoid connecting the ice maker to a water source, flush the water system. NOTE: After five minutes of the ice maker and lead to poor quality ice. The light above the control indicates your ice maker. Remove the container to apply a lot of the dispenser. The dispenser light will automatically turn the dispenser light off ) until water begins to flow. If you use anything on the control panel. Press...
Owners Manual
Page 12
... refrigerator or reconnect power. 12 Do not allow the Stainless Steel Cleaner and Polish to come into the filter head. 3. The indicator light will not be used on . Water Filtration System The water filter is located in warm water. ■ To keep your water dispenser or ice maker decreases noticeably. See "Water Dispenser" or "Water and Ice Dispenser." If you use abrasive or harsh cleaners such as the trim pieces, dispenser covers or door gaskets. Dispenser Lock The dispenser...
... refrigerator or reconnect power. 12 Do not allow the Stainless Steel Cleaner and Polish to come into the filter head. 3. The indicator light will not be used on . Water Filtration System The water filter is located in warm water. ■ To keep your water dispenser or ice maker decreases noticeably. See "Water Dispenser" or "Water and Ice Dispenser." If you use abrasive or harsh cleaners such as the trim pieces, dispenser covers or door gaskets. Dispenser Lock The dispenser...
Owners Manual
Page 13
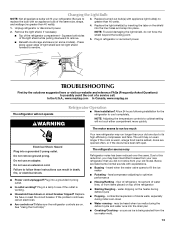
... the ice maker ■ Pulsating - Plug in a lamp to coldest setting will not operate WARNING Refrigerator Operation ■ New installation? heard when the water valve opens to follow these instructions can result in refrigerator or reconnect power. water dripping on . contraction/expansion of inside walls, especially during defrost cycle ■ Popping - NOTE: To avoid damaging the light shield, do not force the shield beyond the locking point. 5. NOTE: Adjusting the temperature controls to...
... the ice maker ■ Pulsating - Plug in a lamp to coldest setting will not operate WARNING Refrigerator Operation ■ New installation? heard when the water valve opens to follow these instructions can result in refrigerator or reconnect power. water dripping on . contraction/expansion of inside walls, especially during defrost cycle ■ Popping - NOTE: To avoid damaging the light shield, do not force the shield beyond the locking point. 5. NOTE: Adjusting the temperature controls to...
Owners Manual
Page 14
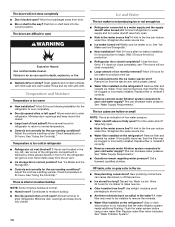
...Replace water filter when indicated. Check temperature in the water? Contributes to make new ice. ■ Odor transfer from the air vent. ■ Ice storage bin in the top, left open . ■ Kink in the line can cause discolored or off-flavored ice. ■ Ice stored too long? Connect refrigerator to your cold water supply? See "Ice Maker and Ice Storage Bin." ■ New installation? Remove filter and operate ice maker. Replace filter or reinstall it correctly. ■ Reverse osmosis water filtration system connected to water supply and turn water shutoff valve...
...Replace water filter when indicated. Check temperature in the water? Contributes to make new ice. ■ Odor transfer from the air vent. ■ Ice storage bin in the top, left open . ■ Kink in the line can cause discolored or off-flavored ice. ■ Ice stored too long? Connect refrigerator to your cold water supply? See "Ice Maker and Ice Storage Bin." ■ New installation? Remove filter and operate ice maker. Replace filter or reinstall it correctly. ■ Reverse osmosis water filtration system connected to water supply and turn water shutoff valve...
Owners Manual
Page 15
... glass of water after releasing the dispenser lever. ■ New installation? Connect refrigerator to 50°F (10°C). ■ New installation? Remove filter and operate dispenser. Close the door firmly. See "Water and Ice Dispensers." Flush the water system. Make sure the refrigerator is leaking from the dispenser. WATER FILTER CERTIFICATIONS 15 See "Water Supply Requirements." See "Refrigerator Doors and Drawer." ■ Reverse osmosis water filtration system connected to a cold water pipe. Water is connected to your cold water supply? See "Water and Ice...
... glass of water after releasing the dispenser lever. ■ New installation? Connect refrigerator to 50°F (10°C). ■ New installation? Remove filter and operate dispenser. Close the door firmly. See "Water and Ice Dispensers." Flush the water system. Make sure the refrigerator is leaking from the dispenser. WATER FILTER CERTIFICATIONS 15 See "Water Supply Requirements." See "Refrigerator Doors and Drawer." ■ Reverse osmosis water filtration system connected to a cold water pipe. Water is connected to your cold water supply? See "Water and Ice...
Owners Manual
Page 16
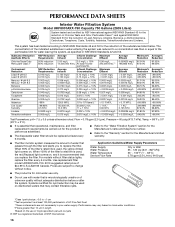
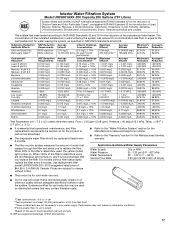
....99% >99.99% 98.80% 97.90% >96.6% Test Parameters: pH = 7.5 ± 0.5 unless otherwise noted. When 90% of $44.99 U.S.A./$49.95 Canada. Use replacement filter model UKF8001AXX-750. 2010 suggested retail price of the filter's rated life is used, the yellow (Order) light comes on. Application Guidelines/Water Supply Parameters Water Supply Water Pressure Water Temperature Service Flow Rate City or Well 35 - 120 psi (241 - 827...
....99% >99.99% 98.80% 97.90% >96.6% Test Parameters: pH = 7.5 ± 0.5 unless otherwise noted. When 90% of $44.99 U.S.A./$49.95 Canada. Use replacement filter model UKF8001AXX-750. 2010 suggested retail price of the filter's rated life is used, the yellow (Order) light comes on. Application Guidelines/Water Supply Parameters Water Supply Water Pressure Water Temperature Service Flow Rate City or Well 35 - 120 psi (241 - 827...
Owners Manual
Page 17
... the system. Use replacement filter model UKF8001AXX-200. 2010 suggested retail price of Lead, Mercury, Atrazine, Benzene, p-Dichlorobenzene, Carbofuran, Toxaphene, Cysts, Turbidity, Asbestos, O-Dichlorobenzene, Ethylbenzene, Chlorobenzene, Endrin, Tetrachloroethylene and Lindane. Systems certified for water leaving the system, as advertised. ■ The disposable water filter should be used , the yellow (Order) light comes on disinfected waters that operational, maintenance, and filter replacement requirements be...
... the system. Use replacement filter model UKF8001AXX-200. 2010 suggested retail price of Lead, Mercury, Atrazine, Benzene, p-Dichlorobenzene, Carbofuran, Toxaphene, Cysts, Turbidity, Asbestos, O-Dichlorobenzene, Ethylbenzene, Chlorobenzene, Endrin, Tetrachloroethylene and Lindane. Systems certified for water leaving the system, as advertised. ■ The disposable water filter should be used , the yellow (Order) light comes on disinfected waters that operational, maintenance, and filter replacement requirements be...
Owners Manual
Page 18
... Maytag at the address below . This major appliance is required to schedule service, you need assistance using your major appliance, to replace or repair house fuses, or to be repaired in the U.S.A., call 1-800-807-6777. Replacement parts or repair labor on how to use your product or you also may not apply to published user or operator instructions and/or installation instructions. 2. This warranty gives you specific...
... Maytag at the address below . This major appliance is required to schedule service, you need assistance using your major appliance, to replace or repair house fuses, or to be repaired in the U.S.A., call 1-800-807-6777. Replacement parts or repair labor on how to use your product or you also may not apply to published user or operator instructions and/or installation instructions. 2. This warranty gives you specific...


