
Use and Care Guide
Page 4
.... Temp Alarm Cube Use to order or replace the filter. Use to activate or deactivate the light. Use to defrost less frequently when you are preset at the factory at 38 ° F (3° C) in the refrigerator compartment and 0° F (-18 ° C) in the refrigerator and freezer compartments. Press and hold pad for three seconds. Indicates a door has been left open a door and the light will turn off . Light Max Cool Vacation Mode Use...
.... Temp Alarm Cube Use to order or replace the filter. Use to activate or deactivate the light. Use to defrost less frequently when you are preset at the factory at 38 ° F (3° C) in the refrigerator compartment and 0° F (-18 ° C) in the refrigerator and freezer compartments. Press and hold pad for three seconds. Indicates a door has been left open a door and the light will turn off . Light Max Cool Vacation Mode Use...

Use and Care Guide
Page 5
... water supply connection before plugging it snaps into a recess where the top of the refrigerator is level from floor to top of refrigerator during transport by using the leveling procedure under Leveling. Materials Needed: • %" hex head driver • Carpenter's level. 1. Turn adjustment screws I :B) to side. . Remove and discard shelf packaging and tape. Some clearance may dent or damage outside finish of hinge cap to unclip. 2. De not remove...
... water supply connection before plugging it snaps into a recess where the top of the refrigerator is level from floor to top of refrigerator during transport by using the leveling procedure under Leveling. Materials Needed: • %" hex head driver • Carpenter's level. 1. Turn adjustment screws I :B) to side. . Remove and discard shelf packaging and tape. Some clearance may dent or damage outside finish of hinge cap to unclip. 2. De not remove...
Use and Care Guide
Page 6
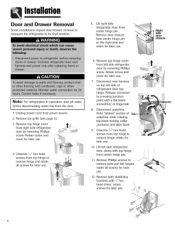
... refrigerators in operation, shut off water I . Unscrew _6" hex head screws from center hinge pin on top left side refrigerator door, along with top hinge, from top hinge to remove right and left side refrigerator door by removing Phillips screw. retain screws for later use . . Hold "tabbed" section of refrigerator door top hinge. Installation Door and Drawer Removal Some installations require door/drawer removal to transport the refrigerator to remove hinge; Remove door closure from top hinge to its final location. . Retain screw and cover...
... refrigerators in operation, shut off water I . Unscrew _6" hex head screws from center hinge pin on top left side refrigerator door, along with top hinge, from top hinge to remove right and left side refrigerator door by removing Phillips screw. retain screws for later use . . Hold "tabbed" section of refrigerator door top hinge. Installation Door and Drawer Removal Some installations require door/drawer removal to transport the refrigerator to remove hinge; Remove door closure from top hinge to its final location. . Retain screw and cover...
Use and Care Guide
Page 9
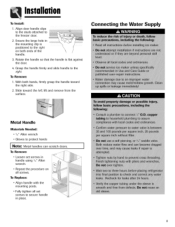
Grasp the handle firmly and slide handle to the freezer door. 2. I Note: Metal handles can scratch doors. With both ends of the handle. 3. Connecting the Water Supply Metal Handle Materials Needed: • %2"Allen wrench • Gloves to secure handle in place. Installation To Install: 1. To Remove: 1. To Replace: • Align handle with the mounting posts. • Fully tighten all screws. Slide toward the right side. 2. Rotate the handle so that...
Grasp the handle firmly and slide handle to the freezer door. 2. I Note: Metal handles can scratch doors. With both ends of the handle. 3. Connecting the Water Supply Metal Handle Materials Needed: • %2"Allen wrench • Gloves to secure handle in place. Installation To Install: 1. To Remove: 1. To Replace: • Align handle with the mounting posts. • Fully tighten all screws. Slide toward the right side. 2. Rotate the handle so that...
Use and Care Guide
Page 11
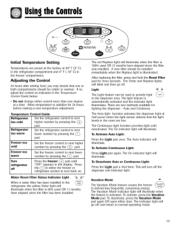
... Temperature Control Guide below. • Do not change either door. The On indicator light will illuminate. The On indicator light will illuminate. Set the freezer control to next lower number by pressing the _ pad. The red Replace light will blink and then go off Control Guide Set the refrigerator control to normal operating mode. 10 After replacing the filter, press and hold the Reset Filter pad for 24 hours before making a new temperature adjustment. The Order and Replace lights will illuminate when the filter...
... Temperature Control Guide below. • Do not change either door. The On indicator light will illuminate. The On indicator light will illuminate. Set the freezer control to next lower number by pressing the _ pad. The red Replace light will blink and then go off Control Guide Set the refrigerator control to normal operating mode. 10 After replacing the filter, press and hold the Reset Filter pad for 24 hours before making a new temperature adjustment. The Order and Replace lights will illuminate when the filter...
Use and Care Guide
Page 12
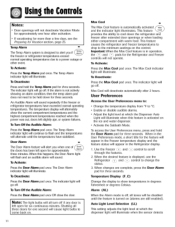
...) This setting adjusts the light level at which the dispenser light will alternately show temperatures in degrees Fahrenheit or degrees Celsius. UsingtheControls Notes: • Door openings will not deactivate Vacation Mode for approximately one of the doors has been left open for one second will alert you if (, _a_P _ the freezer or refrigerator temperatures exceed normal operating temperatures due to change the status. 3. Door Alarm o The Door Alarm feature will cause light bulbs to cool down...
...) This setting adjusts the light level at which the dispenser light will alternately show temperatures in degrees Fahrenheit or degrees Celsius. UsingtheControls Notes: • Door openings will not deactivate Vacation Mode for approximately one of the doors has been left open for one second will alert you if (, _a_P _ the freezer or refrigerator temperatures exceed normal operating temperatures due to change the status. 3. Door Alarm o The Door Alarm feature will cause light bulbs to cool down...
Use and Care Guide
Page 13
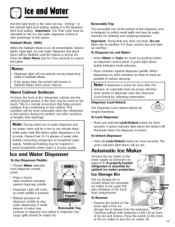
... removed for cleaning and emptying purposes. Ice and Water Dispenser To Use Dispenser Paddle: • Choose Water selection from dispenser control panel. • Press a sturdy, wide-mouthed container against dispenser paddle. Removable Tray The removable tray at the bottom of poor quality. When dispensing ice, hold the Lock/Unlock button for optimal ice maker production. Automatic Ice Maker Connect the ice maker to the water supply as possible to restore the lights. Ice Storage Bin The ice storage bin is designed to turn the ice maker...
... removed for cleaning and emptying purposes. Ice and Water Dispenser To Use Dispenser Paddle: • Choose Water selection from dispenser control panel. • Press a sturdy, wide-mouthed container against dispenser paddle. Removable Tray The removable tray at the bottom of poor quality. When dispensing ice, hold the Lock/Unlock button for optimal ice maker production. Automatic Ice Maker Connect the ice maker to the water supply as possible to restore the lights. Ice Storage Bin The ice storage bin is designed to turn the ice maker...
Use and Care Guide
Page 14
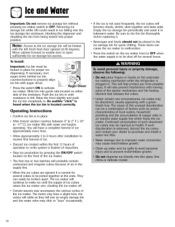
... ice bin completely in ice falling into the ice storage bin enclosure, blocking the dispenser and disabling the bin from being locked into guide rails located on the ice maker front to OFF when the water supply is to properly align ice bin with the left fresh food door opened at the ends. An audible "click" is heard when the ice bin is felt. Operating Instructions • Confirm ice bin is in the ice storage bin...
... ice bin completely in ice falling into the ice storage bin enclosure, blocking the dispenser and disabling the bin from being locked into guide rails located on the ice maker front to OFF when the water supply is to properly align ice bin with the left fresh food door opened at the ends. An audible "click" is heard when the ice bin is felt. Operating Instructions • Confirm ice bin is in the ice storage bin...

Use and Care Guide
Page 15
... Installation The water filter is located in system may cause water and cartridge to take place more often. Remove sealing label from filter head. 2. The filter should be changed at least 2 minutes before removing the filter or blue bypass cap for later use where water is microbiologically unsale or with water of filter and insert into sink, and dispose in filter cover and continue with blue bypass cap. To purchase a replacement water filter cartridge...
... Installation The water filter is located in system may cause water and cartridge to take place more often. Remove sealing label from filter head. 2. The filter should be changed at least 2 minutes before removing the filter or blue bypass cap for later use where water is microbiologically unsale or with water of filter and insert into sink, and dispose in filter cover and continue with blue bypass cap. To purchase a replacement water filter cartridge...
Use and Care Guide
Page 16
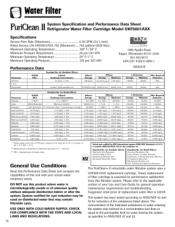
...9Z26% Minimum 96.84% 99.52% 98.94% Min. psi/241 kPA Minimum Operating Temperature 3..3. ° F/1 ° C Maximum Operating Pressure 1..2. 0 psi/827 kPA a 3MC,_¢qm_,y 1000 Apollo Road Eagan, ...049 NTU < 1 #/L < 1 #/L WaterFilter H SRyesfrtiegmeraStopreciWficaatetironFiltaenr dCaPretrrfidogrme anMcoedeDl atUaKFS8h0e0e1tAXX Specifications Service Flow Rate (Maximum 0...78 GPM (2.9 L/min} Rated Service Life U KF8001AXX-750 (Maximum) ......750 gallons/2838 liters Maximum Operating Temperature 1..00° F/38 ° C Minimum Pressure Requirement 3..5. Required Reduction ...
...9Z26% Minimum 96.84% 99.52% 98.94% Min. psi/241 kPA Minimum Operating Temperature 3..3. ° F/1 ° C Maximum Operating Pressure 1..2. 0 psi/827 kPA a 3MC,_¢qm_,y 1000 Apollo Road Eagan, ...049 NTU < 1 #/L < 1 #/L WaterFilter H SRyesfrtiegmeraStopreciWficaatetironFiltaenr dCaPretrrfidogrme anMcoedeDl atUaKFS8h0e0e1tAXX Specifications Service Flow Rate (Maximum 0...78 GPM (2.9 L/min} Rated Service Life U KF8001AXX-750 (Maximum) ......750 gallons/2838 liters Maximum Operating Temperature 1..00° F/38 ° C Minimum Pressure Requirement 3..5. Required Reduction ...
Use and Care Guide
Page 18
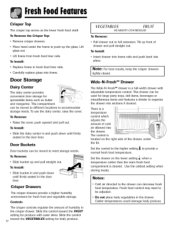
... cold air allowed into sections if desired. To Install: • Insert drawer into frame rails and push back into frame. Door Storage Dairy Center The dairy center provides convenient door storage for fresh fruit and vegetable storage. The control is a temperature control which adjusts the amount of humidity in fresh food liner rails. • Carefully replace glass into place. To Remove the Crisper Top: • Remove crisper drawers...
... cold air allowed into sections if desired. To Install: • Insert drawer into frame rails and push back into frame. Door Storage Dairy Center The dairy center provides convenient door storage for fresh fruit and vegetable storage. The control is a temperature control which adjusts the amount of humidity in fresh food liner rails. • Carefully replace glass into place. To Remove the Crisper Top: • Remove crisper drawers...
Use and Care Guide
Page 19
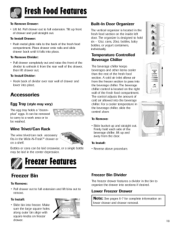
... inside left To Install Drawer: door. cans, 20oz. to carry to a work area or to be laid in the fresh food section on the right Accessories wall of cold air allowed into the beverage Egg Tray (style may be washed. FreezeFreotures Freezer Bin To Remove: • Pull drawer out to full extension and lift bins out to unhook it falls into sections if desired. Temperature Controlled...
... inside left To Install Drawer: door. cans, 20oz. to carry to a work area or to be laid in the fresh food section on the right Accessories wall of cold air allowed into the beverage Egg Tray (style may be washed. FreezeFreotures Freezer Bin To Remove: • Pull drawer out to full extension and lift bins out to unhook it falls into sections if desired. Temperature Controlled...
Use and Care Guide
Page 23
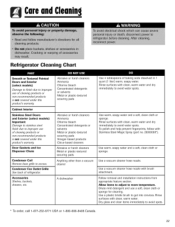
... Refrigerator Cleaning Chart Smooth or Textured Painted Doors and Exterior (select models) Damage to finish due to improper use of cleaning products or non-recommended products is not covered under this product's warranty. Door Gaskets and Ice Dispenser Chute Condenser Coil Remove base grille to get into crevices. To polish and help prevent fingerprints, follow with brush attachment. Use warm, soapy water and a soft, clean cloth or sponge. Use...
... Refrigerator Cleaning Chart Smooth or Textured Painted Doors and Exterior (select models) Damage to finish due to improper use of cleaning products or non-recommended products is not covered under this product's warranty. Door Gaskets and Ice Dispenser Chute Condenser Coil Remove base grille to get into crevices. To polish and help prevent fingerprints, follow with brush attachment. Use warm, soapy water and a soft, clean cloth or sponge. Use...
Use and Care Guide
Page 26
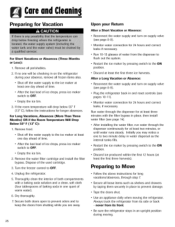
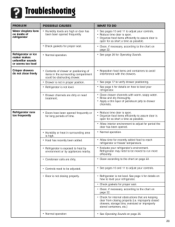
... the ice bin. 2. Run 10-15 glasses of the used cartridge. 3. After a Long Vacation or Absence: • Reconnect the water supply and turn on supply valve (see page 8-9). • Plug the refrigerator back in an upright position during your Return After a Short Vacation or Absence: Reconnect the water supply and turn on supply valve (see page 8-9). Turn the freezer control to Move Follow the above instructions for long vacations/absences, through the dispenser...
... the ice bin. 2. Run 10-15 glasses of the used cartridge. 3. After a Long Vacation or Absence: • Reconnect the water supply and turn on supply valve (see page 8-9). • Plug the refrigerator back in an upright position during your Return After a Short Vacation or Absence: Reconnect the water supply and turn on supply valve (see page 8-9). Turn the freezer control to Move Follow the above instructions for long vacations/absences, through the dispenser...
Use and Care Guide
Page 27
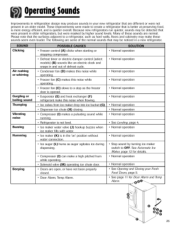
... turning ice maker switch to OFF. Clicking Air rushing or whirring Gurgling or boiling sound Thumping Vibrating noise Buzzing Humming Beeping • Freezer control (A) clicks when starting or stopping compressor. • Defrost timer or electric damper control (select models) (B) sounds like an electric clock and snaps in the 'on' position without water connection. Please note that are different or were not present in an older model. Door Alarm, Temp Alarm. • Normal operation...
... turning ice maker switch to OFF. Clicking Air rushing or whirring Gurgling or boiling sound Thumping Vibrating noise Buzzing Humming Beeping • Freezer control (A) clicks when starting or stopping compressor. • Defrost timer or electric damper control (select models) (B) sounds like an electric clock and snaps in the 'on' position without water connection. Please note that are different or were not present in an older model. Door Alarm, Temp Alarm. • Normal operation...
Use and Care Guide
Page 28
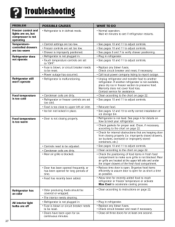
... breaker needs to be reset. • Power outage has occurred. • Refrigerator is malfunctioning. Refrigerator has an odor All interior light bulbs are located at least one second. Troubleshooting Freezer control and lights are on, but compressor is not operating Temperaturecontrolled drawers are too warm Refrigerator does not operate Refrigerator still won't operate • Refrigerator is in defrost mode. • Control settings are too low. • Freezer controls are set too low. • Drawer is improperly positioned. • Refrigerator is not plugged...
... breaker needs to be reset. • Power outage has occurred. • Refrigerator is malfunctioning. Refrigerator has an odor All interior light bulbs are located at least one second. Troubleshooting Freezer control and lights are on, but compressor is not operating Temperaturecontrolled drawers are too warm Refrigerator does not operate Refrigerator still won't operate • Refrigerator is in defrost mode. • Control settings are too low. • Freezer controls are set too low. • Drawer is improperly positioned. • Refrigerator is not plugged...
Use and Care Guide
Page 29
Troubleshooting ++!++ Water droplets form on inside of petroleum jelly to drawer channels. Refrigerator or ice maker makes unfamiliar sounds or seems too loud Crisper drawers do not close freely • Normal operation. • Contents of drawer or positioning of items in the surrounding compartment could be adjusted. • Door is not closing properly. • Normal operation • See pages 10 and 11 to adjust your refrigerator. • Clean drawer channels...
Troubleshooting ++!++ Water droplets form on inside of petroleum jelly to drawer channels. Refrigerator or ice maker makes unfamiliar sounds or seems too loud Crisper drawers do not close freely • Normal operation. • Contents of drawer or positioning of items in the surrounding compartment could be adjusted. • Door is not closing properly. • Normal operation • See pages 10 and 11 to adjust your refrigerator. • Clean drawer channels...
Use and Care Guide
Page 30
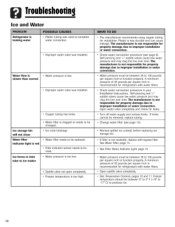
... water pressure and may clog the line over time. Plastic is recommended for refrigerators with water filters. • Open saddle valve completely. • See Temperature Controls, pages 10 and 11. Water flow is slower than normal • Water pressure is leaking water • Plastic tubing was used to produce ice. 29 Troubleshooting Ice and Water Refrigerator is low. • Improper water valve was installed. The manufacturer is not responsible for leaks. • Turn off water supply and remove...
... water pressure and may clog the line over time. Plastic is recommended for refrigerators with water filters. • Open saddle valve completely. • See Temperature Controls, pages 10 and 11. Water flow is slower than normal • Water pressure is leaking water • Plastic tubing was used to produce ice. 29 Troubleshooting Ice and Water Refrigerator is low. • Improper water valve was installed. The manufacturer is not responsible for leaks. • Turn off water supply and remove...

Use and Care Guide
Page 31
Temp Alarm Light is still running • Exceeded normal operating temperatures. • Control has been set to Sabbath Mode. Door alarm set to function properly. Freezer temperature should be between 0° to 2° F (-18° to -17° C) to produce ice. • Do not attempt to page 11. • See Temperature display on dispenser and interior lights are off water supply and remove kinks. If kinks cannot be removed, replace tubing. • Water pressure must be between 35...
Temp Alarm Light is still running • Exceeded normal operating temperatures. • Control has been set to Sabbath Mode. Door alarm set to function properly. Freezer temperature should be between 0° to 2° F (-18° to -17° C) to produce ice. • Do not attempt to page 11. • See Temperature display on dispenser and interior lights are off water supply and remove kinks. If kinks cannot be removed, replace tubing. • Water pressure must be between 35...
Use and Care Guide
Page 32
... installation errors. Instruct the user on owner's responsibilities for product service in your Use and Care Guide or call the dealer from Maytag Services, LLC, Customer Assistance. Expenses for travel and transportation for warranty service. • If the dealer or service company cannot resolve the problem, write to : a. Refer to WARRANTY for further information on the proper use , or acts of the problem you are void if the original serial numbers...
... installation errors. Instruct the user on owner's responsibilities for product service in your Use and Care Guide or call the dealer from Maytag Services, LLC, Customer Assistance. Expenses for travel and transportation for warranty service. • If the dealer or service company cannot resolve the problem, write to : a. Refer to WARRANTY for further information on the proper use , or acts of the problem you are void if the original serial numbers...


