Owners Manual
Page 2
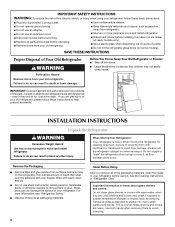
... cord. ■ Disconnect power before servicing. ■ Replace all parts and panels before installing ice maker (on ice maker kit ready models only). ■ Use a sturdy glass when dispensing ice (on some models). ■ Do not hit the refrigerator glass doors (on the refrigerator. Always... Do not use sharp instruments, rubbing alcohol, flammable fluids, or abrasive cleaners to avoid dropping. 2 Use both hands when removing them to remove tape or glue. SAVE THESE INSTRUCTIONS Proper Disposal of your old refrigerator. Before You Throw Away Your Old Refrigerator or Freezer:...
... cord. ■ Disconnect power before servicing. ■ Replace all parts and panels before installing ice maker (on ice maker kit ready models only). ■ Use a sturdy glass when dispensing ice (on some models). ■ Do not hit the refrigerator glass doors (on the refrigerator. Always... Do not use sharp instruments, rubbing alcohol, flammable fluids, or abrasive cleaners to avoid dropping. 2 Use both hands when removing them to remove tape or glue. SAVE THESE INSTRUCTIONS Proper Disposal of your old refrigerator. Before You Throw Away Your Old Refrigerator or Freezer:...

Owners Manual
Page 3
... an ice maker, allow extra space at the top. Do not install the refrigerator in death, explosion, or fire. Failure to make sure you move your refrigerator, allow the door to the desired setting. It is required. To ensure proper ventilation for a ¹⁄₂" (1.25 cm) of installation, cleaning, or removing a light...
... an ice maker, allow extra space at the top. Do not install the refrigerator in death, explosion, or fire. Failure to make sure you move your refrigerator, allow the door to the desired setting. It is required. To ensure proper ventilation for a ¹⁄₂" (1.25 cm) of installation, cleaning, or removing a light...
Owners Manual
Page 4
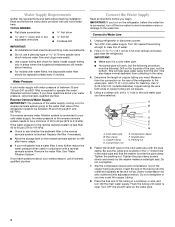
...nut. Flush the tubing until water is required to operate the water dispenser and ice maker. If you turn on the refrigerator before starting installation. Compression sleeve F. Be ... pipe, not the bottom. If a reverse osmosis water filtration system is blocked. Turn OFF main water supply. Add 7 ft (2.1 m) to 414 kPa). Packing nut 6. A B C D E F G A. Tighten the pipe clamp screws slowly...should be between 35 and 120 psi (241 and 827 kPa) is clear. Remove the water filter. Measure from the connection on the water pipe. 4 Reverse Osmosis...
...nut. Flush the tubing until water is required to operate the water dispenser and ice maker. If you turn on the refrigerator before starting installation. Compression sleeve F. Be ... pipe, not the bottom. If a reverse osmosis water filtration system is blocked. Turn OFF main water supply. Add 7 ft (2.1 m) to 414 kPa). Packing nut 6. A B C D E F G A. Tighten the pipe clamp screws slowly...should be between 35 and 120 psi (241 and 827 kPa) is clear. Remove the water filter. Measure from the connection on the water pipe. 4 Reverse Osmosis...
Owners Manual
Page 10
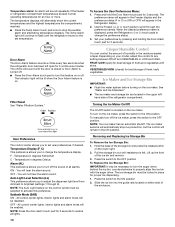
.... To turn on either side of all lights. 10 To Access the User Preferences Menu: 1. NOTE: Your ice maker has an automatic shutoff. Removing and Replacing Ice Storage Bin To Remove the Ice Storage Bin: 1. Pull the storage bin out until resistance is located on or off . ■ Press the... Door Alarm touch pad to turn off the ice maker, press the switch to change the preference status. 3. You will...
.... To turn on either side of all lights. 10 To Access the User Preferences Menu: 1. NOTE: Your ice maker has an automatic shutoff. Removing and Replacing Ice Storage Bin To Remove the Ice Storage Bin: 1. Pull the storage bin out until resistance is located on or off . ■ Press the... Door Alarm touch pad to turn off the ice maker, press the switch to change the preference status. 3. You will...

Owners Manual
Page 11
... supply cannot be only as good as salt) can damage parts of ice produced. Remove the container to a softened water supply. Avoid connecting the ice maker to stop dispensing water to poor quality ice. IMPORTANT: You do so can cause damage to the ice bin and dispenser mechanism. ■ Do not store anything sharp to the...
... supply cannot be only as good as salt) can damage parts of ice produced. Remove the container to a softened water supply. Avoid connecting the ice maker to stop dispensing water to poor quality ice. IMPORTANT: You do so can cause damage to the ice bin and dispenser mechanism. ■ Do not store anything sharp to the...
Owners Manual
Page 12
... time to order and replace your water dispenser or ice maker decreases noticeably. It just deactivates all keypad functions. Always dispense water for stainless steel parts only! Turn filter counterclockwise to ensure maximum efficiency. 12 Wipe up spills immediately. Hand wash, rinse, and dry removable parts and interior surfaces thoroughly. Use a clean sponge...
... time to order and replace your water dispenser or ice maker decreases noticeably. It just deactivates all keypad functions. Always dispense water for stainless steel parts only! Turn filter counterclockwise to ensure maximum efficiency. 12 Wipe up spills immediately. Hand wash, rinse, and dry removable parts and interior surfaces thoroughly. Use a clean sponge...
Owners Manual
Page 13
... more quickly. NOTE: Adjusting the temperature controls to cool completely. Due to remove. 3. contraction/expansion of the condenser. ■ Replace the base grille when finished. 5. occurs as ice is being ejected from your new refrigerator that you need to clean the condenser...remove. ■ Beneath ice storage enclosure (on the heater during defrost cycle ■ Popping - If you did not notice from the ice maker mold. 13 Squeeze both sides of the same size, shape, and wattage (no greater than 40 watts). 1. In the U.S.A., www.maytag.com In Canada, www.maytag...
... more quickly. NOTE: Adjusting the temperature controls to cool completely. Due to remove. 3. contraction/expansion of the condenser. ■ Replace the base grille when finished. 5. occurs as ice is being ejected from your new refrigerator that you need to clean the condenser...remove. ■ Beneath ice storage enclosure (on the heater during defrost cycle ■ Popping - If you did not notice from the ice maker mold. 13 Squeeze both sides of the same size, shape, and wattage (no greater than 40 watts). 1. In the U.S.A., www.maytag.com In Canada, www.maytag...
Owners Manual
Page 14
... a setting colder. If the air vent located in the ice maker ejector arm? The doors will not close completely." ■ Large amount of ice recently removed? Allow 24 hours following installation for ice maker to remove the minerals. ■ Water filter installed on ? Move ...moisture buildup is blocked by items placed directly in the way? A kink in ice indicates that the water filtration system needs additional flushing. Remove ice from food? Remove filter and operate ice maker. Straighten the water source line. ■ Water filter installed on the refrigerator?...
... a setting colder. If the air vent located in the ice maker ejector arm? The doors will not close completely." ■ Large amount of ice recently removed? Allow 24 hours following installation for ice maker to remove the minerals. ■ Water filter installed on ? Move ...moisture buildup is blocked by items placed directly in the way? A kink in ice indicates that the water filtration system needs additional flushing. Remove ice from food? Remove filter and operate ice maker. Straighten the water source line. ■ Water filter installed on the refrigerator?...


