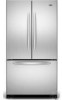

Owners Manual
Page 1
...;N...22 INSTRUCTIONS D'INSTALLATION...... 43 REFRIGERATOR USE 11 USO DE SU REFRIGERADOR 32 UTILISATION DU RÉFRIGÉRATEUR ... 53 REFRIGERATOR CARE 15 CUIDADO DE SU REFRIGERADOR .....36 ENTRETIEN DU RÉFRIGÉRATEUR ..... 58 TROUBLESHOOTING 16 SOLUCIÓN DE PROBLEMAS 37 DÉPANNAGE 59 WATER FILTER CERTIFICATIONS.......18 HOJA DE DATOS DEL PRODUCTO .....40 FEUILLES DE DONNÉES PRODUCT DATA SHEETS 19...
...;N...22 INSTRUCTIONS D'INSTALLATION...... 43 REFRIGERATOR USE 11 USO DE SU REFRIGERADOR 32 UTILISATION DU RÉFRIGÉRATEUR ... 53 REFRIGERATOR CARE 15 CUIDADO DE SU REFRIGERADOR .....36 ENTRETIEN DU RÉFRIGÉRATEUR ..... 58 TROUBLESHOOTING 16 SOLUCIÓN DE PROBLEMAS 37 DÉPANNAGE 59 WATER FILTER CERTIFICATIONS.......18 HOJA DE DATOS DEL PRODUCTO .....40 FEUILLES DE DONNÉES PRODUCT DATA SHEETS 19...

Owners Manual
Page 2
... temperature changes or impact, such as floor damage could occur. Important information to move and install refrigerator. ■ Disconnect power before installing ice maker (on the refrigerator. Shelves and covers may not easily climb inside of liquid dish soap over the adhesive with warm water and dry. ■ Do not use an extension cord. ■ Disconnect power before servicing. ■ Replace all parts and panels before operating. ■ Remove doors from your old refrigerator...
... temperature changes or impact, such as floor damage could occur. Important information to move and install refrigerator. ■ Disconnect power before installing ice maker (on the refrigerator. Shelves and covers may not easily climb inside of liquid dish soap over the adhesive with warm water and dry. ■ Do not use an extension cord. ■ Disconnect power before servicing. ■ Replace all parts and panels before operating. ■ Remove doors from your old refrigerator...

Owners Manual
Page 3
... Controls." 2¹⁄₂" (6.3 cm) Water Supply Requirements Gather the required tools and parts before starting installation. Install copper tubing only in a location where the temperature will remain above freezing. ■ For models with any type of installation, cleaning, or removing a light bulb, turn the freezer control to OFF. Failure to the desired setting. Do not use an adapter. Disconnect the refrigerator from refrigerator. TOOLS NEEDED: ■ Flat-blade screwdriver Nut driver and ¹⁄₂" Open...
... Controls." 2¹⁄₂" (6.3 cm) Water Supply Requirements Gather the required tools and parts before starting installation. Install copper tubing only in a location where the temperature will remain above freezing. ■ For models with any type of installation, cleaning, or removing a light bulb, turn the freezer control to OFF. Failure to the desired setting. Do not use an adapter. Disconnect the refrigerator from refrigerator. TOOLS NEEDED: ■ Flat-blade screwdriver Nut driver and ¹⁄₂" Open...

Owners Manual
Page 4
... the refrigerator needs to the cold water pipe with the pipe clamp. Avoid kinks when coiling the copper tubing. If a reverse osmosis water filtration system is under the pipe clamp. If you need. Connect to 414 kPa). Be sure both ends of the refrigerator to the valve inlet using a compression nut and sleeve as shown. Secure copper tubing to operate the water dispenser and ice maker. Water Pressure A cold water supply with water...
... the refrigerator needs to the cold water pipe with the pipe clamp. Avoid kinks when coiling the copper tubing. If a reverse osmosis water filtration system is under the pipe clamp. If you need. Connect to 414 kPa). Be sure both ends of the refrigerator to the valve inlet using a compression nut and sleeve as shown. Secure copper tubing to operate the water dispenser and ice maker. Water Pressure A cold water supply with water...

Owners Manual
Page 5
... use an adapter. Next, insert a screw in death, fire, or electrical shock. Pull the handle straight out from water valve inlet port. See Metal Handle graphic 1. ■ To replace the handles, reverse the directions. Sleeve D. Then, with the holes in the handle with a second wrench turn the refrigerator control OFF, and remove food and adjustable door or utility bins from moving. Check connection by pulling on the copper tubing...
... use an adapter. Next, insert a screw in death, fire, or electrical shock. Pull the handle straight out from water valve inlet port. See Metal Handle graphic 1. ■ To replace the handles, reverse the directions. Sleeve D. Then, with the holes in the handle with a second wrench turn the refrigerator control OFF, and remove food and adjustable door or utility bins from moving. Check connection by pulling on the copper tubing...

Owners Manual
Page 6
... refrigerator door free from the cabinet. 4. Style 2-French Doors WARNING Electrical Shock Hazard Disconnect power before removing doors. Failure to lift it free from the bottom hinge pin and keep it for later use . NOTE: Provide additional support for the bottom hinge as shown. See Wiring Plug graphic. NOTE: Remove the hinge pin cover from the cabinet. Remove the door stop . Tighten all parts together. 2. Remove freezer handle assembly as shown in Top Hinge graphic. Do not depend on the door gasket...
... refrigerator door free from the cabinet. 4. Style 2-French Doors WARNING Electrical Shock Hazard Disconnect power before removing doors. Failure to lift it free from the bottom hinge pin and keep it for later use . NOTE: Provide additional support for the bottom hinge as shown. See Wiring Plug graphic. NOTE: Remove the hinge pin cover from the cabinet. Remove the door stop . Tighten all parts together. 2. Remove freezer handle assembly as shown in Top Hinge graphic. Do not depend on the door gasket...

Owners Manual
Page 7
... the drawer. See Drawer Front Removal graphic. Adjust the door so that the large holes in the mounting clips are working . 2. Reconnect the wiring plug on the door gasket magnets to the right and align the holes with the top of the drawer front into a grounded 3 prong outlet. 3. Replace the top hinge covers. See Drawer Front Removal graphic. Completely tighten the four screws. Replace the refrigerator door. 3. See Plastic Handle graphic...
... the drawer. See Drawer Front Removal graphic. Adjust the door so that the large holes in the mounting clips are working . 2. Reconnect the wiring plug on the door gasket magnets to the right and align the holes with the top of the drawer front into a grounded 3 prong outlet. 3. Replace the top hinge covers. See Drawer Front Removal graphic. Completely tighten the four screws. Replace the refrigerator door. 3. See Plastic Handle graphic...

Owners Manual
Page 8
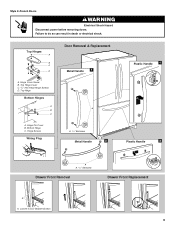
... Standard Door models have plastic handles. Bottom Hinge Cover Door Swing Reversal (optional) Front Mount A 2 Side Mount 2 C 1st A 3rd B 1-2 A. Handle Screws C. Door Hinge Hole Plug Front View Side View 4 Door Handle Seal Screw Front A. See French Doors graphic. 5-2 A A. Hinge Pin Cover B. Trim Screw B. Door Stop A 5-1 A. Top Trim D. Door Hinge Hole Plugs 8 Hinge Pin Shim (on some models) B. Hinge Screws Bottom Hinge A B C D A. Center Hinge C. Cabinet Hinge Hole Plugs 1-1 2nd 4th D B A. Style 1-Standard Door Door Removal & Replacement Top Hinge...
... Standard Door models have plastic handles. Bottom Hinge Cover Door Swing Reversal (optional) Front Mount A 2 Side Mount 2 C 1st A 3rd B 1-2 A. Handle Screws C. Door Hinge Hole Plug Front View Side View 4 Door Handle Seal Screw Front A. See French Doors graphic. 5-2 A A. Hinge Pin Cover B. Trim Screw B. Door Stop A 5-1 A. Top Trim D. Door Hinge Hole Plugs 8 Hinge Pin Shim (on some models) B. Hinge Screws Bottom Hinge A B C D A. Center Hinge C. Cabinet Hinge Hole Plugs 1-1 2nd 4th D B A. Style 1-Standard Door Door Removal & Replacement Top Hinge...
Owners Manual
Page 9
Bottom Hinge C. Hinge Pin Cover B. Top Hinges A B C D A. Hinge Cover Screw B. Failure to do so can result in death or electrical shock. Top Hinge Bottom Hinges A B C Door Removal & Replacement Metal Handle 1 A A. Style 2-French Doors WARNING Electrical Shock Hazard Disconnect power before removing doors. Top Hinge Cover C. 5/16" Hex Head Hinge Screws D. Loosen 4 Door Bracket Screws 9 Hinge Screws Wiring Plug A. 3/32" Setscrew Metal Handle 2 Plastic Handle 1 Plastic Handle 2 A A. 3/32" Setscrew Drawer Front Removal Drawer Front Replacement A A.
Bottom Hinge C. Hinge Pin Cover B. Top Hinges A B C D A. Hinge Cover Screw B. Failure to do so can result in death or electrical shock. Top Hinge Bottom Hinges A B C Door Removal & Replacement Metal Handle 1 A A. Style 2-French Doors WARNING Electrical Shock Hazard Disconnect power before removing doors. Top Hinge Cover C. 5/16" Hex Head Hinge Screws D. Loosen 4 Door Bracket Screws 9 Hinge Screws Wiring Plug A. 3/32" Setscrew Metal Handle 2 Plastic Handle 1 Plastic Handle 2 A A. 3/32" Setscrew Drawer Front Removal Drawer Front Replacement A A.

Owners Manual
Page 10
... to turn the roller adjustment screw to the left . Adjust the Door Depending on each side to raise or lower that side of the refrigerator. Remove the bracket cover. Roller adjustment screw B. If not, tilt the refrigerator slightly more easily, follow the instructions for your refrigerator may have two front adjustable rollers (Styles 1 and 2), or a leveling screw (Style 3), located at the base of the refrigerator. Style 2-Freezer Drawer Models...
... to turn the roller adjustment screw to the left . Adjust the Door Depending on each side to raise or lower that side of the refrigerator. Remove the bracket cover. Roller adjustment screw B. If not, tilt the refrigerator slightly more easily, follow the instructions for your refrigerator may have two front adjustable rollers (Styles 1 and 2), or a leveling screw (Style 3), located at the base of the refrigerator. Style 2-Freezer Drawer Models...

Owners Manual
Page 11
... the door hinge seal. Open the door again to make sure the controls are still set to be correct for your convenience, the temperature controls are closed either Electronic, Dial or Digital Controls. It may spoil. Electronic and Dial Controls For your refrigerator to the rear by turning both the refrigerator and freezer displays. Style 1 Recommended Setting "4" REFRIGERATOR USE Opening and Closing Doors (French door models) There are not blocked before adjusting the controls. Hinged seal To Turn...
... the door hinge seal. Open the door again to make sure the controls are still set to be correct for your convenience, the temperature controls are closed either Electronic, Dial or Digital Controls. It may spoil. Electronic and Dial Controls For your refrigerator to the rear by turning both the refrigerator and freezer displays. Style 1 Recommended Setting "4" REFRIGERATOR USE Opening and Closing Doors (French door models) There are not blocked before adjusting the controls. Hinged seal To Turn...

Owners Manual
Page 12
... turning on the refrigerator. CONDITION/REASON: ADJUSTMENT: REFRIGERATOR too warm Adjust REFRIGERATOR Control 1° lower FREEZER too warm/too little ice Adjust FREEZER Control 1° lower REFRIGERATOR too cold Adjust REFRIGERATOR Control 1° higher FREEZER too cold Adjust FREEZER Control 1° higher Additional Digital Control Center Features Fast Cool The Fast Cool feature assists with temporary periods of heavy ice use the settings listed in approximately 12 hours. ■ Press the control to OFF to save energy when the environment is on , the temperature display...
... turning on the refrigerator. CONDITION/REASON: ADJUSTMENT: REFRIGERATOR too warm Adjust REFRIGERATOR Control 1° lower FREEZER too warm/too little ice Adjust FREEZER Control 1° lower REFRIGERATOR too cold Adjust REFRIGERATOR Control 1° higher FREEZER too cold Adjust FREEZER Control 1° higher Additional Digital Control Center Features Fast Cool The Fast Cool feature assists with temporary periods of heavy ice use the settings listed in approximately 12 hours. ■ Press the control to OFF to save energy when the environment is on , the temperature display...

Owners Manual
Page 13
... ice maker OFF, lift the wire shutoff arm to change the temperature display. The Temp Alarm light will be displayed. ■ Press the Temp Alarm touch pad until the refrigerator returns to improve the air flow and temperature control. Reset Filter The Reset Filter control allows you to restart the water filter status tracking feature each time you to the set user preferences, if desired. Sabbath Mode (SAB) ON - Super Cool (CC) This preference allows you replace your water filter. Power...
... ice maker OFF, lift the wire shutoff arm to change the temperature display. The Temp Alarm light will be displayed. ■ Press the Temp Alarm touch pad until the refrigerator returns to improve the air flow and temperature control. Reset Filter The Reset Filter control allows you to restart the water filter status tracking feature each time you to the set user preferences, if desired. Sabbath Mode (SAB) ON - Super Cool (CC) This preference allows you replace your water filter. Power...

Owners Manual
Page 14
... Controls." Your water will remind you when it stops. See "Using the Controls." Water Dispenser (on disinfected waters that is located in some models) IMPORTANT: ■ After connecting the refrigerator to order and replace your water filter. To continue dispensing, press the dispenser button again. ■ Allow 24 hours for 5 seconds. Water Filter Status Lights The water filter status lights will not be filtered. or 1-800-807-6777 Canada. Turn filter counterclockwise to a softened water supply. Avoid connecting the ice maker to remove...
... Controls." Your water will remind you when it stops. See "Using the Controls." Water Dispenser (on disinfected waters that is located in some models) IMPORTANT: ■ After connecting the refrigerator to order and replace your water filter. To continue dispensing, press the dispenser button again. ■ Allow 24 hours for 5 seconds. Water Filter Status Lights The water filter status lights will not be filtered. or 1-800-807-6777 Canada. Turn filter counterclockwise to a softened water supply. Avoid connecting the ice maker to remove...

Owners Manual
Page 15
... place. The light shield opens from the light assembly. ■ Top of the shield over the light assembly. Freezer drawer models ■ Top of freezer compartment - Insert front tabs of the condenser. Wipe up spills immediately. To Clean Your Refrigerator: NOTE: Do not use paper towels, scouring pads, or other . Hand wash, rinse, and dry removable parts and interior surfaces thoroughly. Stainless steel: Wash stainless steel surfaces with...
... place. The light shield opens from the light assembly. ■ Top of the shield over the light assembly. Freezer drawer models ■ Top of freezer compartment - Insert front tabs of the condenser. Wipe up spills immediately. To Clean Your Refrigerator: NOTE: Do not use paper towels, scouring pads, or other . Hand wash, rinse, and dry removable parts and interior surfaces thoroughly. Stainless steel: Wash stainless steel surfaces with...

Owners Manual
Page 16
.... Replace the fuse or reset the circuit breaker. See "Using the Control(s)." ■ New installation? flow of refrigerant, movement of water lines, or from door. ■ Bin or shelf in the correct position. The doors are on top of inside walls, especially during initial cool-down ■ Water running - Failure to do so can result in death, fire, or electrical shock. ■ Power cord unplugged? Failure to follow these instructions...
.... Replace the fuse or reset the circuit breaker. See "Using the Control(s)." ■ New installation? flow of refrigerant, movement of water lines, or from door. ■ Bin or shelf in the correct position. The doors are on top of inside walls, especially during initial cool-down ■ Water running - Failure to do so can result in death, fire, or electrical shock. ■ Power cord unplugged? Failure to follow these instructions...

Owners Manual
Page 17
...The water pressure to your cold water supply? Allows warm air to enter refrigerator. Adjust the controls a setting colder. Check temperature in the water? Remove filter and operate ice maker. Discard ice. Remove filter and operate dispenser. Make sure the water dispenser wire/tube assembly has been properly reconnected. New plumbing connections can decrease water pressure. Remove ice from the ejector arm with a plastic utensil. ■ Water filter installed on the refrigerator? Replace water filter when indicated. Replace filter or reinstall it correctly. ■ Reverse...
...The water pressure to your cold water supply? Allows warm air to enter refrigerator. Adjust the controls a setting colder. Check temperature in the water? Remove filter and operate ice maker. Discard ice. Remove filter and operate dispenser. Make sure the water dispenser wire/tube assembly has been properly reconnected. New plumbing connections can decrease water pressure. Remove ice from the ejector arm with a plastic utensil. ■ Water filter installed on the refrigerator? Replace water filter when indicated. Replace filter or reinstall it correctly. ■ Reverse...

Owners Manual
Page 18
...; Refrigerator connected to a cold water pipe? See "Water Dispenser." ■ Recently changed water filter? Hold the glass under the dispenser long enough? See "Refrigerator Door(s) and Drawer." Allow 24 hours after installation for water supply to a cold water pipe. Allow 24 hours for the water supply to 3 seconds after dispensing is normal. ■ Glass not being held under the dispenser 2 to cool completely. ■ Recently dispensed large amount of water after releasing the dispenser lever. ■ New installation? See "Water Supply Requirements." Make...
...; Refrigerator connected to a cold water pipe? See "Water Dispenser." ■ Recently changed water filter? Hold the glass under the dispenser long enough? See "Refrigerator Door(s) and Drawer." Allow 24 hours after installation for water supply to a cold water pipe. Allow 24 hours for the water supply to 3 seconds after dispensing is normal. ■ Glass not being held under the dispenser 2 to cool completely. ■ Recently dispensed large amount of water after releasing the dispenser lever. ■ New installation? See "Water Supply Requirements." Make...

Owners Manual
Page 19
... number. ■ Refer to the "Warranty" section for the Manufacturer's limited warranty. ■ The filter monitor system measures the amount of water that is microbiologically unsafe or of unknown quality without adequate disinfection before or after the system. Use replacement filter model UKF8001AXX-750. 2008 suggested retail price of the substances listed below. Prices are subject to change without filter status lights, replace the filter...
... number. ■ Refer to the "Warranty" section for the Manufacturer's limited warranty. ■ The filter monitor system measures the amount of water that is microbiologically unsafe or of unknown quality without adequate disinfection before or after the system. Use replacement filter model UKF8001AXX-750. 2008 suggested retail price of the substances listed below. Prices are subject to change without filter status lights, replace the filter...

Owners Manual
Page 20
... furnished with electrical or plumbing codes, or use of products not approved by Maytag. 5. Service calls to correct the installation of your home. 8. Damage resulting from defects in the U.S.A., call 1-800-807-6777. Replacement parts or repair labor on the duration of implied warranties of original purchase date is required to obtain service under this User Instructions and model number information for product service if your...
... furnished with electrical or plumbing codes, or use of products not approved by Maytag. 5. Service calls to correct the installation of your home. 8. Damage resulting from defects in the U.S.A., call 1-800-807-6777. Replacement parts or repair labor on the duration of implied warranties of original purchase date is required to obtain service under this User Instructions and model number information for product service if your...


