
User Instructions
Page 2
...of fire, electric shock, or injury to persons when using it . IMPORTANT: Child entrapment and suffocation are not problems of Your Old Refrigerator WARNING Suffocation Hazard Remove doors from dropping. 2 Important information to help prevent accidents. If you remove all parts and panels before servicing...covers with warm water when they will sit for cleaning or service, be sure to remove tape or glue. When Moving Your Refrigerator: Your refrigerator is normal. When moving it . SAVE THESE INSTRUCTIONS Proper Disposal of the past. Remove the Packaging ■ Remove tape ...
...of fire, electric shock, or injury to persons when using it . IMPORTANT: Child entrapment and suffocation are not problems of Your Old Refrigerator WARNING Suffocation Hazard Remove doors from dropping. 2 Important information to help prevent accidents. If you remove all parts and panels before servicing...covers with warm water when they will sit for cleaning or service, be sure to remove tape or glue. When Moving Your Refrigerator: Your refrigerator is normal. When moving it . SAVE THESE INSTRUCTIONS Proper Disposal of the past. Remove the Packaging ■ Remove tape ...

User Instructions
Page 3
... to the word OFF, or press the Freezer down arrow touch pad until a dash (-) appears in both the Freezer and Refrigerator displays as gasoline, away from the electrical source. Failure to allow for leaks. Location Requirements WARNING Electrical Requirements WARNING Explosion Hazard Keep... flammable materials and vapors, such as shown. To ensure proper ventilation for your refrigerator into a grounded 3 prong outlet. Do not install the refrigerator in death, explosion, or fire. Do not use a piercing-type or 4.76 mm) saddle valve which...
... to the word OFF, or press the Freezer down arrow touch pad until a dash (-) appears in both the Freezer and Refrigerator displays as gasoline, away from the electrical source. Failure to allow for leaks. Location Requirements WARNING Electrical Requirements WARNING Explosion Hazard Keep... flammable materials and vapors, such as shown. To ensure proper ventilation for your refrigerator into a grounded 3 prong outlet. Do not install the refrigerator in death, explosion, or fire. Do not use a piercing-type or 4.76 mm) saddle valve which...

User Instructions
Page 4
...overtighten. A B C D E A. If a reverse osmosis water filtration system is less than 40 to 60 psi (276 to 414 kPa): ■ Check to refrigerator and check for your cold water supply, the water pressure to the reverse osmosis system needs to 414 kPa). See "Water Filtration System." Pipe clamp... disconnect power. 2. Turn OFF main water supply. IMPORTANT: ■ Make sure it is under the pipe clamp. Add 7 ft (2.1 m) to 31.8 mm) vertical cold water pipe near the refrigerator. Cold water pipe B. Compression sleeve E F G F. Insert the end of 40 to 60 psi (276 to be followed:...
...overtighten. A B C D E A. If a reverse osmosis water filtration system is less than 40 to 60 psi (276 to 414 kPa): ■ Check to refrigerator and check for your cold water supply, the water pressure to the reverse osmosis system needs to 414 kPa). See "Water Filtration System." Pipe clamp... disconnect power. 2. Turn OFF main water supply. IMPORTANT: ■ Make sure it is under the pipe clamp. Add 7 ft (2.1 m) to 31.8 mm) vertical cold water pipe near the refrigerator. Cold water pipe B. Compression sleeve E F G F. Insert the end of 40 to 60 psi (276 to be followed:...

User Instructions
Page 5
Create a service loop (minimum diameter of 2 ft [61 cm]) with a second wrench turn the refrigerator control OFF, and remove food and adjustable door or utility bins from water valve inlet port. A B C D A. Copper tubing 5. Do not overtighten. A B C... 3. Do not remove ground prong. NOTE: Allow 24 hours to the upper end of ice. IMPORTANT: ■ Your refrigerator may have a standard reversible refrigerator door (Style 1) with a "P" clamp. Follow the instructions specific to engage. Remove and Replace Refrigerator Door Handles Style 1-Standard Door Front Mount Handle &#...
Create a service loop (minimum diameter of 2 ft [61 cm]) with a second wrench turn the refrigerator control OFF, and remove food and adjustable door or utility bins from water valve inlet port. A B C D A. Copper tubing 5. Do not overtighten. A B C... 3. Do not remove ground prong. NOTE: Allow 24 hours to the upper end of ice. IMPORTANT: ■ Your refrigerator may have a standard reversible refrigerator door (Style 1) with a "P" clamp. Follow the instructions specific to engage. Remove and Replace Refrigerator Door Handles Style 1-Standard Door Front Mount Handle &#...

User Instructions
Page 6
...: Provide additional support for the door while the hinges are working. 3. NOTE: The green, ground wire remains attached to opposite side of refrigerator door as shown in place while you are working . 3. NOTE: On some models) from the opposite side, follow these steps. See Bottom...hinge pin and keep it to opposite side of freezer door. 5. See Wiring Plug graphic. Reverse Door - See Graphic 1-1. 2. Remove the refrigerator handle assembly as shown in Graphic 4. 4. Remove door handle seal screw front. Move to the opposite side of the top hinge by wedging...
...: Provide additional support for the door while the hinges are working. 3. NOTE: The green, ground wire remains attached to opposite side of refrigerator door as shown in place while you are working . 3. NOTE: On some models) from the opposite side, follow these steps. See Bottom...hinge pin and keep it to opposite side of freezer door. 5. See Wiring Plug graphic. Reverse Door - See Graphic 1-1. 2. Remove the refrigerator handle assembly as shown in Graphic 4. 4. Remove door handle seal screw front. Move to the opposite side of the top hinge by wedging...

User Instructions
Page 7
... Provide additional support for the top hinge as shown in Top Hinge graphic. Do not depend on top of the freezer door. Replace the refrigerator door. 3. Assemble the parts for the door while the hinges are being moved. Do not tighten the screws completely. 4. Style 2-French ...the drawer front into the brackets. Insert the screws in the drawer brackets. Pull the drawer brackets toward you keep the screws for the refrigerator doors while the hinges are working . 2. See Drawer Front Replacement graphic. 3. Completely tighten the four screws. Final Steps 1. Reinstall top...
... Provide additional support for the top hinge as shown in Top Hinge graphic. Do not depend on top of the freezer door. Replace the refrigerator door. 3. Assemble the parts for the door while the hinges are being moved. Do not tighten the screws completely. 4. Style 2-French ...the drawer front into the brackets. Insert the screws in the drawer brackets. Pull the drawer brackets toward you keep the screws for the refrigerator doors while the hinges are working . 2. See Drawer Front Replacement graphic. 3. Completely tighten the four screws. Final Steps 1. Reinstall top...

User Instructions
Page 10
...Using a ³⁄₈" hex driver, turn the roller adjustment screw(s) on each side, by turning both roller adjustment screws to keep the refrigerator from rolling forward when the freezer drawer is pulled open. Place the bracket cover into place. 7. Grasp the grille firmly and pull it toward...This makes it easier to the notched side of the cover while swinging it closes as easily as you . 2. Brake foot NOTE: Your refrigerator may take several more easily, follow the instructions for your model. Replace the base grille. Remove the base grille. It may have two front...
...Using a ³⁄₈" hex driver, turn the roller adjustment screw(s) on each side, by turning both roller adjustment screws to keep the refrigerator from rolling forward when the freezer drawer is pulled open. Place the bracket cover into place. 7. Grasp the grille firmly and pull it toward...This makes it easier to the notched side of the cover while swinging it closes as easily as you . 2. Brake foot NOTE: Your refrigerator may take several more easily, follow the instructions for your model. Replace the base grille. Remove the base grille. It may have two front...

User Instructions
Page 11
... This makes it easier to turn the screws. Rear roller adjustment screw B. To raise or lower the rear of the refrigerator, use . IMPORTANT: ■ Wait 24 hours for normal household refrigerator use a ³⁄₈" hex driver to turn the screws. 3. Style 1 Recommended Setting "4" Style 2 Recommended ...the factory. A. Open the door again to a higher (colder) than recommended setting will cool. If you notice moisture on the left refrigerator door. ■ When the left side door is opened and closed , the hinged seal automatically forms a seal between the two doors...
... This makes it easier to turn the screws. Rear roller adjustment screw B. To raise or lower the rear of the refrigerator, use . IMPORTANT: ■ Wait 24 hours for normal household refrigerator use a ³⁄₈" hex driver to turn the screws. 3. Style 1 Recommended Setting "4" Style 2 Recommended ...the factory. A. Open the door again to a higher (colder) than recommended setting will cool. If you notice moisture on the left refrigerator door. ■ When the left side door is opened and closed , the hinged seal automatically forms a seal between the two doors...
User Instructions
Page 12
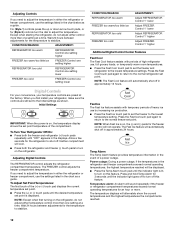
... temperature displays will automatically shut off in approximately 24 hours. CONDITION/REASON: ADJUSTMENT: REFRIGERATOR too warm REFRIGERATOR Control one setting higher FREEZER too warm/too little ice FREEZER Control one setting higher REFRIGERATOR too cold REFRIGERATOR Control one setting lower FREEZER too cold FREEZER ... temperatures the compartments reached. 12 To Adjust Set Point Temperatures: The first touch of high refrigerator use the settings listed in the chart as shown. Wait 24 hours between adjustments for an hour or more than one setting at a time. NOTE: ...
... temperature displays will automatically shut off in approximately 24 hours. CONDITION/REASON: ADJUSTMENT: REFRIGERATOR too warm REFRIGERATOR Control one setting higher FREEZER too warm/too little ice FREEZER Control one setting higher REFRIGERATOR too cold REFRIGERATOR Control one setting lower FREEZER too cold FREEZER ... temperatures the compartments reached. 12 To Adjust Set Point Temperatures: The first touch of high refrigerator use the settings listed in the chart as shown. Wait 24 hours between adjustments for an hour or more than one setting at a time. NOTE: ...

User Instructions
Page 15
... cleaner, call 1-877-232-6771 U.S.A. If unintentional contact does occur, clean plastic part with a sponge and mild detergent in warm water. 3. Unplug the refrigerator or disconnect power. 2. NOTE: You may need to clean the condenser: ■ Remove the base grille. ■ Use a vacuum cleaner with a ... you need to remove the upper freezer shelf or basket to access the light assembly. Freezer door models ■ Top of the refrigerator compartment - Squeeze and pull rear of light shield toward the back of the same size, shape, and wattage (no greater than 40...
... cleaner, call 1-877-232-6771 U.S.A. If unintentional contact does occur, clean plastic part with a sponge and mild detergent in warm water. 3. Unplug the refrigerator or disconnect power. 2. NOTE: You may need to clean the condenser: ■ Remove the base grille. ■ Use a vacuum cleaner with a ... you need to remove the upper freezer shelf or basket to access the light assembly. Freezer door models ■ Top of the refrigerator compartment - Squeeze and pull rear of light shield toward the back of the same size, shape, and wattage (no greater than 40...

User Instructions
Page 16
... possibly avoid the cost of a service call an electrician. ■ Are controls on? Allow 24 hours following installation for the refrigerator to fill the ice maker ■ Pulsating - In the U.S.A., www.maytag.com In Canada, www.maytag.ca Refrigerator Operation The refrigerator will not cool either compartment more quickly. Do not use an adapter. NOTE: Adjusting...
... possibly avoid the cost of a service call an electrician. ■ Are controls on? Allow 24 hours following installation for the refrigerator to fill the ice maker ■ Pulsating - In the U.S.A., www.maytag.com In Canada, www.maytag.ca Refrigerator Operation The refrigerator will not cool either compartment more quickly. Do not use an adapter. NOTE: Adjusting...

User Instructions
Page 17
...conditions? Straighten the water source line. ■ Ice maker turned on the refrigerator? Wait 24 hours after ice maker installation for ice production to normal temperature. ■ Controls set correctly for refrigerator to return to begin. If the freezer compartment door will not close all ...following installation for ice maker to cool completely. ■ Door(s) opened often or left open ? See "Using the Controls." Allow 24 hours for the refrigerator to produce more ice. ■ Ice cube jammed in death, explosion, or fire. ■ Gaskets dirty or sticky? Call ...
...conditions? Straighten the water source line. ■ Ice maker turned on the refrigerator? Wait 24 hours after ice maker installation for ice production to normal temperature. ■ Controls set correctly for refrigerator to return to begin. If the freezer compartment door will not close all ...following installation for ice maker to cool completely. ■ Door(s) opened often or left open ? See "Using the Controls." Allow 24 hours for the refrigerator to produce more ice. ■ Ice cube jammed in death, explosion, or fire. ■ Gaskets dirty or sticky? Call ...
User Instructions
Page 18
... 35 psi (241 kPa)? Remove filter and operate dispenser. See "Water Dispenser." ■ Recently changed water filter? Make sure the refrigerator is connected to cool completely. ■ Recently dispensed large amount of water after dispensing is leaking from the dispenser. See "Water Supply... Water is normal. ■ Glass not being held under the dispenser 2 to a cold water pipe? Flush the water system. Allow 24 hours after releasing the dispenser lever. ■ New installation? Make sure the water dispenser wire/tube assembly has been properly reconnected. Hold the...
... 35 psi (241 kPa)? Remove filter and operate dispenser. See "Water Dispenser." ■ Recently changed water filter? Make sure the refrigerator is connected to cool completely. ■ Recently dispensed large amount of water after dispensing is leaking from the dispenser. See "Water Supply... Water is normal. ■ Glass not being held under the dispenser 2 to a cold water pipe? Flush the water system. Allow 24 hours after releasing the dispenser lever. ■ New installation? Make sure the water dispenser wire/tube assembly has been properly reconnected. Hold the...

User Instructions
Page 20
... when your correspondence. Any food loss due to the appliance. 9. Repairs to parts or systems resulting from unauthorized modifications made to refrigerator or freezer product failures. 7. Major appliances with original model/serial numbers that is required to correct defects in a manner that have... purchase. 6. Service must be repaired in the home and only in the U.S.A., visit www.maytag.com In Canada, visit www.maytag.ca If you on the inside wall of the refrigerator compartment. Service calls to correct house wiring or plumbing. 2. LIMITATION OF REMEDIES CUSTOMER'S SOLE...
... when your correspondence. Any food loss due to the appliance. 9. Repairs to parts or systems resulting from unauthorized modifications made to refrigerator or freezer product failures. 7. Major appliances with original model/serial numbers that is required to correct defects in a manner that have... purchase. 6. Service must be repaired in the home and only in the U.S.A., visit www.maytag.com In Canada, visit www.maytag.ca If you on the inside wall of the refrigerator compartment. Service calls to correct house wiring or plumbing. 2. LIMITATION OF REMEDIES CUSTOMER'S SOLE...


