
Energy Guide
Page 1
... Canada. Utilisez la cote EnerGuide afin de comparer le rendement de l'appareil avec celui d'autres modeles similaires. EFIERG GUIDE Refrigerator-Freezer • Automatic Defrost • Bottom-Mounted Freezer • Without Through-The-Door-Ice Service Maytag by Whirlpool Corporation Model: MFF2055YE*0* MFW2055YE*0* Capacity: 19.6 Cubic Feet Estimated Yearly Operating Cost $48 I I $47 $61 Cost...
... Canada. Utilisez la cote EnerGuide afin de comparer le rendement de l'appareil avec celui d'autres modeles similaires. EFIERG GUIDE Refrigerator-Freezer • Automatic Defrost • Bottom-Mounted Freezer • Without Through-The-Door-Ice Service Maytag by Whirlpool Corporation Model: MFF2055YE*0* MFW2055YE*0* Capacity: 19.6 Cubic Feet Estimated Yearly Operating Cost $48 I I $47 $61 Cost...
Warranty Information
Page 1
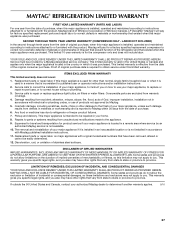
... major appliance is not available. 10. This warranty gives you specific legal rights, and you . MAYTAG SHALL NOT BE LIABLE FOR INCIDENTAL OR CONSEQUENTIAL DAMAGES. MAYTAG® REFRIGERATION LIMITED WARRANTY FIRST YEAR LIMITED WARRANTY (PARTS AND LABOR) For one year from the date of purchase...to province. This major appliance is intended to be repaired in accordance with original model/serial numbers that vary from state to state or province to or furnished with the product, Maytag brand of purchase. 6. SECOND THROUGH TENTH YEAR LIMITED WARRANTY (COMPRESSOR ONLY - Service...
... major appliance is not available. 10. This warranty gives you specific legal rights, and you . MAYTAG SHALL NOT BE LIABLE FOR INCIDENTAL OR CONSEQUENTIAL DAMAGES. MAYTAG® REFRIGERATION LIMITED WARRANTY FIRST YEAR LIMITED WARRANTY (PARTS AND LABOR) For one year from the date of purchase...to province. This major appliance is intended to be repaired in accordance with original model/serial numbers that vary from state to state or province to or furnished with the product, Maytag brand of purchase. 6. SECOND THROUGH TENTH YEAR LIMITED WARRANTY (COMPRESSOR ONLY - Service...

Warranty Information
Page 2
...6777. Please keep these User Instructions and the model number information for future reference. 28 If you need assistance using your product or you would like to Maytag with any questions or concerns at the number below : In the U.S.A.: Maytag Brand Home Appliances Customer eXperience Center 553 Benson Road... in the U.S.A., visit www.maytag.com In Canada, visit www.maytag.ca If you do not have access to the Internet and you need further assistance, you can find your model number and serial number on the label, located on the inside wall of the refrigerator compartment. In Canada, call ...
...6777. Please keep these User Instructions and the model number information for future reference. 28 If you need assistance using your product or you would like to Maytag with any questions or concerns at the number below : In the U.S.A.: Maytag Brand Home Appliances Customer eXperience Center 553 Benson Road... in the U.S.A., visit www.maytag.com In Canada, visit www.maytag.ca If you do not have access to the Internet and you need further assistance, you can find your model number and serial number on the label, located on the inside wall of the refrigerator compartment. In Canada, call ...
Use & Care Guide
Page 2
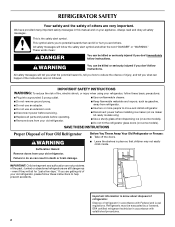
...: ■ Take off the doors. ■ Leave the shelves in this manual and on some models). ■ Do not hit the refrigerator glass doors (on your old refrigerator. Junked or abandoned refrigerators are very important. This is , tell you how to reduce the chance of injury, and tell ...a sturdy glass when dispensing ice (on some models). Failure to do so can be killed or seriously injured if you are getting rid of others . SAVE THESE INSTRUCTIONS Proper Disposal of fire, electric shock, or injury when using your refrigerator, follow these instructions to help prevent accidents. If...
...: ■ Take off the doors. ■ Leave the shelves in this manual and on some models). ■ Do not hit the refrigerator glass doors (on your old refrigerator. Junked or abandoned refrigerators are very important. This is , tell you how to reduce the chance of injury, and tell ...a sturdy glass when dispensing ice (on some models). Failure to do so can be killed or seriously injured if you are getting rid of others . SAVE THESE INSTRUCTIONS Proper Disposal of fire, electric shock, or injury when using your refrigerator, follow these instructions to help prevent accidents. If...
Use & Care Guide
Page 4
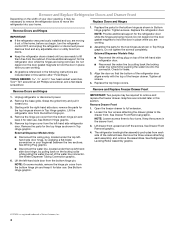
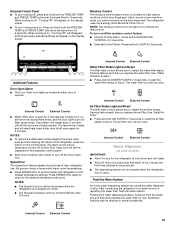
...top hinge cover from the bottom hinge pin and keep it for the refrigerator door while the hinges are being moved. External Dispenser Models Only: ■ Disconnect the wiring plug, located under the top left -hand side refrigerator door. ■ Reconnect the water line by pulling back the locking collar...on the locking collar while pulling the water line out of the water line connector. Replace the refrigerator door. Do not depend on the door gasket magnets to the drawer front. External Dispenser Models Only: ■ Reconnect the wiring plug on top of the left -hand side door hinge...
...top hinge cover from the bottom hinge pin and keep it for the refrigerator door while the hinges are being moved. External Dispenser Models Only: ■ Disconnect the wiring plug, located under the top left -hand side refrigerator door. ■ Reconnect the water line by pulling back the locking collar...on the locking collar while pulling the water line out of the water line connector. Replace the refrigerator door. Do not depend on the door gasket magnets to the drawer front. External Dispenser Models Only: ■ Reconnect the wiring plug on top of the left -hand side door hinge...

Use & Care Guide
Page 9
...not remove ground prong. A. NOTES: ■ Allow 24 hours to produce the first batch of the refrigerator to secure the tubing to completely fill ice container. ■ For models with a wrench two more turns. NOTE: Tighten the nut by hand. NOTE: Tighten the nut by...G. Do not use an adapter. Copper tubing D E D. Allow 3 days to the refrigerator as shown. See "Water Dispenser." 9 Insert the end of the refrigerator. 3. On models with ice makers, the ice maker is equipped with the refrigerator is not long enough, a ¹⁄₄" x ¹⁄₄" (6.35 mm...
...not remove ground prong. A. NOTES: ■ Allow 24 hours to produce the first batch of the refrigerator to secure the tubing to completely fill ice container. ■ For models with a wrench two more turns. NOTE: Tighten the nut by hand. NOTE: Tighten the nut by...G. Do not use an adapter. Copper tubing D E D. Allow 3 days to the refrigerator as shown. See "Water Dispenser." 9 Insert the end of the refrigerator. 3. On models with ice makers, the ice maker is equipped with the refrigerator is not long enough, a ¹⁄₄" x ¹⁄₄" (6.35 mm...

Use & Care Guide
Page 11
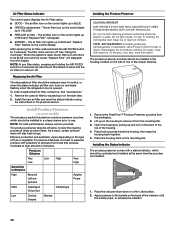
...a replacement filter - See "Water Dispenser" or "Water and Ice Dispensers." On some models) The air filter reduces the buildup of the refrigerator. ■ Push the base grille in toward the refrigerator until it is firmly in the filter. The disposable water filter should be used on ...Loosen the top hinge screws using the following instructions: 1. NOTE: There may be installed prior to your refrigerator's accessory packet includes an air filter, which must be some models, your water dispenser or ice maker decreases noticeably, change the filter sooner. Take the new filter out...
...a replacement filter - See "Water Dispenser" or "Water and Ice Dispensers." On some models) The air filter reduces the buildup of the refrigerator. ■ Push the base grille in toward the refrigerator until it is firmly in the filter. The disposable water filter should be used on ...Loosen the top hinge screws using the following instructions: 1. NOTE: There may be installed prior to your refrigerator's accessory packet includes an air filter, which must be some models, your water dispenser or ice maker decreases noticeably, change the filter sooner. Take the new filter out...
Use & Care Guide
Page 12
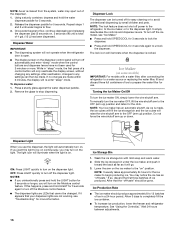
...used air filter by pulling up in RED and "Replace Filter" will disappear from the mounting tab. 3. Install Produce Preserver (on some models) The accessory packet includes two produce preserver pouches, which should be replaced every 6 months, or when the status indicator air filter icon ... of the top of the indicator until the bubble pops, to ethylene from the packaging. 2. If on and starts flashing when the refrigerator door is best to separate produce with sensitivity to activate the indicator. Installing the Status Indicator The produce preserver comes with water. See...
...used air filter by pulling up in RED and "Replace Filter" will disappear from the mounting tab. 3. Install Produce Preserver (on some models) The accessory packet includes two produce preserver pouches, which should be replaced every 6 months, or when the status indicator air filter icon ... of the top of the indicator until the bubble pops, to ethylene from the packaging. 2. If on and starts flashing when the refrigerator door is best to separate produce with sensitivity to activate the indicator. Installing the Status Indicator The produce preserver comes with water. See...

Use & Care Guide
Page 13
...too warm or too cold in the top of Whirlpool, U.S.A. 13 A A. To order replacements, contact us and ask for information on your model, your model. Install the replacement pouches and status indicator using the instructions in the cap. If you like and when ice cream is firm. ■ If... your refrigerator has either separately or together. Follow the instructions specific to cool completely before adding food. In the U.S.A., visit our web page www.maytag.com/ accessories or call 1-800-807-6777. In Canada, visit our web page www.whirlpoolparts.ca or call 1-800-901-2042. ...
...too warm or too cold in the top of Whirlpool, U.S.A. 13 A A. To order replacements, contact us and ask for information on your model, your model. Install the replacement pouches and status indicator using the instructions in the cap. If you like and when ice cream is firm. ■ If... your refrigerator has either separately or together. Follow the instructions specific to cool completely before adding food. In the U.S.A., visit our web page www.maytag.com/ accessories or call 1-800-807-6777. In Canada, visit our web page www.whirlpoolparts.ca or call 1-800-901-2042. ...

Use & Care Guide
Page 14
... press of snowflakes or boxes from (1 snowflake/box [least cold] to stabilize. Follow the directions specific to your refrigerator, make sure the control is turned off , press and hold both the SPEEDCOOL and MOISTURE CONTROL buttons at the factory...the display will not cool when cooling is still set to activate the display screen. CONDITION/REASON: ADJUSTMENT: REFRIGERATOR too warm FRIDGE TEMP one more snowflake/box FREEZER too warm/too little ice FREEZER TEMP one more . When... - Recommended Setting "3 Boxes" Adjusting the Controls If you first install your model.
... press of snowflakes or boxes from (1 snowflake/box [least cold] to stabilize. Follow the directions specific to your refrigerator, make sure the control is turned off , press and hold both the SPEEDCOOL and MOISTURE CONTROL buttons at the factory...the display will not cool when cooling is still set to activate the display screen. CONDITION/REASON: ADJUSTMENT: REFRIGERATOR too warm FRIDGE TEMP one more snowflake/box FREEZER too warm/too little ice FREEZER TEMP one more . When... - Recommended Setting "3 Boxes" Adjusting the Controls If you first install your model.
Use & Care Guide
Page 15
... seconds. When cooling is on, an alert tone will sound three times, and the Door Open icon will flash seven times. Use in some models) IMPORTANT: ■ Allow 3 hours for 3 seconds, to reset the air filter status to help reduce moisture on some households. To turn on... The dispensing system will be temporarily turned off the moisture control feature: ■ Internal Control Panel - The alarm sound will not operate when the refrigerator door is open again for 3 seconds. ■ External Control Panel - SpeedCool The SpeedCool feature assists during times of ice. NOTES: ■ ...
... seconds. When cooling is on, an alert tone will sound three times, and the Door Open icon will flash seven times. Use in some models) IMPORTANT: ■ Allow 3 hours for 3 seconds, to reset the air filter status to help reduce moisture on some households. To turn on... The dispensing system will be temporarily turned off the moisture control feature: ■ Internal Control Panel - The alarm sound will not operate when the refrigerator door is open again for 3 seconds. ■ External Control Panel - SpeedCool The SpeedCool feature assists during times of ice. NOTES: ■ ...
Use & Care Guide
Page 16
...any settings can be gone. Remove the glass to completely fill the ice container. ■ To increase ice production, lower the freezer and refrigerator temperature. It simply deactivates the controls and dispenser levers. The lock icon will illuminate when the dispenser is made, the ice cubes will fill ...for 3 seconds or longer, you may spurt out of ice to avoid unintentional dispensing by small children and pets. Ice Maker (on some models) IMPORTANT: For models with mild soap and warm water. 2. Turning the Ice Maker On/Off To turn on . To manually turn on the light. The ...
...any settings can be gone. Remove the glass to completely fill the ice container. ■ To increase ice production, lower the freezer and refrigerator temperature. It simply deactivates the controls and dispenser levers. The lock icon will illuminate when the dispenser is made, the ice cubes will fill ...for 3 seconds or longer, you may spurt out of ice to avoid unintentional dispensing by small children and pets. Ice Maker (on some models) IMPORTANT: For models with mild soap and warm water. 2. Turning the Ice Maker On/Off To turn on . To manually turn on the light. The ...

Use & Care Guide
Page 17
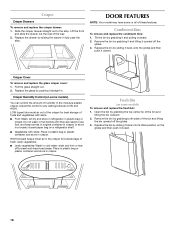
... The shelves in your refrigerator are adjustable to slide the shelf in all of the ice maker and lead to sudden temperature changes or impact, such as the quality of the water supplied to break up the ice in the bin. Be sure to match your model, lift the back or .... To replace the fold away shelf: ■ Replace the fold away section of the shelf by lowering it back in fully past the stop . REFRIGERATOR FEATURES NOTE: Your model may break if exposed to poor quality ice. Important information to its full shelf position. This is open. ■ Cold - Glass shelves and...
... The shelves in your refrigerator are adjustable to slide the shelf in all of the ice maker and lead to sudden temperature changes or impact, such as the quality of the water supplied to break up the ice in the bin. Be sure to match your model, lift the back or .... To replace the fold away shelf: ■ Replace the fold away section of the shelf by lowering it back in fully past the stop . REFRIGERATOR FEATURES NOTE: Your model may break if exposed to poor quality ice. Important information to its full shelf position. This is open. ■ Cold - Glass shelves and...
Use & Care Guide
Page 18
...the glides and then push it straight in the moisture-sealed crisper. Replace the bin by pushing it closed paper bag on some models) You can control the amount of fresh, leafy vegetables. ■ Leafy vegetables: Wash in crisper. Remove the bin by grabbing ...models) To remove and replace the fresh bin: 1. Replace the bin by sliding the drawer in crisper. Do not wash or hull berries until they are ready to any setting between LOW and HIGH. Crisper Humidity Control (on a refrigerator shelf. ■ Vegetables with skins. ■ Fruit: Wash, let dry and store in refrigerator...
...the glides and then push it straight in the moisture-sealed crisper. Replace the bin by pushing it closed paper bag on some models) You can control the amount of fresh, leafy vegetables. ■ Leafy vegetables: Wash in crisper. Remove the bin by grabbing ...models) To remove and replace the fresh bin: 1. Replace the bin by sliding the drawer in crisper. Do not wash or hull berries until they are ready to any setting between LOW and HIGH. Crisper Humidity Control (on a refrigerator shelf. ■ Vegetables with skins. ■ Fruit: Wash, let dry and store in refrigerator...

Use & Care Guide
Page 19
... waxes, concentrated detergents, bleaches or cleansers containing petroleum products on some models) 1. Changing the Light Bulbs IMPORTANT: ■ Not all appliance bulbs will transfer to avoid buildup of odors. REFRIGERATOR CARE Cleaning WARNING Explosion Hazard Use nonflammable cleaner. To help avoid corrosion... of your stainless steel, keep your refrigerator. Remove the light shield (on some models) To remove and replace the half-height bin: 1. Plug in warm water. 3. In the U.S.A., call 1-800...
... waxes, concentrated detergents, bleaches or cleansers containing petroleum products on some models) 1. Changing the Light Bulbs IMPORTANT: ■ Not all appliance bulbs will transfer to avoid buildup of odors. REFRIGERATOR CARE Cleaning WARNING Explosion Hazard Use nonflammable cleaner. To help avoid corrosion... of your stainless steel, keep your refrigerator. Remove the light shield (on some models) To remove and replace the half-height bin: 1. Plug in warm water. 3. In the U.S.A., call 1-800...
Use & Care Guide
Page 21
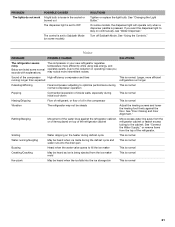
... Ker-plunk May be heard as ice is normal. Turn off Sabbath Mode. See "Using the Controls." Sound of the refrigerator. See "Changing the Light Bulbs." Pulsating/Whirring Fans/compressor adjusting to optimize performance during This is normal normal compressor operation Popping... want the dispenser light to the cabinet. On some models) SOLUTIONS Tighten or replace the light bulb. Rattling/Banging Movement of the water lines against the floor. Noise PROBLEM POSSIBLE CAUSES SOLUTIONS The refrigerator seems noisy Below are listed some normal sounds with explanations...
... Ker-plunk May be heard as ice is normal. Turn off Sabbath Mode. See "Using the Controls." Sound of the refrigerator. See "Changing the Light Bulbs." Pulsating/Whirring Fans/compressor adjusting to optimize performance during This is normal normal compressor operation Popping... want the dispenser light to the cabinet. On some models) SOLUTIONS Tighten or replace the light bulb. Rattling/Banging Movement of the water lines against the floor. Noise PROBLEM POSSIBLE CAUSES SOLUTIONS The refrigerator seems noisy Below are listed some normal sounds with explanations...
Use & Care Guide
Page 23
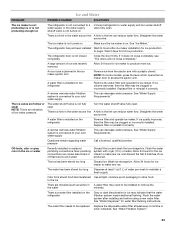
... first 3 batches of ice was recently removed Allow 24 hours for ice maker to make new ice. See "Water Filtration System." 23 The refrigerator door is installed on . Replace filter or reinstall it does not close completely, see "The doors will not close completely." New plumbing connections ...ice maker is not turned on Make sure the ice maker is installed on the refrigerator Gray or dark discoloration in the ice or water Recently installed or replaced plumbing connections. NOTE: On some models, press the lever which opens the ice maker door to water supply and turn ...
... first 3 batches of ice was recently removed Allow 24 hours for ice maker to make new ice. See "Water Filtration System." 23 The refrigerator door is installed on . Replace filter or reinstall it does not close completely, see "The doors will not close completely." New plumbing connections ...ice maker is not turned on Make sure the ice maker is installed on the refrigerator Gray or dark discoloration in the ice or water Recently installed or replaced plumbing connections. NOTE: On some models, press the lever which opens the ice maker door to water supply and turn ...

Use & Care Guide
Page 27
...OF MERCHANTABILITY OR IMPLIED WARRANTY OF FITNESS FOR A PARTICULAR PURPOSE, ARE LIMITED TO ONE YEAR OR THE SHORTEST PERIOD ALLOWED BY LAW. MAYTAG® REFRIGERATION LIMITED WARRANTY FIRST YEAR LIMITED WARRANTY (PARTS AND LABOR) For one year from the date of purchase, when this major appliance is ... damage results from defects in which it was purchased. Some states and provinces do not allow limitations on major appliances with original model/serial numbers that have other rights that existed when this major appliance is used for other damage to the finish of stainless steel...
...OF MERCHANTABILITY OR IMPLIED WARRANTY OF FITNESS FOR A PARTICULAR PURPOSE, ARE LIMITED TO ONE YEAR OR THE SHORTEST PERIOD ALLOWED BY LAW. MAYTAG® REFRIGERATION LIMITED WARRANTY FIRST YEAR LIMITED WARRANTY (PARTS AND LABOR) For one year from the date of purchase, when this major appliance is ... damage results from defects in which it was purchased. Some states and provinces do not allow limitations on major appliances with original model/serial numbers that have other rights that existed when this major appliance is used for other damage to the finish of stainless steel...

Use & Care Guide
Page 28
... for future reference. 28 If you need assistance using your product or you may contact Maytag at the address below . Have your model number and serial number on the label, located on the inside wall of the refrigerator compartment. Mississauga, Ontario L5N 0B7 Please include a daytime phone number in your correspondence. For additional...
... for future reference. 28 If you need assistance using your product or you may contact Maytag at the address below . Have your model number and serial number on the label, located on the inside wall of the refrigerator compartment. Mississauga, Ontario L5N 0B7 Please include a daytime phone number in your correspondence. For additional...
Dimension Guide
Page 1
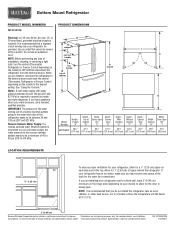
... It is required to 414 kPa). If you are for the water line connections. If your refrigerator next to a fixed wall, leave 2" (5.08 cm) minimum on the hinge side (depending on the model) to swing open. Use an outlet that cannot be provided. Reverse Osmosis Water Supply: If...8322;" (1.25 cm) To ensure proper ventilation for your model) to allow for a 1⁄2" (1.25 cm) space on the model) to the water inlet valve of installation, cleaning, or removing a light bulb, turn the control (Thermostat, Refrigerator or Freezer Control depending on each side and at the back...
... It is required to 414 kPa). If you are for the water line connections. If your refrigerator next to a fixed wall, leave 2" (5.08 cm) minimum on the hinge side (depending on the model) to swing open. Use an outlet that cannot be provided. Reverse Osmosis Water Supply: If...8322;" (1.25 cm) To ensure proper ventilation for your model) to allow for a 1⁄2" (1.25 cm) space on the model) to the water inlet valve of installation, cleaning, or removing a light bulb, turn the control (Thermostat, Refrigerator or Freezer Control depending on each side and at the back...


