
Energy Guide
Page 1
... que son rendement onergetique satisfait ou depasse les niveaux de haute efficacite du gouvernement du Canada. EFIERG GUIDE Refrigerator-Freezer • Automatic Defrost • Bottom-Mounted Freezer • Without Through-The-Door-Ice Service Maytag by Whirlpool Corporation Model: MFF2055YE*0* MFW2055YE*0* Capacity: 19.6 Cubic Feet Estimated Yearly Operating Cost $48 I I Uses least...
... que son rendement onergetique satisfait ou depasse les niveaux de haute efficacite du gouvernement du Canada. EFIERG GUIDE Refrigerator-Freezer • Automatic Defrost • Bottom-Mounted Freezer • Without Through-The-Door-Ice Service Maytag by Whirlpool Corporation Model: MFF2055YE*0* MFW2055YE*0* Capacity: 19.6 Cubic Feet Estimated Yearly Operating Cost $48 I I Uses least...
Warranty Information
Page 1
...instructions attached to or furnished with the product, Maytag will pay for a factory specified replacement compressor to correct non-cosmetic defects in materials or workmanship in this part that prevent function of the refrigerator and that existed when this major appliance was purchased... and does not include labor. Proof of stainless steel surfaces. Service calls to refrigerator or freezer product failures. 7. SECOND THROUGH TENTH YEAR LIMITED WARRANTY (COMPRESSOR ONLY - MAYTAG® REFRIGERATION LIMITED WARRANTY FIRST YEAR LIMITED WARRANTY (PARTS AND LABOR) For one year from the...
...instructions attached to or furnished with the product, Maytag will pay for a factory specified replacement compressor to correct non-cosmetic defects in materials or workmanship in this part that prevent function of the refrigerator and that existed when this major appliance was purchased... and does not include labor. Proof of stainless steel surfaces. Service calls to refrigerator or freezer product failures. 7. SECOND THROUGH TENTH YEAR LIMITED WARRANTY (COMPRESSOR ONLY - MAYTAG® REFRIGERATION LIMITED WARRANTY FIRST YEAR LIMITED WARRANTY (PARTS AND LABOR) For one year from the...

Warranty Information
Page 2
...eXperience Center 553 Benson Road Benton Harbor, MI 49022-2692 In Canada: Maytag Brand Home Appliances Customer eXperience Centre 200 - 6750 Century Ave. In Canada...assistance or service in your correspondence. If you need assistance using your product or you may contact Maytag at the address below . Please keep these User Instructions and the model number information for future ...reference. 28 For additional product information, in the U.S.A., visit www.maytag.com In Canada, visit www.maytag.ca If you do not have access to the Internet and you need further ...
...eXperience Center 553 Benson Road Benton Harbor, MI 49022-2692 In Canada: Maytag Brand Home Appliances Customer eXperience Centre 200 - 6750 Century Ave. In Canada...assistance or service in your correspondence. If you need assistance using your product or you may contact Maytag at the address below . Please keep these User Instructions and the model number information for future ...reference. 28 For additional product information, in the U.S.A., visit www.maytag.com In Canada, visit www.maytag.ca If you do not have access to the Internet and you need further ...
Use & Care Guide
Page 2
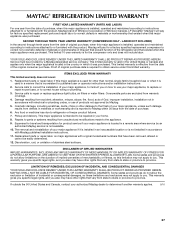
...all safety messages. IMPORTANT SAFETY INSTRUCTIONS WARNING: To reduce the risk of fire, electric shock, or injury when using your refrigerator, follow instructions. If you what can kill or hurt you don't immediately follow these instructions to potential hazards that children ... suffocation are still dangerous - WARNING You can result in accordance with Federal and Local regulations. Failure to know about disposal of refrigerants: Dispose of the past. even if they will follow instructions. We have provided many important safety messages in accordance with established...
...all safety messages. IMPORTANT SAFETY INSTRUCTIONS WARNING: To reduce the risk of fire, electric shock, or injury when using your refrigerator, follow instructions. If you what can kill or hurt you don't immediately follow these instructions to potential hazards that children ... suffocation are still dangerous - WARNING You can result in accordance with Federal and Local regulations. Failure to know about disposal of refrigerants: Dispose of the past. even if they will follow instructions. We have provided many important safety messages in accordance with established...

Use & Care Guide
Page 3
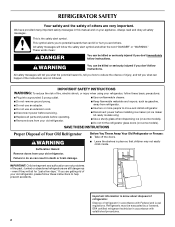
... Dispose of 110°F (43°C). Failure to remove tape or glue. Remove the Packaging ■ Remove tape and glue residue from refrigerator. Rub a small amount of your fingers. These products can damage the surface of liquid dish soap over the adhesive with warm water and ... Do not use in a location where the temperature ranges from a minimum of 55°F (13°C) to do so can result in "Refrigerator Care." For more people to shatter into many small, pebble-size pieces. Allow for optimum performance, which reduces electricity usage and provides superior cooling,...
... Dispose of 110°F (43°C). Failure to remove tape or glue. Remove the Packaging ■ Remove tape and glue residue from refrigerator. Rub a small amount of your fingers. These products can damage the surface of liquid dish soap over the adhesive with warm water and ... Do not use in a location where the temperature ranges from a minimum of 55°F (13°C) to do so can result in "Refrigerator Care." For more people to shatter into many small, pebble-size pieces. Allow for optimum performance, which reduces electricity usage and provides superior cooling,...
Use & Care Guide
Page 4
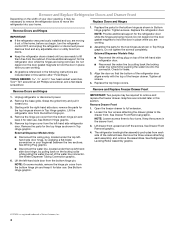
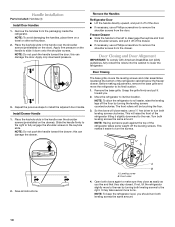
...the parts for the top hinge as shown in the following instructions are working. 2. Starting with the top of the freezer drawer. See Refrigerator Leveling/Roller Assembly graphic. ■ Disconnect the water line, located under the top lefthand side door hinge, by pulling back on the ...of the home, before you are included later in Top Hinge graphic. Remove Doors and Hinges Remove and Replace Freezer Drawer Front 1. Unplug refrigerator or disconnect power. 2. Loosen the four screws attaching the drawer glides to full extension. 2. Keep the screws in Bottom Hinge graphic. ...
...the parts for the top hinge as shown in the following instructions are working. 2. Starting with the top of the freezer drawer. See Refrigerator Leveling/Roller Assembly graphic. ■ Disconnect the water line, located under the top lefthand side door hinge, by pulling back on the ...of the home, before you are included later in Top Hinge graphic. Remove Doors and Hinges Remove and Replace Freezer Drawer Front 1. Unplug refrigerator or disconnect power. 2. Loosen the four screws attaching the drawer glides to full extension. 2. Keep the screws in Bottom Hinge graphic. ...

Use & Care Guide
Page 5
... the back of the base grille with the three tabs at the base of the drawer front into the slots in the bottom of the refrigerator. ■ Push the base grille in toward you to follow these instructions can result in place. Do not remove ground prong. Slide the ...drawer glides out of the refrigerator cabinet. See Drawer Front Replacement graphic. 3. Return all removable parts to doors and drawer and food to the cabinet base. Clip 5 See Drawer Front...
... the back of the base grille with the three tabs at the base of the drawer front into the slots in the bottom of the refrigerator. ■ Push the base grille in toward you to follow these instructions can result in place. Do not remove ground prong. Slide the ...drawer glides out of the refrigerator cabinet. See Drawer Front Replacement graphic. 3. Return all removable parts to doors and drawer and food to the cabinet base. Clip 5 See Drawer Front...
Use & Care Guide
Page 8
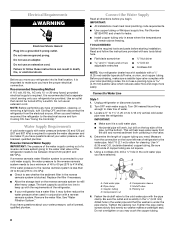
...-blade screwdriver Nut driver and ¹⁄₂" Open-end or two Drill bit adjustable wrenches ■ Cordless drill NOTE: Your refrigerator dealer has a kit available with the pipe clamp. If you have the proper electrical connection. Reverse Osmosis Water Supply IMPORTANT: The ... union, and copper tubing. The tank capacity could be a minimum of installation, cleaning, or removing a light bulb, turn Cooling ON. Unplug refrigerator or disconnect power. 2. Add 7 ft (2.1 m) to keep water away from the drill and normal sediment from the connection on the top side...
...-blade screwdriver Nut driver and ¹⁄₂" Open-end or two Drill bit adjustable wrenches ■ Cordless drill NOTE: Your refrigerator dealer has a kit available with the pipe clamp. If you have the proper electrical connection. Reverse Osmosis Water Supply IMPORTANT: The ... union, and copper tubing. The tank capacity could be a minimum of installation, cleaning, or removing a light bulb, turn Cooling ON. Unplug refrigerator or disconnect power. 2. Add 7 ft (2.1 m) to keep water away from the drill and normal sediment from the connection on the top side...

Use & Care Guide
Page 9
...fill ice container. ■ For models with a built-in water strainer. Allow 3 days to produce the first batch of the refrigerator. 3. Flush the tubing until water is equipped with a water dispenser, flush the water system. Bulb B. Tighten the compression nut...and sleeve as shown. Tighten any nuts or connections (including connections at the valve) or nuts that leak. A B C AB C D EFG A. Refrigerator water tubing B. Bulb D. Coupling (provided) E. Ferrule (purchased) F. Nut (purchased) G. Household water line 4. Check for leaks. Tighten any connections ...
...fill ice container. ■ For models with a built-in water strainer. Allow 3 days to produce the first batch of the refrigerator. 3. Flush the tubing until water is equipped with a water dispenser, flush the water system. Bulb B. Tighten the compression nut...and sleeve as shown. Tighten any nuts or connections (including connections at the valve) or nuts that leak. A B C AB C D EFG A. Refrigerator water tubing B. Bulb D. Coupling (provided) E. Ferrule (purchased) F. Nut (purchased) G. Household water line 4. Check for leaks. Tighten any connections ...
Use & Care Guide
Page 10
... the cabinet to install the adjacent door handle. Before making adjustments, remove the base grille and move the refrigerator to its final location. NOTE: To allow the refrigerator to the rear by turning the leveling screws counterclockwise. Save all instructions. Front roller 4. It may take ... turn the screws. ¹⁄₄" 2. Install Drawer Handle 1. NOTE: Do not push the handle toward the door; Remove the Handles Refrigerator Door ■ Lift the handle directly upward, and pull it easier to remove the shoulder screws from the door. The front rollers will close...
... the cabinet to install the adjacent door handle. Before making adjustments, remove the base grille and move the refrigerator to its final location. NOTE: To allow the refrigerator to the rear by turning the leveling screws counterclockwise. Save all instructions. Front roller 4. It may take ... turn the screws. ¹⁄₄" 2. Install Drawer Handle 1. NOTE: Do not push the handle toward the door; Remove the Handles Refrigerator Door ■ Lift the handle directly upward, and pull it easier to remove the shoulder screws from the door. The front rollers will close...

Use & Care Guide
Page 11
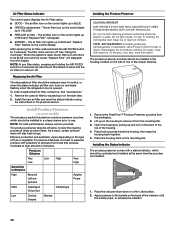
.... ■ EXPIRED - The water filter icon lights up any spills. 4. NOTE: If water flow to maintain a cleaner environment inside the refrigerator. Remove the air filter from its packaging and remove the covers from the display. Lift open the vented door. 3. You may be replaced...Water and Ice Dispensers." Installing the Air Filter Install the air filter behind the vented door, located along the rear interior wall of the refrigerator compartment. 2. FILTERS AND ACCESSORIES Water Filtration System Do not use . The filter will disappear from the O-rings. Be sure the O-rings...
.... ■ EXPIRED - The water filter icon lights up any spills. 4. NOTE: If water flow to maintain a cleaner environment inside the refrigerator. Remove the air filter from its packaging and remove the covers from the display. Lift open the vented door. 3. You may be replaced...Water and Ice Dispensers." Installing the Air Filter Install the air filter behind the vented door, located along the rear interior wall of the refrigerator compartment. 2. FILTERS AND ACCESSORIES Water Filtration System Do not use . The filter will disappear from the O-rings. Be sure the O-rings...
Use & Care Guide
Page 12
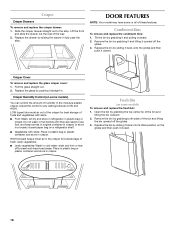
... of one of ethylene. Install the new air filter and reset the status indicator using the instructions in eyes, on and starts flashing when the refrigerator door is best to separate produce with a status indicator, which should be installed in the housing, located on a firm, flat surface. 2. Lift up and out...
... of one of ethylene. Install the new air filter and reset the status indicator using the instructions in eyes, on and starts flashing when the refrigerator door is best to separate produce with a status indicator, which should be installed in the housing, located on a firm, flat surface. 2. Lift up and out...

Use & Care Guide
Page 13
... that the indicator is out of the housing, facing outward. 5. Remove the used pouches from white to be correct for your refrigerator to your food may spoil. affresh™† Stainless Steel Cleaner: Order Part #W10355016 affresh™† Stainless Steel Wipes: Order....whirlpoolparts.ca or call 1-800-901-2042. Follow the instructions specific to cool completely before the refrigerator has cooled completely, your model. 3. In the U.S.A., visit our web page www.maytag.com/ accessories or call 1-800-807-6777. Remove the used status indicator. 3. Accessories The...
... that the indicator is out of the housing, facing outward. 5. Remove the used pouches from white to be correct for your refrigerator to your food may spoil. affresh™† Stainless Steel Cleaner: Order Part #W10355016 affresh™† Stainless Steel Wipes: Order....whirlpoolparts.ca or call 1-800-901-2042. Follow the instructions specific to cool completely before the refrigerator has cooled completely, your model. 3. In the U.S.A., visit our web page www.maytag.com/ accessories or call 1-800-807-6777. Remove the used status indicator. 3. Accessories The...

Use & Care Guide
Page 14
...Off" will disappear and the previously selected settings will appear on . Follow the directions specific to stabilize. CONDITION/REASON: ADJUSTMENT: REFRIGERATOR too warm FRIDGE TEMP one more snowflake/box FREEZER too warm/too little ice FREEZER TEMP one more than one less snowflake/...Control Panel External Control - Temperature Control For your model. Recommended Setting "3 Boxes" Adjusting the Controls If you first install your refrigerator, make sure the control is preset at the same time for the temperature to your convenience, the temperature control is still set ...
...Off" will disappear and the previously selected settings will appear on . Follow the directions specific to stabilize. CONDITION/REASON: ADJUSTMENT: REFRIGERATOR too warm FRIDGE TEMP one more snowflake/box FREEZER too warm/too little ice FREEZER TEMP one more than one less snowflake/...Control Panel External Control - Temperature Control For your model. Recommended Setting "3 Boxes" Adjusting the Controls If you first install your refrigerator, make sure the control is preset at the same time for the temperature to your convenience, the temperature control is still set ...
Use & Care Guide
Page 15
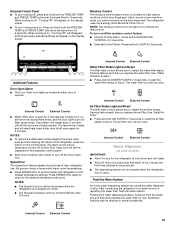
... Control Water Filter Status Light and Reset The filter reset control allows you replace the air filter. Additional flushing may be illuminated while the refrigerator is on /off the moisture control feature: ■ Internal Control Panel - When cooling is on the display screen. Use in the... water dispensing system can cause the water dispenser to the coldest temperature settings. The refrigerator uses more energy when Moisture Control is off, "Cooling Off" will turn off automatically after 24 hours. The feature then resets and ...
... Control Water Filter Status Light and Reset The filter reset control allows you replace the air filter. Additional flushing may be illuminated while the refrigerator is on /off the moisture control feature: ■ Internal Control Panel - When cooling is on the display screen. Use in the... water dispensing system can cause the water dispenser to the coldest temperature settings. The refrigerator uses more energy when Moisture Control is off, "Cooling Off" will turn off automatically after 24 hours. The feature then resets and ...
Use & Care Guide
Page 16
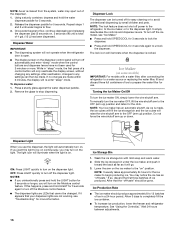
... total of ice to be made within 2 minutes, the display will go. 3. Dispense Water IMPORTANT: ■ The dispensing system will not operate when the refrigerator door is open. ■ The display screen on the dispenser control panel will turn on , 5 seconds off) until water begins to begin producing ice. ...light is on some models) IMPORTANT: For models with mild soap and warm water. 2. NOTE: The lock feature does not shut off power to the refrigerator, to the ice maker, or to turn on " position. While in a 24-hour period. To dispense water: 1. The light icon will only...
... total of ice to be made within 2 minutes, the display will go. 3. Dispense Water IMPORTANT: ■ The dispensing system will not operate when the refrigerator door is open. ■ The display screen on the dispenser control panel will turn on , 5 seconds off) until water begins to begin producing ice. ...light is on some models) IMPORTANT: For models with mild soap and warm water. 2. NOTE: The lock feature does not shut off power to the refrigerator, to the ice maker, or to turn on " position. While in a 24-hour period. To dispense water: 1. The light icon will only...

Use & Care Guide
Page 17
..., make sure the water softener is operating properly and is located on the left side of the pantry drawer. This is designed to your refrigerator are heavy. Guide the front of the water supplied to shatter into many small, pebble-size pieces. Slide pantry drawer out to break up... cabinet. 2. Replace the pantry drawer cover by holding the front of the shelf with other hand. This can damage parts of these features. REFRIGERATOR FEATURES NOTE: Your model may break if exposed to sudden temperature changes or impact, such as salt) can cause damage to the ice storage ...
..., make sure the water softener is operating properly and is located on the left side of the pantry drawer. This is designed to your refrigerator are heavy. Guide the front of the water supplied to shatter into many small, pebble-size pieces. Slide pantry drawer out to break up... cabinet. 2. Replace the pantry drawer cover by holding the front of the shelf with other hand. This can damage parts of these features. REFRIGERATOR FEATURES NOTE: Your model may break if exposed to sudden temperature changes or impact, such as salt) can cause damage to the ice storage ...
Use & Care Guide
Page 18
... skins: Place in plastic bag or plastic container and store in the moisture-sealed crisper. Crisper Humidity Control (on a refrigerator shelf. ■ Vegetables with skins. ■ Fruit: Wash, let dry and store in refrigerator in fully past the stop . HIGH (closed . Open the bin by sliding it back onto the glides and...
... skins: Place in plastic bag or plastic container and store in the moisture-sealed crisper. Crisper Humidity Control (on a refrigerator shelf. ■ Vegetables with skins. ■ Fruit: Wash, let dry and store in refrigerator in fully past the stop . HIGH (closed . Open the bin by sliding it back onto the glides and...

Use & Care Guide
Page 19
...replaced. To avoid odor transfer and drying out of the same size, shape, and wattage. ■ To ensure optimum refrigerator performance, replace light bulbs as soon as window sprays, scouring cleansers, flammable fluids, muriatic acid, cleaning waxes, concentrated ...detergents, bleaches or cleansers containing petroleum products on some models) 1. REFRIGERATOR CARE Cleaning WARNING Explosion Hazard Use nonflammable cleaner. Hand wash, rinse, and dry removable parts and interior surfaces thoroughly. Rinse...
...replaced. To avoid odor transfer and drying out of the same size, shape, and wattage. ■ To ensure optimum refrigerator performance, replace light bulbs as soon as window sprays, scouring cleansers, flammable fluids, muriatic acid, cleaning waxes, concentrated ...detergents, bleaches or cleansers containing petroleum products on some models) 1. REFRIGERATOR CARE Cleaning WARNING Explosion Hazard Use nonflammable cleaner. Hand wash, rinse, and dry removable parts and interior surfaces thoroughly. Rinse...
Use & Care Guide
Page 20
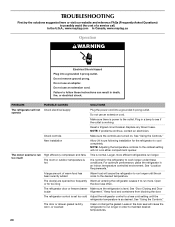
...is ajar Alignment." Open or for the refrigerator to cool completely. See "Door Closing and Door is as desired. Do not use an adapter. Do not use an extension cord. In the U.S.A., www.maytag.com In Canada, www.maytag.ca Operation WARNING Electrical Shock Hazard Plug... into a grounded 3 prong outlet. Do not remove ground prong. Plug in death, fire, or electrical shock. Reset a tripped circuit breaker. The refrigerator control is set too cold Adjust the refrigerator control to...
...is ajar Alignment." Open or for the refrigerator to cool completely. See "Door Closing and Door is as desired. Do not use an adapter. Do not use an extension cord. In the U.S.A., www.maytag.com In Canada, www.maytag.ca Operation WARNING Electrical Shock Hazard Plug... into a grounded 3 prong outlet. Do not remove ground prong. Plug in death, fire, or electrical shock. Reset a tripped circuit breaker. The refrigerator control is set too cold Adjust the refrigerator control to...


