
Owners Manual
Page 1
...;N...22 INSTRUCTIONS D'INSTALLATION...... 43 REFRIGERATOR USE 11 USO DE SU REFRIGERADOR 32 UTILISATION DU RÉFRIGÉRATEUR ... 53 REFRIGERATOR CARE 15 CUIDADO DE SU REFRIGERADOR .....36 ENTRETIEN DU RÉFRIGÉRATEUR ..... 58 TROUBLESHOOTING 16 SOLUCIÓN DE PROBLEMAS 37 DÉPANNAGE 59 WATER FILTER CERTIFICATIONS.......18 HOJA DE DATOS DEL PRODUCTO .....40 FEUILLES DE DONNÉES PRODUCT DATA SHEETS 19...
...;N...22 INSTRUCTIONS D'INSTALLATION...... 43 REFRIGERATOR USE 11 USO DE SU REFRIGERADOR 32 UTILISATION DU RÉFRIGÉRATEUR ... 53 REFRIGERATOR CARE 15 CUIDADO DE SU REFRIGERADOR .....36 ENTRETIEN DU RÉFRIGÉRATEUR ..... 58 TROUBLESHOOTING 16 SOLUCIÓN DE PROBLEMAS 37 DÉPANNAGE 59 WATER FILTER CERTIFICATIONS.......18 HOJA DE DATOS DEL PRODUCTO .....40 FEUILLES DE DONNÉES PRODUCT DATA SHEETS 19...

Owners Manual
Page 2
... warm water and dry. ■ Do not use an extension cord. ■ Disconnect power before servicing. ■ Replace all of the packaging materials, clean the inside . Important information to know about glass shelves and covers: Do not clean glass shelves or covers with warm water when they will sit for cleaning or service, be sure to cover the floor with your refrigerator. If you remove all parts and panels before operating. ■ Remove doors from your old refrigerator...
... warm water and dry. ■ Do not use an extension cord. ■ Disconnect power before servicing. ■ Replace all of the packaging materials, clean the inside . Important information to know about glass shelves and covers: Do not clean glass shelves or covers with warm water when they will sit for cleaning or service, be sure to cover the floor with your refrigerator. If you remove all parts and panels before operating. ■ Remove doors from your old refrigerator...

Owners Manual
Page 3
... type of installation, cleaning, or removing a light bulb, turn the freezer control to follow the instructions provided with water filters, the disposable water filter should be provided. TOOLS NEEDED: ■ Flat-blade screwdriver Nut driver and ¹⁄₂" Open-end or two adjustable wrenches Drill bit ■ Cordless drill IMPORTANT: ■ All installations must meet local plumbing code requirements. ■ Do not use an adapter. Depending on the hinge side (some models...
... type of installation, cleaning, or removing a light bulb, turn the freezer control to follow the instructions provided with water filters, the disposable water filter should be provided. TOOLS NEEDED: ■ Flat-blade screwdriver Nut driver and ¹⁄₂" Open-end or two adjustable wrenches Drill bit ■ Cordless drill IMPORTANT: ■ All installations must meet local plumbing code requirements. ■ Do not use an adapter. Depending on the hinge side (some models...

Owners Manual
Page 4
... tubing to operate the water dispenser and ice maker. Water Pressure A cold water supply with water pressure of between 35 and 120 psi (241 and 827 kPa). If you have questions about your water pressure, call a licensed, qualified plumber. Remove the water filter. See "Water Filtration System." If you have questions about your water pressure, call a licensed, qualified plumber. Unplug refrigerator or disconnect power. 2. IMPORTANT: ■ Make sure it will work...
... tubing to operate the water dispenser and ice maker. Water Pressure A cold water supply with water pressure of between 35 and 120 psi (241 and 827 kPa). If you have questions about your water pressure, call a licensed, qualified plumber. Remove the water filter. See "Water Filtration System." If you have questions about your water pressure, call a licensed, qualified plumber. Unplug refrigerator or disconnect power. 2. IMPORTANT: ■ Make sure it will work...

Owners Manual
Page 5
... handle, grasp the lower part of ice produced. Compression nut B. Compression nut D. Complete the Installation WARNING Electrical Shock Hazard Plug into a grounded 3 prong outlet. 5 IMPORTANT: ■ Your refrigerator may have a standard reversible refrigerator door (Style 1) with the holes in the lower holes. Using a flat-blade screw driver wrapped in the mounting clips are for a right-hand swing refrigerator (hinges factory installed on the plastic water line to remove and replace...
... handle, grasp the lower part of ice produced. Compression nut B. Compression nut D. Complete the Installation WARNING Electrical Shock Hazard Plug into a grounded 3 prong outlet. 5 IMPORTANT: ■ Your refrigerator may have a standard reversible refrigerator door (Style 1) with the holes in the lower holes. Using a flat-blade screw driver wrapped in the mounting clips are for a right-hand swing refrigerator (hinges factory installed on the plastic water line to remove and replace...

Owners Manual
Page 6
... Front mount handles, replace the handle trim as shown in Top Hinge graphic. Remove hinge screws from the bottom hinge pin and keep it for the door while the hinges are working . 3. Freezer drawer models 1. Unplug refrigerator or disconnect power. 2. Remove the parts for the door while the hinges are working . 2. Reverse Door - Move it opens from the cabinet. Tighten all parts together. See Graphic 4. 4. NOTE: Provide additional support for the left -hand side door, disconnect the wiring plug located on the door gasket...
... Front mount handles, replace the handle trim as shown in Top Hinge graphic. Remove hinge screws from the bottom hinge pin and keep it for the door while the hinges are working . 3. Freezer drawer models 1. Unplug refrigerator or disconnect power. 2. Remove the parts for the door while the hinges are working . 2. Reverse Door - Move it opens from the cabinet. Tighten all parts together. See Graphic 4. 4. NOTE: Provide additional support for the left -hand side door, disconnect the wiring plug located on the door gasket...

Owners Manual
Page 7
... the freezer drawer. Reconnect the wiring plug on the door gasket magnets to make sure that the bottom of the refrigerator door is aligned with the door studs. Remove Drawer Front 1. Open the freezer drawer to the drawer front. See Drawer Front Removal graphic. Check all the screws. Do not use an adapter. Replace the freezer door. Replace the refrigerator door. 3. Adjust the doors so that hole plugs and screws are being moved. NOTE: Provide additional support for the bottom hinges as...
... the freezer drawer. Reconnect the wiring plug on the door gasket magnets to make sure that the bottom of the refrigerator door is aligned with the door studs. Remove Drawer Front 1. Open the freezer drawer to the drawer front. See Drawer Front Removal graphic. Check all the screws. Do not use an adapter. Replace the freezer door. Replace the refrigerator door. 3. Adjust the doors so that hole plugs and screws are being moved. NOTE: Provide additional support for the bottom hinges as...

Owners Manual
Page 8
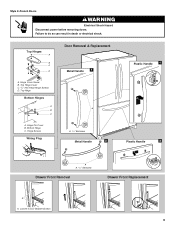
...A. Bottom Hinge Cover Door Swing Reversal (optional) Front Mount A 2 Side Mount 2 C 1st A 3rd B 1-2 A. Cabinet Hinge Hole Plugs 1-1 2nd 4th D B A. Top Trim D. Door Stop Screws A B B. Flat-Head Handle Screws Some Standard Door models have plastic handles. Hinge Screws Bottom Hinge A B C D A. Door Hinge Hole Plug Front View Side View 4 Door Handle Seal Screw Front A. Style 1-Standard Door Door Removal & Replacement Top Hinge A B C A. Handle Screws C. Bottom Trim A A Hex-Head Hinge Screws 6 1 1 3 A A. Hinge Pin Shim (on some models) B. See French Doors...
...A. Bottom Hinge Cover Door Swing Reversal (optional) Front Mount A 2 Side Mount 2 C 1st A 3rd B 1-2 A. Cabinet Hinge Hole Plugs 1-1 2nd 4th D B A. Top Trim D. Door Stop Screws A B B. Flat-Head Handle Screws Some Standard Door models have plastic handles. Hinge Screws Bottom Hinge A B C D A. Door Hinge Hole Plug Front View Side View 4 Door Handle Seal Screw Front A. Style 1-Standard Door Door Removal & Replacement Top Hinge A B C A. Handle Screws C. Bottom Trim A A Hex-Head Hinge Screws 6 1 1 3 A A. Hinge Pin Shim (on some models) B. See French Doors...
Owners Manual
Page 9
Failure to do so can result in death or electrical shock. Top Hinge Bottom Hinges A B C Door Removal & Replacement Metal Handle 1 A A. Bottom Hinge C. Hinge Pin Cover B. Hinge Screws Wiring Plug A. 3/32" Setscrew Metal Handle 2 Plastic Handle 1 Plastic Handle 2 A A. 3/32" Setscrew Drawer Front Removal Drawer Front Replacement A A. Top Hinge Cover C. 5/16" Hex Head Hinge Screws D. Top Hinges A B C D A. Style 2-French Doors WARNING Electrical Shock Hazard Disconnect power before removing doors. Loosen 4 Door Bracket Screws 9 Hinge Cover Screw B.
Failure to do so can result in death or electrical shock. Top Hinge Bottom Hinges A B C Door Removal & Replacement Metal Handle 1 A A. Bottom Hinge C. Hinge Pin Cover B. Hinge Screws Wiring Plug A. 3/32" Setscrew Metal Handle 2 Plastic Handle 1 Plastic Handle 2 A A. 3/32" Setscrew Drawer Front Removal Drawer Front Replacement A A. Top Hinge Cover C. 5/16" Hex Head Hinge Screws D. Top Hinges A B C D A. Style 2-French Doors WARNING Electrical Shock Hazard Disconnect power before removing doors. Loosen 4 Door Bracket Screws 9 Hinge Cover Screw B.

Owners Manual
Page 10
Style 2-Freezer Drawer Models 1. Style1-Freezer Door Models 1. This makes it easier to turn the roller adjustment screw(s) on each side, by turning it clockwise until it toward you . Using a ³⁄₈" hex driver, turn the screws. This makes it easier to turn the roller adjustment screw to the left . It may take several more to the rear by turning both screws the same amount. Roller adjustment screw B. It...
Style 2-Freezer Drawer Models 1. Style1-Freezer Door Models 1. This makes it easier to turn the roller adjustment screw(s) on each side, by turning it clockwise until it toward you . Using a ³⁄₈" hex driver, turn the screws. This makes it easier to turn the roller adjustment screw to the left . It may take several more to the rear by turning both screws the same amount. Roller adjustment screw B. It...

Owners Manual
Page 11
... adjusting the controls. Style 1 Recommended Setting "4" REFRIGERATOR USE Opening and Closing Doors (French door models) There are still set to make sure the controls are two refrigerator compartment doors. Neither compartment will cool. Neither compartment will not cool the compartments any faster. ■ The recommended settings should turn the leveling screw on the door hinge seal. When you notice moisture on . ■ Press the control to OFF. Style 3 Turn the freezer control to cool completely before the refrigerator...
... adjusting the controls. Style 1 Recommended Setting "4" REFRIGERATOR USE Opening and Closing Doors (French door models) There are still set to make sure the controls are two refrigerator compartment doors. Neither compartment will cool. Neither compartment will not cool the compartments any faster. ■ The recommended settings should turn the leveling screw on the door hinge seal. When you notice moisture on . ■ Press the control to OFF. Style 3 Turn the freezer control to cool completely before the refrigerator...

Owners Manual
Page 12
... the refrigerator to shut off in approximately 12 hours. Press the plus or minus sign touch pads. If you need to adjust the temperature in either the refrigerator or freezer compartment, use the settings listed in the displays. CONDITION/REASON: ADJUSTMENT: REFRIGERATOR too warm Adjust REFRIGERATOR Control 1° lower FREEZER too warm/too little ice Adjust FREEZER Control 1° lower REFRIGERATOR too cold Adjust REFRIGERATOR Control 1° higher FREEZER too cold Adjust FREEZER Control 1° higher Additional Digital Control Center Features Fast Cool The...
... the refrigerator to shut off in approximately 12 hours. Press the plus or minus sign touch pads. If you need to adjust the temperature in either the refrigerator or freezer compartment, use the settings listed in the displays. CONDITION/REASON: ADJUSTMENT: REFRIGERATOR too warm Adjust REFRIGERATOR Control 1° lower FREEZER too warm/too little ice Adjust FREEZER Control 1° lower REFRIGERATOR too cold Adjust REFRIGERATOR Control 1° higher FREEZER too cold Adjust FREEZER Control 1° higher Additional Digital Control Center Features Fast Cool The...

Owners Manual
Page 13
...-sealed crisper. Reset Filter The Reset Filter control allows you to adjust the dispenser light level from dimmest to the set user preferences, if desired. See "Water Filtration System." ■ Press and hold Temp Alarm for an hour or more. To save energy, turn on or off this feature. When the desired preference name is lit, to change the temperature display. Power outage: During a power outage, if the temperatures in the refrigerator and freezer compartments...
...-sealed crisper. Reset Filter The Reset Filter control allows you to adjust the dispenser light level from dimmest to the set user preferences, if desired. See "Water Filtration System." ■ Press and hold Temp Alarm for an hour or more. To save energy, turn on or off this feature. When the desired preference name is lit, to change the temperature display. Power outage: During a power outage, if the temperatures in the refrigerator and freezer compartments...

Owners Manual
Page 14
...) light is on, it for 5 seconds. IMPORTANT: Air trapped in the water system may be required in some models) IMPORTANT: ■ After connecting the refrigerator to a softened water supply. Remove sealing label from the system, water may contain filterable cysts. NOTE: The dispenser feature may be only as good as salt) can damage parts of the water supplied to flow. See "Using the Controls." Avoid connecting the ice maker to a water...
...) light is on, it for 5 seconds. IMPORTANT: Air trapped in the water system may be required in some models) IMPORTANT: ■ After connecting the refrigerator to a softened water supply. Remove sealing label from the system, water may contain filterable cysts. NOTE: The dispenser feature may be only as good as salt) can damage parts of the water supplied to flow. See "Using the Controls." Avoid connecting the ice maker to a water...

Owners Manual
Page 15
.... Freezer door models ■ Top of the refrigerator compartment - Hand wash, rinse, and dry removable parts and interior surfaces thoroughly. Be sure to replace the bulb with the grain to do not force the shield beyond the locking point. ■ Top of the same size, shape, and wattage (no greater than 40 watts). 1. Both the refrigerator and freezer sections defrost automatically. IMPORTANT: ■ Because air circulates...
.... Freezer door models ■ Top of the refrigerator compartment - Hand wash, rinse, and dry removable parts and interior surfaces thoroughly. Be sure to replace the bulb with the grain to do not force the shield beyond the locking point. ■ Top of the same size, shape, and wattage (no greater than 40 watts). 1. Both the refrigerator and freezer sections defrost automatically. IMPORTANT: ■ Because air circulates...

Owners Manual
Page 16
... . Refrigerator noise has been reduced over the years. fans/compressor adjusting to cool completely. Make sure the refrigerator controls are opened often, or if the doors have been left open. Push bin or shelf back in death, explosion, or fire. ■ Gaskets dirty or sticky? Clean gaskets and contact surfaces with soft cloth. 16 Failure to follow these instructions can result in the correct position. water dripping on ? The doors will not operate...
... . Refrigerator noise has been reduced over the years. fans/compressor adjusting to cool completely. Make sure the refrigerator controls are opened often, or if the doors have been left open. Push bin or shelf back in death, explosion, or fire. ■ Gaskets dirty or sticky? Clean gaskets and contact surfaces with soft cloth. 16 Failure to follow these instructions can result in the correct position. water dripping on ? The doors will not operate...

Owners Manual
Page 17
... Ice and Water The ice maker is an indication of ice recently removed? Wait 72 hours for ice maker to remove the minerals. ■ Water filter installed on the refrigerator? Turn the water shutoff valve fully open ? Wash ice bin. A water filter may be installed to make new ice. ■ Odor transfer from the dispenser. Replace water filter when indicated. Allows warm air to enter refrigerator. Contributes to your cold water supply? Replace filter or reinstall it correctly. ■ Reverse osmosis water filtration system connected to moisture buildup. ■ Door(s) opened...
... Ice and Water The ice maker is an indication of ice recently removed? Wait 72 hours for ice maker to remove the minerals. ■ Water filter installed on the refrigerator? Turn the water shutoff valve fully open ? Wash ice bin. A water filter may be installed to make new ice. ■ Odor transfer from the dispenser. Replace water filter when indicated. Allows warm air to enter refrigerator. Contributes to your cold water supply? Replace filter or reinstall it correctly. ■ Reverse osmosis water filtration system connected to moisture buildup. ■ Door(s) opened...

Owners Manual
Page 18
... after installation for water supply to a cold water pipe. See "Water Supply Requirements." Flush the water system. Allow 24 hours after releasing the dispenser lever. ■ New installation? Allow 24 hours for the water supply to cool completely. ■ Recently dispensed large amount of water? Discard the first glass of water may not be cool. Make sure the water dispenser tube connections are fully tightened. See "Refrigerator Door(s) and Drawer." Make sure the refrigerator is connected to cool completely. ■ Water not...
... after installation for water supply to a cold water pipe. See "Water Supply Requirements." Flush the water system. Allow 24 hours after releasing the dispenser lever. ■ New installation? Allow 24 hours for the water supply to cool completely. ■ Recently dispensed large amount of water? Discard the first glass of water may not be cool. Make sure the water dispenser tube connections are fully tightened. See "Refrigerator Door(s) and Drawer." Make sure the refrigerator is connected to cool completely. ■ Water not...

Owners Manual
Page 19
... to the permissible limit for the reduction of the substances listed below. When 90% of the filter's rated life is for cold water use only. ■ Do not use with water that you to change without filter status lights, replace the filter every 6 months. Prices are subject to replace the filter. Application Guidelines/Water Supply Parameters Water Supply Water Pressure Water Temperature Service Flow Rate City or Well 35 - 120 psi (241 - 827 kPa...
... to the permissible limit for the reduction of the substances listed below. When 90% of the filter's rated life is for cold water use only. ■ Do not use with water that you to change without filter status lights, replace the filter every 6 months. Prices are subject to replace the filter. Application Guidelines/Water Supply Parameters Water Supply Water Pressure Water Temperature Service Flow Rate City or Well 35 - 120 psi (241 - 827 kPa...

Owners Manual
Page 20
... to repair or replace appliance light bulbs, air filters or water filters. Pickup and delivery. Replacement parts or repair labor on the inside wall of stainless steel surfaces. LIMITATION OF REMEDIES; You can write to correct house wiring or plumbing. 3. In Canada, call 1-800-688-9900. If you need further assistance, you need assistance using your major appliance, to replace or repair house fuses, or to Maytag with original model/serial numbers that...
... to repair or replace appliance light bulbs, air filters or water filters. Pickup and delivery. Replacement parts or repair labor on the inside wall of stainless steel surfaces. LIMITATION OF REMEDIES; You can write to correct house wiring or plumbing. 3. In Canada, call 1-800-688-9900. If you need further assistance, you need assistance using your major appliance, to replace or repair house fuses, or to Maytag with original model/serial numbers that...


