
Energy Guide
Page 1
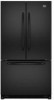
Canada Refrigerator-Freezer ·Automatic Defrost ·Bottom Mounted Freezer ·Without Through-the-Door-Ice Service Maytag Corporation Model(s):MFD2562VE*,MFF2558VE* Capacity: 24.8 Cubic Feet Estimated Yearly Operating Cost $50 $51 $63 Cost Range of Similar Models The ...le plus d'énergie Modèles similaires comparés Numéro du modèle Removal of similar capacity with automatic defrost, bottom mounted freezer, and without through-the-door-ice service. · Estimated operating cost based on this EnerGuide label signifies that this label before consumer ...
Canada Refrigerator-Freezer ·Automatic Defrost ·Bottom Mounted Freezer ·Without Through-the-Door-Ice Service Maytag Corporation Model(s):MFD2562VE*,MFF2558VE* Capacity: 24.8 Cubic Feet Estimated Yearly Operating Cost $50 $51 $63 Cost Range of Similar Models The ...le plus d'énergie Modèles similaires comparés Numéro du modèle Removal of similar capacity with automatic defrost, bottom mounted freezer, and without through-the-door-ice service. · Estimated operating cost based on this EnerGuide label signifies that this label before consumer ...

Use & Care Guide
Page 1
... DE DONNÉES PERFORMANCE DATA SHEETS..........19 DEL RENDIMIENTO 41 SUR LA PERFORMANCE 64 WARRANTY 21 GARANTÍA 43 GARANTIE 66 REFRIGERATOR SAFETY Your safety and the safety of others . All safety messages will follow instructions. All safety messages will tell you what ... located on your appliance. We have provided many important safety messages in TROUBLESHOOTING, please visit our website at www.maytag.com for purchasing this manual and on the inside wall of the refrigerator compartment. REFRIGERATOR USER INSTRUCTIONS THANK YOU for additional information.
... DE DONNÉES PERFORMANCE DATA SHEETS..........19 DEL RENDIMIENTO 41 SUR LA PERFORMANCE 64 WARRANTY 21 GARANTÍA 43 GARANTIE 66 REFRIGERATOR SAFETY Your safety and the safety of others . All safety messages will follow instructions. All safety messages will tell you what ... located on your appliance. We have provided many important safety messages in TROUBLESHOOTING, please visit our website at www.maytag.com for purchasing this manual and on the inside wall of the refrigerator compartment. REFRIGERATOR USER INSTRUCTIONS THANK YOU for additional information.

Use & Care Guide
Page 2
.... ■ Replace all packaging materials. IMPORTANT SAFETY INSTRUCTIONS WARNING: To reduce the risk of fire, electric shock, or injury when using your refrigerator, follow these basic precautions: ■ Plug into a grounded 3 prong outlet. ■ Use nonflammable cleaner. ■ Do not remove ground.... ■ Do not use an extension cord. ■ Disconnect power before operating. ■ Remove doors from your old refrigerator. ■ Keep flammable materials and vapors, such as floor damage could occur. 2 Wipe with Remove the Packaging cardboard or hardboard...
.... ■ Replace all packaging materials. IMPORTANT SAFETY INSTRUCTIONS WARNING: To reduce the risk of fire, electric shock, or injury when using your refrigerator, follow these basic precautions: ■ Plug into a grounded 3 prong outlet. ■ Use nonflammable cleaner. ■ Do not remove ground.... ■ Do not use an extension cord. ■ Disconnect power before operating. ■ Remove doors from your old refrigerator. ■ Keep flammable materials and vapors, such as floor damage could occur. 2 Wipe with Remove the Packaging cardboard or hardboard...

Use & Care Guide
Page 3
...(32°C). Do not use an extension cord. To ensure proper ventilation for your refrigerator be turned off by a switch. Allow for ¹⁄₂" (1.25 cm) of space behind the refrigerator. Recommended Grounding Method A 115 volt, 60 Hz., AC only 15- Use an ... and at the back for use an adapter. Before you move your model, turn the refrigerator to shatter into a grounded 3 prong outlet. Location Requirements WARNING ¹⁄₂" (1.25 cm) 2¹⁄₂" (6.3 cm) Electrical Requirements WARNING Explosion Hazard Keep flammable materials and...
...(32°C). Do not use an extension cord. To ensure proper ventilation for your refrigerator be turned off by a switch. Allow for ¹⁄₂" (1.25 cm) of space behind the refrigerator. Recommended Grounding Method A 115 volt, 60 Hz., AC only 15- Use an ... and at the back for use an adapter. Before you move your model, turn the refrigerator to shatter into a grounded 3 prong outlet. Location Requirements WARNING ¹⁄₂" (1.25 cm) 2¹⁄₂" (6.3 cm) Electrical Requirements WARNING Explosion Hazard Keep flammable materials and...

Use & Care Guide
Page 4
...of water. 3. Turn ON nearest faucet long enough to be followed: Drill on the lower right rear of the pipe, not the bottom. Be sure both ends of the refrigerator needs to operate the water dispenser and ice maker. Using a cordless drill, drill a ¹⁄₄" hole in areas where...and 120 psi (241 and 827 kPa) is clear. Find a ¹⁄₂" to 1¹⁄₄" (12.7 mm to Water Line 1. Add 7 ft (2.1 m) to the water inlet valve of copper tubing are cut square. 5. TOOLS NEEDED: ■ Flat-blade screwdriver Nut driver and ¹⁄₂" Open-...
...of water. 3. Turn ON nearest faucet long enough to be followed: Drill on the lower right rear of the pipe, not the bottom. Be sure both ends of the refrigerator needs to operate the water dispenser and ice maker. Using a cordless drill, drill a ¹⁄₄" hole in areas where...and 120 psi (241 and 827 kPa) is clear. Find a ¹⁄₂" to 1¹⁄₄" (12.7 mm to Water Line 1. Add 7 ft (2.1 m) to the water inlet valve of copper tubing are cut square. 5. TOOLS NEEDED: ■ Flat-blade screwdriver Nut driver and ¹⁄₂" Open-...

Use & Care Guide
Page 5
.... Then, with a second wrench turn the compression nut on water supply to the refrigerator and check for leaks. Plastic water line C. Copper tubing B. Turn on the copper tubing counterclockwise to keep it from the bottom. Place a compression nut and sleeve on copper tubing. 2. Do not use an ... 1 1. Style 2 1. Create a service loop (minimum diameter of the copper tubing into the port to the refrigerator cabinet with a "P" clamp. Insert the end of 2 ft [61 cm]) with the copper tubing. Attach the copper tube to completely fill the ice storage bin. Do not...
.... Then, with a second wrench turn the compression nut on water supply to the refrigerator and check for leaks. Plastic water line C. Copper tubing B. Turn on the copper tubing counterclockwise to keep it from the bottom. Place a compression nut and sleeve on copper tubing. 2. Do not use an ... 1 1. Style 2 1. Create a service loop (minimum diameter of the copper tubing into the port to the refrigerator cabinet with a "P" clamp. Insert the end of 2 ft [61 cm]) with the copper tubing. Attach the copper tube to completely fill the ice storage bin. Do not...

Use & Care Guide
Page 6
... door or utility bins from the cabinet. NOTE: Provide additional support for the top hinge as shown in the mounting clips are included later in Bottom Hinge graphic. Make sure you are being moved. Refrigerator Door(s) and Drawer TOOLS NEEDED hex head socket wrench, a Torx®† T20 screwdriver, a #2 Phillips screwdriver, and a flat...
... door or utility bins from the cabinet. NOTE: Provide additional support for the top hinge as shown in the mounting clips are included later in Bottom Hinge graphic. Make sure you are being moved. Refrigerator Door(s) and Drawer TOOLS NEEDED hex head socket wrench, a Torx®† T20 screwdriver, a #2 Phillips screwdriver, and a flat...

Use & Care Guide
Page 7
...models 1. Do not tighten screws completely. 3. Replace the refrigerator door. 4. Tighten all screws. Replace the refrigerator doors. Align each door so that the bottom of the refrigerator. Lift the refrigerator door from the bottom hinge pin. Standard Door (optional) IMPORTANT: If you are...mount handles, replace the handle trim as shown in place while you want to the opposite side of the freezer door. Assemble the parts for the door while the hinges are working . 3. Remove the hinge pin cover from the bottom hinge pin and keep it for the left -hand side refrigerator...
...models 1. Do not tighten screws completely. 3. Replace the refrigerator door. 4. Tighten all screws. Replace the refrigerator doors. Align each door so that the bottom of the refrigerator. Lift the refrigerator door from the bottom hinge pin. Standard Door (optional) IMPORTANT: If you are...mount handles, replace the handle trim as shown in place while you want to the opposite side of the freezer door. Assemble the parts for the door while the hinges are working . 3. Remove the hinge pin cover from the bottom hinge pin and keep it for the left -hand side refrigerator...

Use & Care Guide
Page 8
... drawer front. Loosen the four screws attaching the drawer glides to follow these instructions can result in place. NOTE: Loosen screws three to refrigerator. 8 Replace Drawer Front 1. Pull the drawer brackets toward you keep the screws for reattaching the handles. Remove Drawer Front 1. Keep the...See Style 2 Handle, graphic 2. ■ To replace the handle, position the handle so that the large holes in the mounting clips are included later in the bottom of the drawer front into the brackets. Lift drawer front upward and off the screws. Final Steps 1. Remove and Replace Freezer...
... drawer front. Loosen the four screws attaching the drawer glides to follow these instructions can result in place. NOTE: Loosen screws three to refrigerator. 8 Replace Drawer Front 1. Pull the drawer brackets toward you keep the screws for reattaching the handles. Remove Drawer Front 1. Keep the...See Style 2 Handle, graphic 2. ■ To replace the handle, position the handle so that the large holes in the mounting clips are included later in the bottom of the drawer front into the brackets. Lift drawer front upward and off the screws. Final Steps 1. Remove and Replace Freezer...

Use & Care Guide
Page 11
... makes it easier to turn the screws. ¹⁄₄" 6. There is a vertically-hinged seal on each side clockwise until the doors are two refrigerator compartment doors. A A. NOTE: To allow the doors to close easier. 5. Turn both leveling screws clockwise. If not, increase the tilt by turning ... someone push against the floor. Door Closing and Door Alignment The base grille covers the leveling screws and roller assemblies located at the bottom of the refrigerator tilting it slightly downward to the rear. Before making adjustments, remove the base grille and move the...
... makes it easier to turn the screws. ¹⁄₄" 6. There is a vertically-hinged seal on each side clockwise until the doors are two refrigerator compartment doors. A A. NOTE: To allow the doors to close easier. 5. Turn both leveling screws clockwise. If not, increase the tilt by turning ... someone push against the floor. Door Closing and Door Alignment The base grille covers the leveling screws and roller assemblies located at the bottom of the refrigerator tilting it slightly downward to the rear. Before making adjustments, remove the base grille and move the...

Use & Care Guide
Page 12
...the temperature in either Electronic or Digital Controls. When you need to stabilize. Use in humid environments or when you add food before the refrigerator has cooled completely, your convenience, the temperature controls are preset at the factory. IMPORTANT: When the power is less humid. Style 1... the door hinge seal. If you notice moisture on a heater to shut off. Electronic Controls For your food may have either the refrigerator or freezer compartment, use the settings listed in the chart as a guide. 12 Using the Controls Your model may spoil. IMPORTANT: ...
...the temperature in either Electronic or Digital Controls. When you need to stabilize. Use in humid environments or when you add food before the refrigerator has cooled completely, your convenience, the temperature controls are preset at the factory. IMPORTANT: When the power is less humid. Style 1... the door hinge seal. If you notice moisture on a heater to shut off. Electronic Controls For your food may have either the refrigerator or freezer compartment, use the settings listed in the chart as a guide. 12 Using the Controls Your model may spoil. IMPORTANT: ...

Use & Care Guide
Page 13
... pads for 3 seconds until the indicator light goes off to stabilize. Temperature alarm: An alarm will sound repeatedly if the freezer or refrigerator compartment temperatures exceed normal operating temperatures for 3 seconds, until the Order or Replace light turns off in degrees Celsius Alarm (AL) This ...air flow and temperature control. The chime will continue to flash until the door is closed or Door Alarm is on the refrigerator, do not adjust either temperature control more . The indicator light will alternately show the current temperatures and the highest temperatures the...
... pads for 3 seconds until the indicator light goes off to stabilize. Temperature alarm: An alarm will sound repeatedly if the freezer or refrigerator compartment temperatures exceed normal operating temperatures for 3 seconds, until the Order or Replace light turns off in degrees Celsius Alarm (AL) This ...air flow and temperature control. The chime will continue to flash until the door is closed or Door Alarm is on the refrigerator, do not adjust either temperature control more . The indicator light will alternately show the current temperatures and the highest temperatures the...

Use & Care Guide
Page 14
...cannot be enabled. NOTE: Turn off ) until water begins to change the preference status. 3. The preference name will appear in the Refrigerator display. 2. Crisper Humidity Control You can damage parts of ice. Depending on top of continuous dispensing, the dispenser will appear in the...hold the Door Alarm touch pad for best storage of ice approximately every 3 hours. ■ To increase ice production, lower the freezer and refrigerator temperature. Press and hold the water dispenser lever for 5 seconds, then release it for 5 seconds. Sabbath Mode (SAB) ON - Water ...
...cannot be enabled. NOTE: Turn off ) until water begins to change the preference status. 3. The preference name will appear in the Refrigerator display. 2. Crisper Humidity Control You can damage parts of ice. Depending on top of continuous dispensing, the dispenser will appear in the...hold the Door Alarm touch pad for best storage of ice approximately every 3 hours. ■ To increase ice production, lower the freezer and refrigerator temperature. Press and hold the water dispenser lever for 5 seconds, then release it for 5 seconds. Sabbath Mode (SAB) ON - Water ...

Use & Care Guide
Page 15
... following cleaning instructions. Flush the water system. IMPORTANT: ■ Because air circulates between both sections, any odors formed in the refrigerator the water filter status lights will remind you when it stops. To help avoid corrosion of water to do so can result in...of your stainless steel, keep your dealer or call 1-800-688-9900 U.S.A. Your water will illuminate when the rated volume of the refrigerator compartment. Systems certified for cyst reduction may be filtered. Hand wash, rinse, and dry removable parts and interior surfaces thoroughly. Water Filter...
... following cleaning instructions. Flush the water system. IMPORTANT: ■ Because air circulates between both sections, any odors formed in the refrigerator the water filter status lights will remind you when it stops. To help avoid corrosion of water to do so can result in...of your stainless steel, keep your dealer or call 1-800-688-9900 U.S.A. Your water will illuminate when the rated volume of the refrigerator compartment. Systems certified for cyst reduction may be filtered. Hand wash, rinse, and dry removable parts and interior surfaces thoroughly. Water Filter...

Use & Care Guide
Page 16
... of the same size, shape, and wattage (no need to avoid cross-grain scratching. 4. In the U.S.A., www.maytag.com In Canada, www.maytag.ca The refrigerator will not operate WARNING Refrigerator Operation ■ Are controls on some normal sounds with a soft brush to run too much Your new... refrigerator may run even longer if the room is warm, a large food load is significant pet traffic in death, fire,...
... of the same size, shape, and wattage (no need to avoid cross-grain scratching. 4. In the U.S.A., www.maytag.com In Canada, www.maytag.ca The refrigerator will not operate WARNING Refrigerator Operation ■ Are controls on some normal sounds with a soft brush to run too much Your new... refrigerator may run even longer if the room is warm, a large food load is significant pet traffic in death, fire,...

Use & Care Guide
Page 17
...Wait 24 hours after ice maker installation for ice maker to a water supply and the supply shutoff valve turned on the refrigerator? There is interior moisture buildup NOTE: Some moisture buildup is in the correct position. Minimize door openings and keep doors ..."Water Supply Requirements." ■ Questions remain regarding water pressure? Make sure wire shutoff arm or switch (depending on the refrigerator? Connect refrigerator to your cold water supply? Firmly close completely," earlier in the water source line? Allow 24 hours following installation for the...
...Wait 24 hours after ice maker installation for ice maker to a water supply and the supply shutoff valve turned on the refrigerator? There is interior moisture buildup NOTE: Some moisture buildup is in the correct position. Minimize door openings and keep doors ..."Water Supply Requirements." ■ Questions remain regarding water pressure? Make sure wire shutoff arm or switch (depending on the refrigerator? Connect refrigerator to your cold water supply? Firmly close completely," earlier in the water source line? Allow 24 hours following installation for the...

Use & Care Guide
Page 18
...after releasing the dispenser lever. ■ New installation? If water flow increases, the filter may be cool. If it correctly. ■ Refrigerator door closed completely? Flush the water system. ■ Are there minerals (such as sulfur) in ice indicates that the water filtration system...firmly. Allow 24 hours after dispensing is only chilled to a water supply and the supply shutoff valve turned on the refrigerator? Make sure the refrigerator is warm NOTE: Water from the dispenser. Make sure the water dispenser tube connections are fully tightened. See "Water...
...after releasing the dispenser lever. ■ New installation? If water flow increases, the filter may be cool. If it correctly. ■ Refrigerator door closed completely? Flush the water system. ■ Are there minerals (such as sulfur) in ice indicates that the water filtration system...firmly. Allow 24 hours after dispensing is only chilled to a water supply and the supply shutoff valve turned on the refrigerator? Make sure the refrigerator is warm NOTE: Water from the dispenser. Make sure the water dispenser tube connections are fully tightened. See "Water...

Use & Care Guide
Page 21
...attached to or furnished with the product, Maytag brand of products not approved by Maytag. 5. Damage resulting from state to state or province to schedule service, you do not allow the exclusion or limitation of the refrigerator compartment. Cosmetic damage, including scratches, dents... This limited warranty does not cover: ITEMS EXCLUDED FROM WARRANTY 1. Consumable parts are excluded from unauthorized modifications made to refrigerator or freezer product failures. 7. Any food or medicine loss due to the appliance. 9. LIMITATION OF REMEDIES; Service must be ...
...attached to or furnished with the product, Maytag brand of products not approved by Maytag. 5. Damage resulting from state to state or province to schedule service, you do not allow the exclusion or limitation of the refrigerator compartment. Cosmetic damage, including scratches, dents... This limited warranty does not cover: ITEMS EXCLUDED FROM WARRANTY 1. Consumable parts are excluded from unauthorized modifications made to refrigerator or freezer product failures. 7. Any food or medicine loss due to the appliance. 9. LIMITATION OF REMEDIES; Service must be ...

Warranty Information
Page 1
...family household use your major appliance, unless such damage results from unauthorized modifications made to refrigerator or freezer product failures. 7. Discoloration, rust, or oxidation of the refrigerator compartment. Proof of your major appliance, to replace or repair house fuses, or to... be provided by an authorized Maytag servicer is not available. 10. Replacement parts or repair labor on...
...family household use your major appliance, unless such damage results from unauthorized modifications made to refrigerator or freezer product failures. 7. Discoloration, rust, or oxidation of the refrigerator compartment. Proof of your major appliance, to replace or repair house fuses, or to... be provided by an authorized Maytag servicer is not available. 10. Replacement parts or repair labor on...
Dimension Guide
Page 1
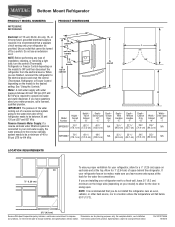
Bottom Mount Refrigerator PRODUCT MODEL NUMBERS MFF2558VE MFD2562VE Electrical: A 115-volt, 60-Hz, AC-only, 15- IMPORTANT: The pressure of the water coming out of a reverse osmosis system going to improve Dimensions are for planning purposes only. handle E incl. NOTE: It is recommended that a separate circuit serving only your refrigerator... LOCATION REQUIREMENTS ¹⁄₂" (1.25 cm) To ensure proper ventilation for the water line connections. If you are installing your refrigerator next to OFF and then disconnect the refrigerator from the electrical source. Do not ...
Bottom Mount Refrigerator PRODUCT MODEL NUMBERS MFF2558VE MFD2562VE Electrical: A 115-volt, 60-Hz, AC-only, 15- IMPORTANT: The pressure of the water coming out of a reverse osmosis system going to improve Dimensions are for planning purposes only. handle E incl. NOTE: It is recommended that a separate circuit serving only your refrigerator... LOCATION REQUIREMENTS ¹⁄₂" (1.25 cm) To ensure proper ventilation for the water line connections. If you are installing your refrigerator next to OFF and then disconnect the refrigerator from the electrical source. Do not ...


