
Installation Guide
Page 2
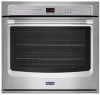
...section. ■ Electrical supply junction box should have an approval label located on rear wall behind oven, it is installed in the upper center of the cabinet. ■ Oven support surface must be solid, level and flush with bottom of cabinet cutout. ■.... If you are shown must provide complete enclosure around the recessed portion of the oven. Undercounter Installation (with oven. ■ Recessed installation area must be able to undercounter installation instructions for wall cabinet installations) ■ Level ■ Flat-blade screwdriver Parts needed ■ ...
...section. ■ Electrical supply junction box should have an approval label located on rear wall behind oven, it is installed in the upper center of the cabinet. ■ Oven support surface must be solid, level and flush with bottom of cabinet cutout. ■.... If you are shown must provide complete enclosure around the recessed portion of the oven. Undercounter Installation (with oven. ■ Recessed installation area must be able to undercounter installation instructions for wall cabinet installations) ■ Level ■ Flat-blade screwdriver Parts needed ■ ...
Installation Guide
Page 12
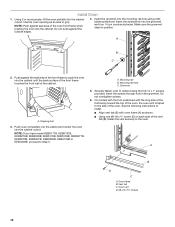
...sure the grommet stays in the grommet. A. Oven frame B. Install Oven 1. NOTE: Push against seal area of the oven front frame when pushing the oven into the cabinet until the back surface of the front frame touches the front wall of the oven. Do not push against the seal area of...using a flatblade screwdriver. Insert the screwdriver into the cabinet cutout. A. On models with the foot positioned with oven frame (A) as an area to Step 5. Using 2 or more people, lift the oven partially into the mounting rail hole using the # 8-14 x 1" screws provided. Grommet 5. NOTE: If ...
...sure the grommet stays in the grommet. A. Oven frame B. Install Oven 1. NOTE: Push against seal area of the oven front frame when pushing the oven into the cabinet until the back surface of the front frame touches the front wall of the oven. Do not push against the seal area of...using a flatblade screwdriver. Insert the screwdriver into the cabinet cutout. A. On models with the foot positioned with oven frame (A) as an area to Step 5. Using 2 or more people, lift the oven partially into the mounting rail hole using the # 8-14 x 1" screws provided. Grommet 5. NOTE: If ...


