Energy Guide
Page 1
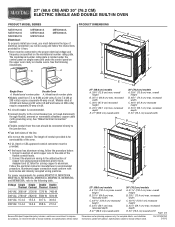
... max. overall height B. 28 72.4 cm) max. See "Make Electrical Connection" section. For power requirements for models MEW7527A, MEW7530A, MEW7627A, MEW7630A, MEW9537A, MEW9627A, MEW9530A and MEW9630A, refer to the following illustrations. q A circuit breaker is for planning purposes only. q Fuse both...68.6 CM) AND 30" (76.2 CM) ELECTRIC SINGLE AND DOUBLE BUILT-IN OVEN PRODUCT MODEL SERIES PRODUCT DIMENSIONS MEW7527A MEW7627A MEW9527A MEW9627A MEW7530A MEW7630A MEW9530A MEW9630A Electrical: To properly install your oven, you must determine the type of electrical connection ...
... max. overall height B. 28 72.4 cm) max. See "Make Electrical Connection" section. For power requirements for models MEW7527A, MEW7530A, MEW7627A, MEW7630A, MEW9537A, MEW9627A, MEW9530A and MEW9630A, refer to the following illustrations. q A circuit breaker is for planning purposes only. q Fuse both...68.6 CM) AND 30" (76.2 CM) ELECTRIC SINGLE AND DOUBLE BUILT-IN OVEN PRODUCT MODEL SERIES PRODUCT DIMENSIONS MEW7527A MEW7627A MEW9527A MEW9627A MEW7530A MEW7630A MEW9530A MEW9630A Electrical: To properly install your oven, you must determine the type of electrical connection ...
Energy Guide
Page 2
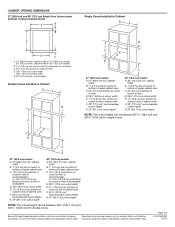
... to top of cabinet door F. 50¹⁄₄" (127.6 cm)* recommended cutout height G. 24" (60.7 cm) cutout depth 30" (76.2 cm) models A. 30" (76.2 cm) min. bottom of cutout to floor is acceptable. cabinet width B. 1" (2.5 cm) top of cutout to bottom of upper cabinet door...;" (3.8 cm) min. D. 28¹⁄₂" (72.4 cm) cutout width E. 1¹⁄₂" (3.8 cm) min. cabinet width on 27" (68.6 cm) models 30" (76.2 cm) min. CABINET OPENING DIMENSIONS 27" (68.6 cm) and 30" (76.2 cm) Single Oven Undercounter (without cooktop installed above) A B Single Ovens Installed...
... to top of cabinet door F. 50¹⁄₄" (127.6 cm)* recommended cutout height G. 24" (60.7 cm) cutout depth 30" (76.2 cm) models A. 30" (76.2 cm) min. bottom of cutout to floor is acceptable. cabinet width B. 1" (2.5 cm) top of cutout to bottom of upper cabinet door...;" (3.8 cm) min. D. 28¹⁄₂" (72.4 cm) cutout width E. 1¹⁄₂" (3.8 cm) min. cabinet width on 27" (68.6 cm) models 30" (76.2 cm) min. CABINET OPENING DIMENSIONS 27" (68.6 cm) and 30" (76.2 cm) Single Oven Undercounter (without cooktop installed above) A B Single Ovens Installed...

Installation Guide
Page 2
...(4)* ■ Foam strip - It is recommended that the junction box be made by a licensed, qualified electrical installer. *Grommets not included with models KEBK171B, KEBK101B, KEBK276B, KEBK206B, KEBS179B, KEBS109B, KEBS277B, KEBS279B, KEBS207B, KEBS209B, KEBU109B and KEBU209B. **Foam strip not included with double oven.... be able to the junction box. IMPORTANT: To avoid damage to your builder or cabinet supplier to undercounter installation instructions for 30" models (76.2 cm). ■ Floor must be located 3" (7.6 cm) maximum below the support surface when the oven is required. ...
...(4)* ■ Foam strip - It is recommended that the junction box be made by a licensed, qualified electrical installer. *Grommets not included with models KEBK171B, KEBK101B, KEBK276B, KEBK206B, KEBS179B, KEBS109B, KEBS277B, KEBS279B, KEBS207B, KEBS209B, KEBU109B and KEBU209B. **Foam strip not included with double oven.... be able to the junction box. IMPORTANT: To avoid damage to your builder or cabinet supplier to undercounter installation instructions for 30" models (76.2 cm). ■ Floor must be located 3" (7.6 cm) maximum below the support surface when the oven is required. ...
Installation Guide
Page 3
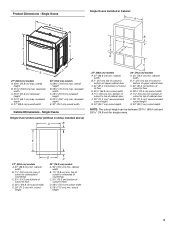
...floor D. 28¹⁄₂" (72.4 cm) cutout width E. 1¹⁄₂" (3.8 cm) min. cutout height 30" (76.2 cm) models A. 30" (76.2 cm) min. recessed depth E. 30" (76.2 cm) overall width Cabinet Dimensions - bottom of cutout to top of cutout to...8322;" (72.4 cm) cutout width E. 28" (71.2 cm) min. cutout height 3 Single Ovens Single Oven Undercounter (without cooktop installed above) A B C 27" (68.6 cm) models A. 27" (68.6 cm) min. cabinet width B. 1¹⁄₂" (3.8 cm) min. overall height B. 25 64.6 cm) max. Single Ovens B Single Ovens Installed in Cabinet...
...floor D. 28¹⁄₂" (72.4 cm) cutout width E. 1¹⁄₂" (3.8 cm) min. cutout height 30" (76.2 cm) models A. 30" (76.2 cm) min. recessed depth E. 30" (76.2 cm) overall width Cabinet Dimensions - bottom of cutout to top of cutout to...8322;" (72.4 cm) cutout width E. 28" (71.2 cm) min. cutout height 3 Single Ovens Single Oven Undercounter (without cooktop installed above) A B C 27" (68.6 cm) models A. 27" (68.6 cm) min. cabinet width B. 1¹⁄₂" (3.8 cm) min. overall height B. 25 64.6 cm) max. Single Ovens B Single Ovens Installed in Cabinet...
Installation Guide
Page 4
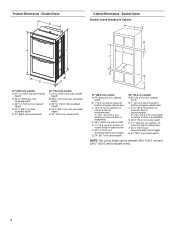
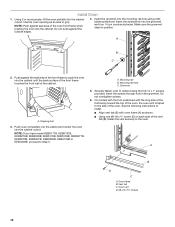
...59.1 cm) max. Double Ovens Double Ovens Installed in Cabinet A A C B D F E D 27" (68.6 cm) models A. 51 130.0 cm) max. recessed depth E. 30" (76.2 cm) overall width G E C 27" (68.6 cm) models A. 27" (68.6 cm) min. D. 28¹⁄₂" (72.4 cm) cutout width E. 1¹⁄₂" (3.8...8260;₂" (64.8 cm) cutout width E. 1¹⁄₂" (3.8 cm) min. recessed depth E. 27" (68.6 cm) overall width 30" (76.2 cm) models A. 51 130.0 cm) max. Product Dimensions - overall height B. 28½" (72.4 cm) max. cabinet width B. 1" (2.5 cm) top of cutout to bottom...
...59.1 cm) max. Double Ovens Double Ovens Installed in Cabinet A A C B D F E D 27" (68.6 cm) models A. 51 130.0 cm) max. recessed depth E. 30" (76.2 cm) overall width G E C 27" (68.6 cm) models A. 27" (68.6 cm) min. D. 28¹⁄₂" (72.4 cm) cutout width E. 1¹⁄₂" (3.8...8260;₂" (64.8 cm) cutout width E. 1¹⁄₂" (3.8 cm) min. recessed depth E. 27" (68.6 cm) overall width 30" (76.2 cm) models A. 51 130.0 cm) max. Product Dimensions - overall height B. 28½" (72.4 cm) max. cabinet width B. 1" (2.5 cm) top of cutout to bottom...

Installation Guide
Page 5
...A 5580 W 30.7 A 26.8 A 5610 W 30.8 A 27.0 A For power requirements for models WOS51EC7A, WOS51EC0A, WOD51EC7A, WOD51EC0A, WOS92EC7A, WOS92EC0A, WOD93EC7A, WOD93EC0A, MEW7527A, MEW7530A, MEW7627A, MEW7630A, MEW9537A, MEW9627A, MEW9530A and MEW9630A, refer to the ends of the line. ■ Do not cut the conduit. The length... of conduit provided is for models KEBU109B and KEBU209B, refer to aluminum. O-M91-latest ...
...A 5580 W 30.7 A 26.8 A 5610 W 30.8 A 27.0 A For power requirements for models WOS51EC7A, WOS51EC0A, WOD51EC7A, WOD51EC0A, WOS92EC7A, WOS92EC0A, WOD93EC7A, WOD93EC0A, MEW7527A, MEW7530A, MEW7627A, MEW7630A, MEW9537A, MEW9627A, MEW9530A and MEW9630A, refer to the ends of the line. ■ Do not cut the conduit. The length... of conduit provided is for models KEBU109B and KEBU209B, refer to aluminum. O-M91-latest ...
Installation Guide
Page 12
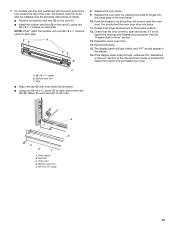
...;" screws 12 Do not push against seal area of the oven, the oven vent is taped to cabinet using a flatblade screwdriver. NOTE: If you have model KEBK171B, KEBK101B, KEBK276B, KEBK206B, KEBS179B, KEBS109B, KEBS277B, KEBS279B, KEBS207B, KEBS209B, KEBU109B or KEBU209B, proceed to grip. Install Oven 1. Use the oven opening as shown. ■... the oven into the cabinet until the back surface of the front frame touches the front wall of the front frame to the oven. On models with the foot positioned with oven frame (A) as an area to Step 5.
...;" screws 12 Do not push against seal area of the oven, the oven vent is taped to cabinet using a flatblade screwdriver. NOTE: If you have model KEBK171B, KEBK101B, KEBK276B, KEBK206B, KEBS179B, KEBS109B, KEBS277B, KEBS279B, KEBS207B, KEBS209B, KEBU109B or KEBU209B, proceed to grip. Install Oven 1. Use the oven opening as shown. ■... the oven into the cabinet until the back surface of the front frame touches the front wall of the front frame to the oven. On models with the foot positioned with oven frame (A) as an area to Step 5.
Installation Guide
Page 13
...; Position the bottom vent trim (B) on the vent (C). ■ Install the bottom vent trim (B) to open the oven door. NOTE: On 27" (68.6 cm) models, only one #8-18 x ³⁄₈" screw (E) on each side. See the "Prepare Built-In Oven" section. 13. The display panel will go and open.... 11. You should appear in the display. 16. Rotate both hinge latches back to the oven. Repeat for lower oven door. 14. A B E D C A. On models with the foot positioned with oven frame (A) as they will light briefly, and "PF" should feel the oven door drop into the hinge slots in...
...; Position the bottom vent trim (B) on the vent (C). ■ Install the bottom vent trim (B) to open the oven door. NOTE: On 27" (68.6 cm) models, only one #8-18 x ³⁄₈" screw (E) on each side. See the "Prepare Built-In Oven" section. 13. The display panel will go and open.... 11. You should appear in the display. 16. Rotate both hinge latches back to the oven. Repeat for lower oven door. 14. A B E D C A. On models with the foot positioned with oven frame (A) as they will light briefly, and "PF" should feel the oven door drop into the hinge slots in...

Installation Guide
Page 14
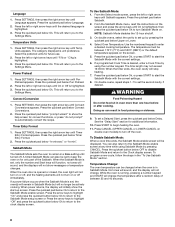
... the clock and any other preferences if available. At first use and cleaning, read the Use and Care Guide. 3. Press BROIL on double oven models. 4. When oven has been on for heat. If you do not feel for 5 minutes, feel heat or if an error message appears in ...the display, turn off the oven and contact a qualified technician. 7. Complete Installation 1. NOTE: Press UPPER BROIL or LOWER BROIL on single oven models. Check that you purchased your tools. 3. Turn power on single ovens. For more information, read the Use and Care Guide. 5. If you need Assistance...
... the clock and any other preferences if available. At first use and cleaning, read the Use and Care Guide. 3. Press BROIL on double oven models. 4. When oven has been on for heat. If you do not feel for 5 minutes, feel heat or if an error message appears in ...the display, turn off the oven and contact a qualified technician. 7. Complete Installation 1. NOTE: Press UPPER BROIL or LOWER BROIL on single oven models. Check that you purchased your tools. 3. Turn power on single ovens. For more information, read the Use and Care Guide. 5. If you need Assistance...
Warranty Information
Page 1
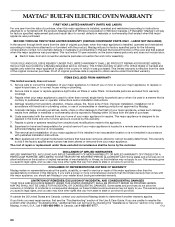
...of the oven and that vary from unauthorized modifications made to use or when it was purchased. Major appliances with original model/serial numbers that have other than the representations contained in this part that prevent function of your major appliance, to ... household use your major appliance. SECOND THROUGH TENTH YEAR LIMITED WARRANTY (CERTAIN COMPONENT PARTS ONLY - DISCLAIMER OF REPRESENTATIONS OUTSIDE OF WARRANTY Maytag makes no representations about buying an extended warranty. In the U.S.A., call 1-800-807-6777. 1/12 24 Expenses for travel and ...
...of the oven and that vary from unauthorized modifications made to use or when it was purchased. Major appliances with original model/serial numbers that have other than the representations contained in this part that prevent function of your major appliance, to ... household use your major appliance. SECOND THROUGH TENTH YEAR LIMITED WARRANTY (CERTAIN COMPONENT PARTS ONLY - DISCLAIMER OF REPRESENTATIONS OUTSIDE OF WARRANTY Maytag makes no representations about buying an extended warranty. In the U.S.A., call 1-800-807-6777. 1/12 24 Expenses for travel and ...

Warranty Information
Page 2
You will need to know your major appliance to better help you obtain assistance or service if you ever need it. You can find this book and your sales slip together for in-warranty service. Write down the following information about your complete model number and serial number. Dealer name Address Phone number Model number Serial number Purchase date 25 Keep this information on the model and serial number label located on the product. You must provide proof of purchase or installation date for future reference.
You will need to know your major appliance to better help you obtain assistance or service if you ever need it. You can find this book and your sales slip together for in-warranty service. Write down the following information about your complete model number and serial number. Dealer name Address Phone number Model number Serial number Purchase date 25 Keep this information on the model and serial number label located on the product. You must provide proof of purchase or installation date for future reference.
Use & Care Guide
Page 4
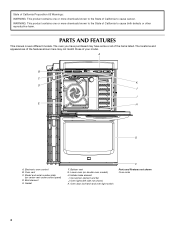
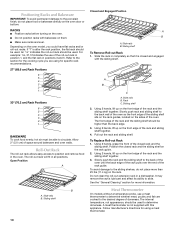
... not match those of California to the State of your model. Oven door lock latch and oven light switch F Parts and Features not shown Oven racks 4 Broil element E. Model and serial number plate (on double oven models) H. Oven lights (left side not shown) K. PARTS... AND FEATURES This manual covers different models. A B C K D J I . Oven vent C. Lower oven (on center vent under ...
... not match those of California to the State of your model. Oven door lock latch and oven light switch F Parts and Features not shown Oven racks 4 Broil element E. Model and serial number plate (on double oven models) H. Oven lights (left side not shown) K. PARTS... AND FEATURES This manual covers different models. A B C K D J I . Oven vent C. Lower oven (on center vent under ...
Use & Care Guide
Page 5
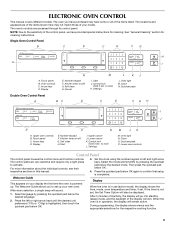
... shows the time, mode, oven temperature and timer, if set , the Set Timer Option will dim. ELECTRONIC OVEN CONTROL This manual covers different models. NOTE: Due to confirm that setup is in operation, the display will sound. 1. Start J. Display E. The Welcome Guide allows you have ...your new oven. to lock) K. Select the mode (am/pm/24h) by pressing the quickset pad below OK again to the sensitivity of your model. Touch panel B. Number keypad F. If the timer is highlighted, then touch the quickset pad below the desired mode. Self clean H. Clock N. ...
... shows the time, mode, oven temperature and timer, if set , the Set Timer Option will dim. ELECTRONIC OVEN CONTROL This manual covers different models. NOTE: Due to confirm that setup is in operation, the display will sound. 1. Start J. Display E. The Welcome Guide allows you have ...your new oven. to lock) K. Select the mode (am/pm/24h) by pressing the quickset pad below OK again to the sensitivity of your model. Touch panel B. Number keypad F. If the timer is highlighted, then touch the quickset pad below the desired mode. Self clean H. Clock N. ...
Use & Care Guide
Page 6
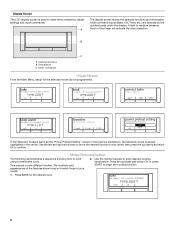
... the Main Menu, setup for the desired oven. 6 Cooking functions B. Menu Demonstration The following demonstrates a sequence showing how to medium pressure touch of your model. 2. The locations and appearances of the features shown may not match those of the finger will activate the menu selection. < > B C A. A... the desired function to the center, then press the quickset pad below Ok, or press START to confirm. This manual covers different models. Press BAKE for the selected mode can be programmed. In the Selection Screens (such as the "Power Preheat Setting" screen in ...
... the Main Menu, setup for the desired oven. 6 Cooking functions B. Menu Demonstration The following demonstrates a sequence showing how to medium pressure touch of your model. 2. The locations and appearances of the features shown may not match those of the finger will activate the menu selection. < > B C A. A... the desired function to the center, then press the quickset pad below Ok, or press START to confirm. This manual covers different models. Press BAKE for the selected mode can be programmed. In the Selection Screens (such as the "Power Preheat Setting" screen in ...
Use & Care Guide
Page 7
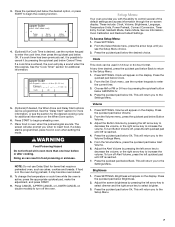
... when setting the mode. Volume 1. Adjust the screen brightness by pressing the left quickset pad until Off is entered, the oven will appear on double models) to select brighter. 3. Doing so can result in oven more information, or see the Setup Menu choice. 3. These include: Clock, Volume, Brightness, Language, Temperature Units...
... when setting the mode. Volume 1. Adjust the screen brightness by pressing the left quickset pad until Off is entered, the oven will appear on double models) to select brighter. 3. Doing so can result in oven more information, or see the Setup Menu choice. 3. These include: Clock, Volume, Brightness, Language, Temperature Units...
Use & Care Guide
Page 8
... the help screen for only part of between 170°F (77°C) and 550°F (288°C) or the default temperature appears on double oven models) to the Sabbath Mode enable screen at any time while using the number keypad. NOTE: Sabbath Mode disables the 12-hour shutoff. 3. Use the numbered...
... the help screen for only part of between 170°F (77°C) and 550°F (288°C) or the default temperature appears on double oven models) to the Sabbath Mode enable screen at any time while using the number keypad. NOTE: Sabbath Mode disables the 12-hour shutoff. 3. Use the numbered...

Use & Care Guide
Page 9
... to the Settings Menu. Demo Mode The Demo Mode is closed and wellventilated room. It should be checked or calibrated. 4. To switch off . On double models, press the quickset pad below Ok. 6. Press the quickset pad below Upper or Lower to choose the oven cavity to cancel the function, or press...
... to the Settings Menu. Demo Mode The Demo Mode is closed and wellventilated room. It should be checked or calibrated. 4. To switch off . On double models, press the quickset pad below Ok. 6. Press the quickset pad below Upper or Lower to choose the oven cavity to cancel the function, or press...
Use & Care Guide
Page 10
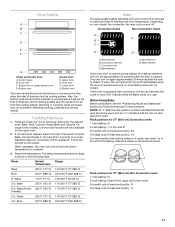
... roll-out racks. Roll-Out Rack The roll-out rack allows easy access to circulate. Slide rails B. Rack C. Using 2 hands, lift up on the oven model, you are using a meat thermometer. 10 Using 2 hands, lift up on the front edge of the rack and sliding shelf together. 4. Follow manufacturer's directions... sliding shelf to the back of the oven until the back edge of the rack pulls over the end of the oven. Meat Thermometer On models without a temperature probe, use of the rack and the sliding shelf should be used to slide. Do not clean the roll-out extension rack...
... roll-out racks. Roll-Out Rack The roll-out rack allows easy access to circulate. Slide rails B. Rack C. Using 2 hands, lift up on the oven model, you are using a meat thermometer. 10 Using 2 hands, lift up on the front edge of the rack and sliding shelf together. 4. Follow manufacturer's directions... sliding shelf to the back of the oven until the back edge of the rack pulls over the end of the oven. Meat Thermometer On models without a temperature probe, use of the rack and the sliding shelf should be used to slide. Do not clean the roll-out extension rack...
Use & Care Guide
Page 11
...vent Double Oven D. Blocking or covering vents will convert the time and/or temperature you entered. 3. If Convection is closed . Depending on your model, the convection fan may cycle on and off in intervals while the Bake mode is in use racks 1ro or 2ro and 5f for rack .... Bottom vent The oven vent(s) should be blocked or covered since it allows the inlet of fresh air into the cooling system. On double oven models, Convect and Favorite are only available on the screen. Follow the prompt on the upper oven. 2. Mode Default Range Temperature Bake 350°F (177&#...
...vent Double Oven D. Blocking or covering vents will convert the time and/or temperature you entered. 3. If Convection is closed . Depending on your model, the convection fan may cycle on and off in intervals while the Bake mode is in use racks 1ro or 2ro and 5f for rack .... Bottom vent The oven vent(s) should be blocked or covered since it allows the inlet of fresh air into the cooling system. On double oven models, Convect and Favorite are only available on the screen. Follow the prompt on the upper oven. 2. Mode Default Range Temperature Bake 350°F (177&#...
Use & Care Guide
Page 12
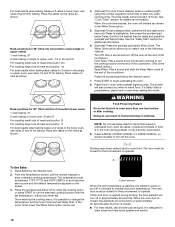
... poultry: 1ro For best results when baking layer cakes on 2 racks in food poisoning or sickness. Press CANCEL (UPPER CANCEL or LOWER CANCEL, on double models) to run the selected cooking function with the set temperature, without any timer set Delay Start. A To Use Bake: 1. Press the quickset pad below Ok...
... poultry: 1ro For best results when baking layer cakes on 2 racks in food poisoning or sickness. Press CANCEL (UPPER CANCEL or LOWER CANCEL, on double models) to run the selected cooking function with the set temperature, without any timer set Delay Start. A To Use Bake: 1. Press the quickset pad below Ok...


