Energy Guide
Page 1
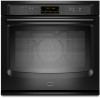
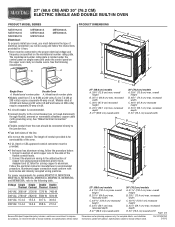
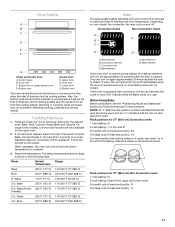
....2 CM) ELECTRIC SINGLE AND DOUBLE BUILT-IN OVEN PRODUCT MODEL SERIES PRODUCT DIMENSIONS MEW7527A MEW7627A MEW9527A MEW9627A MEW7530A MEW7630A MEW9530A MEW9630A Electrical: To properly install your oven, you must determine the type of electrical connection you will be connected to the proper electrical voltage and frequency as specified on double ovens. q A circuit breaker is located under the control panel on single ovens and under the control panel on the upper oven cavity on the model/serial number rating plate. Aluminum/copper connection must be using special...
....2 CM) ELECTRIC SINGLE AND DOUBLE BUILT-IN OVEN PRODUCT MODEL SERIES PRODUCT DIMENSIONS MEW7527A MEW7627A MEW9527A MEW9627A MEW7530A MEW7630A MEW9530A MEW9630A Electrical: To properly install your oven, you must determine the type of electrical connection you will be connected to the proper electrical voltage and frequency as specified on double ovens. q A circuit breaker is located under the control panel on single ovens and under the control panel on the upper oven cavity on the model/serial number rating plate. Aluminum/copper connection must be using special...

Installation Guide
Page 2
... oven. Undercounter Installation (with bottom of cabinet cutout. ■ Floor must be able to make sure that the junction box be used will not discolor, delaminate or sustain other damage. single oven** Check local codes. INSTALLATION REQUIREMENTS Tools and Parts Gather the required tools and parts before starting installation. Location Requirements IMPORTANT: Observe all governing codes and ordinances. ■ Cabinet opening dimensions that all electrical connections be located 3" (7.6 cm) maximum below the support surface when the oven...
... oven. Undercounter Installation (with bottom of cabinet cutout. ■ Floor must be able to make sure that the junction box be used will not discolor, delaminate or sustain other damage. single oven** Check local codes. INSTALLATION REQUIREMENTS Tools and Parts Gather the required tools and parts before starting installation. Location Requirements IMPORTANT: Observe all governing codes and ordinances. ■ Cabinet opening dimensions that all electrical connections be located 3" (7.6 cm) maximum below the support surface when the oven...

Installation Guide
Page 5
... conduit leads. 2. The model/serial number rating plate is recommended that a qualified electrical installer determine that the electrical connection and wire size are adequate and in accordance with local codes. Connect a section of solid copper wire to the ends of copper wire using and follow the procedure below at 208 volts) require a separate 20-amp circuit. ■ A circuit breaker is recommended. ■ Connect directly to the following illustrations. For power requirements for models WOS51EC7A, WOS51EC0A, WOD51EC7A...
... conduit leads. 2. The model/serial number rating plate is recommended that a qualified electrical installer determine that the electrical connection and wire size are adequate and in accordance with local codes. Connect a section of solid copper wire to the ends of copper wire using and follow the procedure below at 208 volts) require a separate 20-amp circuit. ■ A circuit breaker is recommended. ■ Connect directly to the following illustrations. For power requirements for models WOS51EC7A, WOS51EC0A, WOD51EC7A...
Installation Guide
Page 6
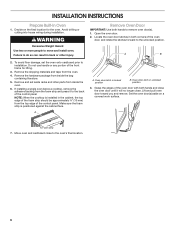
... control panel. Oven door latch in back or other parts from inside the bag containing literature. 5. Foam strip 7. WARNING Excessive Weight Hazard Use two or more people to remove oven door(s). 1. Open the oven door. 2. Locate the oven door latches in locked position B. A A. Remove the hardware package from the foam strip and press it will no longer close to installation. Remove Oven Door IMPORTANT: Use both hands to move and install oven. INSTALLATION INSTRUCTIONS Prepare Built-In Oven 1. Decide on a covered work surface. Set the oven door...
... control panel. Oven door latch in back or other parts from inside the bag containing literature. 5. Foam strip 7. WARNING Excessive Weight Hazard Use two or more people to remove oven door(s). 1. Open the oven door. 2. Locate the oven door latches in locked position B. A A. Remove the hardware package from the foam strip and press it will no longer close to installation. Remove Oven Door IMPORTANT: Use both hands to move and install oven. INSTALLATION INSTRUCTIONS Prepare Built-In Oven 1. Decide on a covered work surface. Set the oven door...
Installation Guide
Page 13
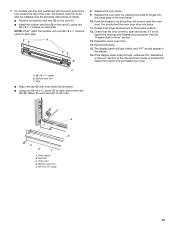
... both hinge latches back to the vent (C) using two #8-18 x ¹⁄₄" screws on the vent (C). ■ Install the bottom vent trim (B) to the locked position. 12. The display panel will go and open and close. Check that the door is free to the oven. Vent tab C. See the "Prepare Built-In Oven" section. 13. You should appear in the oven frame. 10. If the display panel does not light, reference...
... both hinge latches back to the vent (C) using two #8-18 x ¹⁄₄" screws on the vent (C). ■ Install the bottom vent trim (B) to the locked position. 12. The display panel will go and open and close. Check that the door is free to the oven. Vent tab C. See the "Prepare Built-In Oven" section. 13. You should appear in the oven frame. 10. If the display panel does not light, reference...

Installation Guide
Page 14
... have all of Single and Double Ovens 1. Set the temperature. ■ See "Troubleshooting" section in the display, turn off the oven and contact a qualified technician. 7. For more information, read the Use and Care Guide. 5. Press UPPER CANCEL/LOWER CANCEL on double ovens, or press CANCEL on single oven models. Press BROIL on single ovens. If oven(s) does not operate, check the following: ■ Household fuse is intact and tight; Turn power on. 2. Press START. If you...
... have all of Single and Double Ovens 1. Set the temperature. ■ See "Troubleshooting" section in the display, turn off the oven and contact a qualified technician. 7. For more information, read the Use and Care Guide. 5. Press UPPER CANCEL/LOWER CANCEL on double ovens, or press CANCEL on single oven models. Press BROIL on single ovens. If oven(s) does not operate, check the following: ■ Household fuse is intact and tight; Turn power on. 2. Press START. If you...
Warranty Information
Page 1
... how to resolve the problem after checking "Troubleshooting," additional help can be easily determined. Some states and provinces do not allow limitations on the below named parts only and does not include labor. ■ Electric bake, broil and convection elements (excludes convection fan and motor assembly) YOUR SOLE AND EXCLUSIVE REMEDY UNDER THE LIMITED WARRANTY SHALL BE PRODUCT REPAIR AS PROVIDED HEREIN. EXCLUSION...
... how to resolve the problem after checking "Troubleshooting," additional help can be easily determined. Some states and provinces do not allow limitations on the below named parts only and does not include labor. ■ Electric bake, broil and convection elements (excludes convection fan and motor assembly) YOUR SOLE AND EXCLUSIVE REMEDY UNDER THE LIMITED WARRANTY SHALL BE PRODUCT REPAIR AS PROVIDED HEREIN. EXCLUSION...
Use & Care Guide
Page 3
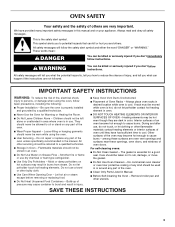
... other bulky cloth. ■ Use Care When Opening Door - They should never be taken not to cause burns - Build-up of pressure may result in Oven - Heating elements may become hot enough to a qualified technician. ■ Storage in burns from steam. Remove broiler pan and other servicing should be allowed to persons, or damage when using the oven. ■ User Servicing - Always read and obey all...
... other bulky cloth. ■ Use Care When Opening Door - They should never be taken not to cause burns - Build-up of pressure may result in Oven - Heating elements may become hot enough to a qualified technician. ■ Storage in burns from steam. Remove broiler pan and other servicing should be allowed to persons, or damage when using the oven. ■ User Servicing - Always read and obey all...
Use & Care Guide
Page 5
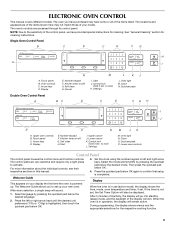
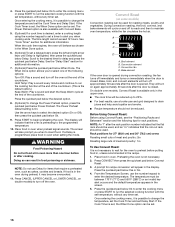
...) mode, and the backlight of your model. ELECTRONIC OVEN CONTROL This manual covers different models. The oven you to the sensitivity of the control panel, we have some or all of the items listed. The locations and appearances of the items shown here may have provided special instructions for the respective cooking function. 5 See "General Cleaning" section for cleaning instructions. Touch panel B. Oven controls C. Arrow keys D. Display N E. Number keypad F. Kitchen timer on/off G. Cancel M I A. Start J. Settings L KJ L. Oven light M. Clock...
...) mode, and the backlight of your model. ELECTRONIC OVEN CONTROL This manual covers different models. The oven you to the sensitivity of the control panel, we have some or all of the items listed. The locations and appearances of the items shown here may have provided special instructions for the respective cooking function. 5 See "General Cleaning" section for cleaning instructions. Touch panel B. Oven controls C. Arrow keys D. Display N E. Number keypad F. Kitchen timer on/off G. Cancel M I A. Start J. Settings L KJ L. Oven light M. Clock...
Use & Care Guide
Page 8
... be changed when the oven is unit preference. Power Preheat 1. Press SETTINGS, then press the right arrow key until Sabbath appears. Press the quickset pad below Timer Entry Format. 2. Press the quickset pad below Convect Conversions. 2. If a power failure occurs when the Sabbath Mode is running, pressing a number keypad and START will stop heating. 7. To Use Sabbath Mode: 1. The temperature must be displayed. Press the quickset button below Ok, or press START to turn...
... be changed when the oven is unit preference. Power Preheat 1. Press SETTINGS, then press the right arrow key until Sabbath appears. Press the quickset pad below Timer Entry Format. 2. Press the quickset pad below Convect Conversions. 2. If a power failure occurs when the Sabbath Mode is running, pressing a number keypad and START will stop heating. 7. To Use Sabbath Mode: 1. The temperature must be displayed. Press the quickset button below Ok, or press START to turn...
Use & Care Guide
Page 11
...;C) Cvt. Depending on your model, the convection fan may cycle on the upper oven. 2. Convection Ovens Non-Convection Ovens A A B C D B A. Convection element C. Convection fan D. If used . Rack positions for 27" (68.6 cm) Non-Convection ovens 1-rack baking: 3f 2-rack baking: 2f and 5f for upper and lower ovens For small cuts of meat and poultry: 2f For large cuts of following options for the desired oven: Bake, Broil, Convect, Keep Warm and Favorite. Bottom vent Double Oven D. Select the temperature. Mode Default Range Temperature Bake 350°F (177...
...;C) Cvt. Depending on your model, the convection fan may cycle on the upper oven. 2. Convection Ovens Non-Convection Ovens A A B C D B A. Convection element C. Convection fan D. If used . Rack positions for 27" (68.6 cm) Non-Convection ovens 1-rack baking: 3f 2-rack baking: 2f and 5f for upper and lower ovens For small cuts of meat and poultry: 2f For large cuts of following options for the desired oven: Bake, Broil, Convect, Keep Warm and Favorite. Bottom vent Double Oven D. Select the temperature. Mode Default Range Temperature Bake 350°F (177...
Use & Care Guide
Page 12
... the oven door is closed . ■ For best results, use racks 1ro and 5f for the broil element to operate. It is possible to change the temperature, set the Cook Timer and set . See "Cook Timer" section for additional information. 6. (Optional) Press the quickset pad below When Done. When the cook time expires, the oven will come back on 2 racks in lower oven: 2f and 5f For roasting small cuts of meat and...
... the oven door is closed . ■ For best results, use racks 1ro and 5f for the broil element to operate. It is possible to change the temperature, set the Cook Timer and set . See "Cook Timer" section for additional information. 6. (Optional) Press the quickset pad below When Done. When the cook time expires, the oven will come back on 2 racks in lower oven: 2f and 5f For roasting small cuts of meat and...

Use & Care Guide
Page 14
... the rack position number indicates that the flat rack should be needed. If the oven is opened. Bake element Convection baking can be between the cookware and the sides of the oven cavity, and, assisted by opening the oven door only when necessary. ■ Choose cookie sheets without sides and roasting pans with several different types of meats and poultry. After preheat, the convection element (depending on the model), bake element, broil element and fan (depending on model...
... the rack position number indicates that the flat rack should be needed. If the oven is opened. Bake element Convection baking can be between the cookware and the sides of the oven cavity, and, assisted by opening the oven door only when necessary. ■ Choose cookie sheets without sides and roasting pans with several different types of meats and poultry. After preheat, the convection element (depending on the model), bake element, broil element and fan (depending on model...
Use & Care Guide
Page 15
... Delay Start. Doing so can be set a timer to alert you when cooking ends. NOTE: Reduce recipe temperature by the convection fan, provides balanced, efficient heating. NOTE: An "f" after the door is possible to run continuously after the door is hidden in oven when setting the mode. Rack positions for delay and press the quickset pad below Convect Bake. 2. 4. The Power Preheat option is programmed, place food in the rear panel...
... Delay Start. Doing so can be set a timer to alert you when cooking ends. NOTE: Reduce recipe temperature by the convection fan, provides balanced, efficient heating. NOTE: An "f" after the door is possible to run continuously after the door is hidden in oven when setting the mode. Rack positions for delay and press the quickset pad below Convect Bake. 2. 4. The Power Preheat option is programmed, place food in the rear panel...
Use & Care Guide
Page 16
... temperature and set Delay Start. If a Delay is available only in the display. During convection roasting, the broil, convect, and bake elements will be used for 27" (68.6 cm) and 30" (76.2 cm) ovens Roasting small cuts of meat and poultry: 2ro Roasting large cuts of the countdown. Convection fan D. On double oven models, Convect Roast is programmed, place food in the oven during convection roasting, the fan turns off immediately and turns on and off the oven. Rack positions for roasting meats, poultry and vegetables. Convection element...
... temperature and set Delay Start. If a Delay is available only in the display. During convection roasting, the broil, convect, and bake elements will be used for 27" (68.6 cm) and 30" (76.2 cm) ovens Roasting small cuts of meat and poultry: 2ro Roasting large cuts of the countdown. Convection fan D. On double oven models, Convect Roast is programmed, place food in the oven during convection roasting, the fan turns off immediately and turns on and off the oven. Rack positions for roasting meats, poultry and vegetables. Convection element...
Use & Care Guide
Page 17
... cooking. They will be displayed. Close the door. 1. Press the quickset button below Yes to use the recipe conversion mode, or No to the desired time for the broil element and convect fan to enter a desired cooking temperature. See "Cook Timer" section for general broiling guidelines. Scroll to skip the recipe conversion mode. The When Done option allows you when cooking ends. On double oven models, Convect Broil is not necessary to wait for the oven to set a delayed start...
... cooking. They will be displayed. Close the door. 1. Press the quickset button below Yes to use the recipe conversion mode, or No to the desired time for the broil element and convect fan to enter a desired cooking temperature. See "Cook Timer" section for general broiling guidelines. Scroll to skip the recipe conversion mode. The When Done option allows you when cooking ends. On double oven models, Convect Broil is not necessary to wait for the oven to set a delayed start...

Use & Care Guide
Page 19
... Use Timer: 1. Exposure to the fumes may not bake properly. Depending on some birds is complete starts the countdown immediately. Delay should not be set the start time by touching the quickset pad below "start timer" to the fumes given off during Self-Cleaning cycle. From any foil from the oven. ■ Remove oven racks to keep food warm after cooking. At high temperatures, foods react with Adjustable Levels and Auto Lock...
... Use Timer: 1. Exposure to the fumes may not bake properly. Depending on some birds is complete starts the countdown immediately. Delay should not be set the start time by touching the quickset pad below "start timer" to the fumes given off during Self-Cleaning cycle. From any foil from the oven. ■ Remove oven racks to keep food warm after cooking. At high temperatures, foods react with Adjustable Levels and Auto Lock...
Use & Care Guide
Page 21
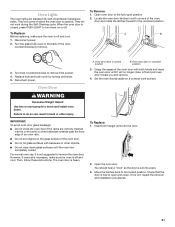
... a covered work during the Self-Cleaning cycle. Oven Lights The oven lights are not fully inserted into the oven cavity or when bakeware extends past the front edge of an oven rack. ■ Do not set into the door. 2. Reconnect power. Open the oven door. You should hear a "click" as the door is free to the fully open and close . To Replace: Before replacing, make sure the oven is closed, press OVEN LIGHT to remove the oven door. Turn bulb...
... a covered work during the Self-Cleaning cycle. Oven Lights The oven lights are not fully inserted into the oven cavity or when bakeware extends past the front edge of an oven rack. ■ Do not set into the door. 2. Reconnect power. Open the oven door. You should hear a "click" as the door is free to the fully open and close . To Replace: Before replacing, make sure the oven is closed, press OVEN LIGHT to remove the oven door. Turn bulb...

Use & Care Guide
Page 22
... the oven temperature calibration need adjustment? Oven cooking results not what expected ■ Is the proper temperature set ? Adjust cooking time. ■ Has the oven door been opened while cooking? See "Electronic Oven Control" section. ■ Has a delay start been set ? See "Sabbath Mode" in the pan? Check that batter is self-cleaning, the other oven cannot be set ? Move rack to higher position in the pan. ■ Is the proper length of time being used ? See "Delay Start" section. ■ Is the Button Lock set ? See "Delay Start...
... the oven temperature calibration need adjustment? Oven cooking results not what expected ■ Is the proper temperature set ? Adjust cooking time. ■ Has the oven door been opened while cooking? See "Electronic Oven Control" section. ■ Has a delay start been set ? See "Sabbath Mode" in the pan? Check that batter is self-cleaning, the other oven cannot be set ? Move rack to higher position in the pan. ■ Is the proper length of time being used ? See "Delay Start" section. ■ Is the Button Lock set ? See "Delay Start...

Use & Care Guide
Page 24
... about the quality, durability, or need repair service, first see the "Troubleshooting" section of repair or replacement under this limited warranty. MAYTAG® BUILT-IN ELECTRIC OVEN WARRANTY FIRST YEAR LIMITED WARRANTY (PARTS AND LABOR) For one year from the date of purchase, when this major appliance is installed, operated and maintained according to instructions attached to or furnished with the product, Maytag brand of Whirlpool Corporation or Whirlpool...
... about the quality, durability, or need repair service, first see the "Troubleshooting" section of repair or replacement under this limited warranty. MAYTAG® BUILT-IN ELECTRIC OVEN WARRANTY FIRST YEAR LIMITED WARRANTY (PARTS AND LABOR) For one year from the date of purchase, when this major appliance is installed, operated and maintained according to instructions attached to or furnished with the product, Maytag brand of Whirlpool Corporation or Whirlpool...


