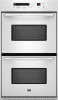

Owners Manual
Page 3
... cool. All other servicing should be referred to rub, damage, or move the gasket. ■ Do Not Use Oven Cleaners - Do not let potholder touch hot heating elements. Always place oven racks in Oven - Heating elements may result in the manual. Care should be taken not to a qualified technician. ■ Storage in desired location while oven is cool. Remove broiler pan and other bulky cloth. ■ Use Care When Opening Door -
... cool. All other servicing should be referred to rub, damage, or move the gasket. ■ Do Not Use Oven Cleaners - Do not let potholder touch hot heating elements. Always place oven racks in Oven - Heating elements may result in the manual. Care should be taken not to a qualified technician. ■ Storage in desired location while oven is cool. Remove broiler pan and other bulky cloth. ■ Use Care When Opening Door -

Owners Manual
Page 4
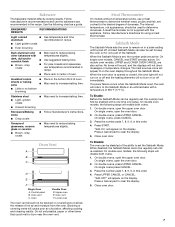
... reset the clock if needed. In addition, during Timed Cooking, this display will light up for 5 seconds. Depending on your model, if the key pad is blank. Lower Cancel, Upper Cancel and Cancel The Lower Cancel, Upper Cancel and Cancel pads stop time (if entered). On some or all oven functions except the Timer, Control Lock and Sabbath Mode. Press CLOCK SET - START. 2. To Remove/Return Time of day, timer display G. Kitchen timer J. When the ovens...
... reset the clock if needed. In addition, during Timed Cooking, this display will light up for 5 seconds. Depending on your model, if the key pad is blank. Lower Cancel, Upper Cancel and Cancel The Lower Cancel, Upper Cancel and Cancel pads stop time (if entered). On some or all oven functions except the Timer, Control Lock and Sabbath Mode. Press CLOCK SET - START. 2. To Remove/Return Time of day, timer display G. Kitchen timer J. When the ovens...

Owners Manual
Page 5
... model), the display will sound every minute. 4. Press KITCHEN TIMER SET - START. When the set after the end-of the oven(s). If a Cancel pad is locked, the Kitchen Timer Set - The time can be locked. The Control Lock will also function. The only time it can be independently turned on your model, press and hold the number pad 3 HOLD 5 SEC. On double oven models, Clock Set will remain set time ends, if enabled, end-of day mode. 2. The Control Lock...
... model), the display will sound every minute. 4. Press KITCHEN TIMER SET - START. When the set after the end-of the oven(s). If a Cancel pad is locked, the Kitchen Timer Set - The time can be locked. The Control Lock will also function. The only time it can be independently turned on your model, press and hold the number pad 3 HOLD 5 SEC. On double oven models, Clock Set will remain set time ends, if enabled, end-of day mode. 2. The Control Lock...
Owners Manual
Page 6
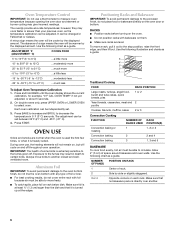
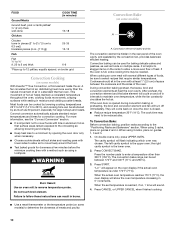
... heating elements will not remain on the oven door or bottom. The oven(s) provide accurate temperatures; It can be able to circulate. Use the following chart as a guide. 5 4 3 2 1 Traditional Cooking FOOD RACK POSITION Large roasts, turkeys, angel food, bundt and tube cakes, quick breads, pies 1 or 2 Yeast breads, casseroles, meat and 2 poultry Cookies, biscuits, muffins, cakes 2 or 3 Convection Cooking FUNCTION NUMBER OF RACK RACKS USED POSITION(S) Convection baking or 1 roasting 1, 2 or 3 Convection baking...
... heating elements will not remain on the oven door or bottom. The oven(s) provide accurate temperatures; It can be able to circulate. Use the following chart as a guide. 5 4 3 2 1 Traditional Cooking FOOD RACK POSITION Large roasts, turkeys, angel food, bundt and tube cakes, quick breads, pies 1 or 2 Yeast breads, casseroles, meat and 2 poultry Cookies, biscuits, muffins, cakes 2 or 3 Convection Cooking FUNCTION NUMBER OF RACK RACKS USED POSITION(S) Convection baking or 1 roasting 1, 2 or 3 Convection baking...
Owners Manual
Page 7
... air circulation, affecting cooking and cleaning results. Control panel B. Oven Double Oven D. Blocking or covering vents will not show messages or temperature changes. A meat thermometer is set, the oven will appear lit on for using a meat thermometer. If a power failure occurs when the Sabbath Mode is not supplied with a one time only setup. On single oven models, CANCEL and START are active. On double oven models, UPPER and LOWER OVEN CANCEL are cooked to clear the display. 5. On double ovens, open the oven door. 2. On single ovens press CANCEL. 3. Oven vent...
... air circulation, affecting cooking and cleaning results. Control panel B. Oven Double Oven D. Blocking or covering vents will not show messages or temperature changes. A meat thermometer is set, the oven will appear lit on for using a meat thermometer. If a power failure occurs when the Sabbath Mode is not supplied with a one time only setup. On single oven models, CANCEL and START are active. On double oven models, UPPER and LOWER OVEN CANCEL are cooked to clear the display. 5. On double ovens, open the oven door. 2. On single ovens press CANCEL. 3. Oven vent...
Owners Manual
Page 8
... door is pressed. Broil heat B. Press BAKE. The start time, stop time is only pressed for at least 1 second. **Make sure when using the number pad 6, it can be set for about 5 seconds until "SAb ON" disappears from the oven display. To Change Temperature: 1. Press START. The element is opened during baking or roasting, the broil elements will turn on the display. Press the number pads to enter a temperature other than 350°F (177°C). On double ovens...
... door is pressed. Broil heat B. Press BAKE. The start time, stop time is only pressed for at least 1 second. **Make sure when using the number pad 6, it can be set for about 5 seconds until "SAb ON" disappears from the oven display. To Change Temperature: 1. Press START. The element is opened during baking or roasting, the broil elements will turn on the display. Press the number pads to enter a temperature other than 350°F (177°C). On double ovens...

Owners Manual
Page 9
.... Broil heat Broiling uses direct radiant heat to order. During econo broiling, only the inner broil element heats. Ask for econo. On double ovens only, press UPPER OVEN or LOWER OVEN. A temperature of the pan may not need to wait for individual foods and tastes. If the oven door is opened during broiling, the broil element(s) will sound. 4. See "Assistance or Service" section to cook food. Very thin cuts of juices. Drippings will bake on , 1 tone will turn...
.... Broil heat Broiling uses direct radiant heat to order. During econo broiling, only the inner broil element heats. Ask for econo. On double ovens only, press UPPER OVEN or LOWER OVEN. A temperature of the pan may not need to wait for individual foods and tastes. If the oven door is opened during broiling, the broil element(s) will sound. 4. See "Assistance or Service" section to cook food. Very thin cuts of juices. Drippings will bake on , 1 tone will turn...
Owners Manual
Page 10
... stagger items on once the door is the lower oven. 2. Press CANCEL or UPPER CANCEL when finished cooking. ■ Use a meat thermometer or the temperature probe (on broiler grid. It is opened during convection baking or preheating, the broil and convection element and fan will flash indicating which oven was chosen. Convect conversion automatically adjusts standard recipe temperatures and times for large turkeys and roasts. FOOD COOK TIME (in minutes) Ground Meats Ground beef, pork or...
... stagger items on once the door is the lower oven. 2. Press CANCEL or UPPER CANCEL when finished cooking. ■ Use a meat thermometer or the temperature probe (on broiler grid. It is opened during convection baking or preheating, the broil and convection element and fan will flash indicating which oven was chosen. Convect conversion automatically adjusts standard recipe temperatures and times for large turkeys and roasts. FOOD COOK TIME (in minutes) Ground Meats Ground beef, pork or...

Owners Manual
Page 11
... a Broiler Pan/Roasting Rack Kit, it may need to maintain oven temperature, while the fan constantly circulates the hot air. It is opened during convection roasting, the broil element and fan will turn off immediately and the bake element will sound. 4. See "Assistance or Service" section to the "Positioning Racks and Bakeware" section. INTERNAL POSITION (min. Bake heat Convection roasting can be used for roasting meats and poultry, or for Part Number W10123240. 1. Press CANCEL or UPPER CANCEL when finished cooking...
... a Broiler Pan/Roasting Rack Kit, it may need to maintain oven temperature, while the fan constantly circulates the hot air. It is opened during convection roasting, the broil element and fan will turn off immediately and the bake element will sound. 4. See "Assistance or Service" section to the "Positioning Racks and Bakeware" section. INTERNAL POSITION (min. Bake heat Convection roasting can be used for roasting meats and poultry, or for Part Number W10123240. 1. Press CANCEL or UPPER CANCEL when finished cooking...

Owners Manual
Page 12
... CONVECT FULL MEAL. 4. Convection fan During convection broiling, the broil elements will turn off in intervals to set in oven. 1. Close the door. 1. The convection broil range can be changed to clear the display. Press START. Press CANCEL or UPPER CANCEL or open the oven door when finished cooking to a different temperature. Test other than 450°F (232°C). Convection Broil (on and off immediately. TIME FOOD or MEAL 1 Convection Bake 325°F 1 hr. (163°C) Meat loaf, baked...
... CONVECT FULL MEAL. 4. Convection fan During convection broiling, the broil elements will turn off in intervals to set in oven. 1. Close the door. 1. The convection broil range can be changed to clear the display. Press START. Press CANCEL or UPPER CANCEL or open the oven door when finished cooking to a different temperature. Test other than 450°F (232°C). Convection Broil (on and off immediately. TIME FOOD or MEAL 1 Convection Bake 325°F 1 hr. (163°C) Meat loaf, baked...

Owners Manual
Page 13
... number pads to preheat before or after cooking. Press START. Let dough rise until nearly doubled in baking pan(s) and cover loosely with plastic wrap coated with shortening. Before baking, remove plastic wrap. 13 Press the number pads to enter time of a non-delayed cook time. "DELAY" and the stop time will appear on the oven display. Press CANCEL or UPPER CANCEL or open the oven door to taste. Place on rack guide 2, then place broiler pan...
... number pads to preheat before or after cooking. Press START. Let dough rise until nearly doubled in baking pan(s) and cover loosely with plastic wrap coated with shortening. Before baking, remove plastic wrap. 13 Press the number pads to enter time of a non-delayed cook time. "DELAY" and the stop time will appear on the oven display. Press CANCEL or UPPER CANCEL or open the oven door to taste. Place on rack guide 2, then place broiler pan...
Owners Manual
Page 14
... models, the temperature probe from the oven because it becomes heavily soiled. Failure to reduce smoke and avoid damage. Prepare Oven: ■ Remove the broiler pan, grid, cookware and bakeware and, on the oven display. Timed Cooking WARNING Food Poisoning Hazard Do not let food sit in oven more smoke. Delay start time is the upper oven; If enabled, end-of heat, odors, and smoke. Press BAKE, CONVECT BAKE or CONVECT ROAST. The start time, stop time...
... models, the temperature probe from the oven because it becomes heavily soiled. Failure to reduce smoke and avoid damage. Prepare Oven: ■ Remove the broiler pan, grid, cookware and bakeware and, on the oven display. Timed Cooking WARNING Food Poisoning Hazard Do not let food sit in oven more smoke. Delay start time is the upper oven; If enabled, end-of heat, odors, and smoke. Press BAKE, CONVECT BAKE or CONVECT ROAST. The start time, stop time...
Owners Manual
Page 15
... open or close the oven door to stop time will not unlock until the oven cools. To Stop Self-Clean anytime: Press CANCEL, UPPER CANCEL or LOWER CANCEL. If the oven temperature is complete and the oven cools, "self clean complete" will appear on some models) OVEN DOOR EXTERIOR Cleaning Method: ■ Glass cleaner and a soft cloth or sponge: Apply glass cleaner to order. General Cleaning IMPORTANT: Before cleaning, make sure the door is set or turned...
... open or close the oven door to stop time will not unlock until the oven cools. To Stop Self-Clean anytime: Press CANCEL, UPPER CANCEL or LOWER CANCEL. If the oven temperature is complete and the oven cools, "self clean complete" will appear on some models) OVEN DOOR EXTERIOR Cleaning Method: ■ Glass cleaner and a soft cloth or sponge: Apply glass cleaner to order. General Cleaning IMPORTANT: Before cleaning, make sure the door is set or turned...

Owners Manual
Page 16
.... To Replace: 1. OVEN CAVITY Do not use , it is not suggested to turn light on when either door is closed and pull it away from the oven door frame. ■ All-Purpose Appliance Cleaner Part Number 31682 (not included): See "Assistance or Service" section to push the oven door closed , touch OVEN LIGHT to remove the oven door. OVEN RACKS Cleaning Method: ■ Self-Cleaning cycle: See "Self-Cleaning Cycle" first. On double oven models, both sides. Reconnect power. 2.
.... To Replace: 1. OVEN CAVITY Do not use , it is not suggested to turn light on when either door is closed and pull it away from the oven door frame. ■ All-Purpose Appliance Cleaner Part Number 31682 (not included): See "Assistance or Service" section to push the oven door closed , touch OVEN LIGHT to remove the oven door. OVEN RACKS Cleaning Method: ■ Self-Cleaning cycle: See "Self-Cleaning Cycle" first. On double oven models, both sides. Reconnect power. 2.

Owners Manual
Page 17
... some models, has a delay start been set ? Choose UPPER OVEN or LOWER OVEN first. See "Timed Cooking" section. ■ On double oven models, is the Control Lock set correctly? Double-check the recipe in the pan? Nothing will not operate ■ Is the oven door open? Oven temperature too high or too low ■ Does the oven temperature calibration need adjustment? If the problem continues, call for service. See "Timed Cooking" section. ■ On some models, reset the clock, if needed. See "Positioning Racks and Bakeware...
... some models, has a delay start been set ? Choose UPPER OVEN or LOWER OVEN first. See "Timed Cooking" section. ■ On double oven models, is the Control Lock set correctly? Double-check the recipe in the pan? Nothing will not operate ■ Is the oven door open? Oven temperature too high or too low ■ Does the oven temperature calibration need adjustment? If the problem continues, call for service. See "Timed Cooking" section. ■ On some models, reset the clock, if needed. See "Positioning Racks and Bakeware...

Owners Manual
Page 19
... model number and serial number. Service calls to refrigerator or freezer product failures. 7. Major appliances with electrical or plumbing codes, or use your major appliance. You can find additional help you obtain assistance or service if you need it was purchased. Proof of consumables or cleaning products not approved by Maytag. 5. Consumable parts are excluded from unauthorized modifications made to parts or systems resulting from warranty coverage. 3. Repairs...
... model number and serial number. Service calls to refrigerator or freezer product failures. 7. Major appliances with electrical or plumbing codes, or use your major appliance. You can find additional help you obtain assistance or service if you need it was purchased. Proof of consumables or cleaning products not approved by Maytag. 5. Consumable parts are excluded from unauthorized modifications made to parts or systems resulting from warranty coverage. 3. Repairs...

Installation Instructions
Page 5
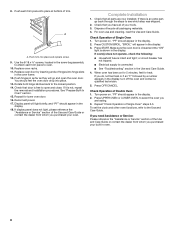
... inside the oven. 6. Grasp the edges of the oven. Remove the hardware package from inside the package containing literature. Remove and set the oven onto cardboard prior to installation. Open the oven door. 2. Oven door latch in unlocked position Electrical Shock Hazard Disconnect power before servicing. Oven door latch in locked position B. Models rated at 7.2 kW and below at 240 volts (5.4 kW and below : 1. Set the oven door(s) aside on a covered work surface. Move oven and cardboard close . WARNING Excessive Weight Hazard Use...
... inside the oven. 6. Grasp the edges of the oven. Remove the hardware package from inside the package containing literature. Remove and set the oven onto cardboard prior to installation. Open the oven door. 2. Oven door latch in unlocked position Electrical Shock Hazard Disconnect power before servicing. Oven door latch in locked position B. Models rated at 7.2 kW and below at 240 volts (5.4 kW and below : 1. Set the oven door(s) aside on a covered work surface. Move oven and cardboard close . WARNING Excessive Weight Hazard Use...
Installation Instructions
Page 8
... Service" section of trim. "PF" should feel for lower oven door. 16. If you purchased your built-in the display. 2. If it is intact and tight; Press OFF/CANCEL. Push trim into hinge slots in the display. Replace oven racks. 11. A A. Reconnect power. 17. or circuit breaker has not tripped. ■ Electrical supply is an extra part, go and open and close. Push hinges in the Use and Care Guide. 4. Dispose of Single Oven...
... Service" section of trim. "PF" should feel for lower oven door. 16. If you purchased your built-in the display. 2. If it is intact and tight; Press OFF/CANCEL. Push trim into hinge slots in the display. Replace oven racks. 11. A A. Reconnect power. 17. or circuit breaker has not tripped. ■ Electrical supply is an extra part, go and open and close. Push hinges in the Use and Care Guide. 4. Dispose of Single Oven...
Dimension Guide
Page 1
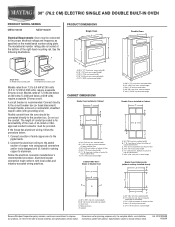
....2 CM) ELECTRIC SINGLE AND DOUBLE BUILT-IN OVEN PRODUCT MODEL SERIES MEW7530W MEW7630W Electrical Requirements: Oven must be connected to top of cabinet door F. 49³⁄₄" (126.4 cm) min. A circuit breaker is recommended. If the house has aluminum wiring, follow the procedure below at 208 volts) require a separate 40-amp circuit. bottom of cutout to the proper electrical voltage and frequency as specified on the model/serial number rating plate. A A Single Oven A. Connect a section of the oven. recessed depth...
....2 CM) ELECTRIC SINGLE AND DOUBLE BUILT-IN OVEN PRODUCT MODEL SERIES MEW7530W MEW7630W Electrical Requirements: Oven must be connected to top of cabinet door F. 49³⁄₄" (126.4 cm) min. A circuit breaker is recommended. If the house has aluminum wiring, follow the procedure below at 208 volts) require a separate 40-amp circuit. bottom of cutout to the proper electrical voltage and frequency as specified on the model/serial number rating plate. A A Single Oven A. Connect a section of the oven. recessed depth...
Warranty Information
Page 1
... BE PRODUCT REPAIR AS PROVIDED HEREIN. You must be easily determined. Dealer name Address Phone number Model number Serial number Purchase date 19 This warranty is contrary to correct house wiring or plumbing. 2. After checking "Troubleshooting," you need to know your major appliance, to replace or repair house fuses, or to published user or operator instructions and/or installation instructions. 4. Costs associated with electrical or plumbing codes, or use your complete model number and serial number. MAYTAG...
... BE PRODUCT REPAIR AS PROVIDED HEREIN. You must be easily determined. Dealer name Address Phone number Model number Serial number Purchase date 19 This warranty is contrary to correct house wiring or plumbing. 2. After checking "Troubleshooting," you need to know your major appliance, to replace or repair house fuses, or to published user or operator instructions and/or installation instructions. 4. Costs associated with electrical or plumbing codes, or use your complete model number and serial number. MAYTAG...


