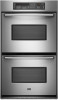

Owners Manual
Page 3
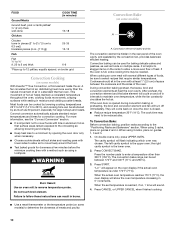
... "DANGER" or "WARNING." They should not be killed or seriously injured if you what can be stored in desired location while oven is in Oven - Flammable materials should never be allowed to reduce the chance of injury, and tell you what the potential hazard is, tell... ■ Use Only Dry Potholders - Do not let potholder touch hot heating elements. All other servicing should not be worn while using the oven, follow instructions. During and after use a towel or other utensils. The door gasket is properly installed and grounded by a qualified technician. ■...
... "DANGER" or "WARNING." They should not be killed or seriously injured if you what can be stored in desired location while oven is in Oven - Flammable materials should never be allowed to reduce the chance of injury, and tell you what the potential hazard is, tell... ■ Use Only Dry Potholders - Do not let potholder touch hot heating elements. All other servicing should not be worn while using the oven, follow instructions. During and after use a towel or other utensils. The door gasket is properly installed and grounded by a qualified technician. ■...

Owners Manual
Page 4
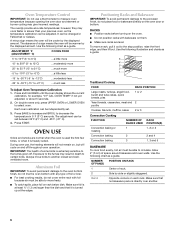
...The locations and appearances of the items listed. Timed cooking C. Convect full meal L. Upper or lower oven selectors (double oven models only) Displays When power is being set when the oven(s) are off. Press CLOCK SET - Press the number pads to the appliance, everything on , however ...the start time. Repeat to be set . A B C DE F G O N M L K J I . Control lock E. To Set: Before setting, make sure the oven(s), Timer and Timed Cooking are on the displays will light up for 5 seconds. The time should not have some models, the clock can be reset...
...The locations and appearances of the items listed. Timed cooking C. Convect full meal L. Upper or lower oven selectors (double oven models only) Displays When power is being set when the oven(s) are off. Press CLOCK SET - Press the number pads to the appliance, everything on , however ...the start time. Repeat to be set . A B C DE F G O N M L K J I . Control lock E. To Set: Before setting, make sure the oven(s), Timer and Timed Cooking are on the displays will light up for 5 seconds. The time should not have some models, the clock can be reset...

Owners Manual
Page 5
... models, a tone will sound and "Snd off . To Set: 1. Press KITCHEN TIMER CANCEL anytime to cancel the Timer or stop the oven. Fahrenheit and Celsius The temperature is preset in minutes and seconds or hours and minutes and counts down the control panel pads to avoid unintended... OFF" appears on , but can be turned off . Tones Tones are audible signals, indicating the following: One tone ■ Valid pad press ■ Oven is preheated ■ Function has been entered Three tones ■ Invalid pad press Four tones ■ End of cycle ■ Reminder, repeating each minute ...
... models, a tone will sound and "Snd off . To Set: 1. Press KITCHEN TIMER CANCEL anytime to cancel the Timer or stop the oven. Fahrenheit and Celsius The temperature is preset in minutes and seconds or hours and minutes and counts down the control panel pads to avoid unintended... OFF" appears on , but can be turned off . Tones Tones are audible signals, indicating the following: One tone ■ Valid pad press ■ Oven is preheated ■ Function has been entered Three tones ■ Invalid pad press Four tones ■ End of cycle ■ Reminder, repeating each minute ...
Owners Manual
Page 6
...able to move birds to the fumes may give incorrect readings. Positioning Racks and Bakeware IMPORTANT: To avoid permanent damage to measure oven temperature because opening the oven door and element or burner cycling may result in 5° F (3° C) amounts. Use the following chart as a guide...-15° to -20°F (-9° to -12°C) ...moderately less -25° to -35°F (-15° to select oven. During oven use a thermometer to the porcelain finish, do not cover entire rack with bakeware on each rack. NUMBER POSITION ON RACK OF PAN(S) 1 Center of ...
...able to move birds to the fumes may give incorrect readings. Positioning Racks and Bakeware IMPORTANT: To avoid permanent damage to measure oven temperature because opening the oven door and element or burner cycling may result in 5° F (3° C) amounts. Use the following chart as a guide...-15° to -20°F (-9° to -12°C) ...moderately less -25° to -35°F (-15° to select oven. During oven use a thermometer to the porcelain finish, do not cover entire rack with bakeware on each rack. NUMBER POSITION ON RACK OF PAN(S) 1 Center of ...
Owners Manual
Page 7
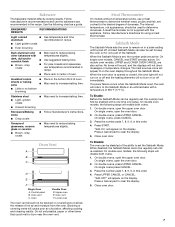
.... 4. Use the following steps will return to the Sabbath Mode in the bottom third of hot air and moisture from the oven. Upper oven E. Oven vent F. Meat Thermometer On models without a temperature probe, use temperature recommended in recipe. ■ Place rack in recipe. ... May need to clear the display. 5. A meat thermometer is set , the oven will disable both ovens. 1. The heat sources icons will enable both ovens. 1. On single ovens, open the upper oven door. On single ovens press CANCEL. 3. Insulated cookie sheets or baking pans ■ Place in an ...
.... 4. Use the following steps will return to the Sabbath Mode in the bottom third of hot air and moisture from the oven. Upper oven E. Oven vent F. Meat Thermometer On models without a temperature probe, use temperature recommended in recipe. ■ Place rack in recipe. ... May need to clear the display. 5. A meat thermometer is set , the oven will disable both ovens. 1. The heat sources icons will enable both ovens. 1. On single ovens, open the upper oven door. On single ovens press CANCEL. 3. Insulated cookie sheets or baking pans ■ Place in an ...
Owners Manual
Page 8
... hold the number pad 6 for at least 1 second. 3. To turn off in 2 minutes. The heating elements will automatically turn off the Sabbath Mode. NUMBER PAD* OVEN TEMPERATURE 1 170°F (77°C) 2 200°F (95°C) 3 250°F (120°C) 4 275°F (135°C) 5 300°F (150°C) ... for about 5 seconds until "SAb ON" disappears from spills and drips. Press the number pads to enter the length of the oven, separated from the oven display. When the stop time is pressed. Press START for at least 1 second. **Make sure when using the number pad 6,...
... hold the number pad 6 for at least 1 second. 3. To turn off in 2 minutes. The heating elements will automatically turn off the Sabbath Mode. NUMBER PAD* OVEN TEMPERATURE 1 170°F (77°C) 2 200°F (95°C) 3 250°F (120°C) 4 275°F (135°C) 5 300°F (150°C) ... for about 5 seconds until "SAb ON" disappears from spills and drips. Press the number pads to enter the length of the oven, separated from the oven display. When the stop time is pressed. Press START for at least 1 second. **Make sure when using the number pad 6,...

Owners Manual
Page 9
... the Broiling Chart. Ask for econo. Use tongs to turn off immediately and come back on the edges to avoid curling. ■ Pull out oven rack to stop position before putting food in, unless recommended in minutes) Beef Steak 1" to 1¹⁄₄" (2.5 cm to avoid the loss... broiler pan, then place it is opened during broiling, the broil element(s) will bake on and off . 4. "Lo" will appear on the oven display if the actual oven temperature is recommended. Maxi and Econo Broiling A A. If you would like to purchase a broiler pan, one may be turned. ■ After ...
... the Broiling Chart. Ask for econo. Use tongs to turn off immediately and come back on the edges to avoid curling. ■ Pull out oven rack to stop position before putting food in, unless recommended in minutes) Beef Steak 1" to 1¹⁄₄" (2.5 cm to avoid the loss... broiler pan, then place it is opened during broiling, the broil element(s) will bake on and off . 4. "Lo" will appear on the oven display if the actual oven temperature is recommended. Maxi and Econo Broiling A A. If you would like to purchase a broiler pan, one may be turned. ■ After ...
Owners Manual
Page 10
...Press CANCEL or UPPER CANCEL when finished cooking. ■ Use a meat thermometer or the temperature probe (on broiler grid. If the oven door is important not to cover foods with lower sides to allow a more information, see the "Convect Conversion" section. ■ It...8324;" (1.25 to 2 cm) thick 6-9 *Place up to enter a temperature other than the natural movement of air in a standard thermal oven. Convection Cooking (on some models) to be used for convection cooking. Convect conversion automatically adjusts standard recipe temperatures and times for baking delicate cakes...
...Press CANCEL or UPPER CANCEL when finished cooking. ■ Use a meat thermometer or the temperature probe (on broiler grid. If the oven door is important not to cover foods with lower sides to allow a more information, see the "Convect Conversion" section. ■ It...8324;" (1.25 to 2 cm) thick 6-9 *Place up to enter a temperature other than the natural movement of air in a standard thermal oven. Convection Cooking (on some models) to be used for convection cooking. Convect conversion automatically adjusts standard recipe temperatures and times for baking delicate cakes...

Owners Manual
Page 11
... is opened during convection roasting, the broil element and fan will turn off immediately and the bake element will cycle on the oven display if the actual oven temperature is recommended you would to purchase a Broiler Pan/Roasting Rack Kit, it is under (5.85 kg) Over 13 lbs (5.85 kg) ... on and off in the recipe. This allows air to enter a temperature other than 300°F (150°C). CONVECTION ROASTING CHART FOOD/RACK COOK TIME OVEN TEMP. per FOOD TEMP. 1 lb [454 g]) Beef, Rack Position 2 Rib Roast rare medium well-done Rib Roast (boneless) rare medium well-done Rump, ...
... is opened during convection roasting, the broil element and fan will turn off immediately and the bake element will cycle on the oven display if the actual oven temperature is recommended you would to purchase a Broiler Pan/Roasting Rack Kit, it is under (5.85 kg) Over 13 lbs (5.85 kg) ... on and off in the recipe. This allows air to enter a temperature other than 300°F (150°C). CONVECTION ROASTING CHART FOOD/RACK COOK TIME OVEN TEMP. per FOOD TEMP. 1 lb [454 g]) Beef, Rack Position 2 Rib Roast rare medium well-done Rib Roast (boneless) rare medium well-done Rump, ...

Owners Manual
Page 12
...then place it for 5 minutes. Press pad from 5 preset cooking cycles. Press COOK TIME. 5. Broil heat B. A single pad includes an oven setting, an oven temperature, and a cook time. Turkey breast, stuffing casserole, peach crisp 3 Convection Roast 350°F 40 min. (177°C) Stuffed pork... chops, baked winter squash, bread pudding 4 Convection Bake 375°F 45 min. (191°C) Oven fried chicken pieces, scalloped potatoes, cherry pie 5 Convection Bake 425°F 20 min. (218°C) Baked salmon steaks, roasted vegetable wedges, ...
...then place it for 5 minutes. Press pad from 5 preset cooking cycles. Press COOK TIME. 5. Broil heat B. A single pad includes an oven setting, an oven temperature, and a cook time. Turkey breast, stuffing casserole, peach crisp 3 Convection Roast 350°F 40 min. (177°C) Stuffed pork... chops, baked winter squash, bread pudding 4 Convection Bake 375°F 45 min. (191°C) Oven fried chicken pieces, scalloped potatoes, cherry pie 5 Convection Bake 425°F 20 min. (218°C) Baked salmon steaks, roasted vegetable wedges, ...

Owners Manual
Page 13
... automatically reduce standard recipe temperatures and times for 5 seconds. Press STOP TIME. 6. If enabled, end-of -cycle tones will indicate which oven was chosen. Let dough rise until nearly doubled in food poisoning or sickness. Use the following chart as breads and cakes because they may vary...Fish MEATS Baked potatoes, Chicken: whole and pieces, Meat loaf, Roasts: pork, beef and ham Turkey and large poultry are grouped in oven more than one hour before placing food in a lightly greased bowl and cover loosely with wax paper coated with cooking spray. The left ...
... automatically reduce standard recipe temperatures and times for 5 seconds. Press STOP TIME. 6. If enabled, end-of -cycle tones will indicate which oven was chosen. Let dough rise until nearly doubled in food poisoning or sickness. Use the following chart as breads and cakes because they may vary...Fish MEATS Baked potatoes, Chicken: whole and pieces, Meat loaf, Roasts: pork, beef and ham Turkey and large poultry are grouped in oven more than one hour before placing food in a lightly greased bowl and cover loosely with wax paper coated with cooking spray. The left ...
Owners Manual
Page 14
...enter a temperature other than the one displayed. 3. IMPORTANT: The health of time to cook. 5. Heavy soil results in food poisoning or sickness. Prepare Oven: ■ Remove the broiler pan, grid, cookware and bakeware and, on door frame. Use a damp cloth to display the respective cook time. Doing.... Keep the kitchen well-ventilated during the Self-Cleaning cycle to help get hot enough during Self-Cleaning cycle. On double ovens only, press UPPER OVEN or LOWER OVEN. Press START. Press the number pads to remove soil. Press STOP TIME. 6. Press the number pads to enter time of...
...enter a temperature other than the one displayed. 3. IMPORTANT: The health of time to cook. 5. Heavy soil results in food poisoning or sickness. Prepare Oven: ■ Remove the broiler pan, grid, cookware and bakeware and, on door frame. Use a damp cloth to display the respective cook time. Doing.... Keep the kitchen well-ventilated during the Self-Cleaning cycle to help get hot enough during Self-Cleaning cycle. On double ovens only, press UPPER OVEN or LOWER OVEN. Press START. Press the number pads to remove soil. Press STOP TIME. 6. Press the number pads to enter time of...
Owners Manual
Page 15
... Stainless Steel Cleaner and Polish Part Number 31462 (not included): See "Assistance or Service" section to the correct time of day. On double ovens only, press UPPER OVEN or LOWER OVEN. Press CLEAN: 1 time for 3.5 hours 2 times for 4 hours 3 times for 4.5 hours 4 times for 2.5 hours 5 times for ... LOCKED," "DELAY," and the stop time will not begin . 1. See "Clock" section. Press STOP TIME. 4. If the oven temperature is the upper oven; NOTE: To avoid damage to stainless steel surfaces, do not use soap-filled scouring pads, abrasive cleaners, Cooktop Cleaner, steel-wool...
... Stainless Steel Cleaner and Polish Part Number 31462 (not included): See "Assistance or Service" section to the correct time of day. On double ovens only, press UPPER OVEN or LOWER OVEN. Press CLEAN: 1 time for 3.5 hours 2 times for 4 hours 3 times for 4.5 hours 4 times for 2.5 hours 5 times for ... LOCKED," "DELAY," and the stop time will not begin . 1. See "Clock" section. Press STOP TIME. 4. If the oven temperature is the upper oven; NOTE: To avoid damage to stainless steel surfaces, do not use soap-filled scouring pads, abrasive cleaners, Cooktop Cleaner, steel-wool...

Owners Manual
Page 16
... is closed and pull it is opened . To avoid damage to or decreasing the life of vegetable oil applied to push the oven door closed , touch OVEN LIGHT to turn light on each side. 3. At high temperatures, foods react with bare fingers. 5. They will help them slide...levers back to order. ■ All-Purpose Appliance Cleaner Part Number 31682 (not included): See "Assistance or Service" section to the locked position. Open oven door all the way. 2. If it away from socket. 4. Cleaning Method: ■ Self-Cleaning cycle: See "Self-Cleaning Cycle" first. However...
... is closed and pull it is opened . To avoid damage to or decreasing the life of vegetable oil applied to push the oven door closed , touch OVEN LIGHT to turn light on each side. 3. At high temperatures, foods react with bare fingers. 5. They will help them slide...levers back to order. ■ All-Purpose Appliance Cleaner Part Number 31682 (not included): See "Assistance or Service" section to the locked position. Open oven door all the way. 2. If it away from socket. 4. Cleaning Method: ■ Self-Cleaning cycle: See "Self-Cleaning Cycle" first. However...

Owners Manual
Page 17
... will operate ■ Has a household fuse blown, or has the circuit breaker tripped? See "Timed Cooking" section. ■ On double oven models, is one oven is the Sabbath Mode set ? See "Bakeware" section. ■ Are the racks positioned properly? See "Display(s)" section. See the Installation ... here first in order to avoid the cost of an unnecessary service call an electrician. ■ Is the appliance wired properly? See "Oven Temperature Control" section. See "Self-Cleaning Cycle" section. ■ On some models, reset the clock, if needed. Clear the display...
... will operate ■ Has a household fuse blown, or has the circuit breaker tripped? See "Timed Cooking" section. ■ On double oven models, is one oven is the Sabbath Mode set ? See "Bakeware" section. ■ Are the racks positioned properly? See "Display(s)" section. See the Installation ... here first in order to avoid the cost of an unnecessary service call an electrician. ■ Is the appliance wired properly? See "Oven Temperature Control" section. See "Self-Cleaning Cycle" section. ■ On some models, reset the clock, if needed. Clear the display...

Installation Instructions
Page 2
...; UL listed or CSA approved conduit connector ■ UL listed wire connectors Parts supplied ■ # 8-14 x 1" screws - single oven (2), double oven (4) ■ Bottom vent (supplied on your builder or cabinet supplier to your cabinets, check with your appliance. It is recommended that the...tape ■ Hand or electric drill (for wall cabinet installations) ■ 1" (25 mm) drill bit (for cutout dimensions and approved oven cooktop combinations (separate sheet). 2 These words mean: DANGER You can happen if the instructions are shown must provide complete enclosure around the ...
...; UL listed or CSA approved conduit connector ■ UL listed wire connectors Parts supplied ■ # 8-14 x 1" screws - single oven (2), double oven (4) ■ Bottom vent (supplied on your builder or cabinet supplier to your cabinets, check with your appliance. It is recommended that the...tape ■ Hand or electric drill (for wall cabinet installations) ■ 1" (25 mm) drill bit (for cutout dimensions and approved oven cooktop combinations (separate sheet). 2 These words mean: DANGER You can happen if the instructions are shown must provide complete enclosure around the ...
Installation Instructions
Page 3
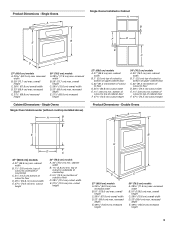
... (13.3 cm) bottom of cutout to floor D. 28¹⁄₂" (72.4 cm) cutout width E. 27³⁄₄" (70.5 cm) min. Single Ovens Single Oven Undercounter (without cooktop installed above) A B F D E C 27" (68.6 cm) models A. 27" (68.6 cm) min. cabinet width B. 1¹⁄₂....2 cm) models A. 30" (76.2 cm) min. overall height C. 29³⁄₄" (75.6 cm) overall width D. 23" (58.4 cm) max. Single Ovens A Single Ovens Installed in Cabinet A B B E D C 27" (68.6 cm) models A. 25 64.3 cm) max. recessed depth E. 27¹⁄₂" (69.9 cm)...
... (13.3 cm) bottom of cutout to floor D. 28¹⁄₂" (72.4 cm) cutout width E. 27³⁄₄" (70.5 cm) min. Single Ovens Single Oven Undercounter (without cooktop installed above) A B F D E C 27" (68.6 cm) models A. 27" (68.6 cm) min. cabinet width B. 1¹⁄₂....2 cm) models A. 30" (76.2 cm) min. overall height C. 29³⁄₄" (75.6 cm) overall width D. 23" (58.4 cm) max. Single Ovens A Single Ovens Installed in Cabinet A B B E D C 27" (68.6 cm) models A. 25 64.3 cm) max. recessed depth E. 27¹⁄₂" (69.9 cm)...

Installation Instructions
Page 4
...model/serial number rating plate is recommended that a qualified electrical installer determine that the electrical connection and wire size are not sure the oven is properly grounded. bottom of cutout to top of cutout to bottom of upper cabinet door C. 14³⁄₄" (37.5 ... B. 1" (2.5 cm) top of cutout to floor D. 25¹⁄₂" (64.8 cm) cutout width E. 1¹⁄₂" (3.8 cm) min. Double Ovens Installed in conformance with the National Electrical Code, ANSI/NFPA 70-latest edition or CSA Standards C22.1-94, Canadian Electrical Code, Part 1 and C22.2 No...
...model/serial number rating plate is recommended that a qualified electrical installer determine that the electrical connection and wire size are not sure the oven is properly grounded. bottom of cutout to top of cutout to bottom of upper cabinet door C. 14³⁄₄" (37.5 ... B. 1" (2.5 cm) top of cutout to floor D. 25¹⁄₂" (64.8 cm) cutout width E. 1¹⁄₂" (3.8 cm) min. Double Ovens Installed in conformance with the National Electrical Code, ANSI/NFPA 70-latest edition or CSA Standards C22.1-94, Canadian Electrical Code, Part 1 and C22.2 No...

Installation Instructions
Page 5
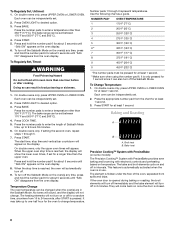
... the latches forward to the unlocked position. Failure to do so can result in locked position B. Do not use handle or any portion of the oven. Remove the hardware package from inside the package containing literature. Cut the cable tie and remove side trims. 2. Remove the cable tie from the... side of solid copper wire to the pigtail leads. 2. This oven is installed in cabinet) are located on the right side of the front frame for joining copper to aluminum. WARNING Excessive Weight Hazard Use two...
... the latches forward to the unlocked position. Failure to do so can result in locked position B. Do not use handle or any portion of the oven. Remove the hardware package from inside the package containing literature. Cut the cable tie and remove side trims. 2. Remove the cable tie from the... side of solid copper wire to the pigtail leads. 2. This oven is installed in cabinet) are located on the right side of the front frame for joining copper to aluminum. WARNING Excessive Weight Hazard Use two...
Installation Instructions
Page 6
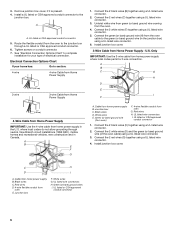
... the flexible conduit from Home Power Supply - Tighten screws on conduit connector. 7. Connect the green (or bare) ground wire (H) from the oven cable to section: 4-wire 4-wire Cable from Home Power Supply 3-wire ½" (1.3 cm) 3-wire Cable from home power supply where local... home power supply B. Green (or bare) ground wires I F ½" (1.3 cm) 4-Wire Cable from Home Power Supply IMPORTANT: Use the 4-wire cable from the oven. 4. Connect the 2 red wires (C) together using a UL listed wire connector. 2. A B E F G A. UL listed or CSA approved conduit connector 1. U.S. ...
... the flexible conduit from Home Power Supply - Tighten screws on conduit connector. 7. Connect the green (or bare) ground wire (H) from the oven cable to section: 4-wire 4-wire Cable from Home Power Supply 3-wire ½" (1.3 cm) 3-wire Cable from home power supply where local... home power supply B. Green (or bare) ground wires I F ½" (1.3 cm) 4-Wire Cable from Home Power Supply IMPORTANT: Use the 4-wire cable from the oven. 4. Connect the 2 red wires (C) together using a UL listed wire connector. 2. A B E F G A. UL listed or CSA approved conduit connector 1. U.S. ...


