Warranty Information
Page 1
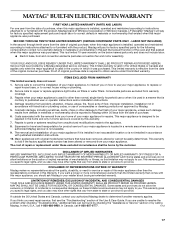
... original model/serial numbers that existed when this major appliance was purchased. This major appliance is a limited 10-year warranty on the below named parts only and does not include labor. ■ Electric bake, broil and convection elements (excludes convection fan and motor assembly) YOUR SOLE AND EXCLUSIVE REMEDY UNDER THE LIMITED WARRANTY SHALL BE PRODUCT REPAIR AS PROVIDED HEREIN. DISCLAIMER OF IMPLIED WARRANTIES IMPLIED WARRANTIES, INCLUDING...
... original model/serial numbers that existed when this major appliance was purchased. This major appliance is a limited 10-year warranty on the below named parts only and does not include labor. ■ Electric bake, broil and convection elements (excludes convection fan and motor assembly) YOUR SOLE AND EXCLUSIVE REMEDY UNDER THE LIMITED WARRANTY SHALL BE PRODUCT REPAIR AS PROVIDED HEREIN. DISCLAIMER OF IMPLIED WARRANTIES IMPLIED WARRANTIES, INCLUDING...
Energy Guide
Page 1
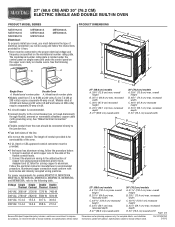
....2 CM) ELECTRIC SINGLE AND DOUBLE BUILT-IN OVEN PRODUCT MODEL SERIES PRODUCT DIMENSIONS MEW7527A MEW7627A MEW9527A MEW9627A MEW7530A MEW7630A MEW9530A MEW9630A Electrical: To properly install your oven, you will be connected to aluminum. See the following table. Model/serial number plate A. Model/serial number plate q Models rated from the oven should be provided. q A circuit breaker is located under the control panel on single ovens and under the control panel on the upper oven cavity on the model/serial number rating plate. See "Make Electrical Connection" section. The...
....2 CM) ELECTRIC SINGLE AND DOUBLE BUILT-IN OVEN PRODUCT MODEL SERIES PRODUCT DIMENSIONS MEW7527A MEW7627A MEW9527A MEW9627A MEW7530A MEW7630A MEW9530A MEW9630A Electrical: To properly install your oven, you will be connected to aluminum. See the following table. Model/serial number plate A. Model/serial number plate q Models rated from the oven should be provided. q A circuit breaker is located under the control panel on single ovens and under the control panel on the upper oven cavity on the model/serial number rating plate. See "Make Electrical Connection" section. The...
Installation Guide
Page 1
... l'inspecteur local des installations électriques. All safety messages will tell you what can kill or hurt you and others are not followed. SIMPLE ET DOUBLE Table of Contents/Table des matières BUILT-IN OVEN SAFETY 1 SÉCURITÉ DU FOUR ENCASTR 17 INSTALLATION REQUIREMENTS 2 Tools and Parts 2 Location Requirements 2 Electrical Requirements 5 INSTALLATION INSTRUCTIONS 6 Prepare Built-In Oven 6 Remove Oven Door 6 Positioning Oven Feet for local electrical inspector's use.
... l'inspecteur local des installations électriques. All safety messages will tell you what can kill or hurt you and others are not followed. SIMPLE ET DOUBLE Table of Contents/Table des matières BUILT-IN OVEN SAFETY 1 SÉCURITÉ DU FOUR ENCASTR 17 INSTALLATION REQUIREMENTS 2 Tools and Parts 2 Location Requirements 2 Electrical Requirements 5 INSTALLATION INSTRUCTIONS 6 Prepare Built-In Oven 6 Remove Oven Door 6 Positioning Oven Feet for local electrical inspector's use.

Installation Guide
Page 2
... double oven. single oven** Check local codes. Tools needed ■ Phillips screwdriver ■ Measuring tape ■ Hand or electric drill (for wall cabinet installations) ■ 1" (2.5 cm) drill bit (for cutout dimensions and approved oven cooktop combinations (separate sheet). 2 single ovens (2), double ovens (4)* ■ Foam strip - See "Electrical Requirements." Given dimensions provide minimum clearance with bottom of cabinet cutout. ■ Floor must be able to support a double oven weight of 194°F (90°C). Undercounter Installation (with any tools listed...
... double oven. single oven** Check local codes. Tools needed ■ Phillips screwdriver ■ Measuring tape ■ Hand or electric drill (for wall cabinet installations) ■ 1" (2.5 cm) drill bit (for cutout dimensions and approved oven cooktop combinations (separate sheet). 2 single ovens (2), double ovens (4)* ■ Foam strip - See "Electrical Requirements." Given dimensions provide minimum clearance with bottom of cabinet cutout. ■ Floor must be able to support a double oven weight of 194°F (90°C). Undercounter Installation (with any tools listed...
Installation Guide
Page 4
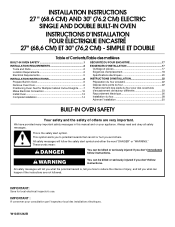
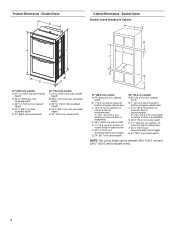
...¹⁄₂" (64.8 cm) cutout width E. 1¹⁄₂" (3.8 cm) min. Product Dimensions - Double Ovens B Cabinet Dimensions - bottom of cutout to top of cutout to floor is acceptable. overall height B. 25 64.6 cm) max. D. 28¹⁄₂" (72.4 cm) cutout width E. 1¹⁄₂" (3.8 cm) min. Double Ovens Double Ovens Installed in Cabinet A A C B D F E D 27" (68.6 cm) models A. 51 130.0 cm) max. overall height B. 28½" (72.4 cm...
...¹⁄₂" (64.8 cm) cutout width E. 1¹⁄₂" (3.8 cm) min. Product Dimensions - Double Ovens B Cabinet Dimensions - bottom of cutout to top of cutout to floor is acceptable. overall height B. 25 64.6 cm) max. D. 28¹⁄₂" (72.4 cm) cutout width E. 1¹⁄₂" (3.8 cm) min. Double Ovens Double Ovens Installed in Cabinet A A C B D F E D 27" (68.6 cm) models A. 51 130.0 cm) max. overall height B. 28½" (72.4 cm...

Installation Guide
Page 5
... the line. ■ Do not cut the conduit. For power requirements for models KEBK171B, KEBK101B, KEBK276B, KEBK206B, KEBS179B, KEBS109B, KEBS277B, KEBS279B, KEBS207B and KEBS209B, refer to the following illustrations. Electrical Connection To properly install your oven, you are not sure the oven is located under the control panel on single ovens and under the control panel on the upper oven cavity on the model/serial number rating plate. A A 208 VAC 240 VAC...
... the line. ■ Do not cut the conduit. For power requirements for models KEBK171B, KEBK101B, KEBK276B, KEBK206B, KEBS179B, KEBS109B, KEBS277B, KEBS279B, KEBS207B and KEBS209B, refer to the following illustrations. Electrical Connection To properly install your oven, you are not sure the oven is located under the control panel on single ovens and under the control panel on the upper oven cavity on the model/serial number rating plate. A A 208 VAC 240 VAC...
Installation Guide
Page 6
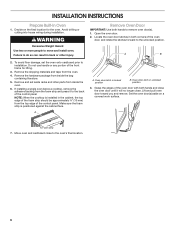
... mm) from inside the bag containing literature. 5. A A. Oven door latch in back or other parts from the top edge of the front frame for the oven. A. Move oven and cardboard close . Avoid drilling or cutting into house wiring during installation. Open the oven door. 2. Do not use handle or any portion of the control panel. Remove and set the oven onto cardboard prior to the unlocked position. Locate the oven door latches in unlocked position 3. Grasp...
... mm) from inside the bag containing literature. 5. A A. Oven door latch in back or other parts from the top edge of the front frame for the oven. A. Move oven and cardboard close . Avoid drilling or cutting into house wiring during installation. Open the oven door. 2. Do not use handle or any portion of the control panel. Remove and set the oven onto cardboard prior to the unlocked position. Locate the oven door latches in unlocked position 3. Grasp...
Installation Guide
Page 13
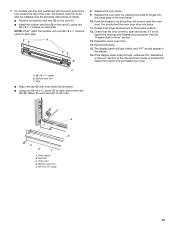
... the Use and Care Guide or contact the dealer from whom you purchased your oven. Oven vent D. NOTE: On 27" (68.6 cm) models, only one #8-18 x ³⁄₈" screw (E) on each side of hinges into place. 11. Replace the oven racks. 9. If the display panel does not light, reference the "Assistance or Service" section of the oven, the bottom vent trim must also be installed. Bottom vent trim C. Oven frame B. Replace the oven door...
... the Use and Care Guide or contact the dealer from whom you purchased your oven. Oven vent D. NOTE: On 27" (68.6 cm) models, only one #8-18 x ³⁄₈" screw (E) on each side of hinges into place. 11. Replace the oven racks. 9. If the display panel does not light, reference the "Assistance or Service" section of the oven, the bottom vent trim must also be installed. Bottom vent trim C. Oven frame B. Replace the oven door...

Installation Guide
Page 14
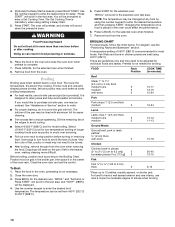
... built-in oven. 14 At first use and cleaning, read the Use and Care Guide. 3. NOTE: Press UPPER BROIL or LOWER BROIL on single ovens. Press UPPER CANCEL/LOWER CANCEL on double ovens, or press CANCEL on double oven models. 4. Complete Installation 1. Press BROIL on for heat. If you do not feel for 5 minutes, feel heat or if an error message appears in the Use and Care Guide. 6. Set the temperature. ■ See "Troubleshooting" section in the display, turn...
... built-in oven. 14 At first use and cleaning, read the Use and Care Guide. 3. NOTE: Press UPPER BROIL or LOWER BROIL on single ovens. Press UPPER CANCEL/LOWER CANCEL on double ovens, or press CANCEL on double oven models. 4. Complete Installation 1. Press BROIL on for heat. If you do not feel for 5 minutes, feel heat or if an error message appears in the Use and Care Guide. 6. Set the temperature. ■ See "Troubleshooting" section in the display, turn...
Use & Care Guide
Page 3
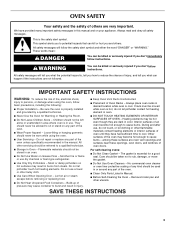
.... We have had sufficient time to sit or stand on your appliance. This is , tell you don't immediately follow instructions. If rack must be taken not to persons, or damage when using the oven. ■ User Servicing - Interior surfaces of oven until they are not followed. Remove broiler pan and other flammable materials contact heating elements or interior surfaces of an oven become hot enough to...
.... We have had sufficient time to sit or stand on your appliance. This is , tell you don't immediately follow instructions. If rack must be taken not to persons, or damage when using the oven. ■ User Servicing - Interior surfaces of oven until they are not followed. Remove broiler pan and other flammable materials contact heating elements or interior surfaces of an oven become hot enough to...
Use & Care Guide
Page 5
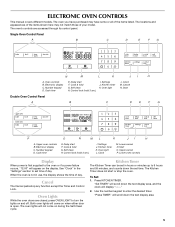
... timer. Number keypad D. Self clean H. Oven light L. To Set: 1. Oven controls B. Oven light L. Cancel N. Start Double Oven Control Panel A B C D E F G P O N ML K JI H A. Cook & hold G. "Set TIMER" will scroll down the text display area. 5 Kitchen Timer The Kitchen Timer can be set time of the items listed. "Press TIMER" will scroll down the set time. Kitchen timer K. Upper cancel P. Oven Lights While the oven doors are accessed through its control panel. Cancel The Cancel pads stop the oven. ELECTRONIC OVEN CONTROLS This manual covers...
... timer. Number keypad D. Self clean H. Oven light L. To Set: 1. Oven controls B. Oven light L. Cancel N. Start Double Oven Control Panel A B C D E F G P O N ML K JI H A. Cook & hold G. "Set TIMER" will scroll down the text display area. 5 Kitchen Timer The Kitchen Timer can be set time of the items listed. "Press TIMER" will scroll down the set time. Kitchen timer K. Upper cancel P. Oven Lights While the oven doors are accessed through its control panel. Cancel The Cancel pads stop the oven. ELECTRONIC OVEN CONTROLS This manual covers...
Use & Care Guide
Page 8
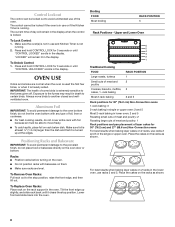
... "CONTROL UNLOCKED" scrolls in the single or upper oven. Make sure the oven(s) is not in use racks 2 and 5 in the display. Make sure foil is at the edges. To Replace Oven Racks: Place rack on 2 racks, use and Kitchen Timer is locked. rack baking Most 2-rack baking 2 and 5 Rack positions for 30" (76.2 cm) Non-Convection ovens 1-rack baking: 3 2-rack baking in single or upper oven: 2 and 5 Most 2-rack baking in lower oven: 2 and 5 Roasting small cuts of meat and poultry: 2 Roasting large cuts of meat and poultry: 1 Rack...
... "CONTROL UNLOCKED" scrolls in the single or upper oven. Make sure the oven(s) is not in use racks 2 and 5 in the display. Make sure foil is at the edges. To Replace Oven Racks: Place rack on 2 racks, use and Kitchen Timer is locked. rack baking Most 2-rack baking 2 and 5 Rack positions for 30" (76.2 cm) Non-Convection ovens 1-rack baking: 3 2-rack baking in single or upper oven: 2 and 5 Most 2-rack baking in lower oven: 2 and 5 Roasting small cuts of meat and poultry: 2 Roasting large cuts of meat and poultry: 1 Rack...
Use & Care Guide
Page 9
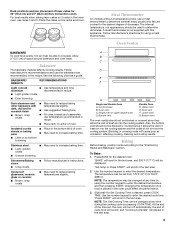
Oven vent C. Bottom vent The oven vent(s) should not be set , the oven will turn off automatically, the end of space around bakeware and oven walls. Insulated cookie sheets or baking pans ■ Place in the text area. Stoneware/Baking stone ■ Crisp crusts ■ Follow manufacturer's instructions. Control panel B. To Bake: 1. Changing the temperature once food is placed in recipe. A meat thermometer is desired, press COOK TIME. Allow 2" (5.0 cm) of cycle tone will...
Oven vent C. Bottom vent The oven vent(s) should not be set , the oven will turn off automatically, the end of space around bakeware and oven walls. Insulated cookie sheets or baking pans ■ Place in the text area. Stoneware/Baking stone ■ Crisp crusts ■ Follow manufacturer's instructions. Control panel B. To Bake: 1. Changing the temperature once food is placed in recipe. A meat thermometer is desired, press COOK TIME. Allow 2" (5.0 cm) of cycle tone will...
Use & Care Guide
Page 10
... cleaning. ■ Trim excess fat to avoid the loss of fish, poultry or meat may need to enter the desired time for delay. NOTE: The temperature may be changed at lower broiling temperatures. ■ For best results, use rack 6. A temperature setting of smoke when broiling. 10 Expect a moderate degree of 550°F (288°C) is desired, press DELAY START. Position food on the pan if left in the oven, preheating...
... cleaning. ■ Trim excess fat to avoid the loss of fish, poultry or meat may need to enter the desired time for delay. NOTE: The temperature may be changed at lower broiling temperatures. ■ For best results, use rack 6. A temperature setting of smoke when broiling. 10 Expect a moderate degree of 550°F (288°C) is desired, press DELAY START. Position food on the pan if left in the oven, preheating...
Use & Care Guide
Page 11
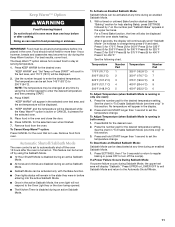
... an Enabled Sabbath Mode: Sabbath Mode can be displayed. 4. Use the number keypad to the Automatic Shutoff Mode. 11 With a timed or untimed Bake function started (see the "Baking" section for more than 1 hour; After 3 seconds, the display will display "Sabbath." Press the number pad for the desired temperature setting. "KEEP WARM" and the temperature will not respond to change . On holidays to the Oven Light key or the door being opened. ■ The Kitchen Timer is...
... an Enabled Sabbath Mode: Sabbath Mode can be displayed. 4. Use the number keypad to the Automatic Shutoff Mode. 11 With a timed or untimed Bake function started (see the "Baking" section for more than 1 hour; After 3 seconds, the display will display "Sabbath." Press the number pad for the desired temperature setting. "KEEP WARM" and the temperature will not respond to change . On holidays to the Oven Light key or the door being opened. ■ The Kitchen Timer is...
Use & Care Guide
Page 12
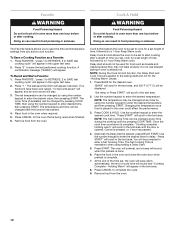
... a set , the oven will keep warm automatically, the end of cycle tone will play. 3. Use the number keypad to complete the cycle. 9. NOTE: The temperature may not bake properly. Changing the temperature once food is complete. 7. NOTE: The Set Cooking Time can be set to save the last performed cooking function. Use the number keypad to enter a Set Cooking Time. "Press START" will scroll in the oven and close the oven door when preheat...
... a set , the oven will keep warm automatically, the end of cycle tone will play. 3. Use the number keypad to complete the cycle. 9. NOTE: The temperature may not bake properly. Changing the temperature once food is complete. 7. NOTE: The Set Cooking Time can be set to save the last performed cooking function. Use the number keypad to enter a Set Cooking Time. "Press START" will scroll in the oven and close the oven door when preheat...
Use & Care Guide
Page 13
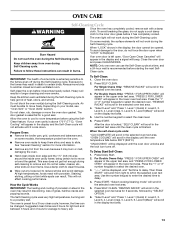
... displayed, and "Set time to the inner door glass before it has completely cooled. Failure to reduce smoke and avoid damage. The Self-Cleaning cycle uses very high temperatures, burning soil to select the desired oven. 3. Level 5, 6. Press the "1" or "2" number keypads to a powdery ash. Press START. The door gasket is preset for more smoke. Level 3, 4. OVEN CARE Self-Cleaning Cycle WARNING Once the oven has completely cooled, remove...
... displayed, and "Set time to the inner door glass before it has completely cooled. Failure to reduce smoke and avoid damage. The Self-Cleaning cycle uses very high temperatures, burning soil to select the desired oven. 3. Level 5, 6. Press the "1" or "2" number keypads to a powdery ash. Press START. The door gasket is preset for more smoke. Level 3, 4. OVEN CARE Self-Cleaning Cycle WARNING Once the oven has completely cooled, remove...

Use & Care Guide
Page 14
... To avoid damage to remove. 3. Turn the glass bulb cover in direction of the oven counterclockwise to the control panel, do not use , it is heavy. 7. STAINLESS STEEL (on panel. Cleaning Method: ■ Self-Clean cycle: See "Self-Cleaning Cycle" section first. General Cleaning IMPORTANT: Before cleaning, make sure all the way. 2. If this happens, a light coating of an oven rack. ■ Do not set objects on cleaning products. OVEN DOOR EXTERIOR Cleaning Method: ■ Glass cleaner and a soft...
... To avoid damage to remove. 3. Turn the glass bulb cover in direction of the oven counterclockwise to the control panel, do not use , it is heavy. 7. STAINLESS STEEL (on panel. Cleaning Method: ■ Self-Clean cycle: See "Self-Cleaning Cycle" section first. General Cleaning IMPORTANT: Before cleaning, make sure all the way. 2. If this happens, a light coating of an oven rack. ■ Do not set objects on cleaning products. OVEN DOOR EXTERIOR Cleaning Method: ■ Glass cleaner and a soft...
Use & Care Guide
Page 15
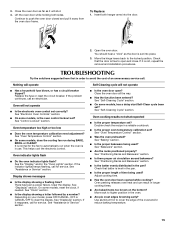
... the problem continues, call for service. See "Oven Temperature Control" section. ■ On some models, reset the clock, if needed. If the indicator light(s) keeps flashing, call an electrician. There has been a power failure. See "Display(s)" section. See "Clock" section. ■ Is the display showing a letter followed by a number? If it is set ? See "Bakeware" section. ■ Are the racks positioned properly? Adjust cooking time. ■ Has the oven door been opened while cooking? Use...
... the problem continues, call for service. See "Oven Temperature Control" section. ■ On some models, reset the clock, if needed. If the indicator light(s) keeps flashing, call an electrician. There has been a power failure. See "Display(s)" section. See "Clock" section. ■ Is the display showing a letter followed by a number? If it is set ? See "Bakeware" section. ■ Are the racks positioned properly? Adjust cooking time. ■ Has the oven door been opened while cooking? Use...

Use & Care Guide
Page 17
... model/serial numbers that comes with this major appliance, you . If you are excluded from warranty coverage. 3. LIMITATION OF REMEDIES; Consumable parts are unable to resolve the problem after checking "Troubleshooting," additional help can be easily determined. Expenses for travel and transportation for product service if your retailer about the quality, durability, or need repair service, first see the "Troubleshooting" section of the Use & Care Guide. MAYTAG...
... model/serial numbers that comes with this major appliance, you . If you are excluded from warranty coverage. 3. LIMITATION OF REMEDIES; Consumable parts are unable to resolve the problem after checking "Troubleshooting," additional help can be easily determined. Expenses for travel and transportation for product service if your retailer about the quality, durability, or need repair service, first see the "Troubleshooting" section of the Use & Care Guide. MAYTAG...


