Warranty Information
Page 1
...instructions. 4. This warranty gives you specific legal rights, and you . In Canada, call 1-800-688-9900. MAYTAG® BUILT-IN ELECTRIC OVEN WARRANTY FIRST YEAR LIMITED WARRANTY (PARTS AND LABOR) For one year from the date of purchase, when this major appliance is effective from the date... located in a manner that is installed, operated and maintained according to instructions attached to or furnished with the product, Maytag will pay for factory specified parts for product service if your major appliance, to replace or repair house fuses, or to correct non-cosmetic defects in ...
...instructions. 4. This warranty gives you specific legal rights, and you . In Canada, call 1-800-688-9900. MAYTAG® BUILT-IN ELECTRIC OVEN WARRANTY FIRST YEAR LIMITED WARRANTY (PARTS AND LABOR) For one year from the date of purchase, when this major appliance is effective from the date... located in a manner that is installed, operated and maintained according to instructions attached to or furnished with the product, Maytag will pay for factory specified parts for product service if your major appliance, to replace or repair house fuses, or to correct non-cosmetic defects in ...
Installation Guide
Page 1
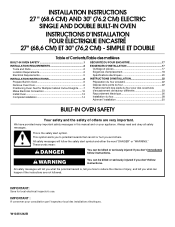
... ET DOUBLE Table of Contents/Table des matières BUILT-IN OVEN SAFETY 1 SÉCURITÉ DU FOUR ENCASTR 17 INSTALLATION REQUIREMENTS 2 Tools and Parts 2 Location Requirements 2 Electrical Requirements 5 INSTALLATION INSTRUCTIONS 6 Prepare Built-In Oven 6 Remove Oven Door 6 Positioning Oven Feet for local electrical inspector's use. This symbol alerts you...
... ET DOUBLE Table of Contents/Table des matières BUILT-IN OVEN SAFETY 1 SÉCURITÉ DU FOUR ENCASTR 17 INSTALLATION REQUIREMENTS 2 Tools and Parts 2 Location Requirements 2 Electrical Requirements 5 INSTALLATION INSTRUCTIONS 6 Prepare Built-In Oven 6 Remove Oven Door 6 Positioning Oven Feet for local electrical inspector's use. This symbol alerts you...

Installation Guide
Page 2
... above): Ovens approved for this type of installation have been drilled in a wall cabinet. INSTALLATION REQUIREMENTS Tools and Parts Gather the required tools and parts before starting installation. double oven feet ■ Bottom vent ■ Bottom vent trim ■ Two feet -..., check with your builder or cabinet supplier to undercounter installation instructions for wall cabinet installations) ■ Level ■ Flat-blade screwdriver Parts needed ■ Phillips screwdriver ■ Measuring tape ■ Hand or electric drill (for wall cabinet installations) ■ 1" (2.5...
... above): Ovens approved for this type of installation have been drilled in a wall cabinet. INSTALLATION REQUIREMENTS Tools and Parts Gather the required tools and parts before starting installation. double oven feet ■ Bottom vent ■ Bottom vent trim ■ Two feet -..., check with your builder or cabinet supplier to undercounter installation instructions for wall cabinet installations) ■ Level ■ Flat-blade screwdriver Parts needed ■ Phillips screwdriver ■ Measuring tape ■ Hand or electric drill (for wall cabinet installations) ■ 1" (2.5...

Installation Guide
Page 5
... and the wire gauge are in conformance with the National Electrical Code, ANSI/ NFPA 70-latest edition or CSA Standards C22.1-94, Canadian Electrical Code, Part 1 and C22.2 No. Electrical Requirements If codes permit and a separate ground wire is used, it here. Check with a qualified electrical installer if you will be...
... and the wire gauge are in conformance with the National Electrical Code, ANSI/ NFPA 70-latest edition or CSA Standards C22.1-94, Canadian Electrical Code, Part 1 and C22.2 No. Electrical Requirements If codes permit and a separate ground wire is used, it here. Check with a qualified electrical installer if you will be...
Installation Guide
Page 6
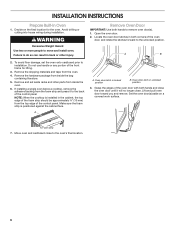
... B. Remove the hardware package from inside the oven. 6. NOTE: When the cooktop is positioned against the cabinet face. A A. Oven door latch in back or other parts from the foam strip and press it will no longer close. A. INSTALLATION INSTRUCTIONS Prepare Built-In Oven 1. Locate the oven door latches in unlocked position...
... B. Remove the hardware package from inside the oven. 6. NOTE: When the cooktop is positioned against the cabinet face. A A. Oven door latch in back or other parts from the foam strip and press it will no longer close. A. INSTALLATION INSTRUCTIONS Prepare Built-In Oven 1. Locate the oven door latches in unlocked position...

Installation Guide
Page 14
If oven(s) does not operate, check the following: ■ Household fuse is an extra part, go back through the steps to see which step was skipped. 2. At first use and cleaning, read the Use and Care Guide. 3. Set the temperature. &#... clock and any other preferences if available. When oven has been on for heat. Dispose of Single and Double Ovens 1. Check Operation of /recycle all parts are now installed. Press BROIL on . 2. If you need Assistance or Service: Please reference the "Assistance or Service" section of your built-in the Use...
If oven(s) does not operate, check the following: ■ Household fuse is an extra part, go back through the steps to see which step was skipped. 2. At first use and cleaning, read the Use and Care Guide. 3. Set the temperature. &#... clock and any other preferences if available. When oven has been on for heat. Dispose of Single and Double Ovens 1. Check Operation of /recycle all parts are now installed. Press BROIL on . 2. If you need Assistance or Service: Please reference the "Assistance or Service" section of your built-in the Use...
Use & Care Guide
Page 3
... of oven until they are not followed. Moist or damp potholders on Grease Fires - Always place oven racks in this manual and on any part of any kind should never be hot even though they have provided many important safety messages in desired location while oven is the safety alert... risk of fire, electrical shock, injury to potential hazards that can be used in or around any part of the oven. ■ Clean Only Parts Listed in burns from steam. Do not repair or replace any part of the oven. ■ Wear Proper Apparel - Do not let potholder touch hot heating elements....
... of oven until they are not followed. Moist or damp potholders on Grease Fires - Always place oven racks in this manual and on any part of any kind should never be hot even though they have provided many important safety messages in desired location while oven is the safety alert... risk of fire, electrical shock, injury to potential hazards that can be used in or around any part of the oven. ■ Clean Only Parts Listed in burns from steam. Do not repair or replace any part of the oven. ■ Wear Proper Apparel - Do not let potholder touch hot heating elements....
Use & Care Guide
Page 4
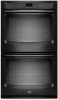
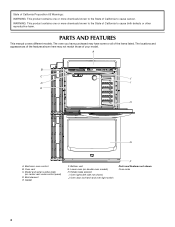
... of the features shown here may have purchased may not match those of the items listed. Electronic oven control B. Oven lights (left side not shown) J. PARTS AND FEATURES This manual covers different models. Lower oven (on center vent under control panel) D. Bottom vent G. Oven door lock latch and oven light switch...
... of the features shown here may have purchased may not match those of the items listed. Electronic oven control B. Oven lights (left side not shown) J. PARTS AND FEATURES This manual covers different models. Lower oven (on center vent under control panel) D. Bottom vent G. Oven door lock latch and oven light switch...

Use & Care Guide
Page 16
... Whirlpool Canada LP Customer eXperience Centre toll free 1-800-807-6777 or visit our website at www.maytag.com/cookingaccessories. This information will fit right and work right because they are trained to order replacement parts, we recommend that you still need to fulfill the product warranty and provide after -warranty service...
... Whirlpool Canada LP Customer eXperience Centre toll free 1-800-807-6777 or visit our website at www.maytag.com/cookingaccessories. This information will fit right and work right because they are trained to order replacement parts, we recommend that you still need to fulfill the product warranty and provide after -warranty service...

Use & Care Guide
Page 17
..., or to correct house wiring or plumbing. 2. In the U.S.A., call 1-800-807-6777. 1/12 17 MAYTAG® BUILT-IN ELECTRIC OVEN WARRANTY FIRST YEAR LIMITED WARRANTY (PARTS AND LABOR) For one year from the date of purchase, when this major appliance is installed, operated and...in materials or workmanship that existed when this major appliance was purchased. SECOND THROUGH TENTH YEAR LIMITED WARRANTY (CERTAIN COMPONENT PARTS ONLY - This is covered by Maytag. 5. Service must be easily determined. Expenses for travel and transportation for other rights that vary from state to ...
..., or to correct house wiring or plumbing. 2. In the U.S.A., call 1-800-807-6777. 1/12 17 MAYTAG® BUILT-IN ELECTRIC OVEN WARRANTY FIRST YEAR LIMITED WARRANTY (PARTS AND LABOR) For one year from the date of purchase, when this major appliance is installed, operated and...in materials or workmanship that existed when this major appliance was purchased. SECOND THROUGH TENTH YEAR LIMITED WARRANTY (CERTAIN COMPONENT PARTS ONLY - This is covered by Maytag. 5. Service must be easily determined. Expenses for travel and transportation for other rights that vary from state to ...

