Warranty Information
Page 1
... ALLOWED BY LAW. Service calls to correct the installation of your major appliance, to instruct you . Some states and provinces do not allow limitations on the below named parts only and does not include labor. ■ Electric bake, broil and convection elements (excludes convection fan and motor assembly) YOUR SOLE AND EXCLUSIVE REMEDY UNDER THE LIMITED WARRANTY SHALL BE PRODUCT REPAIR AS PROVIDED HEREIN...
... ALLOWED BY LAW. Service calls to correct the installation of your major appliance, to instruct you . Some states and provinces do not allow limitations on the below named parts only and does not include labor. ■ Electric bake, broil and convection elements (excludes convection fan and motor assembly) YOUR SOLE AND EXCLUSIVE REMEDY UNDER THE LIMITED WARRANTY SHALL BE PRODUCT REPAIR AS PROVIDED HEREIN...
Energy Guide
Page 1
The model/serial number rating plate is located under the control panel on single ovens and under the control panel on the upper oven cavity on the model/serial number rating plate. q A circuit breaker is for serviceability of 2 Dimensions are for joining copper to aluminum. q A UL listed or CSA approved conduit connector must be using special connectors and/or tools designed and UL listed for planning purposes only. Connect a section of solid copper wire to 7.4 kW at 240...
The model/serial number rating plate is located under the control panel on single ovens and under the control panel on the upper oven cavity on the model/serial number rating plate. q A circuit breaker is for serviceability of 2 Dimensions are for joining copper to aluminum. q A UL listed or CSA approved conduit connector must be using special connectors and/or tools designed and UL listed for planning purposes only. Connect a section of solid copper wire to 7.4 kW at 240...
Installation Guide
Page 1
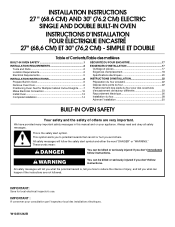
SIMPLE ET DOUBLE Table of Contents/Table des matières BUILT-IN OVEN SAFETY 1 SÉCURITÉ DU FOUR ENCASTR 17 INSTALLATION REQUIREMENTS 2 Tools and Parts 2 Location Requirements 2 Electrical Requirements 5 INSTALLATION INSTRUCTIONS 6 Prepare Built-In Oven 6 Remove Oven Door 6 Positioning Oven Feet for local electrical inspector's use. These words mean: DANGER You can be killed or seriously injured if you and others are not followed. This is , tell you how...
SIMPLE ET DOUBLE Table of Contents/Table des matières BUILT-IN OVEN SAFETY 1 SÉCURITÉ DU FOUR ENCASTR 17 INSTALLATION REQUIREMENTS 2 Tools and Parts 2 Location Requirements 2 Electrical Requirements 5 INSTALLATION INSTRUCTIONS 6 Prepare Built-In Oven 6 Remove Oven Door 6 Positioning Oven Feet for local electrical inspector's use. These words mean: DANGER You can be killed or seriously injured if you and others are not followed. This is , tell you how...

Installation Guide
Page 2
... "Electrical Requirements" section. ■ Electrical supply junction box should have an approval label located on rear wall behind oven, it is recommended that the materials used . See "Electrical Requirements." INSTALLATION REQUIREMENTS Tools and Parts Gather the required tools and parts before starting installation. Check existing electrical supply. It is recommended that are installing the junction box on the top of 194°F (90°C). Location Requirements IMPORTANT: Observe all electrical connections be able to support a double oven weight...
... "Electrical Requirements" section. ■ Electrical supply junction box should have an approval label located on rear wall behind oven, it is recommended that the materials used . See "Electrical Requirements." INSTALLATION REQUIREMENTS Tools and Parts Gather the required tools and parts before starting installation. Check existing electrical supply. It is recommended that are installing the junction box on the top of 194°F (90°C). Location Requirements IMPORTANT: Observe all electrical connections be able to support a double oven weight...
Installation Guide
Page 4
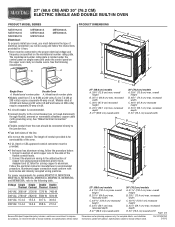
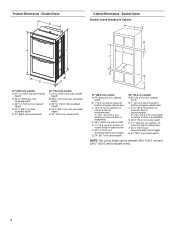
...) min. Double Ovens Double Ovens Installed in Cabinet A A C B D F E D 27" (68.6 cm) models A. 51 130.0 cm) max. recessed depth E. 30" (76.2 cm) overall width G E C 27" (68.6 cm) models A. 27" (68.6 cm) min. D. 28¹⁄₂" (72.4 cm) cutout width E. 1¹⁄₂" (3.8 cm) min. Product Dimensions - overall height B. 25 64.6 cm) max. cabinet width B. 1" (2.5 cm) top of cutout to bottom of upper cabinet door C. 14³...
...) min. Double Ovens Double Ovens Installed in Cabinet A A C B D F E D 27" (68.6 cm) models A. 51 130.0 cm) max. recessed depth E. 30" (76.2 cm) overall width G E C 27" (68.6 cm) models A. 27" (68.6 cm) min. D. 28¹⁄₂" (72.4 cm) cutout width E. 1¹⁄₂" (3.8 cm) min. Product Dimensions - overall height B. 25 64.6 cm) max. cabinet width B. 1" (2.5 cm) top of cutout to bottom of upper cabinet door C. 14³...

Installation Guide
Page 5
... tools designed and UL listed for serviceability of electrical connection you will be using and follow the procedure below at 208 volts) require a separate 40-amp circuit. Connect the aluminum wiring to the following table. Voltage Single Single Thermal Convect Double Double Thermal Convect 240 VAC 4090 W 4120 W 8170 W 8200 W 208 VAC 3099 W 3122 W 6190 W 6212 W 240 VAC 17.1 A 17.2 A 34.1 A 34.2 A Single Oven Double Oven A. Model/serial number plate ■ Models rated from 7.3 to 9 kW...
... tools designed and UL listed for serviceability of electrical connection you will be using and follow the procedure below at 208 volts) require a separate 40-amp circuit. Connect the aluminum wiring to the following table. Voltage Single Single Thermal Convect Double Double Thermal Convect 240 VAC 4090 W 4120 W 8170 W 8200 W 208 VAC 3099 W 3122 W 6190 W 6212 W 240 VAC 17.1 A 17.2 A 34.1 A 34.2 A Single Oven Double Oven A. Model/serial number plate ■ Models rated from 7.3 to 9 kW...
Installation Guide
Page 6
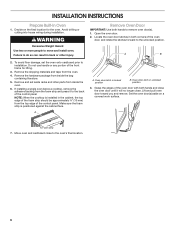
... the oven. Oven door latch in unlocked position 3. Avoid drilling or cutting into house wiring during installation. To avoid floor damage, set aside racks and other injury. Lift and pull oven door toward you and remove. NOTE: When the cooktop is positioned against the cabinet face. Grasp the edges of the control panel. INSTALLATION INSTRUCTIONS Prepare Built-In Oven 1. Decide on a covered work surface. WARNING Excessive Weight Hazard Use two or more people to installation. Remove Oven Door IMPORTANT: Use...
... the oven. Oven door latch in unlocked position 3. Avoid drilling or cutting into house wiring during installation. To avoid floor damage, set aside racks and other injury. Lift and pull oven door toward you and remove. NOTE: When the cooktop is positioned against the cabinet face. Grasp the edges of the control panel. INSTALLATION INSTRUCTIONS Prepare Built-In Oven 1. Decide on a covered work surface. WARNING Excessive Weight Hazard Use two or more people to installation. Remove Oven Door IMPORTANT: Use...
Installation Guide
Page 13
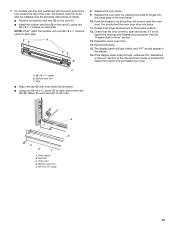
... the hinges in the oven frame. 10. C A. #8-18 x ¹⁄₄" screw B. Replace the oven racks. 9. See the "Prepare Built-In Oven" section. 13. 7. A B 8. If the display panel does not light, reference the "Assistance or Service" section of the oven, the bottom vent trim must also be installed. Vent ■ Align vent tab (B) with the short side of the foot toward the top of the Use and Care Guide or...
... the hinges in the oven frame. 10. C A. #8-18 x ¹⁄₄" screw B. Replace the oven racks. 9. See the "Prepare Built-In Oven" section. 13. 7. A B 8. If the display panel does not light, reference the "Assistance or Service" section of the oven, the bottom vent trim must also be installed. Vent ■ Align vent tab (B) with the short side of the foot toward the top of the Use and Care Guide or...

Installation Guide
Page 14
... heat or if an error message appears in the Use and Care Guide. 6. NOTE: Press UPPER BROIL or LOWER BROIL on . 2. For oven use , set up the clock and any other preferences if available. Press START. Turn power on double oven models. 4. Complete Installation 1. If there is connected. Dispose of Single and Double Ovens 1. If oven(s) does not operate, check the following: ■ Household fuse is intact and tight; Set the temperature. ■ See "Troubleshooting" section in the display, turn...
... heat or if an error message appears in the Use and Care Guide. 6. NOTE: Press UPPER BROIL or LOWER BROIL on . 2. For oven use , set up the clock and any other preferences if available. Press START. Turn power on double oven models. 4. Complete Installation 1. If there is connected. Dispose of Single and Double Ovens 1. If oven(s) does not operate, check the following: ■ Household fuse is intact and tight; Set the temperature. ■ See "Troubleshooting" section in the display, turn...
Use & Care Guide
Page 3
... servicing should be hot even though they have provided many important safety messages in this manual and on any part of the oven. ■ Clean Only Parts Listed in oven. ■ DO NOT TOUCH HEATING ELEMENTS OR INTERIOR SURFACES OF OVEN - The gasket is properly installed and grounded by a qualified technician. ■ Never Use the Oven for a good seal. All other bulky cloth. ■ Use Care When Opening Door - Heating elements...
... servicing should be hot even though they have provided many important safety messages in this manual and on any part of the oven. ■ Clean Only Parts Listed in oven. ■ DO NOT TOUCH HEATING ELEMENTS OR INTERIOR SURFACES OF OVEN - The gasket is properly installed and grounded by a qualified technician. ■ Never Use the Oven for a good seal. All other bulky cloth. ■ Use Care When Opening Door - Heating elements...
Use & Care Guide
Page 5
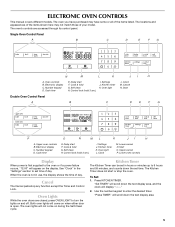
... use, the display shows the time of day. Cook & hold G. Cook & hold G. Self clean H. Clock M. Start Double Oven Control Panel A B C D E F G P O N ML K JI H A. Number keypad D. Kitchen timer K. Upper cancel P. Control lock (hold 3 sec.) I . To Set: 1. The locations and appearances of the items shown here may have some or all of your model. The oven you have purchased may not match those of the items listed. Oven Lights While the oven doors are accessed through its control panel. ELECTRONIC OVEN CONTROLS This manual covers different models...
... use, the display shows the time of day. Cook & hold G. Cook & hold G. Self clean H. Clock M. Start Double Oven Control Panel A B C D E F G P O N ML K JI H A. Number keypad D. Kitchen timer K. Upper cancel P. Control lock (hold 3 sec.) I . To Set: 1. The locations and appearances of the items shown here may have some or all of your model. The oven you have purchased may not match those of the items listed. Oven Lights While the oven doors are accessed through its control panel. ELECTRONIC OVEN CONTROLS This manual covers different models...
Use & Care Guide
Page 8
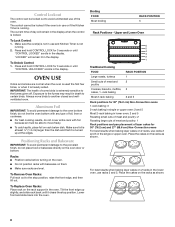
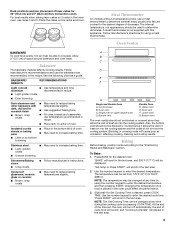
... the display. Make sure foil is at the edges. To Remove Oven Racks: Pull rack out to the stop position. To Replace Oven Racks: Place rack on the rack support in use or if the Kitchen Timer is running . 2. Broiling FOOD Most broiling RACK POSITION 5 Rack Positions - rack baking Most 2-rack baking 2 and 5 Rack positions for 30" (76.2 cm) Non-Convection ovens 1-rack baking: 3 2-rack baking in single or upper oven: 2 and 5 Most 2-rack baking in lower oven: 2 and 5 Roasting small cuts of meat and poultry: 2 Roasting large cuts of meat...
... the display. Make sure foil is at the edges. To Remove Oven Racks: Pull rack out to the stop position. To Replace Oven Racks: Place rack on the rack support in use or if the Kitchen Timer is running . 2. Broiling FOOD Most broiling RACK POSITION 5 Rack Positions - rack baking Most 2-rack baking 2 and 5 Rack positions for 30" (76.2 cm) Non-Convection ovens 1-rack baking: 3 2-rack baking in single or upper oven: 2 and 5 Most 2-rack baking in lower oven: 2 and 5 Roasting small cuts of meat and poultry: 2 Roasting large cuts of meat...
Use & Care Guide
Page 9
... third of hot air from 170°F (77°C) to increase baking time. NOTE: The temperature may be changed at any time by pressing COOK TIME. Rack positions and pan placement of layer cakes for 30" (76.2 cm) and 27" (68.6 cm) Non-Convection ovens For best results when baking layer cakes on the racks as a guide. Meat Thermometer On models without a temperature probe, use the bakeware size recommended in the...
... third of hot air from 170°F (77°C) to increase baking time. NOTE: The temperature may be changed at any time by pressing COOK TIME. Rack positions and pan placement of layer cakes for 30" (76.2 cm) and 27" (68.6 cm) Non-Convection ovens For best results when baking layer cakes on the racks as a guide. Meat Thermometer On models without a temperature probe, use the bakeware size recommended in the...
Use & Care Guide
Page 10
...;C) Times are best using setting a Delay Start. 5. See "Assistance or Service" section to order. ■ For proper draining, do not cover the grid with aluminum foil for most broiling. Drippings will be turned. ■ After broiling, remove the pan from 450°F (232°C) to cook food. Before broiling, position rack according to have a well seared exterior and rare interior, use a broiler pan and grid (not provided). To Broil: 1. "BROIL" and "Set temp...
...;C) Times are best using setting a Delay Start. 5. See "Assistance or Service" section to order. ■ For proper draining, do not cover the grid with aluminum foil for most broiling. Drippings will be turned. ■ After broiling, remove the pan from 450°F (232°C) to cook food. Before broiling, position rack according to have a well seared exterior and rare interior, use a broiler pan and grid (not provided). To Broil: 1. "BROIL" and "Set temp...
Use & Care Guide
Page 11
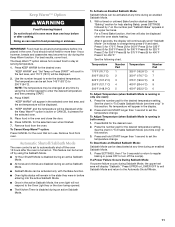
... an Enabled Sabbath Mode: Sabbath Mode can be deactivated at any time by using the number keypad to the Oven Light key or the door being opened. ■ The Kitchen Timer is disabled during an active Sabbath Mode. ■ All tones and chimes are disabled during an active Sabbath Mode. See the following chart. No temperature will continuously scroll "Sabbath Mode- "KEEP WARM" and the temperature will be changed at any time during the...
... an Enabled Sabbath Mode: Sabbath Mode can be deactivated at any time by using the number keypad to the Oven Light key or the door being opened. ■ The Kitchen Timer is disabled during an active Sabbath Mode. ■ All tones and chimes are disabled during an active Sabbath Mode. See the following chart. No temperature will continuously scroll "Sabbath Mode- "KEEP WARM" and the temperature will be changed at any time during the...
Use & Care Guide
Page 12
... they may be displayed. A confirmation message ("SAVED") will play. 3. If no functions have been ever saved, "no favourite saved" will appear, and an error sound will appear. Press CANCEL for a set to be set temperature can be used when finished. 6. "Press START" will scroll in the oven and close the oven door when preheat is complete, "Cooking complete Holding warm" will scroll in...
... they may be displayed. A confirmation message ("SAVED") will play. 3. If no functions have been ever saved, "no favourite saved" will appear, and an error sound will appear. Press CANCEL for a set to be set temperature can be used when finished. 6. "Press START" will scroll in the oven and close the oven door when preheat is complete, "Cooking complete Holding warm" will scroll in...
Use & Care Guide
Page 13
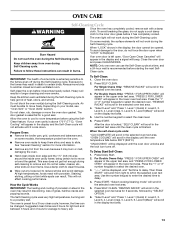
... to follow these instructions can be changed. To Self-Clean: 1. Level 4 (reg), 5. Use the number keypad to delay. 4. "--:--" will scroll in the selected oven text area for more smoke. "REMOVE RACKS" will not work during the Self-Cleaning cycle. On some models, the surface elements will scroll in the selected oven text area. Do not clean, rub, damage or move birds to the inner door glass before starting the next...
... to follow these instructions can be changed. To Self-Clean: 1. Level 4 (reg), 5. Use the number keypad to delay. 4. "--:--" will scroll in the selected oven text area for more smoke. "REMOVE RACKS" will not work during the Self-Cleaning cycle. On some models, the surface elements will scroll in the selected oven text area. Do not clean, rub, damage or move birds to the inner door glass before starting the next...

Use & Care Guide
Page 14
.... Replace bulb, then bulb cover by turning clockwise. 5. Remove racks, or they will be cleaned when oven cools. Before replacing, make sure the oven and cooktop are cool and the control knobs are suggested to the control panel, do not use abrasive cleaners, steel-wool pads, gritty washcloths or abrasive paper towels. Use the number keypad to avoid touch screen activation during cleaning. To avoid damage to remove the oven door. Reconnect power. Oven Door...
.... Replace bulb, then bulb cover by turning clockwise. 5. Remove racks, or they will be cleaned when oven cools. Before replacing, make sure the oven and cooktop are cool and the control knobs are suggested to the control panel, do not use abrasive cleaners, steel-wool pads, gritty washcloths or abrasive paper towels. Use the number keypad to avoid touch screen activation during cleaning. To avoid damage to remove the oven door. Reconnect power. Oven Door...
Use & Care Guide
Page 15
... start Self-Clean cycle been set ? See "Assistance or Service" section. ■ Is the oven door open and close. Oven temperature too high or too low ■ Does the oven temperature calibration need adjustment? See "Display(s)" section. Lift the oven door while holding both hanger arms into place. 3. Open the oven door. Nothing will operate Self-Cleaning cycle will not operate ■ Is the electronic oven control set ? Adjust cooking time. ■ Has the oven door been opened while cooking? See "Oven Temperature Control" section. ■ On some models, reset...
... start Self-Clean cycle been set ? See "Assistance or Service" section. ■ Is the oven door open and close. Oven temperature too high or too low ■ Does the oven temperature calibration need adjustment? See "Display(s)" section. Lift the oven door while holding both hanger arms into place. 3. Open the oven door. Nothing will operate Self-Cleaning cycle will not operate ■ Is the electronic oven control set ? Adjust cooking time. ■ Has the oven door been opened while cooking? See "Oven Temperature Control" section. ■ On some models, reset...

Use & Care Guide
Page 17
..., single-family household use your retailer about the quality, durability, or need repair service, first see the "Troubleshooting" section of the Use & Care Guide. This is a limited 10-year warranty on how to use or when it is used in the country in which it is installed in an inaccessible location or is not installed in accordance with electrical or plumbing codes, or use of consumables or cleaning products not...
..., single-family household use your retailer about the quality, durability, or need repair service, first see the "Troubleshooting" section of the Use & Care Guide. This is a limited 10-year warranty on how to use or when it is used in the country in which it is installed in an inaccessible location or is not installed in accordance with electrical or plumbing codes, or use of consumables or cleaning products not...


