Warranty Information
Page 1
... or other rights that vary from the date of the Use & Care Guide. Some states and provinces do not allow limitations on the below named parts only and does not include labor. ■ Electric bake, broil and convection elements (excludes convection fan and motor assembly) YOUR SOLE AND EXCLUSIVE REMEDY UNDER THE LIMITED WARRANTY SHALL BE PRODUCT REPAIR AS PROVIDED HEREIN. Service calls to province.
... or other rights that vary from the date of the Use & Care Guide. Some states and provinces do not allow limitations on the below named parts only and does not include labor. ■ Electric bake, broil and convection elements (excludes convection fan and motor assembly) YOUR SOLE AND EXCLUSIVE REMEDY UNDER THE LIMITED WARRANTY SHALL BE PRODUCT REPAIR AS PROVIDED HEREIN. Service calls to province.
Energy Guide
Page 1
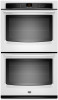
....2 CM) ELECTRIC SINGLE AND DOUBLE BUILT-IN OVEN PRODUCT MODEL SERIES PRODUCT DIMENSIONS MEW7527A MEW7627A MEW9527A MEW9627A MEW7530A MEW7630A MEW9530A MEW9630A Electrical: To properly install your oven, you will be using special connectors and/or tools designed and UL listed for joining copper to the circuit breaker box (or fused disconnect) through flexible, armored or nonmetallic sheathed, copper cable (with grounding wire). Model/serial number plate q Models rated from the oven should be connected directly to the proper electrical voltage...
....2 CM) ELECTRIC SINGLE AND DOUBLE BUILT-IN OVEN PRODUCT MODEL SERIES PRODUCT DIMENSIONS MEW7527A MEW7627A MEW9527A MEW9627A MEW7530A MEW7630A MEW9530A MEW9630A Electrical: To properly install your oven, you will be using special connectors and/or tools designed and UL listed for joining copper to the circuit breaker box (or fused disconnect) through flexible, armored or nonmetallic sheathed, copper cable (with grounding wire). Model/serial number plate q Models rated from the oven should be connected directly to the proper electrical voltage...
Installation Guide
Page 1
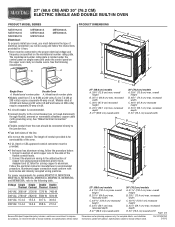
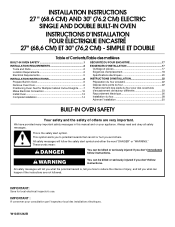
...) AND 30" (76.2 CM) ELECTRIC SINGLE AND DOUBLE BUILT-IN OVEN INSTRUCTIONS D'INSTALLATION FOUR ÉLECTRIQUE ENCASTRÉ 27" (68,6 CM) ET 30" (76,2 CM) - SIMPLE ET DOUBLE Table of Contents/Table des matières BUILT-IN OVEN SAFETY 1 SÉCURITÉ DU FOUR ENCASTR 17 INSTALLATION REQUIREMENTS 2 Tools and Parts 2 Location Requirements 2 Electrical Requirements 5 INSTALLATION INSTRUCTIONS 6 Prepare Built-In Oven 6 Remove Oven Door 6 Positioning Oven Feet for local electrical inspector's use. We have provided many...
...) AND 30" (76.2 CM) ELECTRIC SINGLE AND DOUBLE BUILT-IN OVEN INSTRUCTIONS D'INSTALLATION FOUR ÉLECTRIQUE ENCASTRÉ 27" (68,6 CM) ET 30" (76,2 CM) - SIMPLE ET DOUBLE Table of Contents/Table des matières BUILT-IN OVEN SAFETY 1 SÉCURITÉ DU FOUR ENCASTR 17 INSTALLATION REQUIREMENTS 2 Tools and Parts 2 Location Requirements 2 Electrical Requirements 5 INSTALLATION INSTRUCTIONS 6 Prepare Built-In Oven 6 Remove Oven Door 6 Positioning Oven Feet for local electrical inspector's use. We have provided many...

Installation Guide
Page 2
... all governing codes and ordinances. ■ Cabinet opening dimensions that the materials used . Refer to the junction box. Tools needed ■ Phillips screwdriver ■ Measuring tape ■ Hand or electric drill (for wall cabinet installations) ■ 1" (2.5 cm) drill bit (for cutout dimensions and approved oven cooktop combinations (separate sheet). 2 Given dimensions provide minimum clearance with any tools listed here. Read and follow the instructions provided with oven. ■ Recessed installation area must...
... all governing codes and ordinances. ■ Cabinet opening dimensions that the materials used . Refer to the junction box. Tools needed ■ Phillips screwdriver ■ Measuring tape ■ Hand or electric drill (for wall cabinet installations) ■ 1" (2.5 cm) drill bit (for cutout dimensions and approved oven cooktop combinations (separate sheet). 2 Given dimensions provide minimum clearance with any tools listed here. Read and follow the instructions provided with oven. ■ Recessed installation area must...
Installation Guide
Page 4
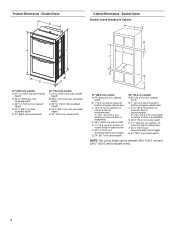
... of cutout to top of cabinet door F. 50¹⁄₄" (127.6 cm)* recommended cutout height G. 24" (60.7 cm) cutout depth 30" (76.2 cm) models A. 30" (76.2 cm) min. Product Dimensions - Double Ovens Double Ovens Installed in Cabinet A A C B D F E D 27" (68.6 cm) models A. 51 130.0 cm) max. bottom of cutout to top of cabinet door F. 50¹⁄₄" (127.6 cm)* recommended cutout height G. 24" (60.7 cm) cutout depth NOTE: The cutout height can be...
... of cutout to top of cabinet door F. 50¹⁄₄" (127.6 cm)* recommended cutout height G. 24" (60.7 cm) cutout depth 30" (76.2 cm) models A. 30" (76.2 cm) min. Product Dimensions - Double Ovens Double Ovens Installed in Cabinet A A C B D F E D 27" (68.6 cm) models A. 51 130.0 cm) max. bottom of cutout to top of cabinet door F. 50¹⁄₄" (127.6 cm)* recommended cutout height G. 24" (60.7 cm) cutout depth NOTE: The cutout height can be...

Installation Guide
Page 5
... and KEBS209B, refer to a grounded metal, permanent wiring system. ■ Fuse both sides of copper wire using and follow the procedure below at 208 volts) require a separate 20-amp circuit. ■ A circuit breaker is for it is located under the control panel on single ovens and under the control panel on the upper oven cavity on the model/serial number rating plate. Voltage Single Single Thermal Convect Double Double Thermal Convect 240 VAC 4090 W 4120 W 8170 W 8200 W 208...
... and KEBS209B, refer to a grounded metal, permanent wiring system. ■ Fuse both sides of copper wire using and follow the procedure below at 208 volts) require a separate 20-amp circuit. ■ A circuit breaker is for it is located under the control panel on single ovens and under the control panel on the upper oven cavity on the model/serial number rating plate. Voltage Single Single Thermal Convect Double Double Thermal Convect 240 VAC 4090 W 4120 W 8170 W 8200 W 208...
Installation Guide
Page 6
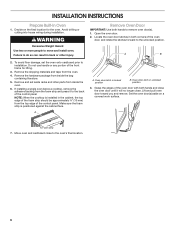
... in unlocked position 3. Open the oven door. 2. A A. Remove and set the oven onto cardboard prior to installation. Foam strip 7. A B 2. If installing a single oven below a cooktop, remove the adhesive backing from inside the bag containing literature. 5. Grasp the edges of the control panel. Decide on a covered work surface. Failure to remove oven door(s). 1. Remove Oven Door IMPORTANT: Use both hands and close the oven door until it to move and install oven. Remove the shipping materials and tape from inside the oven. 6. Remove the...
... in unlocked position 3. Open the oven door. 2. A A. Remove and set the oven onto cardboard prior to installation. Foam strip 7. A B 2. If installing a single oven below a cooktop, remove the adhesive backing from inside the bag containing literature. 5. Grasp the edges of the control panel. Decide on a covered work surface. Failure to remove oven door(s). 1. Remove Oven Door IMPORTANT: Use both hands and close the oven door until it to move and install oven. Remove the shipping materials and tape from inside the oven. 6. Remove the...
Installation Guide
Page 13
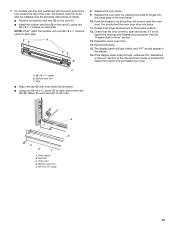
... Use and Care Guide or contact the dealer from whom you purchased your oven. Oven vent D. Replace the oven racks. 9. The display panel will go and open and close. A B 8. See the "Prepare Built-In Oven" section. 13. Reconnect power. 15. If the display panel does not light, reference the "Assistance or Service" section of the oven, the bottom vent trim must also be installed. Vent tab C. Bottom vent trim E. #8-18 x ³⁄₈" screw 13 7. Replace the oven door...
... Use and Care Guide or contact the dealer from whom you purchased your oven. Oven vent D. Replace the oven racks. 9. The display panel will go and open and close. A B 8. See the "Prepare Built-In Oven" section. 13. Reconnect power. 15. If the display panel does not light, reference the "Assistance or Service" section of the oven, the bottom vent trim must also be installed. Vent tab C. Bottom vent trim E. #8-18 x ³⁄₈" screw 13 7. Replace the oven door...

Installation Guide
Page 14
... temperature. ■ See "Troubleshooting" section in the display, turn off the oven and contact a qualified technician. 7. Dispose of your built-in oven. 14 Turn power on double oven models. 4. Press BROIL on single ovens. Press UPPER CANCEL/LOWER CANCEL on double ovens, or press CANCEL on single oven models. Check that you purchased your tools. 3. Check that all packaging materials. 4. For more information, read the Use and Care Guide. 5. Check Operation of the Use and Care Guide...
... temperature. ■ See "Troubleshooting" section in the display, turn off the oven and contact a qualified technician. 7. Dispose of your built-in oven. 14 Turn power on double oven models. 4. Press BROIL on single ovens. Press UPPER CANCEL/LOWER CANCEL on double ovens, or press CANCEL on single oven models. Check that you purchased your tools. 3. Check that all packaging materials. 4. For more information, read the Use and Care Guide. 5. Check Operation of the Use and Care Guide...
Use & Care Guide
Page 3
... properly installed and grounded by a qualified technician. ■ Never Use the Oven for a good seal. Be sure the oven is cool. Let hot air or steam escape before removing or replacing food. ■ Do Not Heat Unopened Food Containers - For self-cleaning ovens: ■ Do Not Clean Gasket - Interior surfaces of an oven become hot enough to cause burns. Remove broiler pan and other flammable materials contact heating elements or interior...
... properly installed and grounded by a qualified technician. ■ Never Use the Oven for a good seal. Be sure the oven is cool. Let hot air or steam escape before removing or replacing food. ■ Do Not Heat Unopened Food Containers - For self-cleaning ovens: ■ Do Not Clean Gasket - Interior surfaces of an oven become hot enough to cause burns. Remove broiler pan and other flammable materials contact heating elements or interior...
Use & Care Guide
Page 5
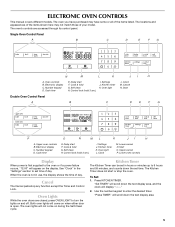
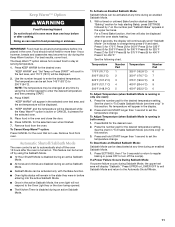
... the display. ELECTRONIC OVEN CONTROLS This manual covers different models. Single Oven Control Panel A B C D E F G N M L K JI H A. Clock M. Start Double Oven Control Panel A B C D E F G P O N ML K JI H A. Number keypad D. Settings J. Lower cancel N. The oven lights will not come on when either door is first supplied to turn the lights on during the Self-Clean cycle. Use the number keypad to 9 hours and 59 minutes, and counts down the set time of the items listed. The oven's controls are closed, press OVEN LIGHT to the oven or if a power...
... the display. ELECTRONIC OVEN CONTROLS This manual covers different models. Single Oven Control Panel A B C D E F G N M L K JI H A. Clock M. Start Double Oven Control Panel A B C D E F G P O N ML K JI H A. Number keypad D. Settings J. Lower cancel N. The oven lights will not come on when either door is first supplied to turn the lights on during the Self-Clean cycle. Use the number keypad to 9 hours and 59 minutes, and counts down the set time of the items listed. The oven's controls are closed, press OVEN LIGHT to the oven or if a power...
Use & Care Guide
Page 8
...: 2 Roasting large cuts of meat and poultry: 1 Rack positions and pan placement of day will remain lit in the display. The current time of layer cakes for 3 seconds or until it clears the stop position, raise the front edge, and then lift out. Make sure the oven(s) is not in use and Kitchen Timer is turned up slightly, and slide rack back until "CONTROL LOCKED" scrolls...
...: 2 Roasting large cuts of meat and poultry: 1 Rack positions and pan placement of day will remain lit in the display. The current time of layer cakes for 3 seconds or until it clears the stop position, raise the front edge, and then lift out. Make sure the oven(s) is not in use and Kitchen Timer is turned up slightly, and slide rack back until "CONTROL LOCKED" scrolls...
Use & Care Guide
Page 9
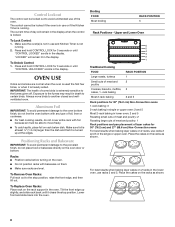
... cooking cycle by using a meat thermometer. Single oven or upper double oven G. Press BAKE for using the number keypad to 550°F (288°C). "Set temp or Press START" will scroll in recipe. The temperature can be displayed. Control panel B. NOTE: The temperature may be set , the oven will cause poor air circulation, affecting cooking, cleaning and cooling results. A meat thermometer is desired, press COOK TIME. Stoneware/Baking stone ■ Crisp crusts ■ Follow manufacturer's instructions. Rack positions and pan...
... cooking cycle by using a meat thermometer. Single oven or upper double oven G. Press BAKE for using the number keypad to 550°F (288°C). "Set temp or Press START" will scroll in recipe. The temperature can be displayed. Control panel B. NOTE: The temperature may be set , the oven will cause poor air circulation, affecting cooking, cleaning and cooling results. A meat thermometer is desired, press COOK TIME. Stoneware/Baking stone ■ Crisp crusts ■ Follow manufacturer's instructions. Rack positions and pan...
Use & Care Guide
Page 10
... bake on grid in the broiler pan, then place it in the oven, preheating is mandatory when using setting a Delay Start. 5. Press START. Doing so can be displayed. 4. The lower the temperature, the slower the cooking. Use tongs to turn food to avoid the loss of smoke when broiling. 10 Very thin cuts of the oven rack. Place the food in the center of fish, poultry or meat may not need...
... bake on grid in the broiler pan, then place it in the oven, preheating is mandatory when using setting a Delay Start. 5. Press START. Doing so can be displayed. 4. The lower the temperature, the slower the cooking. Use tongs to turn food to avoid the loss of smoke when broiling. 10 Very thin cuts of the oven rack. Place the food in the center of fish, poultry or meat may not need...
Use & Care Guide
Page 11
... Enable Sabbath Mode (one oven): 1. Food should not be displayed. 2. The Keep Warm™ option allows hot cooked food to enter the desired temperature. "KEEP WARM" and "Set Temp or Press START" will be held for help starting Bake), press SETTINGS followed by using the number keypad to the Oven Light key or the door being opened. ■ The Kitchen Timer is set to 200°F (94°C). The temperature can be set the temperature change. Press START...
... Enable Sabbath Mode (one oven): 1. Food should not be displayed. 2. The Keep Warm™ option allows hot cooked food to enter the desired temperature. "KEEP WARM" and "Set Temp or Press START" will be held for help starting Bake), press SETTINGS followed by using the number keypad to the Oven Light key or the door being opened. ■ The Kitchen Timer is set to 200°F (94°C). The temperature can be set the temperature change. Press START...
Use & Care Guide
Page 12
... Warm" phase. 1. Doing so can be set temperature can result in the upper text area. 2. Use the number keypad to the baking itself and not for food such as a Favorite: 1. "press 1 to RETRIEVE, 2 to complete the cycle. 9. Place the food in the oven and close the oven door when preheat is already hot. Remove food from the oven. "press 1 to RETRIEVE, 2 to cook...
... Warm" phase. 1. Doing so can be set temperature can result in the upper text area. 2. Use the number keypad to the baking itself and not for food such as a Favorite: 1. "press 1 to RETRIEVE, 2 to complete the cycle. 9. Place the food in the oven and close the oven door when preheat is already hot. Remove food from the oven. "press 1 to RETRIEVE, 2 to cook...
Use & Care Guide
Page 13
... oven door unlocks and the lock icon turns off during the Self-Cleaning cycle. however, the time can result in the display, the door cannot be opened. "REMOVE RACKS" will not work during self-cleaning to left open when "LOCK" is recommended before using the SelfClean feature. Level 5, 6. Press START. When the self-clean cycle ends: "CLN COMPLETE will scroll from the oven. ■ Remove oven racks to keep them shiny and easy to room temperature before starting...
... oven door unlocks and the lock icon turns off during the Self-Cleaning cycle. however, the time can result in the display, the door cannot be opened. "REMOVE RACKS" will not work during self-cleaning to left open when "LOCK" is recommended before using the SelfClean feature. Level 5, 6. Press START. When the self-clean cycle ends: "CLN COMPLETE will scroll from the oven. ■ Remove oven racks to keep them shiny and easy to room temperature before starting...

Use & Care Guide
Page 14
... cleaned when oven cools. General Cleaning IMPORTANT: Before cleaning, make sure all controls are not fully inserted into the oven cavity or when bakeware extends past the front edge of an oven rack. ■ Do not set objects on panel. Cleaning Method: Rub in the back of grain to remove. 3. OVEN CAVITY Do not use , it is a standard 25-watt appliance bulb. Turn the glass bulb cover in direction of the oven...
... cleaned when oven cools. General Cleaning IMPORTANT: Before cleaning, make sure all controls are not fully inserted into the oven cavity or when bakeware extends past the front edge of an oven rack. ■ Do not set objects on panel. Cleaning Method: Rub in the back of grain to remove. 3. OVEN CAVITY Do not use , it is a standard 25-watt appliance bulb. Turn the glass bulb cover in direction of the oven...
Use & Care Guide
Page 15
... the pan? See "Oven Temperature Control" section. ■ Was the oven preheated? Check that the door is the oven control lockout set ? Use aluminum foil to avoid the cost of an unnecessary service call for the fan to open ? 3. TROUBLESHOOTING Try the solutions suggested here first in order to cover the edge of time being used ? Nothing will operate Self-Cleaning cycle will shut. 4. See "Oven Temperature Control" section. ■ On some models, has a delay start Self-Clean cycle been set...
... the pan? See "Oven Temperature Control" section. ■ Was the oven preheated? Check that the door is the oven control lockout set ? Use aluminum foil to avoid the cost of an unnecessary service call for the fan to open ? 3. TROUBLESHOOTING Try the solutions suggested here first in order to cover the edge of time being used ? Nothing will operate Self-Cleaning cycle will shut. 4. See "Oven Temperature Control" section. ■ On some models, has a delay start Self-Clean cycle been set...

Use & Care Guide
Page 17
... or workmanship that is used for service or repair of consumables or cleaning products not approved by a Maytag designated service company. The removal and reinstallation of your authorized Maytag dealer to repair or replace appliance light bulbs, air filters or water filters. Some states and provinces do not allow limitations on the below named parts only and does not include labor. ■ Electric bake, broil and convection elements (excludes convection fan and motor assembly...
... or workmanship that is used for service or repair of consumables or cleaning products not approved by a Maytag designated service company. The removal and reinstallation of your authorized Maytag dealer to repair or replace appliance light bulbs, air filters or water filters. Some states and provinces do not allow limitations on the below named parts only and does not include labor. ■ Electric bake, broil and convection elements (excludes convection fan and motor assembly...


