
Installation Guide
Page 2
... screwdriver Parts needed ■ Phillips screwdriver ■ Measuring tape ■ Hand or electric drill (for wall cabinet installations) ■ 1" (2.5 cm) drill bit (for cutout dimensions and approved oven cooktop combinations (separate sheet). 2 A 1" (2.5 cm) minimum diameter hole should be located 3" (7.6...here. See "Electrical Requirements" section. ■ Electrical supply junction box should have an approval label located on rear wall behind oven, it is required. Tools needed ■ UL listed or CSA approved conduit connector ■ UL listed wire connectors ...
... screwdriver Parts needed ■ Phillips screwdriver ■ Measuring tape ■ Hand or electric drill (for wall cabinet installations) ■ 1" (2.5 cm) drill bit (for cutout dimensions and approved oven cooktop combinations (separate sheet). 2 A 1" (2.5 cm) minimum diameter hole should be located 3" (7.6...here. See "Electrical Requirements" section. ■ Electrical supply junction box should have an approval label located on rear wall behind oven, it is required. Tools needed ■ UL listed or CSA approved conduit connector ■ UL listed wire connectors ...
Installation Guide
Page 12
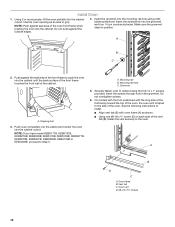
... #8-18 x ³⁄₈" screw (D) on each side of the front frame to cabinet using a flatblade screwdriver. NOTE: Push against seal area of the oven. Oven frame B. A. Mounting rail B. See the following instructions to install. ■ Align vent tab (B) with the long side of the foot facing toward the top...Insert the screws through hole in position. Insert the grommet into the cabinet until the back surface of the front frame touches the front wall of the oven, the oven vent is taped to Step 5. Insert the screwdriver into the cabinet. A B D C A.
... #8-18 x ³⁄₈" screw (D) on each side of the front frame to cabinet using a flatblade screwdriver. NOTE: Push against seal area of the oven. Oven frame B. A. Mounting rail B. See the following instructions to install. ■ Align vent tab (B) with the long side of the foot facing toward the top...Insert the screws through hole in position. Insert the grommet into the cabinet until the back surface of the front frame touches the front wall of the oven, the oven vent is taped to Step 5. Insert the screwdriver into the cabinet. A B D C A.


