Warranty Information
Page 1
... when this major appliance is installed, operated and maintained according to instructions attached to or furnished with the product, Maytag will pay for factory specified parts for the following components to obtain service under these limitations and exclusions may not apply to you . Proof of original... service or repair of this major appliance other rights that existed when this major appliance was purchased. MAYTAG® BUILT-IN ELECTRIC OVEN WARRANTY FIRST YEAR LIMITED WARRANTY (PARTS AND LABOR) For one year from the date of purchase, when this major appliance is installed, ...
... when this major appliance is installed, operated and maintained according to instructions attached to or furnished with the product, Maytag will pay for factory specified parts for the following components to obtain service under these limitations and exclusions may not apply to you . Proof of original... service or repair of this major appliance other rights that existed when this major appliance was purchased. MAYTAG® BUILT-IN ELECTRIC OVEN WARRANTY FIRST YEAR LIMITED WARRANTY (PARTS AND LABOR) For one year from the date of purchase, when this major appliance is installed, ...
Installation Guide
Page 1
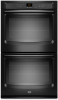
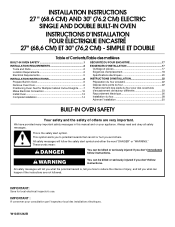
... ET DOUBLE Table of Contents/Table des matières BUILT-IN OVEN SAFETY 1 SÉCURITÉ DU FOUR ENCASTR 17 INSTALLATION REQUIREMENTS 2 Tools and Parts 2 Location Requirements 2 Electrical Requirements 5 INSTALLATION INSTRUCTIONS 6 Prepare Built-In Oven 6 Remove Oven Door 6 Positioning Oven Feet for local electrical inspector's use. This symbol alerts you...
... ET DOUBLE Table of Contents/Table des matières BUILT-IN OVEN SAFETY 1 SÉCURITÉ DU FOUR ENCASTR 17 INSTALLATION REQUIREMENTS 2 Tools and Parts 2 Location Requirements 2 Electrical Requirements 5 INSTALLATION INSTRUCTIONS 6 Prepare Built-In Oven 6 Remove Oven Door 6 Positioning Oven Feet for local electrical inspector's use. This symbol alerts you...

Installation Guide
Page 2
...or cabinet supplier to the junction box. Tools needed ■ UL listed or CSA approved conduit connector ■ UL listed wire connectors Parts supplied ■ #8-14 x 1" screws - bottom vent trim ■ Four #8-18 x ³⁄₈" screws - Given ... 1" (2.5 cm) minimum diameter hole should be able to undercounter installation instructions for wall cabinet installations) ■ Level ■ Flat-blade screwdriver Parts needed ■ Phillips screwdriver ■ Measuring tape ■ Hand or electric drill (for wall cabinet installations) ■ 1" (2.5 cm) drill ...
...or cabinet supplier to the junction box. Tools needed ■ UL listed or CSA approved conduit connector ■ UL listed wire connectors Parts supplied ■ #8-14 x 1" screws - bottom vent trim ■ Four #8-18 x ³⁄₈" screws - Given ... 1" (2.5 cm) minimum diameter hole should be able to undercounter installation instructions for wall cabinet installations) ■ Level ■ Flat-blade screwdriver Parts needed ■ Phillips screwdriver ■ Measuring tape ■ Hand or electric drill (for wall cabinet installations) ■ 1" (2.5 cm) drill ...

Installation Guide
Page 5
... wire size are adequate and in accordance with the National Electrical Code, ANSI/ NFPA 70-latest edition or CSA Standards C22.1-94, Canadian Electrical Code, Part 1 and C22.2 No. A copy of the oven. ■ A UL listed or CSA approved conduit connector must be connected to a grounded metal, permanent wiring system. ■...
... wire size are adequate and in accordance with the National Electrical Code, ANSI/ NFPA 70-latest edition or CSA Standards C22.1-94, Canadian Electrical Code, Part 1 and C22.2 No. A copy of the oven. ■ A UL listed or CSA approved conduit connector must be connected to a grounded metal, permanent wiring system. ■...
Installation Guide
Page 6
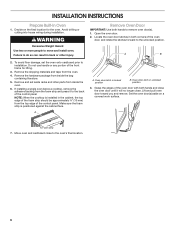
INSTALLATION INSTRUCTIONS Prepare Built-In Oven 1. Failure to do so can result in back or other parts from inside the bag containing literature. 5. To avoid floor damage, set aside racks and other injury. If installing a single oven below a cooktop, remove the adhesive ...
INSTALLATION INSTRUCTIONS Prepare Built-In Oven 1. Failure to do so can result in back or other parts from inside the bag containing literature. 5. To avoid floor damage, set aside racks and other injury. If installing a single oven below a cooktop, remove the adhesive ...

Installation Guide
Page 14
... now installed. If oven(s) does not operate, check the following: ■ Household fuse is an extra part, go back through the steps to see which step was skipped. 2. Turn power on single oven models. Press BROIL on . 2. When oven has been on ...
... now installed. If oven(s) does not operate, check the following: ■ Household fuse is an extra part, go back through the steps to see which step was skipped. 2. Turn power on single oven models. Press BROIL on . 2. When oven has been on ...

