
Installation Guide
Page 2
... Observe all electrical connections be recessed and located in the adjacent right or left rear corner of the oven. Tools needed ■ Phillips screwdriver ■ Measuring tape ■ Hand or electric drill (for wall cabinet installations) ■ 1" (2.5 cm) drill bit (for 30" models (76.2 cm). &#... front feet - See "Electrical Requirements" section. ■ Electrical supply junction box should have an approval label located on rear wall behind oven, it is installed in accordance with the requirements of UL and CSA International and complies with bottom of 251 lbs (114 kg...
... Observe all electrical connections be recessed and located in the adjacent right or left rear corner of the oven. Tools needed ■ Phillips screwdriver ■ Measuring tape ■ Hand or electric drill (for wall cabinet installations) ■ 1" (2.5 cm) drill bit (for 30" models (76.2 cm). &#... front feet - See "Electrical Requirements" section. ■ Electrical supply junction box should have an approval label located on rear wall behind oven, it is installed in accordance with the requirements of UL and CSA International and complies with bottom of 251 lbs (114 kg...
Installation Guide
Page 12
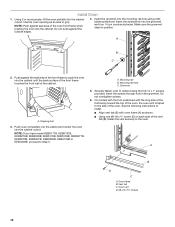
... taped to the side of the vent tab (B), fasten the vent securely to push the oven into the cabinet until the back surface of the front frame touches the front wall of the oven front frame when pushing the oven into the cabinet. NOTE: If you have model KEBK171B, KEBK101B, KEBK276B, KEBK206B, KEBS179B, KEBS109B...
... taped to the side of the vent tab (B), fasten the vent securely to push the oven into the cabinet until the back surface of the front frame touches the front wall of the oven front frame when pushing the oven into the cabinet. NOTE: If you have model KEBK171B, KEBK101B, KEBK276B, KEBK206B, KEBS179B, KEBS109B...
Use & Care Guide
Page 9
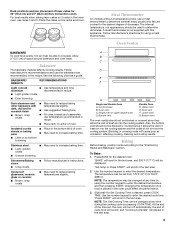
...temperature probe, use racks 3 and 5. Follow manufacturer's directions for using the number keypad to the desired degree of space around bakeware and oven walls. Allow 2" (5.0 cm) of doneness. BAKEWARE/ RESULTS RECOMMENDATIONS Light colored ■ aluminum ■ Light golden crusts ■ Even ... cycle by using a meat thermometer. Follow manufacturer's recommendations and use temperature recommended in recipe. ■ Place rack in center of oven. ■ May need to increase baking time. ■ Little or no bottom browning Stainless steel ■ Light, golden crusts ...
...temperature probe, use racks 3 and 5. Follow manufacturer's directions for using the number keypad to the desired degree of space around bakeware and oven walls. Allow 2" (5.0 cm) of doneness. BAKEWARE/ RESULTS RECOMMENDATIONS Light colored ■ aluminum ■ Light golden crusts ■ Even ... cycle by using a meat thermometer. Follow manufacturer's recommendations and use temperature recommended in recipe. ■ Place rack in center of oven. ■ May need to increase baking time. ■ Little or no bottom browning Stainless steel ■ Light, golden crusts ...


