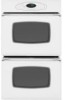

Owners Manual
Page 2
... speech impaired) (Mon.-Fri., 8 am-8 pm Eastern Time) Internet: http://www.maytag.com In our continuing effort to improve the quality and performance of Fire Use dry ...CAUTION - Keep plastics away from combustible materials. Children should never be properly installed and grounded by closing the oven door. TTY for future reference. Common sense, caution, and care must ...may be exercised when installing, maintaining, or operating the appliance. Always disconnect power to appliance before using this appliance to prevent the potential risk of fire, electric shock, personal injury ...
... speech impaired) (Mon.-Fri., 8 am-8 pm Eastern Time) Internet: http://www.maytag.com In our continuing effort to improve the quality and performance of Fire Use dry ...CAUTION - Keep plastics away from combustible materials. Children should never be properly installed and grounded by closing the oven door. TTY for future reference. Common sense, caution, and care must ...may be exercised when installing, maintaining, or operating the appliance. Always disconnect power to appliance before using this appliance to prevent the potential risk of fire, electric shock, personal injury ...

Owners Manual
Page 10
... in the display. Turn meat once about four inches (the first stop). 6. Note: This chart is cooked, press the CANCEL pad. Leave oven door open about halfway through broiling time. If it does not operate, contact an authorized servicer. • HI is used . APPROX. When food...cooking foods. The times may be longer when the lower broiling temperature is installed on a 208-volt circuit. • If more than 30 seconds elapse between pressing the Broil pad and the Autoset pad, the oven will remain lit. 4. For optimum browning, preheat broil element for normal ...
... in the display. Turn meat once about four inches (the first stop). 6. Note: This chart is cooked, press the CANCEL pad. Leave oven door open about halfway through broiling time. If it does not operate, contact an authorized servicer. • HI is used . APPROX. When food...cooking foods. The times may be longer when the lower broiling temperature is installed on a 208-volt circuit. • If more than 30 seconds elapse between pressing the Broil pad and the Autoset pad, the oven will remain lit. 4. For optimum browning, preheat broil element for normal ...

Owners Manual
Page 20
...in Sabbath Mode. (See page 11.) • Oven may be over 400° F. Foods do not allow pans to touch each other or oven wall. • Check instructions for a new wall oven and will disappear after self-cleaning process. •...Oven may be in oven. • Oven not preheated properly. Foods bake unevenly. • Oven was not preheated. • The oven may have cooled to self-cleaning process. Turning on the oven bottom. Clock, indicator words, and/or lights operate but oven does not heat. • Oven may be set for a delay clean. • Oven may be installed...
...in Sabbath Mode. (See page 11.) • Oven may be over 400° F. Foods do not allow pans to touch each other or oven wall. • Check instructions for a new wall oven and will disappear after self-cleaning process. •...Oven may be in oven. • Oven not preheated properly. Foods bake unevenly. • Oven was not preheated. • The oven may have cooled to self-cleaning process. Turning on the oven bottom. Clock, indicator words, and/or lights operate but oven does not heat. • Oven may be set for a delay clean. • Oven may be installed...

Owners Manual
Page 22
...an authorized Maytag servicer is ...service by a Maytag designated service company....installation, installation not in accordance with electrical or plumbing codes, or use your authorized Maytag dealer to determine if another warranty applies. MAYTAG...not installed in accordance with published installation instructions...Maytag. 5. Service calls to refrigerator or freezer product failures. 7. Service calls to correct the installation... it is installed in an ... and/or installation instructions. 4. MAYTAG® MAJOR...Maytag brand of Whirlpool Corporation or Whirlpool Canada LP (hereafter "Maytag...
...an authorized Maytag servicer is ...service by a Maytag designated service company....installation, installation not in accordance with electrical or plumbing codes, or use your authorized Maytag dealer to determine if another warranty applies. MAYTAG...not installed in accordance with published installation instructions...Maytag. 5. Service calls to refrigerator or freezer product failures. 7. Service calls to correct the installation... it is installed in an ... and/or installation instructions. 4. MAYTAG® MAJOR...Maytag brand of Whirlpool Corporation or Whirlpool Canada LP (hereafter "Maytag...

Installation Instructions
Page 1
....6 CM) AND 30" (76.2 CM) ELECTRIC SINGLE AND DOUBLE BUILT-IN OVEN INSTRUCTIONS D'INSTALLATION FOUR ÉLECTRIQUE ENCASTRÉ DE 27" (68,6 CM) ET 30" (76,2 CM) - SIMPLE ET DOUBLE Table of Contents/Table des matières IBUILT-IN OVEN SAFETY 1 NSTALLATION REQUIREMENTS 2 Tools and Parts 2 Location Requirements 2 Electrical Requirements 4 INSTALLATION INSTRUCTIONS 5 Prepare Built-In Oven 5 Make Electrical Connection 6 Install Oven 7 Complete Installation 8 SÉ...
....6 CM) AND 30" (76.2 CM) ELECTRIC SINGLE AND DOUBLE BUILT-IN OVEN INSTRUCTIONS D'INSTALLATION FOUR ÉLECTRIQUE ENCASTRÉ DE 27" (68,6 CM) ET 30" (76,2 CM) - SIMPLE ET DOUBLE Table of Contents/Table des matières IBUILT-IN OVEN SAFETY 1 NSTALLATION REQUIREMENTS 2 Tools and Parts 2 Location Requirements 2 Electrical Requirements 4 INSTALLATION INSTRUCTIONS 5 Prepare Built-In Oven 5 Make Electrical Connection 6 Install Oven 7 Complete Installation 8 SÉ...

Installation Instructions
Page 2
... 30" (76.2 cm) models B. 1¹⁄₂" (3.8 cm) min. Refer to the junction box. Location Requirements IMPORTANT: Observe all electrical connections be recessed and located in a wall cabinet. A 1¼" (3.4 cm) minimum diameter hole should be able to support a single oven weight of 142 lbs (64.4 kg) or a double oven weight of the oven. ■ Grounded electrical supply is installed...
... 30" (76.2 cm) models B. 1¹⁄₂" (3.8 cm) min. Refer to the junction box. Location Requirements IMPORTANT: Observe all electrical connections be recessed and located in a wall cabinet. A 1¼" (3.4 cm) minimum diameter hole should be able to support a single oven weight of 142 lbs (64.4 kg) or a double oven weight of the oven. ■ Grounded electrical supply is installed...

Installation Instructions
Page 3
...height 30" (76.2 cm) models A. 30" (76.2 cm) min. Electric cooktop 1⁵⁄₈" (4.1 cm); Electric cooktop 5" (12.7 cm); cabinet width B. overall height C. 29³⁄₄" (75.6 cm) overall width D. 23½" (59.7 cm) max. Double Oven 27" (68.6 cm) and 30" (76.2 cm) Ovens A E D C A. 30" ... 83.8 cm) bottom of cutout to floor D. 28¹⁄₂" (72.4 cm) cutout width E. 1¹⁄₂" (3.8 cm) min. cutout height Single Oven Installed in Cabinet A B F D E C B E D C 27" (68.6 cm) models A. 25³⁄₈" (64.5 cm) max. recessed depth ...
...height 30" (76.2 cm) models A. 30" (76.2 cm) min. Electric cooktop 1⁵⁄₈" (4.1 cm); Electric cooktop 5" (12.7 cm); cabinet width B. overall height C. 29³⁄₄" (75.6 cm) overall width D. 23½" (59.7 cm) max. Double Oven 27" (68.6 cm) and 30" (76.2 cm) Ovens A E D C A. 30" ... 83.8 cm) bottom of cutout to floor D. 28¹⁄₂" (72.4 cm) cutout width E. 1¹⁄₂" (3.8 cm) min. cutout height Single Oven Installed in Cabinet A B F D E C B E D C 27" (68.6 cm) models A. 25³⁄₈" (64.5 cm) max. recessed depth ...

Installation Instructions
Page 4
... plate Double Oven A. cutout height 30" (76.2 cm) models A. 30" (76.2 cm) min. Oven front D. Be sure that the ground path and the wire gauge are in conformance with a qualified electrical installer if you will be using and follow the instructions provided for it is recommended. ■ Connect directly to a grounded metal, permanent wiring system. Cabinet A A Single Oven A. Double Oven Double Oven Installed...
... plate Double Oven A. cutout height 30" (76.2 cm) models A. 30" (76.2 cm) min. Oven front D. Be sure that the ground path and the wire gauge are in conformance with a qualified electrical installer if you will be using and follow the instructions provided for it is recommended. ■ Connect directly to a grounded metal, permanent wiring system. Cabinet A A Single Oven A. Double Oven Double Oven Installed...

Installation Instructions
Page 5
... aside on the final location for joining copper to the pigtail leads. 2. Follow the electrical connector manufacturer's recommended procedure. INSTALLATION INSTRUCTIONS Prepare Built-In Oven 1. Remove Oven Door. Open oven door to remove oven doors. 1. C A. Decide on a covered surface. 5 Lift and pull oven door toward you and remove. WARNING Excessive Weight Hazard Use two or more people...
... aside on the final location for joining copper to the pigtail leads. 2. Follow the electrical connector manufacturer's recommended procedure. INSTALLATION INSTRUCTIONS Prepare Built-In Oven 1. Remove Oven Door. Open oven door to remove oven doors. 1. C A. Decide on a covered surface. 5 Lift and pull oven door toward you and remove. WARNING Excessive Weight Hazard Use two or more people...

Installation Instructions
Page 6
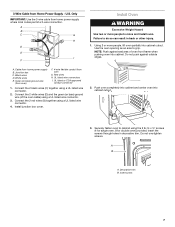
... conduit connector to complete installation for your home has: Go to section: 4-wire 4-wire Cable from Home Power Supply 3-wire ½" (1.3 cm) 3-wire Cable from the oven. 4. Green (or bare) ground wires I A. Connect the 2 black wires (B) together using a UL listed wire connector. 5. For Double Ovens Make Electrical Connection For Single Ovens WARNING WARNING Electrical Shock Hazard Disconnect...
... conduit connector to complete installation for your home has: Go to section: 4-wire 4-wire Cable from Home Power Supply 3-wire ½" (1.3 cm) 3-wire Cable from the oven. 4. Green (or bare) ground wires I A. Connect the 2 black wires (B) together using a UL listed wire connector. 5. For Double Ovens Make Electrical Connection For Single Ovens WARNING WARNING Electrical Shock Hazard Disconnect...
Installation Instructions
Page 7
... B C G H D E I . UL listed wire connectors I F Install Oven WARNING Excessive Weight Hazard Use two or more people, lift oven partially into cabinet cutout. A B A. Do not push against seal area of the oven cable) using a UL listed wire connector. 4. White wires E. A. Insert ...wire connector. 3. Failure to move and install oven. Connect the 2 black wires (C) together using the # 8-14 x ¾" screws (4 for single oven, 8 for double oven) provided. Cable from Home Power Supply - Push oven completely into cabinet and center oven into cabinet. U.S. 3-Wire Cable from...
... B C G H D E I . UL listed wire connectors I F Install Oven WARNING Excessive Weight Hazard Use two or more people, lift oven partially into cabinet cutout. A B A. Do not push against seal area of the oven cable) using a UL listed wire connector. 4. White wires E. A. Insert ...wire connector. 3. Failure to move and install oven. Connect the 2 black wires (C) together using the # 8-14 x ¾" screws (4 for single oven, 8 for double oven) provided. Cable from Home Power Supply - Push oven completely into cabinet and center oven into cabinet. U.S. 3-Wire Cable from...

Installation Instructions
Page 8
...place. 9. Repeat for instructions. Complete Installation 1. Check Operation of oven. 5. Turn on for 5 minutes, feel the oven door drop into hinge slots in the display, turn off the oven and contact a qualified technician. 5. or circuit breaker has not tripped. ■ Electrical supply is connected. ■ See ...if an "F" followed by aligning and inserting ends of the oven. 10. 4. If there is closed 3. If oven(s) does not operate, check the following instructions to install. ■ Align mounting hole in bottom oven trim to holes in as far as they will light briefly,...
...place. 9. Repeat for instructions. Complete Installation 1. Check Operation of oven. 5. Turn on for 5 minutes, feel the oven door drop into hinge slots in the display, turn off the oven and contact a qualified technician. 5. or circuit breaker has not tripped. ■ Electrical supply is connected. ■ See ...if an "F" followed by aligning and inserting ends of the oven. 10. 4. If there is closed 3. If oven(s) does not operate, check the following instructions to install. ■ Align mounting hole in bottom oven trim to holes in as far as they will light briefly,...

