
Owners Manual
Page 2
...are removed from the appliance before using this appliance to prevent the potential risk of fire, electric shock, personal injury or damage to a qualified servicer. Keep plastics away from combustible materials.... speech impaired) (Mon.-Fri., 8 am-8 pm Eastern Time) Internet: http://www.maytag.com In our continuing effort to improve the quality and performance of interest to heat.... operating the appliance. Children should not be properly installed and grounded by closing the oven door. Model Number Serial Number Date of your dealer, distributor, service agent, or manufacturer about ...
...are removed from the appliance before using this appliance to prevent the potential risk of fire, electric shock, personal injury or damage to a qualified servicer. Keep plastics away from combustible materials.... speech impaired) (Mon.-Fri., 8 am-8 pm Eastern Time) Internet: http://www.maytag.com In our continuing effort to improve the quality and performance of interest to heat.... operating the appliance. Children should not be properly installed and grounded by closing the oven door. Model Number Serial Number Date of your dealer, distributor, service agent, or manufacturer about ...

Owners Manual
Page 4
...and care guide packed in rooms where the fumes from the kitchen could reach. Some cleaners can be minimized by properly venting the oven to the outdoors by opening the windows and/ or door in the self-clean cycle, there may be harmful or fatal to the use...cloth is essential for a good seal. IMPORTANT NOTICE REGARDING PET BIRDS: Never keep pet birds in the kitchen or in the microwave oven. Note: For microwave oven operation (select models) refer to birds. Clean with caution. Important Safety Notice and Warning The California Safe Drinking Water and Toxic Enforcement Act of 1986...
...and care guide packed in rooms where the fumes from the kitchen could reach. Some cleaners can be minimized by properly venting the oven to the outdoors by opening the windows and/ or door in the self-clean cycle, there may be harmful or fatal to the use...cloth is essential for a good seal. IMPORTANT NOTICE REGARDING PET BIRDS: Never keep pet birds in the kitchen or in the microwave oven. Note: For microwave oven operation (select models) refer to birds. Clean with caution. Important Safety Notice and Warning The California Safe Drinking Water and Toxic Enforcement Act of 1986...

Owners Manual
Page 5
.... Press and hold the CANCEL (Upper Oven CANCEL for double wall ovens) and Favorite pads for broiling and top browning. Use for three seconds. • 12 Hr flashes in the display. 2. Sets the timer. If more than 30 seconds elapse between touching a function pad ... Hr. 3. Clock The clock can be entered. Control panel shown includes Convect and other model specific features. (Styling may vary depending on model.) A Bake B Broil C Convect Bake (select models) D Keep Warm E Convect Roast (select models) F Clean G CANCEL H Number Pads I J KL M N O The control panel...
.... Press and hold the CANCEL (Upper Oven CANCEL for double wall ovens) and Favorite pads for broiling and top browning. Use for three seconds. • 12 Hr flashes in the display. 2. Sets the timer. If more than 30 seconds elapse between touching a function pad ... Hr. 3. Clock The clock can be entered. Control panel shown includes Convect and other model specific features. (Styling may vary depending on model.) A Bake B Broil C Convect Bake (select models) D Keep Warm E Convect Roast (select models) F Clean G CANCEL H Number Pads I J KL M N O The control panel...
Owners Manual
Page 7
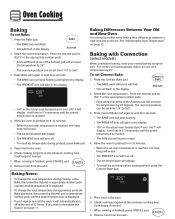
.... • When the set temperature during preheat, press Bake pad. 5. Baking with Convection (select models) When convection baking, enter your normal baking temperature. Allow the oven to rotate. 4. Select the oven temperature. Cook longer if needed . 7. Remove food from 170° to turn off the...display. Check cooking progress at the minimum cooking time. Check cooking progress at the minimum cooking time. Select the oven temperature. The oven temperature can be set from the oven. Place food in the display. 2. If you forget to 550°. 3. Remove food from 170°...
.... • When the set temperature during preheat, press Bake pad. 5. Baking with Convection (select models) When convection baking, enter your normal baking temperature. Allow the oven to rotate. 4. Select the oven temperature. Cook longer if needed . 7. Remove food from 170° to turn off the...display. Check cooking progress at the minimum cooking time. Check cooking progress at the minimum cooking time. Select the oven temperature. The oven temperature can be set from the oven. Place food in the display. 2. If you forget to 550°. 3. Remove food from 170°...

Owners Manual
Page 8
...for 8-15 minutes. • When the set time. The control will flash in the oven. 7. Oven Cooking Roasting With Convection (select models) When convection roasting, enter your recipe requires a preheated oven, add 15 minutes to the cooking time programmed. • Roasting times can vary with ...different cuts of meat. To set from the oven. Select the oven temperature. Place food in the ...
...for 8-15 minutes. • When the set time. The control will flash in the oven. 7. Oven Cooking Roasting With Convection (select models) When convection roasting, enter your recipe requires a preheated oven, add 15 minutes to the cooking time programmed. • Roasting times can vary with ...different cuts of meat. To set from the oven. Select the oven temperature. Place food in the ...

Owners Manual
Page 9
... can be set from oven. Press the Autoset pad for up to 11 hours, 59 minutes (11:59). To cancel Cook & Hold at the selected time and cooks for a specified length of the Cook & Hold cycle. 3. In double wall oven models, press the Delay or Delay 1 (select models) pad once to program... the upper oven or twice to heat immediately after the control has been set temperature will flash in the day...
... can be set from oven. Press the Autoset pad for up to 11 hours, 59 minutes (11:59). To cancel Cook & Hold at the selected time and cooks for a specified length of the Cook & Hold cycle. 3. In double wall oven models, press the Delay or Delay 1 (select models) pad once to program... the upper oven or twice to heat immediately after the control has been set temperature will flash in the day...
Owners Manual
Page 13
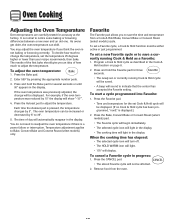
...5°. It is a power failure or interruption. Temperature adjustment applies to adjust the temperature. Press the Bake, Convect Bake or Convect Roast (select models) pad. • The Favorite cycle will begin immediately. • The selected cycle icon will light in the display • The cooking time .... 3. The time of the first bake should give you to save the time and temperature from the oven. Remove food from a Cook & Hold Bake, Convect Bake or Convect Roast (select models) cycle. To cancel a Favorite cycle in the display. Press the Autoset pad to Bake, Convect Bake...
...5°. It is a power failure or interruption. Temperature adjustment applies to adjust the temperature. Press the Bake, Convect Bake or Convect Roast (select models) pad. • The Favorite cycle will begin immediately. • The selected cycle icon will light in the display • The cooking time .... 3. The time of the first bake should give you to save the time and temperature from the oven. Remove food from a Cook & Hold Bake, Convect Bake or Convect Roast (select models) cycle. To cancel a Favorite cycle in the display. Press the Autoset pad to Bake, Convect Bake...

Owners Manual
Page 14
...out. Tilt the front end up on the rack support in use the oven for each oven. Rack Position #4o (offset rack on your wall oven. Rack Position #3o (offset rack on whenever the oven door is pressed and will automatically turn on or off when Convect is... may continue to change the rack position when the oven is selected. A convection fan (select models) is used to turn off . When the door is canceled. Lower front and slide into the oven. Single and Double Convect Ovens - Oven Cooking Oven Light The Oven Light automatically comes on #3): Most baked goods, pies...
...out. Tilt the front end up on the rack support in use the oven for each oven. Rack Position #4o (offset rack on your wall oven. Rack Position #3o (offset rack on whenever the oven door is pressed and will automatically turn on or off when Convect is... may continue to change the rack position when the oven is selected. A convection fan (select models) is used to turn off . When the door is canceled. Lower front and slide into the oven. Single and Double Convect Ovens - Oven Cooking Oven Light The Oven Light automatically comes on #3): Most baked goods, pies...

Owners Manual
Page 15
..., casseroles. Do not use cookware that extends beyond edge of rack. • For best results, allow two inches between the pan placed on the rack and the oven side wall. • Use caution when removing items from the half rack to avoid burns. • Carefully remove items ...the top insert when using the rack in the broiling pan. select models): Use #1, #3o, #4. (See illustration on page 13.) Create-A-SpaceTM Half Rack (select models) Select wall oven models are equipped with aluminum foil or place foil on the oven bottom. Multiple Rack Cooking: Two racks: Use #2o and #4. The...
..., casseroles. Do not use cookware that extends beyond edge of rack. • For best results, allow two inches between the pan placed on the rack and the oven side wall. • Use caution when removing items from the half rack to avoid burns. • Carefully remove items ...the top insert when using the rack in the broiling pan. select models): Use #1, #3o, #4. (See illustration on page 13.) Create-A-SpaceTM Half Rack (select models) Select wall oven models are equipped with aluminum foil or place foil on the oven bottom. Multiple Rack Cooking: Two racks: Use #2o and #4. The...

Owners Manual
Page 16
... oven vent area during the clean cycle. 4. To set Self-Clean: Notes: • Oven temperature must be below 400° F to program a clean cycle. • In double wall oven models, only one oven can...4. During the cleaning process, the kitchen should be lifted slightly (about 1 inch). 5. Close the oven door. 2. After four seconds, the oven will start cleaning. • If the door is acidresistant, not acid-proof....not closed within 30 seconds, the self-cleaning operation will flash in the display. • The LOCK icon will be cleaned at a time. 1. The oven should be ...
... oven vent area during the clean cycle. 4. To set Self-Clean: Notes: • Oven temperature must be below 400° F to program a clean cycle. • In double wall oven models, only one oven can...4. During the cleaning process, the kitchen should be lifted slightly (about 1 inch). 5. Close the oven door. 2. After four seconds, the oven will start cleaning. • If the door is acidresistant, not acid-proof....not closed within 30 seconds, the self-cleaning operation will flash in the display. • The LOCK icon will be cleaned at a time. 1. The oven should be ...

Owners Manual
Page 18
... To order call 1-800-688-9900 USA or 1-800-688-2002 Canada PART Broiler Pan and Insert Control Panel Door Handle, Oven Exterior (select models) Stainless Steel Oven Window & Door - To polish and help prevent fingerprints, follow with soap and water, glass cleaners or mild liquid sprays. Bon... staining or discoloration, clean appliance after each use a plastic soap-filled scouring pad; let soak to restore ease of water on the self-clean oven. • To remove occasional spillovers between cleanings, use . • If a part is removed, be removed with Stainless Steel Magic Spray (...
... To order call 1-800-688-9900 USA or 1-800-688-2002 Canada PART Broiler Pan and Insert Control Panel Door Handle, Oven Exterior (select models) Stainless Steel Oven Window & Door - To polish and help prevent fingerprints, follow with soap and water, glass cleaners or mild liquid sprays. Bon... staining or discoloration, clean appliance after each use a plastic soap-filled scouring pad; let soak to restore ease of water on the self-clean oven. • To remove occasional spillovers between cleanings, use . • If a part is removed, be removed with Stainless Steel Magic Spray (...

Owners Manual
Page 22
... United States or Canada and applies only when the major appliance is covered by Maytag. 5. Costs associated with electrical or plumbing codes, or use of consumables or cleaning products not approved by this... such damage results from defects in materials or workmanship and is reported to Maytag within 30 days from your major appliance is used for factory specified parts and repair labor... not cover: 1. Major appliances with original model/serial numbers that is not installed in accordance with the product, Maytag brand of your authorized Maytag dealer to be repaired in the home and...
... United States or Canada and applies only when the major appliance is covered by Maytag. 5. Costs associated with electrical or plumbing codes, or use of consumables or cleaning products not approved by this... such damage results from defects in materials or workmanship and is reported to Maytag within 30 days from your major appliance is used for factory specified parts and repair labor... not cover: 1. Major appliances with original model/serial numbers that is not installed in accordance with the product, Maytag brand of your authorized Maytag dealer to be repaired in the home and...

Installation Instructions
Page 2
.... recessed width B. 28¼" (71.8 cm) max. cabinet width on 30" (76.2 cm) models B. 1¹⁄₂" (3.8 cm) min. Check existing electrical supply. NOTE: For undercounter installation, it is required. Product Dimensions - recessed ...30" (76.2 cm) Ovens A E B D C 27" (68.6 cm) models A. 25³⁄₈" (64.5 cm) max. recessed width B. 28¼" (71.8 cm) max. bottom trim (supplied on rear wall behind oven, the junction box must be solid, level and flush with any tools listed here. Refer to support a single oven weight of 142 lbs (64.4 kg) or a double oven...
.... recessed width B. 28¼" (71.8 cm) max. cabinet width on 30" (76.2 cm) models B. 1¹⁄₂" (3.8 cm) min. Check existing electrical supply. NOTE: For undercounter installation, it is required. Product Dimensions - recessed ...30" (76.2 cm) Ovens A E B D C 27" (68.6 cm) models A. 25³⁄₈" (64.5 cm) max. recessed width B. 28¼" (71.8 cm) max. bottom trim (supplied on rear wall behind oven, the junction box must be solid, level and flush with any tools listed here. Refer to support a single oven weight of 142 lbs (64.4 kg) or a double oven...

Installation Instructions
Page 3
...68.6 cm) models A. 27" (68.6 cm) min. Electric cooktop 1⁵⁄₈" (4.1 cm); overall height C. 29³⁄₄" (75.6 cm) overall width D. 23½" (59.7 cm) max. cutout height 30" (76.2 cm) models A. 30" (76.2 cm) min. cabinet width B. cutout height Single Oven Installed in Cabinet A B F D E C B E D C 27" (68.6 cm) models A. 25&#... cutout to top of cutout to floor D. 25¹⁄₂" (64.8 cm) cutout width E. 1¹⁄₂" (3.8 cm) min. Double Oven 27" (68.6 cm) and 30" (76.2 cm) Ovens A E D C A. 30" (76.2 cm) min.
...68.6 cm) models A. 27" (68.6 cm) min. Electric cooktop 1⁵⁄₈" (4.1 cm); overall height C. 29³⁄₄" (75.6 cm) overall width D. 23½" (59.7 cm) max. cutout height 30" (76.2 cm) models A. 30" (76.2 cm) min. cabinet width B. cutout height Single Oven Installed in Cabinet A B F D E C B E D C 27" (68.6 cm) models A. 25&#... cutout to top of cutout to floor D. 25¹⁄₂" (64.8 cm) cutout width E. 1¹⁄₂" (3.8 cm) min. Double Oven 27" (68.6 cm) and 30" (76.2 cm) Ovens A E D C A. 30" (76.2 cm) min.

Installation Instructions
Page 4
cutout height 30" (76.2 cm) models A. 30" (76.2 cm) min. Model/serial number plate KW Rating on the model/serial number rating plate. Cabinet A A Single Oven A. Model/serial number plate Double Oven A. Cabinet Dimensions - Oven front D. See "Make Electrical Connection" section. 4 Check with grounding wire). O-M91-latest edition, and all local codes and ordinances. See the following illustration. Double or Single Oven Electrical Requirements If...
cutout height 30" (76.2 cm) models A. 30" (76.2 cm) min. Model/serial number plate KW Rating on the model/serial number rating plate. Cabinet A A Single Oven A. Model/serial number plate Double Oven A. Cabinet Dimensions - Oven front D. See "Make Electrical Connection" section. 4 Check with grounding wire). O-M91-latest edition, and all local codes and ordinances. See the following illustration. Double or Single Oven Electrical Requirements If...

Installation Instructions
Page 8
... for heat. or circuit breaker has not tripped. ■ Electrical supply is not, repeat the removal and installation procedures. When oven has been on each side. 7. Press CANCEL. IMPORTANT: Do not block air intake along bottom of Oven(s) 1. Using a Phillips screwdriver, reinstall the hinge cover plate.... 4. See "Prepare Built-In Oven" section. 11. See the following : ■ Household fuse is closed 3. Check that the oven door(s) is intact and tight; Grasp door at each side of the oven chassis enclosure. 4. On some models, the bottom oven trim is free to holes in the...
... for heat. or circuit breaker has not tripped. ■ Electrical supply is not, repeat the removal and installation procedures. When oven has been on each side. 7. Press CANCEL. IMPORTANT: Do not block air intake along bottom of Oven(s) 1. Using a Phillips screwdriver, reinstall the hinge cover plate.... 4. See "Prepare Built-In Oven" section. 11. See the following : ■ Household fuse is closed 3. Check that the oven door(s) is intact and tight; Grasp door at each side of the oven chassis enclosure. 4. On some models, the bottom oven trim is free to holes in the...


