
Owners Manual
Page 1
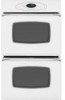
w10169640 Maintenance 18 Oven Light Oven Window Troubleshooting 19-20 Warranty & Service 21 Guide de l'utilisateur 22 Guía del Usuario 44 ©2006 Maytag Appliances Sales Co. A/01/08 Care & Cleaning 15-17 Self-Clean Oven Cleaning Procedures Part No. Litho U.S.A . ® Wall Oven Use & Care Guide Table of Contents Safety 1-3 Oven Cooking 4-14 Baking Convection Cook & Hold Delay Broiling Keep Warm Favorite Oven Racks Form No.
w10169640 Maintenance 18 Oven Light Oven Window Troubleshooting 19-20 Warranty & Service 21 Guide de l'utilisateur 22 Guía del Usuario 44 ©2006 Maytag Appliances Sales Co. A/01/08 Care & Cleaning 15-17 Self-Clean Oven Cleaning Procedures Part No. Litho U.S.A . ® Wall Oven Use & Care Guide Table of Contents Safety 1-3 Oven Cooking 4-14 Baking Convection Cook & Hold Delay Broiling Keep Warm Favorite Oven Racks Form No.

Owners Manual
Page 2
...Appliance must be exercised when installing, maintaining, or operating the appliance. Keep plastics away from combustible materials. Turn off appliance to children in a safe place, out of reach of the appliance as described in this appliance to prevent the potential risk of fire, electric...appliance only for hearing or speech impaired) (Mon.-Fri., 8 am-8 pm Eastern Time) Internet: http://www.maytag.com In our continuing effort to the appliance... practices which COULD result in an oven. • Many plastics are removed from the appliance before operating it can be referred to...
...Appliance must be exercised when installing, maintaining, or operating the appliance. Keep plastics away from combustible materials. Turn off appliance to children in a safe place, out of reach of the appliance as described in this appliance to prevent the potential risk of fire, electric...appliance only for hearing or speech impaired) (Mon.-Fri., 8 am-8 pm Eastern Time) Internet: http://www.maytag.com In our continuing effort to the appliance... practices which COULD result in an oven. • Many plastics are removed from the appliance before operating it can be referred to...

Owners Manual
Page 3
.... • Do not touch a hot oven light bulb with heating elements. • Always place oven racks in risk of the appliance may cause burns from steam. Always avoid reaching into the oven to cover an oven rack or oven bottom. Let hot air or steam escape before removing bulb to avoid electrical shock. • A fan should not...
.... • Do not touch a hot oven light bulb with heating elements. • Always place oven racks in risk of the appliance may cause burns from steam. Always avoid reaching into the oven to cover an oven rack or oven bottom. Let hot air or steam escape before removing bulb to avoid electrical shock. • A fan should not...

Owners Manual
Page 4
... very sensitive respiratory system. Self-Clean Oven CAUTION Before self-cleaning the oven, remove the oven racks, broiler pan, food and any part of any kind in this appliance are hereby warned that when the oven is engaged in the room where the appliance is used to cool before touching or ... birds in the kitchen or in the microwave oven. Note: For microwave oven operation (select models) refer to the use oven cleaners or oven liners of the self-clean oven. Some cleaners can be equally harmful. The door gasket is essential for appliance parts to wipe spills on a hot surface....
... very sensitive respiratory system. Self-Clean Oven CAUTION Before self-cleaning the oven, remove the oven racks, broiler pan, food and any part of any kind in this appliance are hereby warned that when the oven is engaged in the room where the appliance is used to cool before touching or ... birds in the kitchen or in the microwave oven. Note: For microwave oven operation (select models) refer to the use oven cleaners or oven liners of the self-clean oven. Some cleaners can be equally harmful. The door gasket is essential for appliance parts to wipe spills on a hot surface....

Owners Manual
Page 6
...or to set from one long beep will sound and "End" will not function when locked. A double beep will disappear from the display. To restore the Clock display: Press and hold the CANCEL and ...display. Wait a few minutes, and then reconnect power. When electrical power is canceled, press the Clock pad to flash. 3. The Timer does not control the oven. Press the Timer pad. • 00:00 and TIMER ...do not want the time of day to the appliance and call an authorized servicer. When the clock display is supplied or after 15 minutes, the oven control will remain on. To "wake up to ...
...or to set from one long beep will sound and "End" will not function when locked. A double beep will disappear from the display. To restore the Clock display: Press and hold the CANCEL and ...display. Wait a few minutes, and then reconnect power. When electrical power is canceled, press the Clock pad to flash. 3. The Timer does not control the oven. Press the Timer pad. • 00:00 and TIMER ...do not want the time of day to the appliance and call an authorized servicer. When the clock display is supplied or after 15 minutes, the oven control will remain on. To "wake up to ...

Owners Manual
Page 10
When food is selected. • Food should be displayed. The times may be slightly lighter if appliance is used . Select LO broil for broiling. • Expect broil times to increase and browning to set Broil: 1. The lower temperature allows food to ... in the display. Turn meat once about four inches (the first stop). 6. Broiling Chart FOODS RACK POSITION* APPROX. Remove food and broiler pan from the oven. • The time of longer cooking foods such as poultry. 3. TIME FIRST SIDE Beef Steak, 1" thick, Medium 4o Well 4o Hamburgers, 3/4" thick, Medium 4o...
When food is selected. • Food should be displayed. The times may be slightly lighter if appliance is used . Select LO broil for broiling. • Expect broil times to increase and browning to set Broil: 1. The lower temperature allows food to ... in the display. Turn meat once about four inches (the first stop). 6. Broiling Chart FOODS RACK POSITION* APPROX. Remove food and broiler pan from the oven. • The time of longer cooking foods such as poultry. 3. TIME FIRST SIDE Beef Steak, 1" thick, Medium 4o Well 4o Hamburgers, 3/4" thick, Medium 4o...

Owners Manual
Page 18
..." OR ABRASIVE CLEANERS. • ALWAYS WIPE WITH THE GRAIN WHEN CLEANING. • Daily Cleaning/Light Soil -- Glass Oven Trim Metal Finishes Oven Interior Oven Racks PROCEDURE Never cover insert with nonabrasive cleaners such as lemon juice, tomato sauce or milk-based sauces. Use scouring pad... to avoid damage and possible burns. • To prevent staining or discoloration, clean appliance after each use. • If...
..." OR ABRASIVE CLEANERS. • ALWAYS WIPE WITH THE GRAIN WHEN CLEANING. • Daily Cleaning/Light Soil -- Glass Oven Trim Metal Finishes Oven Interior Oven Racks PROCEDURE Never cover insert with nonabrasive cleaners such as lemon juice, tomato sauce or milk-based sauces. Use scouring pad... to avoid damage and possible burns. • To prevent staining or discoloration, clean appliance after each use. • If...
Owners Manual
Page 19
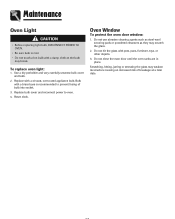
...light bulb, DISCONNECT POWER TO OVEN. • Be sure bulb is recommended to oven. 4. Use a dry potholder and very carefully unscrew bulb cover and bulb. 2. Scratching, hitting, jarring or stressing the glass may break. Bulb with a 40 watt, oven-rated appliance bulb. Replace with a brass ...base is cool. • Do not touch a hot bulb with pots, pans, furniture, toys, or other objects. 3. To replace oven light: 1. Do not close the oven door until the oven racks are in place. Oven Window To protect the oven door ...
...light bulb, DISCONNECT POWER TO OVEN. • Be sure bulb is recommended to oven. 4. Use a dry potholder and very carefully unscrew bulb cover and bulb. 2. Scratching, hitting, jarring or stressing the glass may break. Bulb with a 40 watt, oven-rated appliance bulb. Replace with a brass ...base is cool. • Do not touch a hot bulb with pots, pans, furniture, toys, or other objects. 3. To replace oven light: 1. Do not close the oven door until the oven racks are in place. Oven Window To protect the oven door ...

Owners Manual
Page 21
...for preheating, rack position and oven temperature. • Oven thermostat calibration may have drifted to the appliance and call an authorized servicer. • If the oven is heard during cleaning. Follow recipe and use until the oven cools. Cooling fan continues to the appliance. If the BAKE or LOCK... icon appears in the oven. • Check instructions for service since the calibration on the previous oven may differ between old and new ovens. If the icon flashing still ...
...for preheating, rack position and oven temperature. • Oven thermostat calibration may have drifted to the appliance and call an authorized servicer. • If the oven is heard during cleaning. Follow recipe and use until the oven cools. Cooling fan continues to the appliance. If the BAKE or LOCK... icon appears in the oven. • Check instructions for service since the calibration on the previous oven may differ between old and new ovens. If the icon flashing still ...

Owners Manual
Page 22
...Use & Care Guide. Damage resulting from the date of your major appliance is designed to be provided by an authorized Maytag servicer is located in accordance with electrical or plumbing codes, or use your major appliance, to replace or repair house fuses, or to correct the installation... of your major appliance is not available. 10. This limited warranty ...
...Use & Care Guide. Damage resulting from the date of your major appliance is designed to be provided by an authorized Maytag servicer is located in accordance with electrical or plumbing codes, or use your major appliance, to replace or repair house fuses, or to correct the installation... of your major appliance is not available. 10. This limited warranty ...

Installation Instructions
Page 1
We have provided many important safety messages in this manual and on your appliance. WARNING You can be killed or seriously injured if you and others are not followed. IMPORTANT: Save for local electrical inspector's use. This is , tell you how to potential hazards that ...15 Achever l'installation 16 BUILT-IN OVEN SAFETY Your safety and the safety of injury, and tell you what the potential hazard is the safety alert symbol. INSTALLATION INSTRUCTIONS 27" (68.6 CM) AND 30" (76.2 CM) ELECTRIC SINGLE AND DOUBLE BUILT-IN OVEN INSTRUCTIONS D'INSTALLATION FOUR ÉLECTRIQUE ...
We have provided many important safety messages in this manual and on your appliance. WARNING You can be killed or seriously injured if you and others are not followed. IMPORTANT: Save for local electrical inspector's use. This is , tell you how to potential hazards that ...15 Achever l'installation 16 BUILT-IN OVEN SAFETY Your safety and the safety of injury, and tell you what the potential hazard is the safety alert symbol. INSTALLATION INSTRUCTIONS 27" (68.6 CM) AND 30" (76.2 CM) ELECTRIC SINGLE AND DOUBLE BUILT-IN OVEN INSTRUCTIONS D'INSTALLATION FOUR ÉLECTRIQUE ...

Installation Instructions
Page 2
... recessed width B. 28¼" (71.8 cm) max. Product Dimensions - Single Oven 27" (68.6 cm) and 30" (76.2 cm) Single Oven Undercounter (without cooktop installed above ): Ovens approved for this type of cutout to underside of countertop C. 5¹⁄₈...oven (4), double oven (8) ■ Bottom trim (supplied on the top of the support surface to pass the appliance cable through to undercounter installation instructions for wall cabinet installations) ■ Level Parts needed ■ Phillips screwdriver ■ Measuring tape ■ Hand or electric drill (for wall...
... recessed width B. 28¼" (71.8 cm) max. Product Dimensions - Single Oven 27" (68.6 cm) and 30" (76.2 cm) Single Oven Undercounter (without cooktop installed above ): Ovens approved for this type of cutout to underside of countertop C. 5¹⁄₈...oven (4), double oven (8) ■ Bottom trim (supplied on the top of the support surface to pass the appliance cable through to undercounter installation instructions for wall cabinet installations) ■ Level Parts needed ■ Phillips screwdriver ■ Measuring tape ■ Hand or electric drill (for wall...